


Server and Browser Cache
Heavy caching is one of the best ways to speed up your browsing experience, which is why WP Engine provides heavy caching through default and upgraded services. The primary caching layers are server (Varnish) and network (CDN).
When updating content on your site, you might not see your updates and changes reflected immediately when viewing the site. The reason for this is most commonly caching, and caches simply need to be purged. Typically seeing your changes is as easy as purging the right cache.
Not seeing changes after a deployment? Website looks wrong after copying? Made a change to a post or page but not seeing it reflected on the frontend? Purge caches!
WP Engine Cache
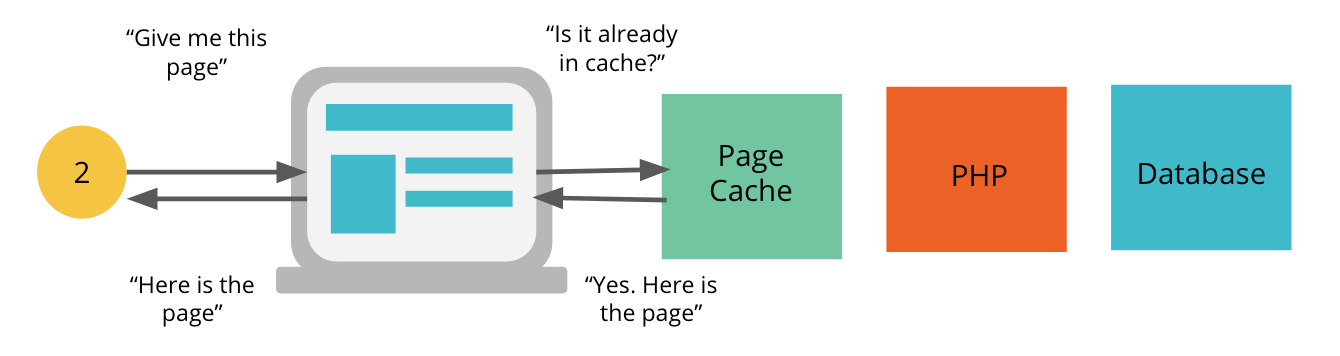
Our servers employ extensive caching by default. This is part of what makes WP Engine the fastest WordPress website host. When using page caching, the typical flow for the first page request looks something like this:
 Many of these steps are saved when you introduce a cached version:
Each layer of caching has its own default expiration times as well.
Page Cache — Stores the dynamically generated version of a page.
- 10 minute cache expiration
Network Caches —DNS-level caching, including CDN, powered by Cloudflare. Requires a domain be added to the environment to activate.
- Advanced Network Cache, includes CDN
- Advanced network is included with all plan levels
- 365 day static asset cache expiration
- Global Edge Security (GES) Cache, includes CDN
- 365 day static asset cache expiration
- Caches based on file extension. Uses all of Cloudflare’s default file extensions, plus mp4.
Object Cache — Stores results of database queries.
- Object cache an optional feature
- No cache expiration
- 1MB buffer size, data is stored based on what was request most recently
Page Speed Boost (PSB) — A performance tool that automatically handles cloud-based optimization of the frontend of your website.
- PSB is an optional plan add-on
Browser Cache — Stores assets in a user’s local browser, such as Chrome or Firefox.
- All static assets on the WP Engine platform are cached 365 days by default
- Cache expiration can be adjusted through cache headers
Cache Headers
Cache headers are rules that tell each visitor’s computer how long to save assets (like images) locally. Because these assets are stored locally, purging server cache will not clear old assets off visitors machines. Assets can only be cleared when the cache header reaches its expiration or the user clears their browser cache.
Cache-control headers cannot be set lower than 600 seconds (10 minutes) – anything lower requires a full cache exclusion rule.
To learn more about testing and changing cache headers see the full guide.
Cache Exclusions
There are situations when a page should never be served from cache and the interaction should always be treated as unique, such as during checkout or login. Our servers will respect cache exclusion rules for pages, cookies and arguments.
Default Cache Exclusions
Certain pages are excluded from server caching by default on all sites to help ensure functionality. Some of these default cache exclusions are:
- WP Admin area
wp-login.php- Pages named
cart,checkout, orcheck-out - Pages where a cookie containing
wordpress_has a value set
If we see WooCommerce on the site we add some extra default exclusions, so you don’t have to worry. We exclude the following pages for WooCommerce sites:
/products-compare/coupon/my-account/lost-password/wp-json/wc/wc-api
As well as the arguments:
add-to-cart=.+wp-api=.+
And finally, these cookies:
woocommerce_items_in_cart=[1-9]+wp_woocommerce_sessionwoocommerce_cart_hashwoocommerce_recently_viewedstore_notice[notice id]
Custom Cache Exclusions
While we’d added some default exclusions there are still situations you may need custom cache exclusions put in place.
If you’re having issues with a form not submitting, login not working, password reset emails not being sent, or are using a custom checkout URL, you will need to reach out to our support team to have the custom page URL excluded from server caching on the website. At times a plugin or theme may not be carrying data correctly from page to page. If this happens there may need to be a cookie or arg excluded from caching instead of a path.
To view custom cache exclusions, visit the Caching Options page in your User Portal.
- From the Sites page, select the environment name
- Click Caching
- Choose Cache Exclusions
Each type of exclusion will be noted before the excluded phrase. These are; path, arg, and cookie.

NOTE
Caching cannot be fully disabled on your website, or on your website’s homepage, as this will negatively impact your site’s performance. This is particularly important on shared hosting accounts, where resources are split between all sites on a server.
Partial caching of a page is not possible- a page will either be served from cache, or the page will be generated new every time.
When setting cache exclusions, you should be as specific as possible. Too many pages excluded from cache by a cache exclusion rule will impact performance. We reserve the right to remove cache exclusion that are negatively impacting server performance.
NOTE
Nothing can be excluded from object cache. Object cache is either enabled for the website or disabled for the website.
Purge Server Caches
Extensive caching can complicate things if you’re working on your site and expecting to see changes immediately on the frontend. Purging cache is an essential part of the development process. There are two different methods to trigger the purge cache functionality.
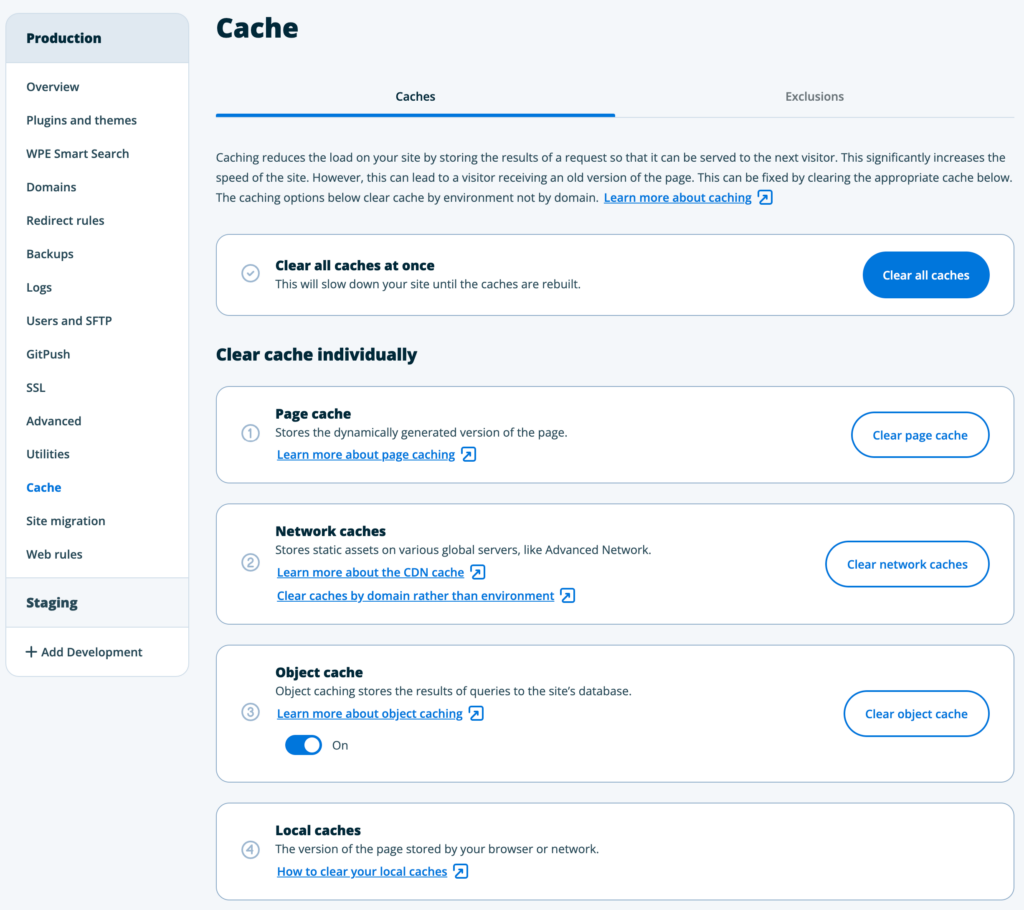
User Portal
Purging cache through the User Portal is considered the recommended method because it does not require access to the wp-admin of your website and allows you to purge individual caches, page cache, and object cache.
- From the Sites page, click the environment name
- Select Caching
- You will see the following options:
- Clear all caches – When used, your website will be slower for a period of time until the pages become newly cached.
- Page cache (Varnish)
- Network caches (Advanced Network and Global Edge Security) including CDN cache
- Object cache (if enabled)
- Page Speed Boost cache
- Clear page cache – Clears only the dynamically generated version of your pages (Varnish caching).
- Clear network caches – Purges the network caches for advanced network and Global Edge Security, including CDN. This option displays only if you have added a domain to the environment.
- Clear object cache – If enabled, clears stored query results.
- Clear local cache – See steps to clear local browser cache. Learn more here.
- Clear all caches – When used, your website will be slower for a period of time until the pages become newly cached.
NOTE
You may still need to purge browser caches, which is done locally, to see your changes appear.
WordPress Admin
Cache can be purged from the wp-admin dashboard of your website. This method will purge page cache (varnish), Global Edge Security, and advanced network caches. It will not purge object cache.
- Log in to your website’s wp-admin dashboard
- Click on the WP Engine plugin tab in the main menu
- Select Caching
- Click Clear All Caches
NOTE
In a WordPress multisite, all subsite caches will also be cleared when using this option.
WP Engine API
The customer API can be leveraged to purge cache by making a POST request to the /installs/{install_id}/purge_cache endpoint. Learn how to enable the API and check out our API documentation.
This leverages the same cache purge functionality as the wp-admin button, meaning this method will purge the following caches: page (Varnish), CDN, advanced network, and Global Edge Security. It will not purge object cache.
Purge Cache with PHP
Through the WP Engine MU plugin there is a function called wpecommon::purge_varnish_cache(). The post ID you want to purge can be passed into this function. Varnish page cache is purged only for that post URL, and not for the entire domain. This can have a positive impact on a website’s performance by keeping all other pages stored in cached.
If wpecommon::purge_varnish_cache() is called without being passed a post ID, then Varnish will be purged for the entire domain.
This function can be built into your PHP code, if you so choose.
Purge Browser Cache
Your browser may cache items such as: css styles, cookies and sessions, auth boxes, DNS/IP Addresses, and permalinks. Browser cache generally respects the cache-control headers sent back with the request from the web server.
Meaning if someone requests the /about-me/ page on your site and it has a cache-control time of 10 minutes/600 seconds, the page is not only cached on our server, it’s also cached in the browser for that amount of time.
For static assets, which have long-cache expiration times (images, css, etc), this means the browser will also cache them for the time specified by the server when sending the request back. The default cache expiration for static assets on WP Engine is 365 days.
Most browsers respect ctrl + F5 or cmd + F5 for a hard-refresh, which reloads the page and ignores any existing browser cache.
NOTE
Browser cache can only be purged for your own device. There is no way to force other visitors to purge their browser cache.
Purge Common Theme or Plugin Cache
Plugins and themes will often cache content as well, which can cause old data to be stored and served. We’ve gathered some common plugins with cache below as an example:
- Autoptimize
- WP Minify
- WP Super Cache
- Fast Velocity Minify
Still Not Seeing Your Changes?
- Check your site for caching or compression plugins and purge their cache.
- Are you using Cloudflare? Login and purge Cloudflare cache.
- We also suggest installing the Cloudflare plugin to easily purge Cloudflare cache from your wp-admin dashboard.
- Are you using a firewall service, like Sucuri? Log in to their portal and purge caches.
- Check the page in a proxy, like GeoPeeker or kproxy, to see how it looks in other locations.
- If the changes show correctly, then you’ll need to purge browser cache.
- If the changes do not show, try purging server caches.
- DNS caching could be at play as well. This easiest way to purge this is simply by restarting your computer or device. Otherwise, you can try flushing your DNS manually.
If you’re still not seeing your updated content, just open a Live Chat (available 24/7) with our Support Team from within your User Portal, and we will gladly help troubleshoot further.
Cache Busting
If you’d like to see an updated version of a specific page, but don’t want to clear caches for their whole website, you can manually “bust cache” locally, by adding an argument onto the end of the URL.
EX: To see a newly generated version of http://somedomain.com/updated-page/ you could go to http://somedomain.com/updated-page/?somearg1 to force the page to be generated new from the server.
Once it’s loaded, the URL is cached on the server again. Meaning simply reloading the URL will show the same cached version. If you want a new version each time you must change the arg value each reload:
This will only address WP Engine server cache because our server sees the change in URL as a completely different page. Your local browser, caching plugins, and some firewall or proxy service could still see this as the same page and serve from their cache.
Testing Cache
A cURL can tell you quite a bit about where the URL may be getting cached. You can curl from your terminal or with a tool like Online Curl.
You may have to cURL a page a few times in a row to generate cached hits.
This page can be cached but it is the first time it’s been generated by the server, so this specific hit was not served from cache:

This page is cached and this version is served from cache. It is the first time this page has been served from cached.

NEXT STEP: Learn how PHP sessions and cookies work on WP Engine