The App Router in Next.js 14 allows you to use React’s latest features, such as Server Components and Streaming. Combining this with headless WordPress can be daunting, especially with the latest features within the framework and how the rendering methodology fits together in certain use cases.
In this article, I will guide you through a series of code challenges. I encourage you to try these yourself and if you get stuck, the answers are in the GitHub repository. At the end of this article and code challenge, you will gain knowledge of the core features in Next.js 14 using headless WordPress.
Table of Contents
Pre-Requisite Knowledge
To get the most out of this article, you should have a basic understanding of HTML, CSS, React, and Next.js. If you need to brush up on your React skills, check out the React Foundations Course, which will introduce you to the fundamentals.
If you need to brush up on basic Next.js App Router methodology, please refer to my article here before reading this article.
The addition of the App Router to Next.js and the advent of React Server Components have ushered in a significant paradigm shift. In the past, devs using Next.js may have considered whole pages to be either SSG(Statically Generated), SSR(Rendered on the Server), or ISR(Incremental Static Regeneration).
Now, however, they’re most often thinking of their apps in terms of:
- “Where should this render?” (server, client, or both)
- “When should this render?” (build time, runtime, or stream whenever the server sends the response).
By the end of this, you’ll end up with your own Next.js 14 project that contains these pages:
- /static-rendering
- /dynamic-rendering
- /streaming
- /client-side-rendering
(A side note: I made a Navbar just to make it easier to navigate between pages, as you will see in the repo. However, you do not have to make one as you follow along since I will not go over the creation of one and the Next.js Link component.)
Here is the link to the finished repository for this article:
https://github.com/Fran-A-Dev/devrel-nextjs14-corecomp
Nested layouts and Partial rendering
Nested layouts are a new feature in the App Router. Let’s start with it.
Create a root layout that applies to the entire app. It should render this markup:
<!DOCTYPE html>
<html>
<head>
 <meta charset="UTF-8" />
 <title>DevRel Headless WP Core Competencies</title>
</head>
<body>
 <!-- Site content goes here -->
</body>
</html>
Code language: HTML, XML (xml)
Replace <!-- Site content goes here --> with the children passed in.
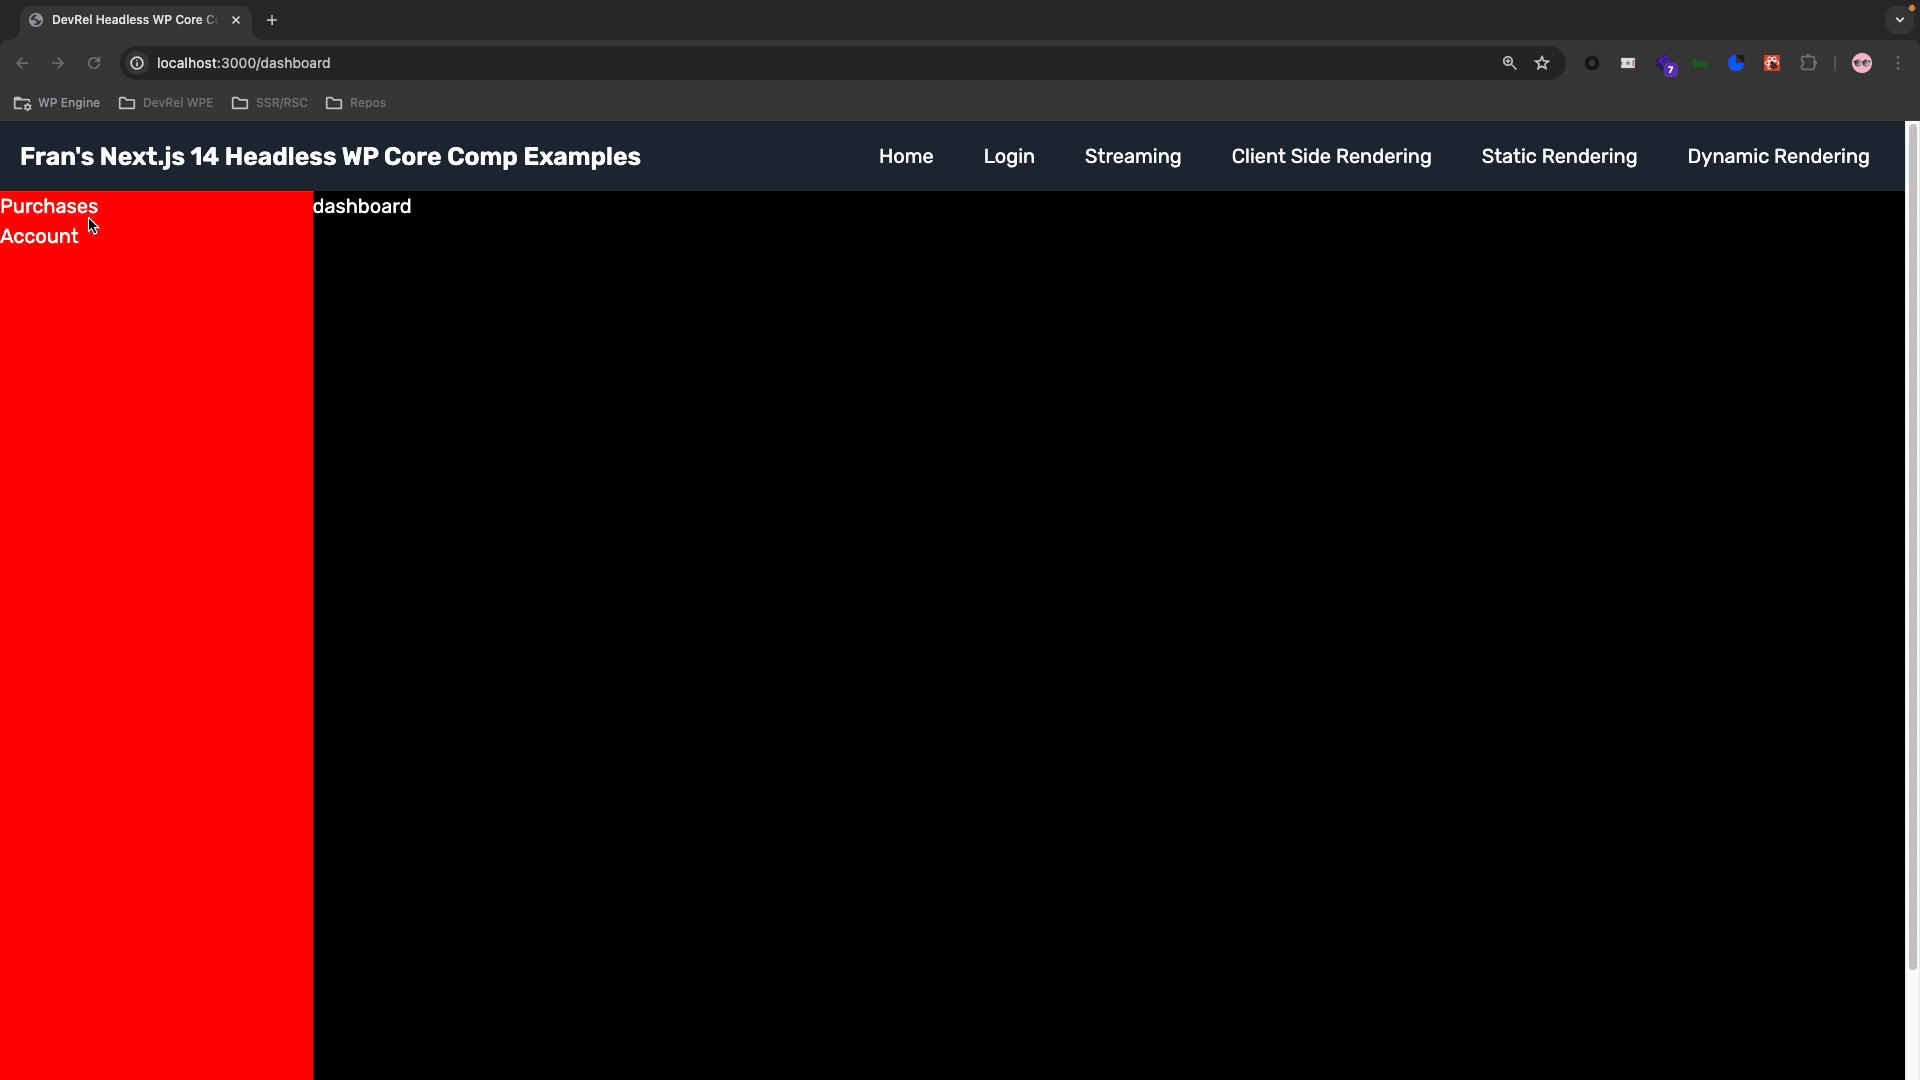
Following that, create /dashboard/purchases and /dashboard/account routes with a simple div element rendered on each.
Once you have those finished, create a layout that applies to all routes nested under the /dashboard/.
It should render a sidebar that contains <Link /> components that point to the Purchases (/dashboard/purchases) and Account (/dashboard/account) pages.
Remember, if you get stuck during these challenges, you can refer to the finished repo. Here are links to the specific docs for this section:
https://nextjs.org/learn/dashboard-app/creating-layouts-and-pages
https://nextjs.org/learn/dashboard-app/navigating-between-pages
Image Component
Images are an important part of any website. In Next.js, its Image component extends the HTML <img> tag with features for auto-image optimization using a variety of props and configurations.
In this section, let’s utilize the image component to render an AVIF. An Avif is a powerful open-source, free file format that encodes AV1 bitstreams in the High Efficiency Image File Format (HEIF) container.
First, copy this image into your project:
https://videomentions.com/mic-and-headphones.avif
Then, on the Account page, render this image at the top using Next.js’ Image component. Make sure you specify the image and height to guard against Cumulative Layout Shift (CLS).
Below the image, render details and summary elements that display the following questions and their answers (it’s up to you to answer them 😊):
- Does a simple
<img>tag get rendered, or something else? - Is the primary image still in AVIF format, or something else?
- Are
srcsetandsizesattributes defined to reference other sizes of this image? If so, explain how they work to serve responsive images. - Does the image leverage native lazy loading?
Inspect the image markup that gets rendered on the front end and take note of what you see.
The docs to this section: https://nextjs.org/learn/dashboard-app/optimizing-fonts-images#why-optimize-images
You should have something that looks like this now:
Server Components and Data Loading
React Server Components (RSCs)are components that allow you to write UI that can be rendered and optionally cached on the server side. In Next.js 14 and its new App Router, the rendering work is further divided by route segments to enable streaming and partial rendering. The data loading is also done on the server.
Static Rendering
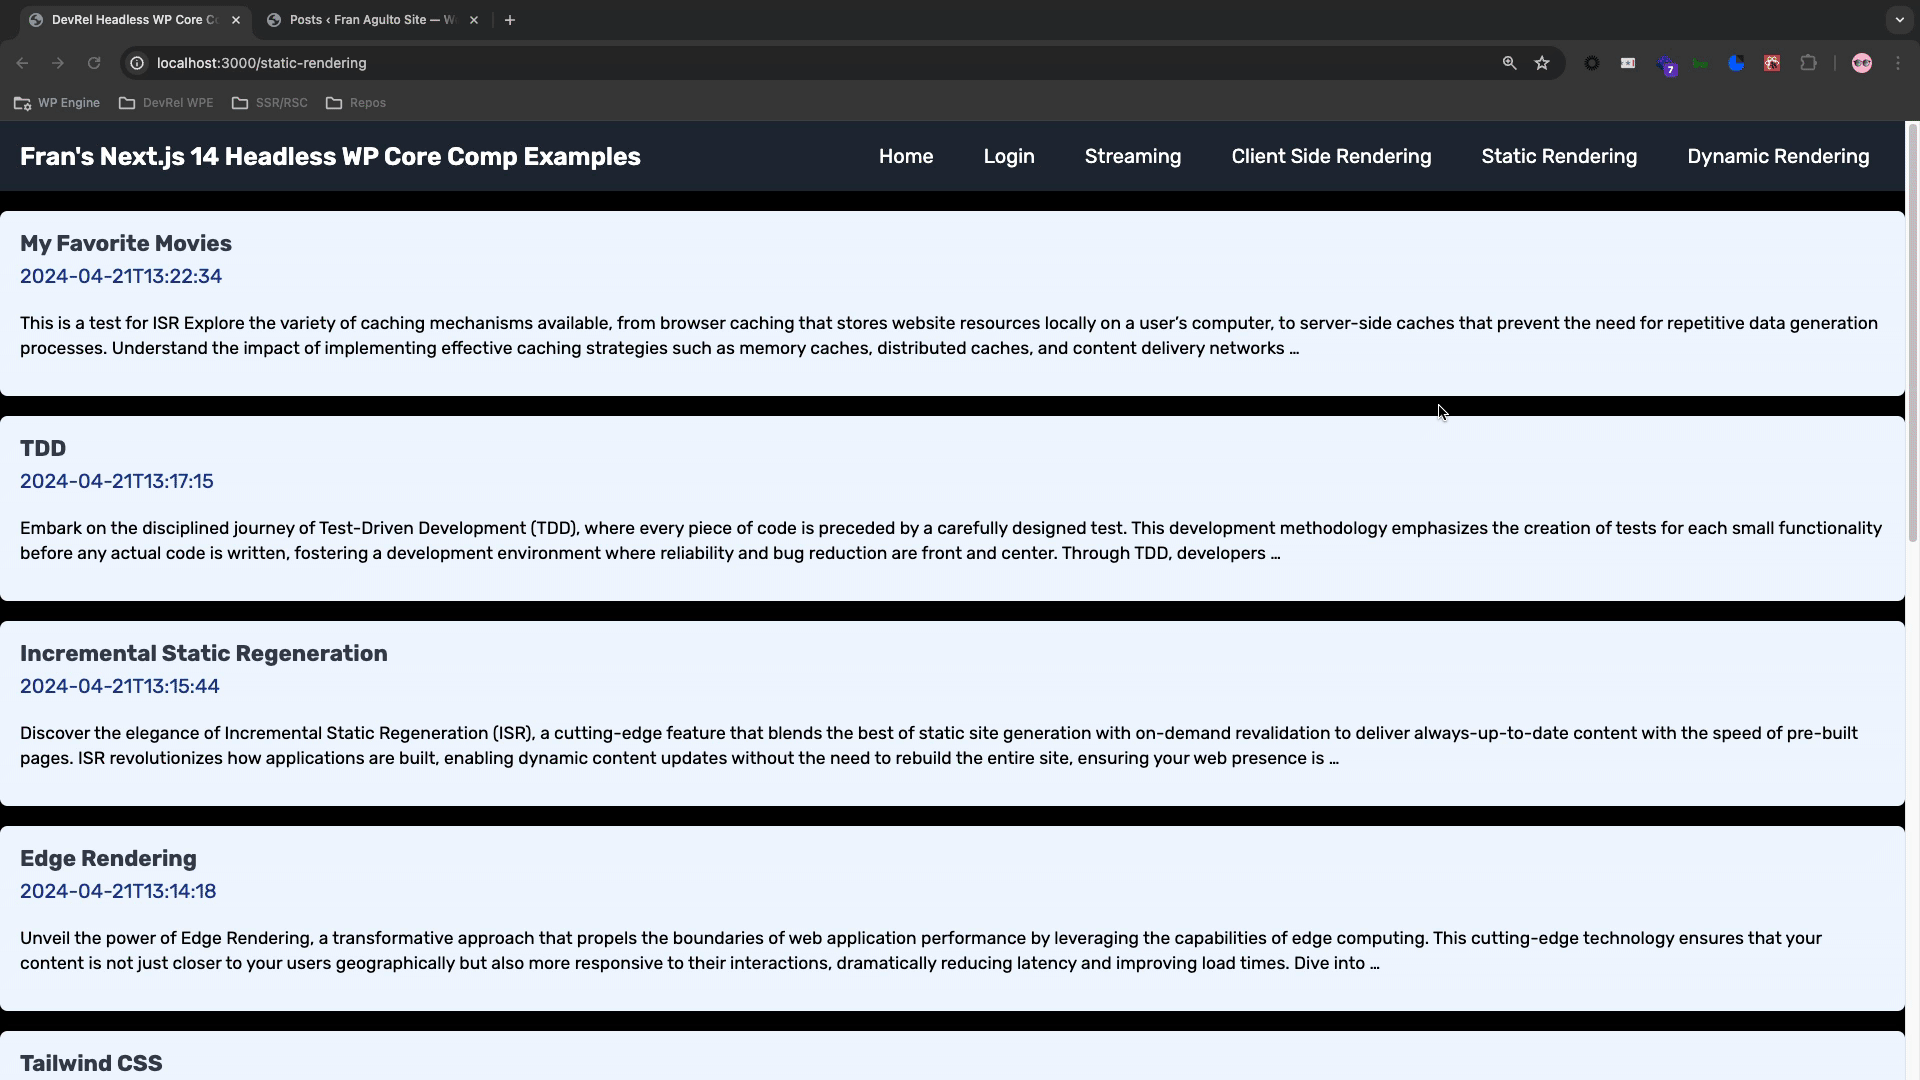
In this section, let’s utilize an RSC that does the data loading and rendering on the server. The goal is to create a full static page that can be cached on a CDN in a server component.
First, create a new /static-rendering route segment in the root of the App directory. Inside this route segment, include the declaration for a server component.
Then, await a fetch call to the /graphql endpoint associated with your headless WP backend to get the most recent 10 blog posts. Make a request for the databaseId, title, date and excerpt. Use raw fetch API for this and define the WPGraphQL requests in a template literal.
With the data returned, render a list of posts to the page. For good HTML semantics, represent each post as a <article> tag.
Time-Based Revalidation
This fully static page poses a problem, though. When a new blog post is published, this page will be out-of-date; it’ll still show the same list of posts that existed at the time it was generated.
Please use the stale-while-revalidate method here or SWR. The page should be invalidated once every 30 minutes to display accurate, fresh data. You can also test this out by doing a 10-second interval, changing your data in WordPress, then hitting your page again, waiting 10 seconds, then hitting it again. It should look like this:
The time-based method is great, but what if you have a use case where you need up-to-the-minute, close-to-real-time data? Next.js does have a way to do this. On-demand Revalidation allows you to invalidate your data on demand by path.
If you would like to add this method to the file instead of time-based, please free to do so. I left this method out of the repo. Currently, Atlas does not support on-demand revalidation but is working on adopting support for it soon!
Here are the docs for this section:
Static Rendering: https://nextjs.org/learn/dashboard-app/static-and-dynamic-rendering
Revalidation Techniques: https://nextjs.org/docs/app/building-your-application/data-fetching/fetching-caching-and-revalidating#revalidating-data
Dynamic Rendering
Dynamic Rendering or Server-Side Rendering is content rendered on the server for each user when the user visits the page at each request. This rendering method is beneficial if you need real-time data, user-specific content such as a dashboard, or access to information that can only be known at request time, such as cookies.
In this section, we will utilize this method to display relative date strings on a page, such as “Ten minutes ago,” “Three months ago,” etc.
First, create a new /dynamic-rendering route segment in the App directory. Copy your page component from the /static-rendering route and paste it in as the starting point for the /dynamic-rendering page component.
Next, use the unstable_noStore utility to opt out of static rendering and make the page dynamic (rendered on the server at request time). Docs: https://nextjs.org/docs/app/api-reference/functions/unstable_noStore
Let’s use the date-fns Use the NPM package to format dates as relative date strings (“Ten minutes ago,” “Three months ago,” etc.), as shown in this example.
If you have followed these steps correctly, you have now created a dynamic page that will always display up-to-date relative date strings to users. Stoked! It should look like this:
There are a few considerations in this section. Dynamism is costly since it requires more load on the server and is less performant. This is no longer a cacheable static page. It will hit the server on each request. Sometimes, though, it is worth it, depending on your use case. The date-fns library will not be included in the client-side bundle since this is being used server side.
Streaming and React Suspense
Streaming is a data transfer technique that allows you to break down a route into smaller “chunks” and progressively stream them from the server to the client as they become ready.
In this section, let’s use streaming to grab data from WPGraphQL and a random API endpoint that is not from WordPress. Docs:https://nextjs.org/learn/dashboard-app/streaming
The first thing we need to do is choose a random API endpoint. You can use any API endpoint that returns JSON data. For this example, I am going to use JSON server, an NPM package that allows you to run a local server and gives you an endpoint on whatever port you want to watch it at.
If you decide to use the JSON server method, you will need to create a file to house the JSON. For this article, I created a folder in the root of the project and just added my JSON there:

(Just a reminder, in choosing this method, you will need to run the command on another terminal to spin up the JSON server)
If you do not feel like using that, you can use any common one. I find the Rick and Morty GraphQL API to be a reliable one that many developers use. With this method, you can fetch the data right from the endpoint.
Next, create a new route segment called /streaming. Copy the /dynamic-rendering page component into it as a starting point.
Remove the data fetching from the page component and add these two functions to the file:
https://gist.github.com/Fran-A-Dev/678ebe8a4e0affb80ab253402dcb88bc
Notice the “Simulate 3 seconds of network latency” line within the fetchStarWarsCharacters() function. This will be the data that will lag behind the WordPress data. Because this network latency exists, let’s opt for a streaming approach where we’re going to render our page immediately, show a loading placeholder, and then stream in the markup from these components when they’re ready using React Suspense.
Once that is all done, create a custom loading.jsx file within the root of the application and add whatever markup and style you want to it. When you create that file, import it into the page component of the streaming route segment and pass that into the Suspense component like this: <Suspense fallback={<Loading />}>
Ensure that within the page.jsx for this component, the post list, and characters list pop into the UI at the same time, regardless of which one took longer.
Stoked!!! We now have a page that loads as quickly as possible with the parts of the page that rely on more expensive queries being streamed in. It should look like this:

Client-Side Rendering
Client Components allow you to write interactive UI that is prerendered on the server and can use client JavaScript to run in the browser. Now, this was the default rendering method in React.js before server components. However, with Next.js 14, you now have to declare a component to be client-side with the "use client" directive in a file.
For this section, let’s build a dynamic page that grabs the github-username query string parameter in the URL, fetches that user’s public SSH key, and displays it on the page. This data fetching and rendering will take place entirely on the client– none of it on the server.
First, create a new /client-side-rendering route segment. Inside that route segment, create a simple page component that renders, then renders the <GitHubSSHKey /> component that we’ll create next.
Now, within this same route segment, create a GitHubSSHKey component. Include the "use-client" directive to mark it as a client component. Inside of this component, render the custom loading component we made in the previous section. Here are the docs: https://nextjs.org/docs/app/building-your-application/rendering/client-components
Following that, we need to access the value of the github-username query string parameter as described in the docs here. We can use the value of the github-username to make a fetch request like this to grab the user’s SSH key:
const response = await fetch(`https://github.com/${username}.keys`);
const sshKey = await response.text();

Code language: JavaScript (javascript)
Once the request resolves, store the SSH key in state and trigger a re-render to replace your loading skeleton with this:
<h2>Public SSH key for {username}:</h2>
<p>{sshKey}</p>

Code language: HTML, XML (xml)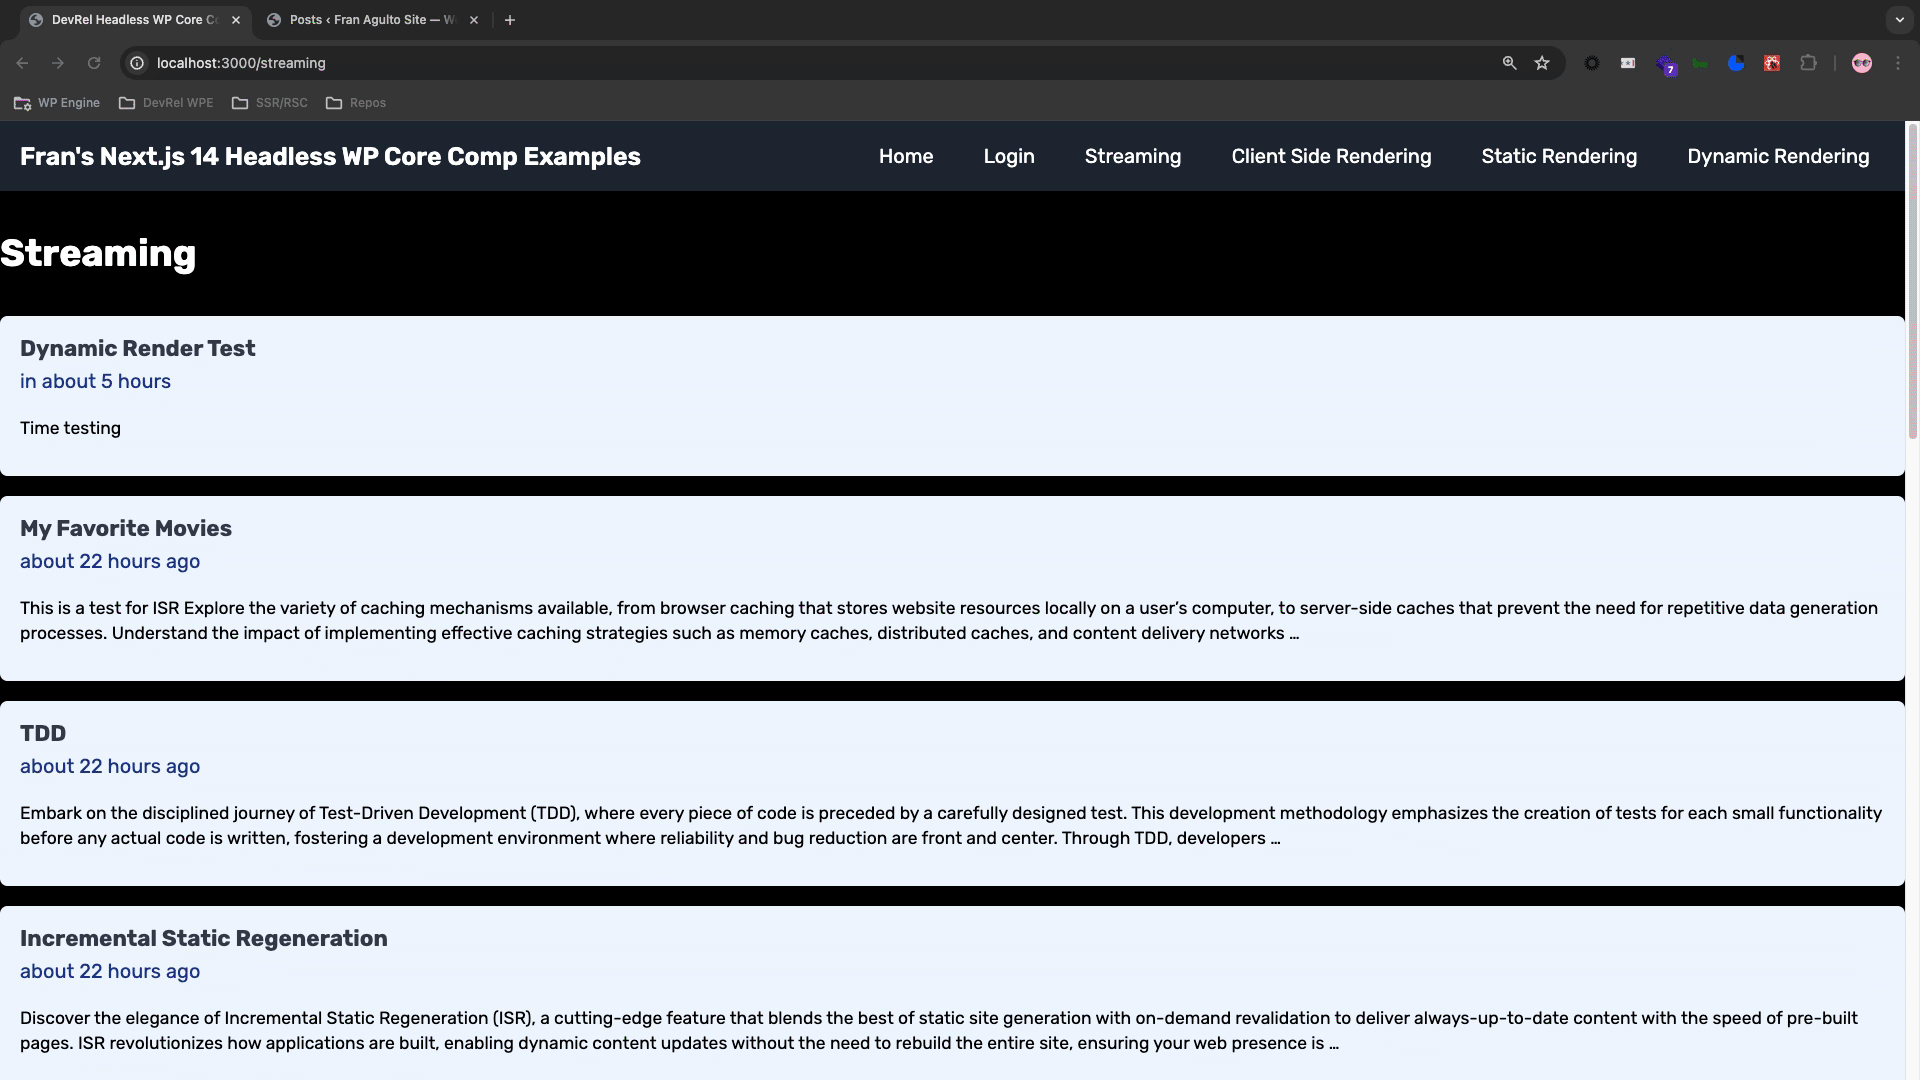
Now, just add a query parameter to the URL with the github-username key and assign it the username and SSH key you want to grab. I used Kellen Mace’s.
Stoked!!! We have now implemented a client component. Something to keep in mind is that you can render a client component from a server component which we just did here. However, the other way around will not work. You can’t have a client component that renders a server component.
Conclusion
Next.js 14 is the latest version of the most used meta framework on top of React. It introduces new ways to handle data, create routes and files as well as rendering methods. We hope you have a deeper understanding of how its core competencies work together.
Stay tuned for more Next.js 14 and headless WordPress content coming soon!!
As always, stoked to hear your feedback and any questions you might have on headless WordPress! Hit us up in our Discord!