When developing a traditional, monolithic WordPress site, you typically don’t give authentication a second thought. WordPress already provides a native cookie-based authentication system that works out of the box.
What you may not know is that for a headless WordPress project, it’s possible to leverage that same authentication system in your decoupled JavaScript frontend app!
In this post, we’ll explore a Next.js app that uses WordPress’ own native authentication cookies to provide the following functionality:
- Log in
- Log out
- New user sign-ups
- Password resets
- User profile page
- A “Members” page with gated content that only authenticated users can access
- A “Create Post” page where users with the
publish_postscapability can create new posts, but other users can’t. - A
useAuth()custom hook that provides the user’sloggedInstatus and user details to the rest of the app via React context. - Helper components to limit certain content to only authenticated/unauthenticated users.
(A Gatsby.js port of the codebase also exists, here)
To accomplish this, we’ll leverage the WPGraphQL CORS plugin, which allows us to tell WordPress to not only accept cookies from the domain where WP is installed, but also from the decoupled frontend app’s domain. That way, the same cookies can be used to authenticate users on both domains.
Getting Started
To benefit from this post, you should be familiar with the basics of local WordPress development, WPGraphQL, React, and Apollo Client.
Here are the steps for getting set up:
WordPress Backend Setup
- Set up a local WordPress site and get it running.
- Install and activate the WPGraphQL, WPGraphQL CORS, and Headless WordPress Email Settings WordPress plugins.
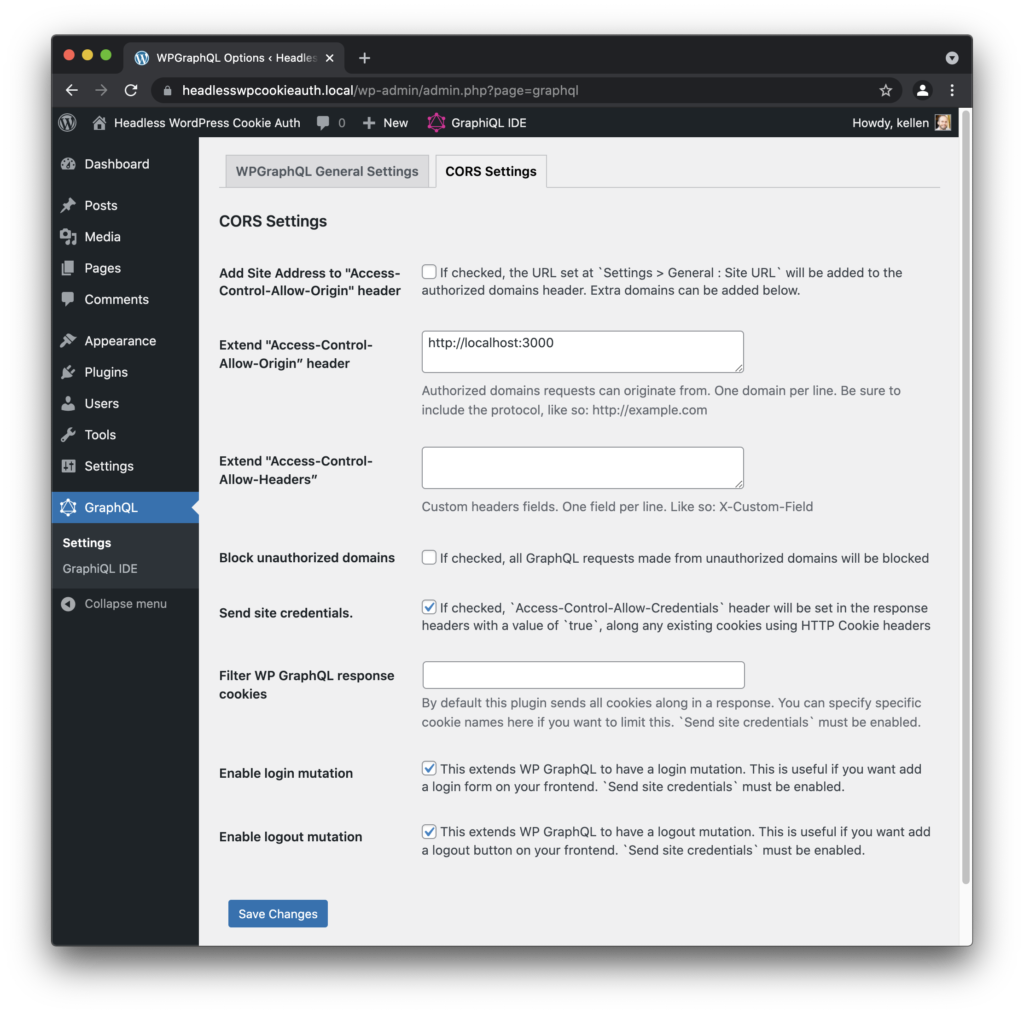
- From the WordPress admin sidebar, go to
GraphQL>Settingsand click theCORS Settingstab. - Check the checkboxes next to these options:
–Send site credentials
–Enable login mutation
–Enable logout mutation - In the
Extend "Access-Control-Allow-Origin” headerfield, enterhttp://localhost:3000and click the button to save your changes.
The CORS Settings page should now look like this:
Next.js App Setup
- Clone down the Next.js app repo.
- Create a
.env.localfile inside of the app’s root folder. Open that file in a text editor and paste inNEXT_PUBLIC_WORDPRESS_API_URL=https://headlesswpcookieauth.local/graphql, replacingheadlesswpcookieauth.localwith the domain for your local WordPress site. This is the endpoint that Apollo Client will use when it sends requests to your WordPress backend. - Run
npm install(oryarn) to install the app’s NPM dependencies. - Run
npm run devto get the server running locally. - You should now be able to visit http://localhost:3000/ in a web browser and see the app’s homepage.
Alternatively, you can follow the steps for getting set up with the Gatsby.js port of this codebase.
Try it Out!
Take a minute to explore the app. Try logging in and logging out. You’ll notice that the top navigation bar re-renders to show different things when you’re logged in vs. logged out, and that some pages are only accessible when you’re logged in/out.
How it Works
At a high level, our authentication system works like this:
- An unauthenticated user navigates to the Log In page and attempts to log in.
- Our app fires off a GraphQL request to the WordPress backend with that user’s email address and password.
- If the credentials are valid, WordPress sends an HttpOnly cookie back to the client, along with a success response.
- Knowing that the user has been logged in successfully, our app is then able to fire off a request to get some basic info about that user and re-render the app to display links and pages meant for authenticated users.
- Requests made to the WordPress backend after that point include the auth cookie in the request headers, which is used to authenticate the user.
A Note on Security
That “HttpOnly” cookie part is important. Some other authentication strategies involve storing an authentication token in local storage or in a cookie that does not have the HttpOnly attribute. That means that the site would be vulnerable to a cross-site scripting (XSS) attack where some rogue client-side JavaScript code would be able to “reach” into local storage/the non-HttpOnly cookie to get the auth token, then make authenticated requests on behalf of the user without their permission. More info on that type of vulnerability can be found here.
Since our cookie does have the HttpOnly attribute, it is not accessible at all via client-side JavaScript, and therefore not vulnerable to the type of cross-site scripting (XSS) attack mentioned above. This results in more robust security.
Apollo Client Configuration
Apollo Client is initialized in lib/apolloClient.ts.
import { ApolloClient, InMemoryCache, createHttpLink } from "@apollo/client";

const link = createHttpLink({
  uri: process.env.NEXT_PUBLIC_WORDPRESS_API_URL,
  credentials: 'include',
});

export const client = new ApolloClient({
  cache: new InMemoryCache(),
  link
});
Code language: JavaScript (javascript)
The credentials: 'include', option is what tells Apollo to send the auth cookie along with every request.
The client from that file is then passed as a prop into the ApolloProvider component in pages/_app.tsx, which allows us to make GraphQL network requests from anywhere in our app.
useAuth() Hook
Take a look at hooks/useAuth.tsx.
const AuthContext = createContext(DEFAULT_STATE);

export const GET_USER = gql`
  query getUser {
    viewer {
      id
      databaseId
      firstName
      lastName
      email
      capabilities
    }
  }
`;

export function AuthProvider({ children }: { children: ReactNode }) {
  const { data, loading, error } = useQuery(GET_USER);
  const user = data?.viewer;
  const loggedIn = Boolean(user);

  const value = {
    loggedIn,
    user,
    loading,
    error,
  };

  return <AuthContext.Provider value={value}>{children}</AuthContext.Provider>
}

const useAuth = () => useContext(AuthContext);

export default useAuth;
Code language: JavaScript (javascript)
When our app first boots up, the GET_USER query defined here is fired off to see if the user is authenticated. If they are, loggedIn is toggled to true. It, along with the user data and loading and error states are passed down to the rest of our app via React context. This way, any component or hook in our app can use the useAuth() hook to access that authentication-related data.
AuthContent & UnAuthContent Components
These two components are used to conditionally render parts of our application that should only be shown to authenticated or unauthenticated users. They also redirect users who don’t meet that criterion to the proper page.
AuthContent
Open up components/AuthContent.tsx to see how this component works.
export default function AuthContent({ children }: { children: ReactNode }) {
  const { loggedIn, loading } = useAuth();
  const router = useRouter();

  // Navigate unauthenticated users to Log In page.
  useEffect(() => {
    if (!loading && !loggedIn) {
      router.push('/log-in');
    }
  }, [loggedIn, loading, router]);

  if (loggedIn) {
    return <>{children}</>;
  }

  return <p>Loading...</p>;
}
Code language: JavaScript (javascript)
The logic works like this:
- If the app just booted up and we don’t know whether or not the user is logged in yet, display a “Loading…” message.
- If we have determined the user is logged in, display the children nested inside of this component and allow the user to stay on this page.
- If we have determined the user is NOT logged in, redirect the user to the Log In page. The children nested inside of this component are never rendered.
To see that in action, you can head over to the /profile page. The component for that page (pages/profile.tsx) does this:
<AuthContent>
  <ProfileForm />
</AuthContent>
Code language: HTML, XML (xml)
If you try to navigate directly to that page as a logged-in user, you’ll see a loading message momentarily, followed by the user profile form.
If you try to navigate there directly as a logged-out user though, you’ll see the loading message momentarily, then you will be redirected to the Log In page to log in.
Obviously, you shouldn’t hardcode any sensitive information into your JavaScript code, since then it would be accessible to anyone whether they’re authenticated or not. This component is merely helpful for knowing when it’s safe to proceed with rendering components that depend on the user being logged in to work properly, such as the ProfileForm component.
UnAuthContent
This component simply does the opposite of the AuthContent component. If the user is unauthenticated, the children nested inside of this component are rendered and the user is allowed to stay on this page. Authenticated users are redirected to the /members page.
Features
Now that we understand how authentication is being done and how the useAuth() hook and AuthContent & UnAuthContent components can help us, let’s peruse the app’s features.
Nav
This component lives in components/Nav.tsx. it calls useAuth() to get the loggedIn value for the current user. It uses that to do some conditional rendering; logged-out users are shown some navigation links, whereas logged-in users are shown others.
Log In
You can navigate to /log-in to see this page, and open pages/log-in.tsx to view its code.
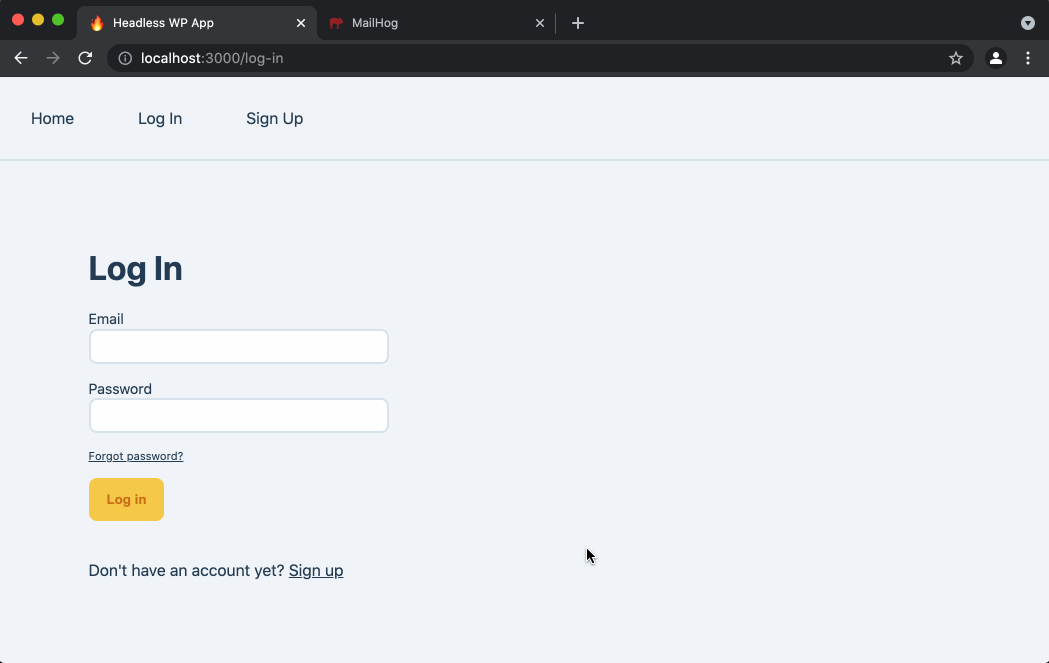
The page contents are wrapped in the <UnAuthContent> component to ensure that only unauthenticated users can view the Log In form.
You can find the code for the LogInForm component in components/LogInForm.tsx.
const LOG_IN = gql`
  mutation logIn($login: String!, $password: String!) {
    loginWithCookies(input: {
      login: $login
      password: $password
    }) {
      status
    }
  }
`;

export default function LogInForm() {
  const [logIn, { loading, error }] = useMutation(LOG_IN, {
    refetchQueries: [
      { query: GET_USER }
    ],
  });

  function handleSubmit(event: React.FormEvent<HTMLFormElement>) {
    event.preventDefault();
    const data = new FormData(event.currentTarget);
    const { email, password } = Object.fromEntries(data);
    logIn({
      variables: {
        login: email,
        password,
      }
    }).catch(error => {
      console.error(error);
    });
  }

  return (
    <form method="post" onSubmit={handleSubmit}>
      {/* etc. */}
    </form>
  );
}
Code language: JavaScript (javascript)
It renders out the form and fires off the logIn mutation when the user submits it. It also displays any errors that come back in the response.
If the log in is successful, it tells Apollo Client to refetch the GET_USER query (defined in hooks/useAuth.tsx). This results in the user being navigated away from this unauthenticated-users-only page and over to the /members page.
This Log In form asks for the user’s email address, but you could modify that to instead ask for their WordPress login (a.k.a. their “username”) instead, if desired. Either one works with the loginWithCookies mutation.
Log Out
If you visit /log-out, the code in pages/log-out.tsx runs.
const LOG_OUT = gql`
  mutation logOut {
    logout(input: {}) {
      status
    }
  }
`;

export default function LogOut() {
  const [logOut, { called, loading, error, data }] = useMutation(LOG_OUT, {
    refetchQueries: [
      { query: GET_USER }
    ],
  });
  const loggedOut = Boolean(data?.logout?.status);

  useEffect(() => {
    logOut();
  }, [logOut]);

  return (
    <Layout>
      <h1>Log Out</h1>
      {!called || loading ? (
        <p>Logging out...</p>
      ) : error ? (
        <p>{error.message}</p>
      ) : !loggedOut ? (
        <p>Unable to log out. Please reload the page and try again.</p>
      ) : (
        <p>You have been logged out.</p>
      )}
    </Layout>
  );
}
Code language: JavaScript (javascript)
When the useEffect() callback runs, the logOut mutation is executed to log the user out.
Different messages are rendered to the page depending on whether the mutation has not yet completed, an error has occurred, or the user was successfully logged out.
This code is implemented so that as soon as the user hits the Log Out page, they are logged out. As an alternative approach, you could have users click a Log Out button in your app, execute the logOut mutation, and then once they’re logged out, navigate them to another page and present them with a “You have been logged out” confirmation message. Either way works.
New User Sign-up
You can visit /sign-up as an unauthenticated user to test out this feature. It allows new users to register an account on the site.
Note that users will only be able to sign up if the Anyone can register box is checked on the Settings > General page in theWordPress admin. Otherwise, if new user registrations are disabled, users will see a “User registration is currently not allowed” error message when attempting to submit the form.
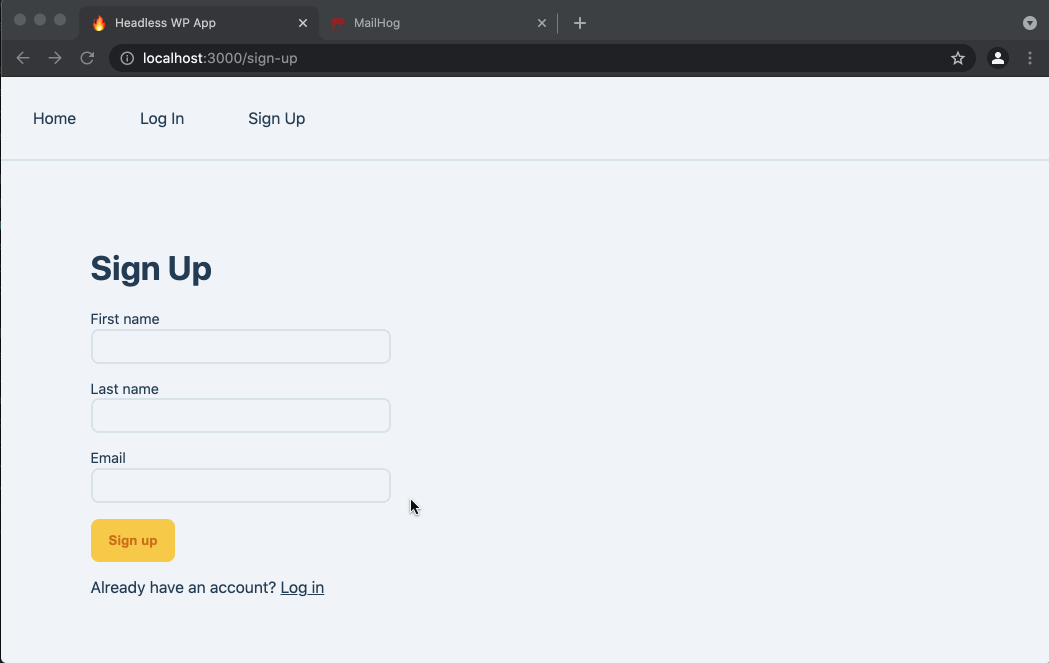
The user flow goes like this:
- User visits
/sign-up, fills out the form and clicks the button to sign up. - They see a message telling them a confirmation email has been sent to them.
- User opens that email and clicks the link, which sends them back to the
/set-passwordpage in the Next.js app. The link includeskeyandloginquery string parameters, which are required for setting a user password. - User types their password into the
PasswordandConfirm Passwordfields and hits the button to set it. - If an error occurred, such as if the link is old and no longer valid, the user will see error text.
- Otherwise, if the new user’s password was successfully set, they see a
Your new password has been setconfirmation message and a link they can click to go to the Log In page.
This is the SignUpForm component that provides that functionality:
const REGISTER_USER = gql`
  mutation registerUser(
    $email: String!
    $firstName: String!
    $lastName: String!
  ) {
    registerUser(
      input: {
        username: $email
        email: $email
        firstName: $firstName
        lastName: $lastName
      }
    ) {
      user {
        databaseId
      }
    }
  }
`;

export default function SignUpForm() {
  const [register, { data, loading, error }] = useMutation(REGISTER_USER);
  const wasSignUpSuccessful = Boolean(data?.registerUser?.user?.databaseId);

  function handleSubmit(event: React.FormEvent<HTMLFormElement>) {
    event.preventDefault();
    const data = new FormData(event.currentTarget);
    const values = Object.fromEntries(data);
    register({
      variables: values,
    }).catch(error => {
      console.error(error);
    });
  }

  if (wasSignUpSuccessful) {
    return (
      <p>
        Thanks! Check your email – an account confirmation link has been sent to you.
      </p>
    )
  }

  return (
    <form method="post" onSubmit={handleSubmit}>
      {/* etc. */}
    </form>
  );
}
Code language: JavaScript (javascript)
Set Password Link
The link in this email that users must click to set their password is generated by the Headless WordPress Email Settings plugin. It follows this format:
"https://frontend-js-app.com/set-password/?key={$key}&login={$login}"
Code language: JSON / JSON with Comments (json)
When clicked, it will send users to the /set-password page of your frontend JS app where they can set their password. It also includes the key and login query string parameters, which WordPress requires to set a new password.
Set Password Form
The SetPasswordForm component (components/SetPasswordForm.tsx) that allows the user to set a password looks like this:
const RESET_PASSWORD = gql`
  mutation resetUserPassword(
    $key: String!
    $login: String!
    $password: String!
  ) {
    resetUserPassword(
      input: {
        key: $key
        login: $login
        password: $password
      }
    ) {
      user {
        databaseId
      }
    }
  }
`;

export default function SetPasswordForm({ resetKey: key, login }: Props) {
  const [password, setPassword] = useState('');
  const [passwordConfirm, setPasswordConfirm] = useState('');
  const [clientErrorMessage, setClientErrorMessage] = useState('');
  const [resetPassword, { data, loading, error }] = useMutation(RESET_PASSWORD);
  const wasPasswordReset = Boolean(data?.resetUserPassword?.user?.databaseId);

  function handleSubmit(event: React.FormEvent<HTMLFormElement>) {
    event.preventDefault()
    const isValid = validate();
    if (!isValid) return

    resetPassword({
      variables: {
        key,
        login,
        password,
      },
    }).catch(error => {
      console.error(error);
    });
  }

  function validate() {
    // etc.
  }

  if (wasPasswordReset) {
    return (
      <>
        <p>Your new password has been set.</p>
        <Link href="/log-in">
          <a>Log in</a>
        </Link>
      </>
    );
  }

  return (
    <form method="post" onSubmit={handleSubmit}>
      {/* etc. */}
    </form>
  );
}
Code language: JavaScript (javascript)
When the form is submitted and the field values pass validation, the resetUserPassword mutation is executed to perform the password reset.
Password Strength Validation
SetPasswordForm contains a validate() function that is called before the mutation gets fired off to set the user’s password. Currently, it ensures that the Password and Confirm Password values match, and that the password is at least 5 characters long. So just know that with the current implementation, a user would be able to set a very weak password, such as “12345”.
If desired, you can use something like zxcvbn to enforce strong passwords on the client-side, and/or a WordPress plugin that enforces strong passwords on the server-side.
Password Resets
As a logged-out user, click the “Forgot password?” link below the Log In form to be navigated to the /forgot-password page.
The password reset user flow goes like this:
- User enters their email address and clicks the
Send password reset emailbutton. - If an error occurs, such as if there is no user with that email address, error text will be displayed.
- If the password reset email was successfully sent, the form is replaced with a success message telling the user to check their email.
- User opens that email and clicks the link, which sends them back to the
/set-passwordpage in the Next.js app. The link includeskeyandloginquery string parameters, which are required for setting a user password. - User types their password into the
PasswordandConfirm Passwordfields and hits the button to set it. - If an error occurred, such as if the link is old and no longer valid, the user will see error text.
- Otherwise, if the new user’s password was successfully set, they see a
Your new password has been setconfirmation message and a link they can click to go to the Log In page.

You may have noticed that steps 4-7 on this list are identical to steps 3-6 of the New User Sign-up flow. That’s because the /set-password page and the SetPasswordForm component are used for both new user signups and for password resets.
The /forgot-password page component (pages/forgot-password.tsx) renders the SendPasswordResetEmailForm component (components/SendPasswordResetEmailForm.tsx).
const SEND_PASSWORD_RESET_EMAIL = gql`
  mutation sendPasswordResetEmail($username: String!) {
    sendPasswordResetEmail(
      input: { username: $username }
    ) {
      user {
        databaseId
      }
    }
  }
`;

export default function SendPasswordResetEmailForm() {
  const [sendPasswordResetEmail, { loading, error, data }] = useMutation(
    SEND_PASSWORD_RESET_EMAIL
  );
  const wasEmailSent = Boolean(data?.sendPasswordResetEmail?.user?.databaseId);

  function handleSubmit(event: React.FormEvent<HTMLFormElement>) {
    event.preventDefault();
    const data = new FormData(event.currentTarget);
    const { email } = Object.fromEntries(data);
    sendPasswordResetEmail({
      variables: {
        username: email,
      }
    }).catch(error => {
      console.error(error);
    });
  }

  if (wasEmailSent) {
    return (
      <p> Please check your email. A password reset link has been sent to you.</p>
    );
  }

  return (
    <form method="post" onSubmit={handleSubmit}>
      {/* etc. */}
    </form>
  );
}
Code language: JavaScript (javascript)
You can see that when the user submits the form, the sendPasswordResetEmail mutation is executed. If it is successful, the form gets replaced with the confirmation message telling the user to check their email. They can then click the link in the email to be sent to the /set-password page and perform the reset.
User Profile Page
As a logged in user, you can head over to the /profile page to view and edit your user profile information.
The ProfileForm component that provides this functionality is in components/ProfileForm.tsx.
const UPDATE_PROFILE = gql`
  mutation updateProfile(
    $id: ID!
    $firstName: String!,
    $lastName: String!,
    $email: String!
  ) {
    updateUser(input: {
      id: $id
      firstName: $firstName
      lastName: $lastName
      email: $email
    }) {
      user {
        databaseId
      }
    }
  }
`;

export default function ProfileForm() {
  const { user } = useAuth();
  const { id, firstName, lastName, email } = user as User;
  const [updateProfile, { data, loading, error }] = useMutation(UPDATE_PROFILE);
  const wasProfileUpdated = Boolean(data?.updateUser?.user?.databaseId);

  function handleSubmit(event: React.FormEvent<HTMLFormElement>) {
    event.preventDefault();
    const data = new FormData(event.currentTarget);
    const values = Object.fromEntries(data);
    updateProfile({
      variables: { id, ...values, },
    }).catch(error => {
      console.error(error);
    });
  }

  return (
    <form method="post" onSubmit={handleSubmit}>
      {wasProfileUpdated ? (
        <p className="profile-update-confirmation">
          ✅ Profile details have been updated.
        </p>
      ) : null}
      {/* etc. */}
    </form>
  );
}
Code language: JavaScript (javascript)
When the user submits this form, the updateProfile mutation is fired off, which updates their information in the WordPress database. A success message is then displayed at the top of the form.
You can try submitting this form, then viewing that user’s profile page in the WordPress admin to see the modified first name, last name, and/or email details reflected there.
Members Page
This page’s content is only visible to authenticated users. The app treats this page as the “home base” for logged-in users. Users are sent here immediately after logging in, and are also automatically redirected here if they attempt to visit a page that’s only for logged-out users, such as the /log-in page.
Create Post
You know how I said this blog post is only about authentication? I lied! ????
The /create-post page gets into authorization. That is, it checks to see if the user has the publish_posts capability. If they do, the CreatePostForm component is rendered. If not, a message is displayed to let them know they don’t have the permissions necessary to create posts.
export default function CreatePost() {
const { user } = useAuth();
const canCreatePosts = Boolean(user?.capabilities?.includes('publish_posts'));
return (
<Layout>
<AuthContent>
<h1>Create Post</h1>
{canCreatePosts ? (
<CreatePostForm />
) : (
<p>You don't have the permissions necessary to create posts.</p>
)}
</AuthContent>
</Layout>
);
}
Code language: JavaScript (javascript)CreatePostForm is in components/CreatePostForm.tsx and looks like this:
const CREATE_POST = gql`
  mutation createPost($title: String!, $content: String!) {
    createPost(input: {
      title: $title
      content: $content
      status: PUBLISH
    }) {
      post {
        databaseId
      }
    }
  }
`;

export default function CreatePostForm() {
  const [createPost, { data, loading, error }] = useMutation(CREATE_POST);
  const wasPostCreated = Boolean(data?.createPost?.post?.databaseId);

  function handleSubmit(event: React.FormEvent<HTMLFormElement>) {
    event.preventDefault();
    const data = new FormData(event.currentTarget);
    const values = Object.fromEntries(data);
    createPost({
      variables: values
    }).catch(error => {
      console.error(error);
    });
  }

  if (wasPostCreated) {
    return (
      <p>Post successfully created.</p>
    );
  }

  return (
    <form method="post" onSubmit={handleSubmit}>
      {/* etc. */}
    </form>
  )
}
Code language: JavaScript (javascript)
When the user submits the form, the createPost mutation is fired off to create the post.
Go ahead and try to log in as a user with the publish_posts capability (WP’s built-in Author, Editor or Administrator roles should work fine), and submit the form to create a new post. You can then visit the Posts page in the WordPress admin to see your newly created post on the list.
But…why?
You may be wondering: “Why would I want users who create blog posts to do so from my decoupled JS app? Shouldn’t they do that from the WordPress admin instead?”. You’re right– having content creators write blog posts from the WordPress admin makes much more sense. You may want users to be able to create some custom post types (CPT) posts from your frontend app, however. Here’s an example:
Let’s say I have an educational site where students can create an account, take a course, then leave a review. I register a Review custom post type in WordPress, and register a Student user role, which is assigned the publish_review capability. In my decoupled JS application, I set it up so that logged-in students who have the publish_review capability are able to fill out a Course Review form. When they submit the form, a new Review CPT post is created in WordPress to capture that information. The student is then presented with a “Thanks for leaving a review!” message.
Shared Cookies & Admin Access
You might have noticed that:
- When you’re logged into the frontend JS app, you’re also logged into the WordPress admin and vice versa.
- When you’re logged out of the frontend JS app, you’re also logged out of the WordPress admin and vice versa.
This happens because the same cookie is being used in both places to authenticate you.
Control WordPress Admin Access
If you want to use native WordPress cookies to authenticate the users of your frontend JS app, but never want them to be able to log into the WordPress admin, you can use this WordPress plugin:
Headless WordPress Admin Access
You can follow the steps in the readme to lock down access to the WordPress admin to only users with a certain role or capability.
CRUD Operations
We saw how on the /create-post page, our app allows users to create new posts. If you want to go further than that and build an app where users can view, create, edit, and delete Custom Post Type posts, check out this other video of mine that covers how to do CRUD (create, read, update, delete) operations in headless WordPress:
Post Type CRUD Operations for WPGraphQL
How to Use in Production
In order to use this authentication method in production, you need to do the following:
WordPress Backend
- Install and activate the same plugins mentioned in the WordPress Backend Setup section, above.
- From the WordPress admin sidebar, go to
Graphql>Settingsand click theCORS Settingstab. - Check the checkboxes next to these options:
–Send site credentials
–Enable login mutation
–Enable logout mutation - In the
Extend "Access-Control-Allow-Origin” headerfield, enter the URL of your decoupled frontend JS app and click the button to save your changes.
Next.js Frontend
- In the UI that your frontend JS app hosting company provides, define an environment variable named
NEXT_PUBLIC_WORDPRESS_API_URL. Set its value to the GraphQL endpoint for your headless WordPress backend. For example:https://api.my-cool-site.com/graphql
Wrapping Up
I hope this blog post and the code repos provided give you a strong foundation for building headless WordPress projects that use WordPress’ native cookies for authentication.
Please reach out to let us know what cool things you’re able to create!