
In this article, you’ll learn how to build a basic headless WordPress site using Nuxt 3 and Vue 3. Nuxt 3 is a full-stack framework built around the latest version of the Vue JavaScript framework. Nuxt 3 comes built-in with lots of features that developers will enjoy, including auto-imports, abstractions for data fetching, and support for multiple deployment targets. It uses Vue 3 for the frontend layer and a server rendering engine called Nitro, which is open source and can be used for other projects.
Hopefully, this article will help you get started using Nuxt 3 and headless WordPress! You’ll be creating an app from scratch. If you need some additional information to migrate from Nuxt 2 to Nuxt 3, check out this migration guide. You can access the finished project for this tutorial on GitHub.
In this tutorial, you will do the following things:
- Start a Nuxt 3 project from scratch and install Tailwind CSS and Nuxt DevTools
- Create static and dynamic routes in Nuxt 3
- Use data fetching abstractions in Nuxt 3 to query and transform data from WPGraphQL
- Build and deploy your Nuxt application to a Node.js server environment
Installing Nuxt
To get started with Nuxt 3, open up your terminal application and run the following command:
npx nuxi@latest init nuxt-wordpress
Code language: Bash (bash)
After Nuxt 3 has finished installing, change your directory to your new Nuxt 3 project. Once inside your project’s directory, run npm run install and then npm run dev to start the server in development mode.
Once the development server starts up, you should be able to load http://localhost:3000/ in your browser and see the following start screen provided by the Nuxt application.

Now that you know your Nuxt project is running, let’s install a few Nuxt 3 modules to get us started. First, you can install the experimental Nuxt DevTools as a dev dependency to help you develop your applications more easily. Then you can install the Nuxt Tailwind CSS module so you can use those styles in your app.
npm install @nuxt/devtools -d
npm install @nuxtjs/tailwindcss --save
Code language: Bash (bash)
With both of those packages installed, you will need to add them as modules to your nuxt.config.ts file in the root of your project:
// https://nuxt.com/docs/api/configuration/nuxt-config
export default defineNuxtConfig({
   modules: [
       '@nuxt/devtools',
       '@nuxtjs/tailwindcss'
   ]
})
Code language: TypeScript (typescript)
Once these entries have been added to your Nuxt config file, restart the development server to view them in the browser. The Nuxt DevTools will add a small Nuxt icon to the bottom of the screen that triggers the dev tools modal to open.

The Nuxt DevTools have a lot of functionality, allowing you to inspect components and their state, examine the modules you have installed, and even modify your Tailwind config directly from this interface. To get started building out your pages, you can click on the routing menu inside of the DevTools to enable routes inside your project.
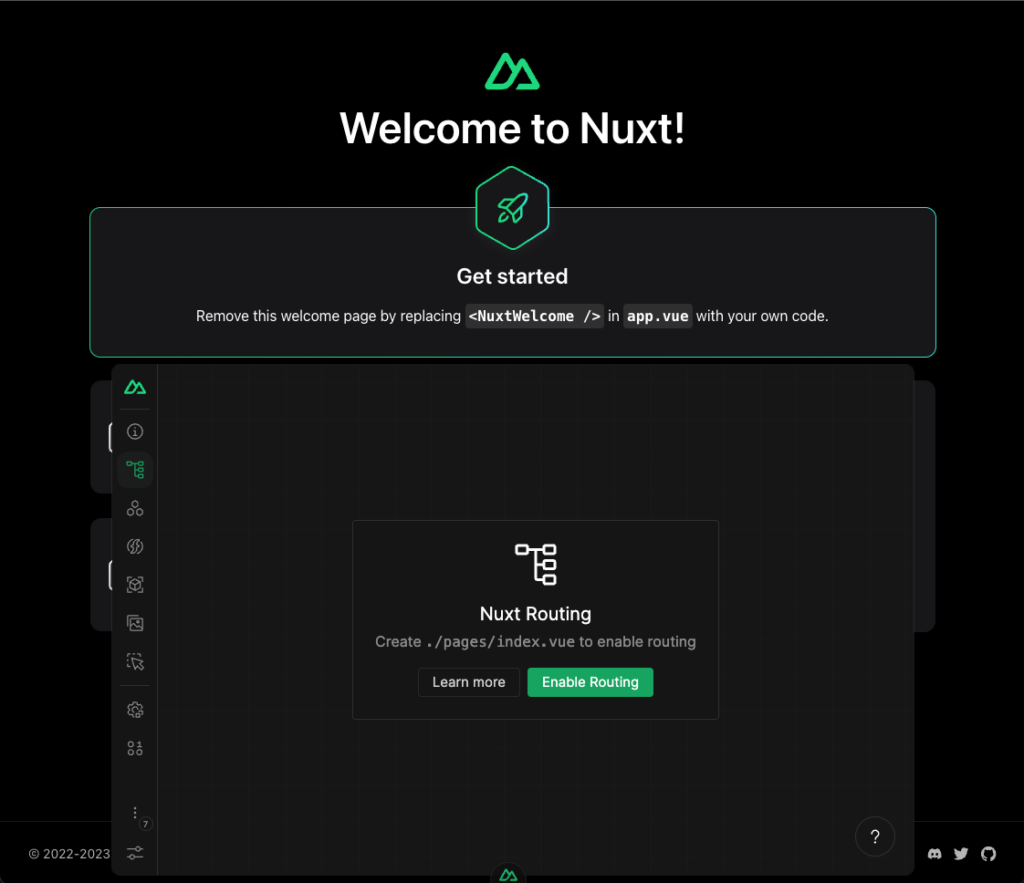
By clicking the button labeled Enable Routing, Nuxt will make the necessary changes to your project structure by adding a pages directory to store our routes and modifying the application root in app.vue to display your routes instead of this default welcome screen. Once the dev server reloads, you should see a page that looks like this, indicating that your Nuxt application is now serving the routes we define.

Now that the structure is in place, you can begin creating static and dynamic routes that pull data from your WordPress backend.
Understanding Nuxt Routing
Although you enabled routing using the DevTools, it’s important that you understand how Nuxt routing works inside your project’s directory. When you enabled routing, Nuxt made modifications to two different parts of your project. First, it created a pages directory where your page-based route files will live. Then, it updated your application root to display those routes based on the current URL.
If you look inside the app.vue file, you will see the following code. Nuxt implements its own component called <NuxtPage /> to display the route file that matches the current URL:
<template>
 <div>
 </div>
 <NuxtPage />
</template>

Code language: HTML, XML (xml)
Inside the pages directory, you’ll see a index.vue file that contains both a component template and a component script. As a part of this project, you will modify this index.vue file to display a list of your WordPress posts, but you will also need to create an additional route to display each post’s details.
To do that, you will implement a catch-all route in Nuxt by creating a file with the following name in the pages directory: [...uri].vue. Catch-all routes are useful because they allow you to match complex URI patterns that may exist in your WordPress CMS. Inside your URI template, add some additional markup just to get things working. After you save this file, you should be able to visit any URI in the browser, like /test, and view the contents of this page component.
<template>
   <h1>URI Page</h1>
</template>
Code language: HTML, XML (xml)
Building Out Some Basic Components
For this project, you have two routes that you’ll need to display: your blog’s index page and your individual blog posts. Now, you can create a few components to add some content to these routes. Inside the root of your project, create a folder called components and add a file called TheHeader.vue. Since you enabled the Tailwind CSS module, you can use those styles in your component.
Add the following code to your header file:
<template>
    <header className="relative w-full p-6 h-85px mx-auto bg-slate-200">
        <h1 className="text-4xl">Nuxt WP</h1>
    </header>
</template>

Code language: HTML, XML (xml)
Once the component file is created, you can use it in your route files. Nuxt 3 supports auto-imports, so all you have to do is use the component inside of a template block, as you see in the example below. While you’re adding this component, you can also create a div with some grid layout options that will hold your posts once you begin using dynamic data:
<script setup lang="ts">
const route = useRoute();
</script>

<template>
 <div>
   <TheHeader></TheHeader>
   <div class="grid gap-8 grid-cols-1 lg:grid-cols-3 p-6">
   </div>
 </div>
</template>

Code language: HTML, XML (xml)
Automatic imports are a great feature for developers because it eliminates the need to write as much boilerplate to build your site. After you’ve added TheHeader component to your index route, add it to your URI route as well.
Now that you have a route file prepared to accept some data, you can shift gears and focus on setting up WordPress as a headless CMS using WPGraphQL.
Configuring WordPress and WPGraphQL
While there are a ton of ways to work with WordPress locally, with tools like MAMP, XAMPP, Vagrant, and even Docker, the quickest way to spin up a local WordPress site is by using the Local development environment.
After downloading the software, you can create a local WordPress site for this project in a few clicks:
If you have a pre-existing WordPress site, you can use that as well.
After you’ve got a basic WordPress site either locally or on a server somewhere, you can install the WPGraphQL plugin from the plugin repository and activate it.

After you install and activate the plugin, you gain access to a GraphQL menu option that provides you with an interactive IDE called GraphiQL that you can use to construct and test your GraphQL queries.

By default, WPGraphQL makes a GraphQL endpoint available at the /graphql path of your site domain.
Creating a Dynamic Index Page
The first step in getting data from your WordPress site is making the URL to your WPGraphQL endpoint available in the Nuxt config file. For this project, you will add this as a runtime configuration variable instead of in a .env file. Open your Nuxt config file and add an additional key to the configuration object called runtimeConfig, which can accept both public and private values. You can add your WordPress URL as you see in the example below:
// https://nuxt.com/docs/api/configuration/nuxt-config
export default defineNuxtConfig({
    modules: [
        '@nuxt/devtools',
        '@nuxtjs/tailwindcss'
    ],
    runtimeConfig: {
        public: {
            wordpressUrl: 'https://acfheadless.wpengine.com/graphql'
        }
    }
})

Code language: JavaScript (javascript)
With this value in place, you can access your WordPress URL from inside your Nuxt application using config.public.wordpressUrl.
Query WPGraphQL using useFetch
To make the connection between our Nuxt application and your WordPress site, you will also need to add some data-fetching code to your index.vue file. This data-fetching code will live inside the script block of the route component.
<script setup lang="ts">
const route = useRoute()
const config = useRuntimeConfig();
const { data, refresh, pending } = await useFetch(config.public.wordpressUrl, {
 method: 'get',
 query: {
   query: `
     query NewQuery {
       posts(first:10){
         nodes {
           title
           date
           excerpt
           uri
         }
       }
     }`
},
transform(data){
return data.data.posts.nodes as Array<Record<'title' | 'date' | 'excerpt' | 'uri', string>>;
}
});
</script>

Code language: HTML, XML (xml)
There is a lot going on in this section of code so let’s spend some time unpacking it. First, you need to make the runtime config values available by calling the useRuntimeConfig composable. From there, you can use the useFetch composable to make a network request to your WordPress site. This particular API has a ton of options that are worth exploring.
In this example, you are making a GET request to your WordPress site and passing your GraphQL query as a query parameter. This GraphQL query will get the 10 most recent posts and include the title, date, excerpt, and URI. Since this is a simple query, you can use a GET request instead of a POST request to take advantage of any network caching that your host may enable.
Instead of returning the raw result, the useFetch composable also accepts a transform callback that lets you process the data returned from your network call. In this example, you dig into the data returned from WPGraphQL to get only the relevant posts and then add some additional typing that will help Nuxt auto-complete your code as you type. All of the variables you have created in this component’s script block are available inside the component’s template as well.
Implement a Post Component
Now that you have some data from WordPress, you can create a component to display the posts on your index page. Inside your components folder, create a new file called Post.vue. This file will have both a script and a template block with the following code:
<template>
   <NuxtLink :to='post.uri'>
       <div class="flex
       items-center
       bg-gradient-to-r
       from-cyan-500
       to-blue-500
       p-8
       rounded-lg
       text-white
       transition-all
       hover:-translate-y-1
       hover:scale-105"
       >
           <div>
               <h2 class="font-semibold text-2xl">{{ post.title }}</h2>
               <p>{{ new Date(post.date).toLocaleDateString() }}</p>
           </div>
       </div>
   </NuxtLink>
</template>
<script setup lang="ts">
const props = defineProps<{
   post: Record<'title' | 'date' | 'excerpt' | 'uri', string>
}>();

</script>


Code language: HTML, XML (xml)
Let’s examine the script block first. In this component, you’ll need to define the props that it will accept. Since the data you got back from WPGraphQL already has individual posts formatted as objects, you can just pass the entire object as a single post prop. To register props on this component, you can use the defineProps API and pure-type syntax to type your post prop. You can also do this in a more conventional manner by passing its configuration object directly to the defineProps composable.
Now that your component can accept props, let’s focus on the template block. At the topmost level, you have the NuxtLink component wrapping a few other divs that contain your styles and interpolate your data. The NuxtLink component can be used for both internal and external links, and Nuxt intelligently will apply optimizations to them based on the target location. In this example, the to attribute will be the value of the current post’s URI.
<NuxtLink :to='post.uri'></NuxtLink>
Code language: HTML, XML (xml)
Inside the link, you can add some additional Tailwind styles to modify the appearance of the post component. To display the other data from your WordPress post, you can use Vue’s text interpolation syntax, which is also known as mustache syntax {{}}, to display your text values. In the case of the post date, you can also include JavaScript expressions if you need to do any further data manipulation:
<h2 class="font-semibold text-2xl">{{ post.title }}</h2>
<p>{{ new Date(post.date).toLocaleDateString() }}</p>
Code language: HTML, XML (xml)
After creating the Post component, you will need to use the component on the index.vue route to display the list of posts. To do this, you can use a v-for directive to render a post component for each post returned from WordPress. By using the post in data syntax, you create a local post variable that can be passed to other component attributes. Like other frameworks, Vue needs a :key attribute that is unique, so you can use the post.uri value for that. Then you can pass the current post to the Post component using the post prop.
<template>
 <div>
   <TheHeader></TheHeader>
   <div class="grid gap-8 grid-cols-1 lg:grid-cols-3 p-6">
     <Post v-for="post in data" :key="post.uri" :post="post"></Post>
   </div>
 </div>
</template>

Code language: HTML, XML (xml)
When your application rerenders, you should see a screen that looks like this if you visit the index route of your site.

If you hover over the cards, you should see CSS animations applied with Tailwind, and each link should route you to the URI for that particular post. In the next steps, you will enhance that route to display dynamic data.
Create Dynamic Post Detail Pages
Now that you have a dynamic index page, you can shift your focus to creating post-detail pages. Since this route component will only display content for one post at a time, you can build that layout directly into your page component. Open up your [...uri].vue file and copy the following code into that component:
<template>
   <div>
     <TheHeader></TheHeader>
       <main class="bg-gray-100 container mx-auto mt-6 p-6 rounded-lg">
           <h1 class="text-4xl">{{ data.title }}</h1>
           <div class="text-2xl mt-4">{{ new Date(data.date).toLocaleDateString() }}</div>
           <article class="mt-4 space-y-2" v-html="data.content"></article>
       </main>
   </div>
</template>

<script setup>

const route = useRoute();
const uri = route.params.uri.join('/');
const config = useRuntimeConfig();
const {data, pending, refresh, error} = await useFetch(config.public.wordpressUrl, {
   method: 'get',
   query: {
       query: `
       query MyQuery3($uri: String!) {
           nodeByUri(uri: $uri) {
               ... on Post {
                   id
                   title
                   date
                   content
               }
           }
       }
       `,
       variables: {
           uri: uri
       }
   },
   transform(data){
       return data.data.nodeByUri
   }
})


useHead({
   title: data.value.title
})
</script>

Code language: HTML, XML (xml)
Let’s start by breaking down the script block. The first thing to call out is how you handle extracting the URI params from the current route using the useRoute composable. Since this route utilizes a catch-all, route.params.uri is an array instead of a string. To make these array items usable inside your query, you need to join them using a forward slash:
const uri = route.params.uri.join('/');
Code language: JavaScript (javascript)
Now that the URI for the route is stored in a variable, you can use the useFetch helper to make another network request to WPGraphQL:
const {data, pending, refresh, error} = await useFetch(config.public.wordpressUrl, {
   method: 'get',
   query: {
       query: `
       query MyQuery3($uri: String!) {
           nodeByUri(uri: $uri) {
               ... on Post {
                   id
                   title
                   date
                   content
               }
           }
       }
       `,
       variables: {
           uri: uri
       }
   },
   transform(data){
       return data.data.nodeByUri
   }
})


Code language: PHP (php)
The shape of this code should look very similar to the data fetching you did for your index page. However, instead of requesting a list of posts, this query utilizes a variable to get a specific post using the URI you extract from the route using the nodeByUri query.
GraphQL Queries with Variables
Let’s break down a few parts of this query to examine how variables work in GraphQL. When you give your query an operation name, you also specify the variable arguments that the query will take along with their types and whether or not they are required, indicated by the exclamation point following the type. Since this query could potentially return multiple different content types you can use an inline fragment on the post type to get properties only on that specific type:
   query MyQuery3($uri: String!) {
           nodeByUri(uri: $uri) {
               ... on Post {
                   id
                   title
                   date
                   content
               }
           }
       }

Code language: PHP (php)
To pass a value into your query’s variable argument, you need to add another key to your fetch call’s query params that specifies the names of the variables and their values. When this query is evaluated by the GraphQL server, the values provided by the variables key will be substituted inside of your query:
 variables: {
      uri: uri
 }
Code language: CSS (css)
As in the previous example, you can also use the transform option on useFetch to directly return the data from your GraphQL query.
SEO with Nuxt 3
Once you have post data available in your script block, you can make a quick call using the useHead composable to set the page title. Nuxt 3 also provides some other methods of manipulating SEO data that help you avoid common mistakes with meta property names.
useHead({
   title: data.value.title
})
Code language: CSS (css)
Render HTML Content
Now that you have an individual post’s details stored in the data variable, you can use those values inside of your template block.
<template>
   <div>
     <TheHeader></TheHeader>
       <main class="bg-gray-100 container mx-auto mt-6 p-6 rounded-lg">
           <h1 class="text-4xl">{{ data.title }}</h1>
           <div class="text-2xl mt-4">{{ new Date(data.date).toLocaleDateString() }}</div>
           <article class="mt-4 space-y-2" v-html="data.content"></article>
       </main>
   </div>
</template>

Code language: HTML, XML (xml)
Most of the text interpolation examples in this piece of code should look very similar to the previous examples you’ve already created. However, since you’re dealing with post content returned as raw HTML, you need to use a different Vue directive to display that content on the page. To display raw HTML, you can add the v-html directive to an element to render the HTML inside of the element:
<article class="mt-4 space-y-2" v-html="data.content"></article>
Code language: HTML, XML (xml)
Much like React’s dangerouslySetInnerHTML attribute, including user-supplied HTML here does open some security concerns, but WordPress already has some built-in mechanisms to protect you from cross-site scripting attacks.
Once your application refreshes, visit one of the post URI routes and you should see a page that looks like this:

Amazing! Now that you have a fully functioning Nuxt application pulling data from your WordPress site, you can explore different deployment methods in the next step of this tutorial.
Deploy Your Nuxt Site
Nuxt 3 offers a number of different deployment options depending on your use case.
If you want to statically generate your entire site, including creating a static version of your API payloads, you can run the following command:
npx nuxi generate
Code language: Bash (bash)
The built files will be available in the .output/public directory, but in some cases, you may also need a file server in front of this folder to serve those static files.
To deploy the project to a Node.js server, you can run the following command:
npm run nuxt build
Code language: Bash (bash)
This will generate an entry file called .output/server/index.mjs, and you can change your start command in package.json to the following command:
node .output/server/index.mjs
Code language: Bash (bash)
If you are interested in deploying your headless WordPress & Nuxt 3 site on the Atlas platform, you can follow the framework guide for Nuxt 3. Each Atlas instance comes with hosting environments for both WordPress and Node.js applications and supports some of the awesome features listed below:
- Git-based CI/CD
- PR Preview Environments
- Build Webhooks
- Optimized Infrastructure for Headless WordPress
Wrapping Up
Excellent! Hopefully, you have a better idea of how to work with headless WordPress and Nuxt 3. After reading this tutorial, you should be able to implement Nuxt 3 routing, use WordPress with WPGraphQL to fetch data and deploy your Nuxt project.