Templates in Faust bring the power of the WordPress Template Hierarchy to your JavaScript frontend application. This article is a high-level guide to walk you through how templates are resolved and how to create your first templates using this system.
Table of Contents
Prerequisites
To benefit from this article, you will need to have a basic understanding of Faust.js, headless WordPress, and WPGraphQL.
This article also assumes that you already have a WP install and a Faust.js app created and connected. If you do not, please refer to the Faust.js documentation.
If you need a more basic tutorial, please reference this article on the subject matter here.
WPGraphQL
An extendable GraphQL
schema & API for WordPress.
Faust.js
The JavaScript framework
specifically for WordPress.
The #1 local WordPress
development tool
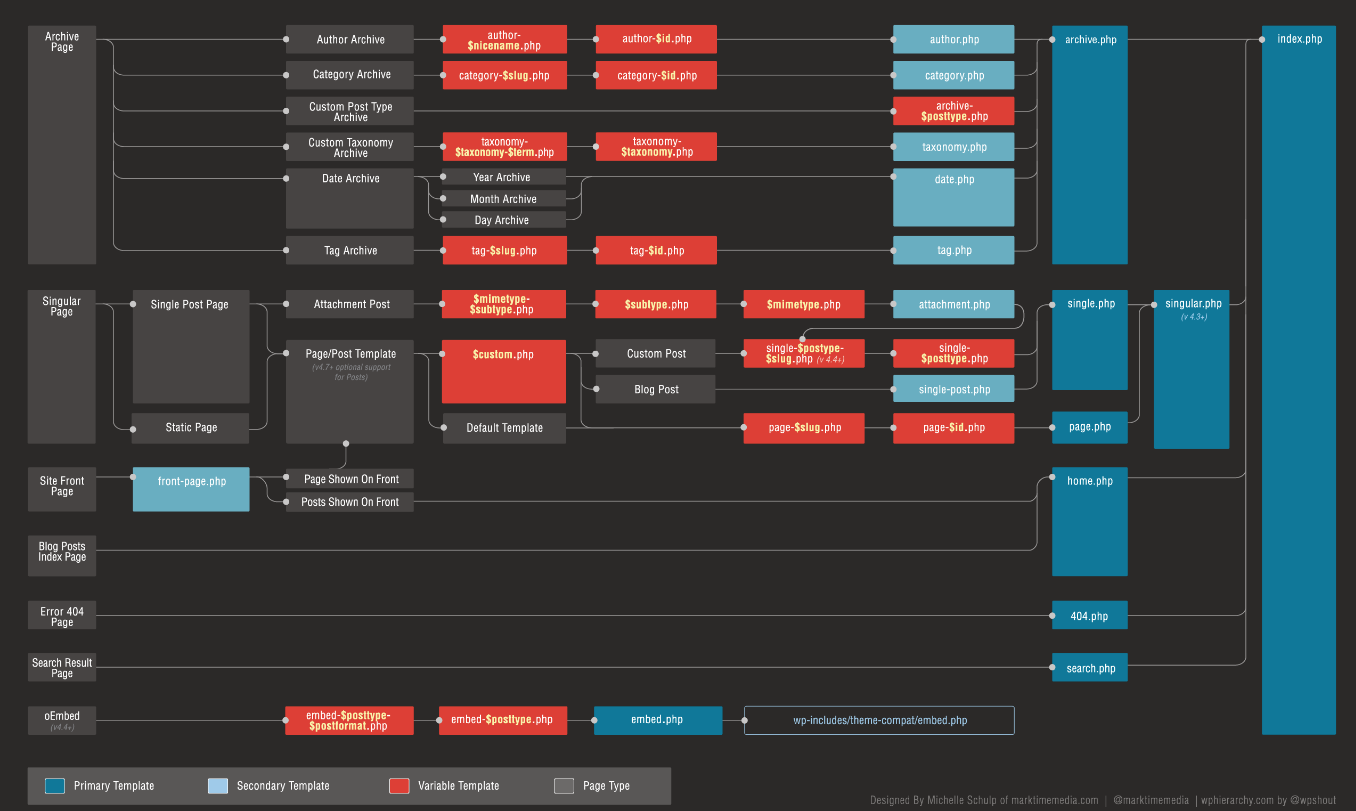
The Traditional WordPress Template Hierarchy
Before we dive into what the templating system is in Faust.js, let’s quickly go over what it mimics in traditional WordPress.
The WordPress template hierarchy is a system that WordPress uses to decide which template files to use when generating a particular page on a WordPress site. This hierarchy is designed to provide a flexible and efficient method for determining the layout and structure of a page based on the type of content being presented.
When a visitor accesses a page on a WordPress site, WordPress runs a query to determine the type of content requested (e.g., a blog post, a specific page, a category archive, etc.). It then consults the template hierarchy to identify the most appropriate template file to use to display this content. The hierarchy is structured as a series of decisions WordPress makes, looking for template files in a specific order. If it doesn’t find a specific template file, it moves on to a more generic template until it finds a match.
The hierarchy starts with the most specific template files (like those for individual posts or pages) and moves towards more general templates (like archive or index templates) if the more specific templates are not present in the theme. This allows theme developers to create highly customized experiences for different types of content by creating specific template files, while also providing default templates that ensure content is always presented, even if no custom templates are available.
For instance, for a single blog post, WordPress will first look for a template specific to the post’s ID, then for a template for the post’s slug, followed by a template for the post type, and so on, down to more generic templates like single.php and finally index.php if no other template is found.
Here is an image of the template hierarchy:
The Templating System in Faust.js
Now that we understand what Faust.js is mimicking from WordPress in its templating system, let’s discuss how templates are resolved in it.
The template resolver works by sending a preliminary GraphQL request (called the Seed Query) for the given URI in WordPress. The response includes data like the database ID, slug, content type, etc, which is then used to determine what the possible templates are for the given URI. This is how traditional WordPress does it but in JavaScript! Stoked!!!
In the next few sections, we will dissect the folder and file structure of the default boilerplate template system.
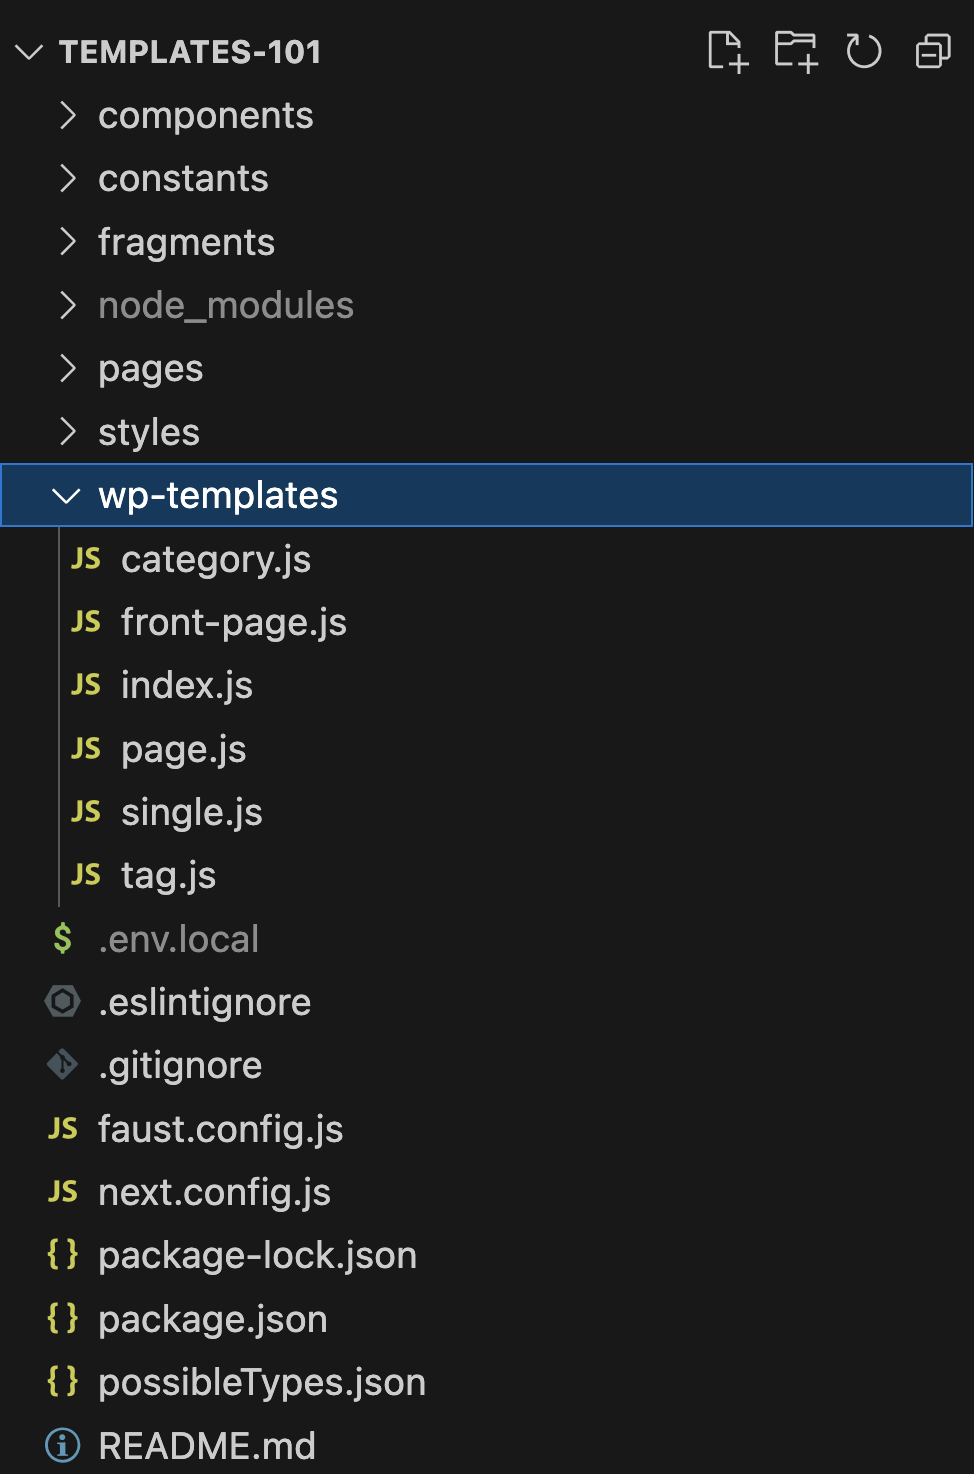
The WP-Templates Directory
The Faust.js template system obeys the Next.js Pages Router method. When you spin up the boilerplate npm package, you will see a directory in the root of the project called wp-templates. You can name this anything you want, but out of the box, this name makes the most sense. This is the folder that will house your Faust.js templates.
The Default Files
The files that come out of the box with the Faust.js npm package and the pages that they resolve and render are as follows:
category.js : This resolves and renders the category archive page with the posts that are related within certain categories from the WordPress backendfront-page.js : This resolves and renders the front page of the Faust.js boilerplate that contains your general settings data as well as anything you want to add to the front-page template. When first spun up, it just renders HTML that says this is a front page.
index.js: This is where your template files will be kept and sifted through for the system to go through what template is best to resolve and render.
page.js : This file resolves and renders any page post type in WordPress.
single.js: This file will render any post from the post type menu. Any individual blog posts will resolve and render this template.
tag.js : This file is the archive page for a specific page. For example, if you have a tag called “apple” it will resolve all of the posts tagged as “apple”.
Here is an image of the boilerplate folder with files:
Create Your First Custom Template
Now that we have an understanding of how the templating works in Faust.js, let’s create a custom template.
The first template we will make is a custom sample page template. Navigate to the wp-templates directory at the root of your Faust.js project and create a file called sample-page.js. Once the file is created, copy and paste this code onto the file:
import { gql } from "@apollo/client";

// The Component is required
export default function Component(props) {
  return (
    <>
      <h1>{props.data.page.title}</h1>
      <div dangerouslySetInnerHTML={{ __html: props.data.page.content }} />
    </>
  );
}

Component.query = gql`
  query GetPageDataByURI($uri: ID!) {
    page(id: $uri, idType: URI) {
      title
      content
      slug
    }
  }
`;

Component.variables = (seedQuery, context) => {
  return {
    uri: seedQuery?.uri,
  };
};


Component.variables = (seedQuery, context) => {
  return {
    uri: seedQuery?.uri,
  };
};

Code language: JavaScript (javascript)
Let’s break down what is happening in the code block.
At the top of the file, we import the gql tag from the Apollo Client to parse WPGraphQL queries.
Next, we define a functional component named Component that takes props as an argument. This will be the default exported component.
Following that we return some JSX to render the HTML using the React escape hatch to render the content from a string. We traverse that data path accurately to gain access to the content of the page from WordPress, in this case, just the page content and the page title.
Below that, we have our WPGraphQL queries the Component.query syntax from Faust to assign the query prop of the component. We are querying for page data by a variable which is its URI.
Lastly, we need to add its variable component function. We define that and assign it a variables property which is used to compute the variables of the WPGraphQL query based on the input parameters seedQuery and context.
Then we return an object containing the variables for the query and access the URI by chaining the seedQuery.
The Index File
Before we test this out and see if this renders correctly on the browser, the finishing step is to add and specify the template in our index.js file in the wp-templates directory.
The index.js file is the most important file in the wp-templates directory when using Faust.js for headless WordPress. It acts as the control center, telling the system which template to use for showing content on the browser. Without setting up this file, the website won’t display pages correctly, if at all.
I like to think of it as a directory or map. It lists all the templates you have and matches them with what the user wants to see. This setup is vital for making sure the right template is picked for each page request. Without this file, the system is like a library without an index; you wouldn’t know where to find anything.
In the wp-templates folder, import your sample-page.js file at the top, then in the export object add the key identifier and value of the imported module like so:
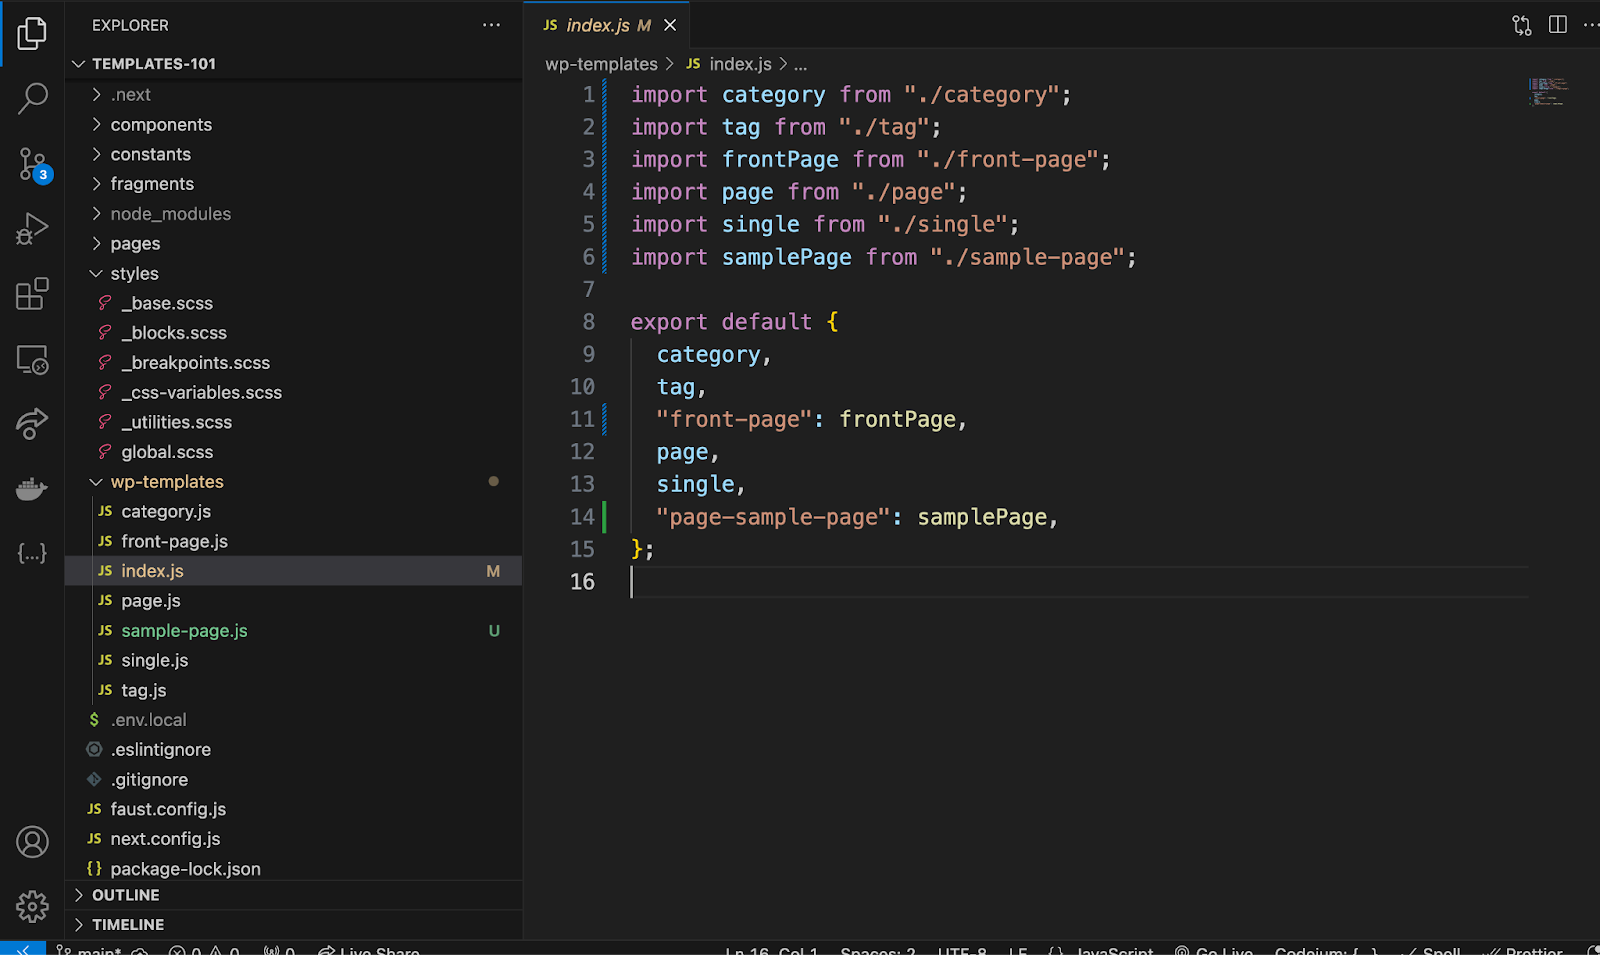
Notice that we make the key ID string unique by calling it page-sample-page. If we do not, the page will conflict with the page.js file and render that instead. Make sure to make the key ID string unique in relation to the other files in your wp-templates folder.
We can now test this out and see if it works.
Go to your WP Admin and navigate to the Pages option on the left-hand side of the hamburger menu:
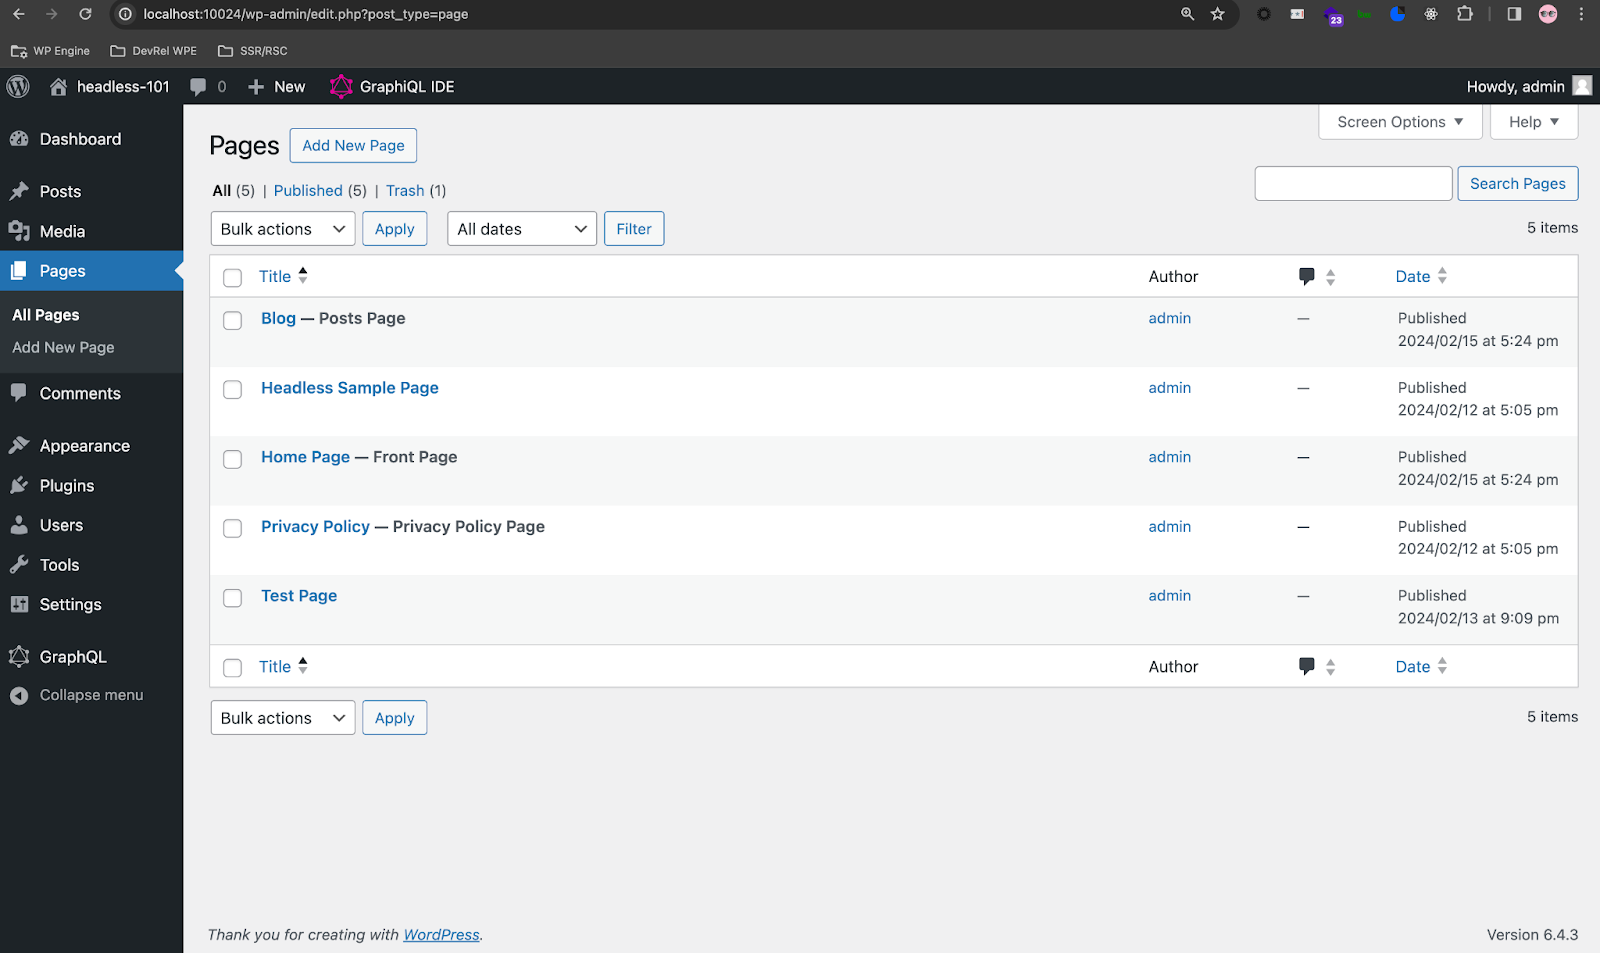
Make a test sample page. You can call this whatever you want. I called it Test Faust.js Sample Page. Click on the page link you just created to edit it:
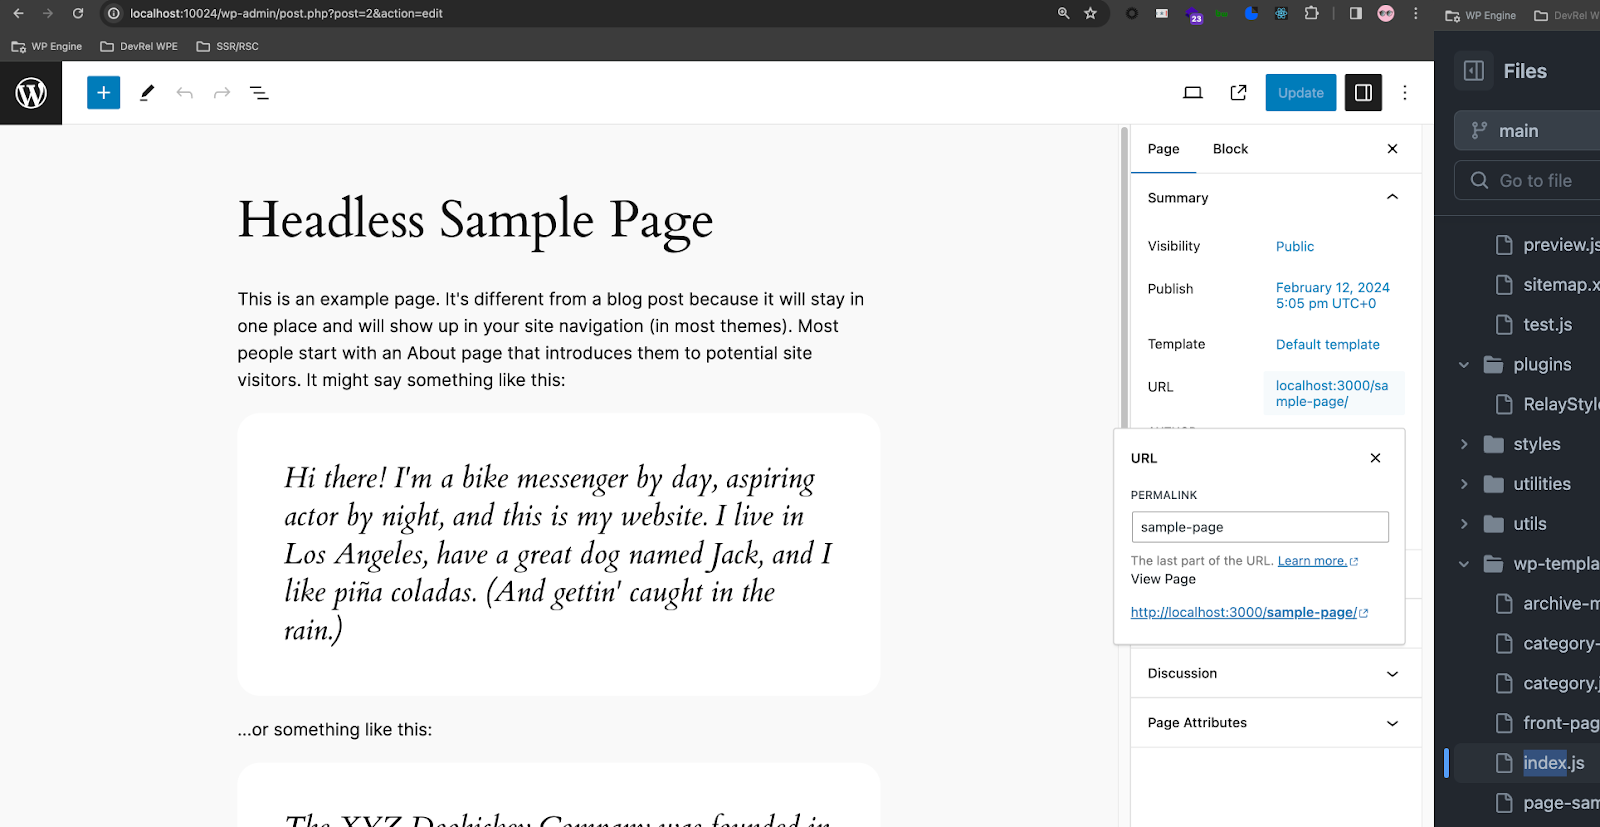
In the URL field, make sure the permalink reflects the name of your file on the frontend. In this case, it is sample-page. This will tell Faust.js what template to resolve.
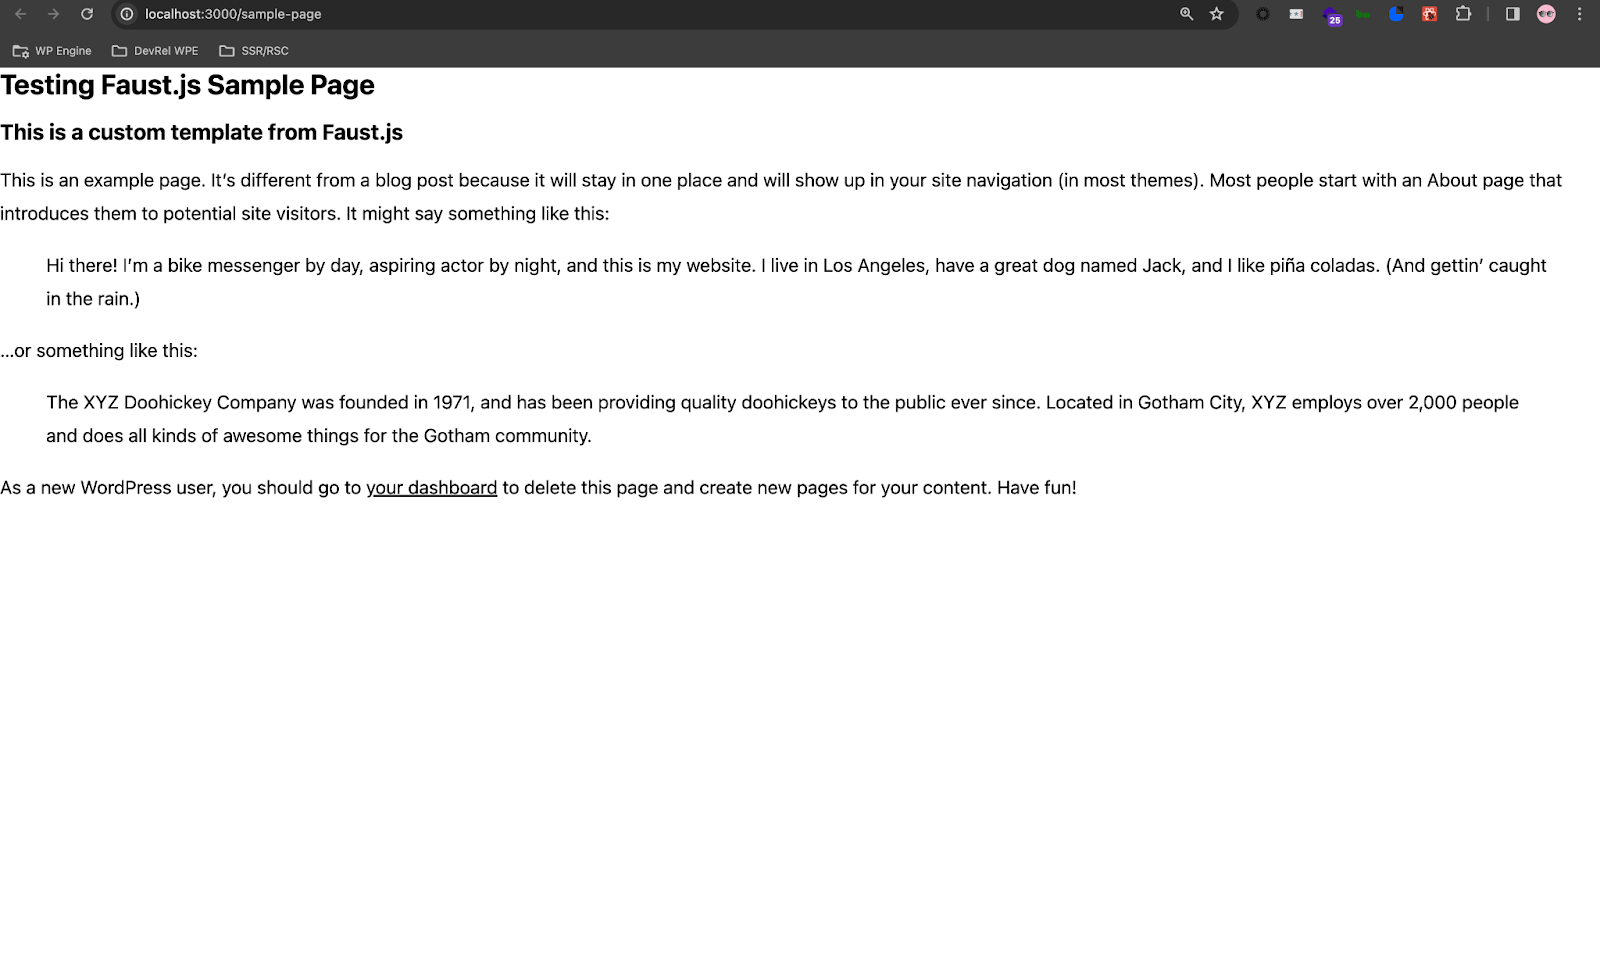
Finally, click the link to view the page and you should see this on the browser:
Conclusion
The template hierarchy in traditional WordPress is an important system to help the overall UI experience for users on a website. In headless WordPress, Faust.js compliments that hierarchy to mimic it on the JavaScript frontend. I hope this gave you a better understanding of how the basics work on the Faust.js side.
Stay tuned for my next article on this matter where we will dive a little deeper and create custom templates in Faust.js with WPGraphQL for ACF.
As always, stoked to hear your feedback and any questions you might have on headless WordPress! Hit us up in our Discord!