Next.js 14 introduces a new paradigm in the project structure and the development of sites and applications. With the new version of Next.js being adapted, Faust.js also must coincide to support this.
In this article, I will give you an overview of the support of Next 14 with Faust.js including:
Table of Contents
Getting Started
To benefit from this post, you should be familiar with the basics of WordPress development, WPGraphQL, Next.js 14, and Apollo Client.
Configure Your WordPress Site
- Set up a WordPress site on local, WP Engine, or any host of your choice
- Install and activate the WPGraphQL plugin
- Install and activate the Faust.js plugin
WPGraphQL
An extendable GraphQL
schema & API for WordPress.
Faust.js Experimental App Router Setup
Get started by downloading the example project by running:
npx create-next-app \
    -e https://github.com/wpengine/faustjs/tree/main \
    --example-path examples/next/app-router \
    --use-npm

Code language: PHP (php)
Once you download the example project, cd into the project you named it and run this command: npm install --legacy-peer-deps due to conflicts in dependencies for now.
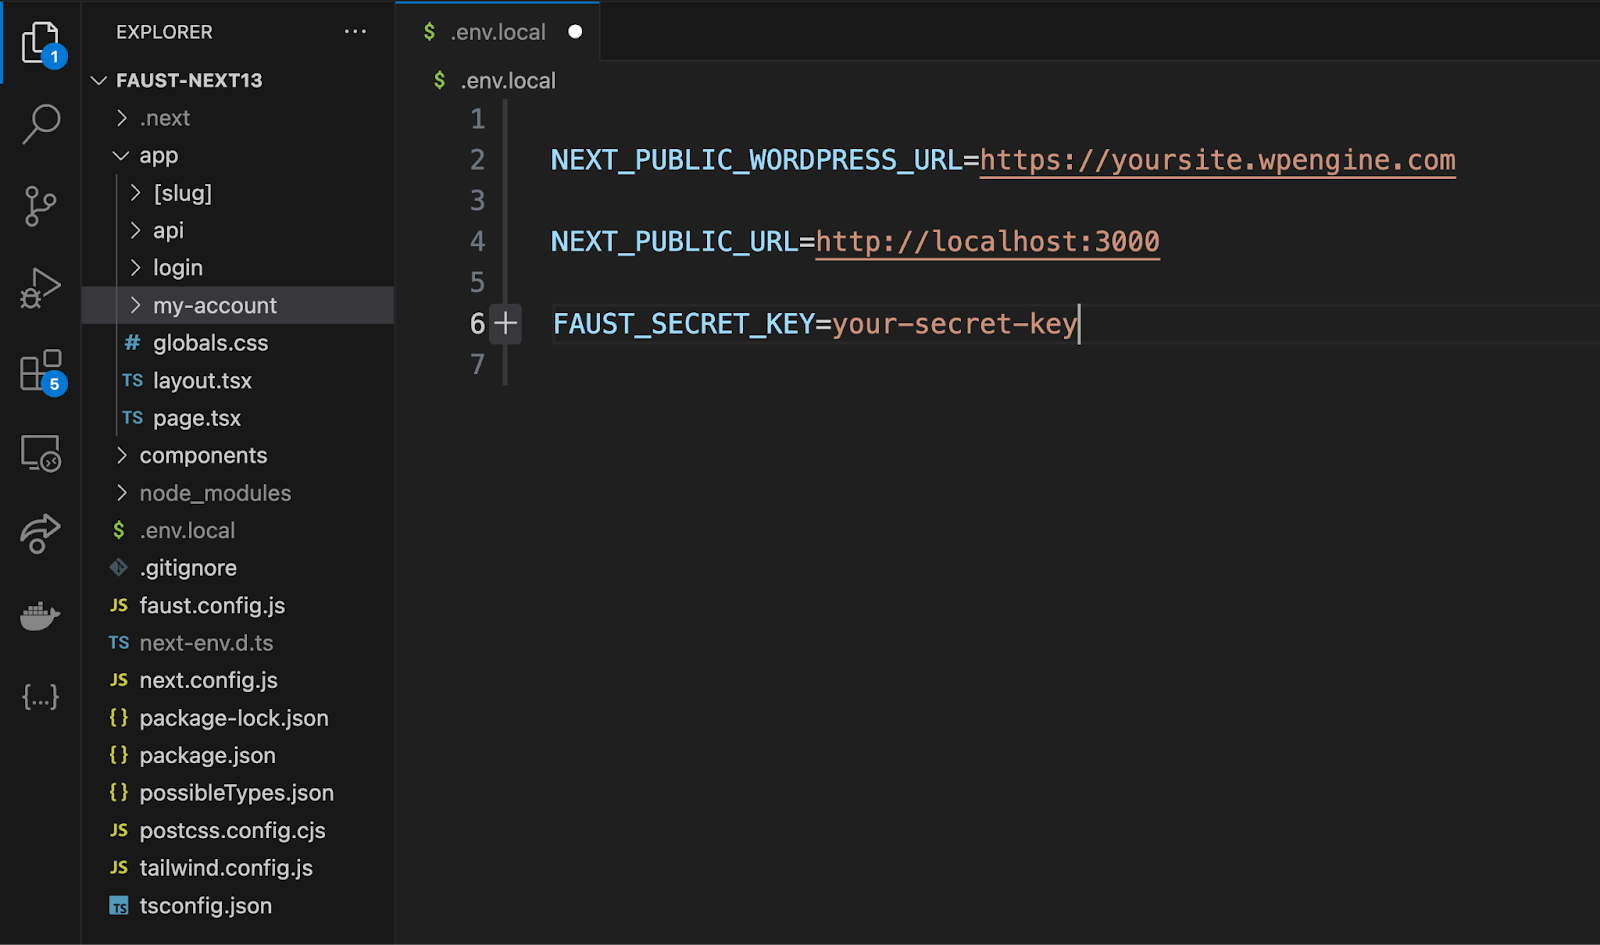
.env.local File Set-Up
Copy the example’s .env.local.sample file, ensuring you rename the file .env.local.
You’ll see an example NEXT_PUBLIC_WORDPRESS_URL in this file. Set this to your WordPress site’s URL.
You’ll also see a NEXT_PUBLIC_URL set to http://localhost:3000. You can keep that as is for now.
Get your FAUST_SECRET_KEY from your WordPress Settings->Faust and set it in.
Faust.js
The JavaScript framework
specifically for WordPress.
Faust.js App Router Example Project
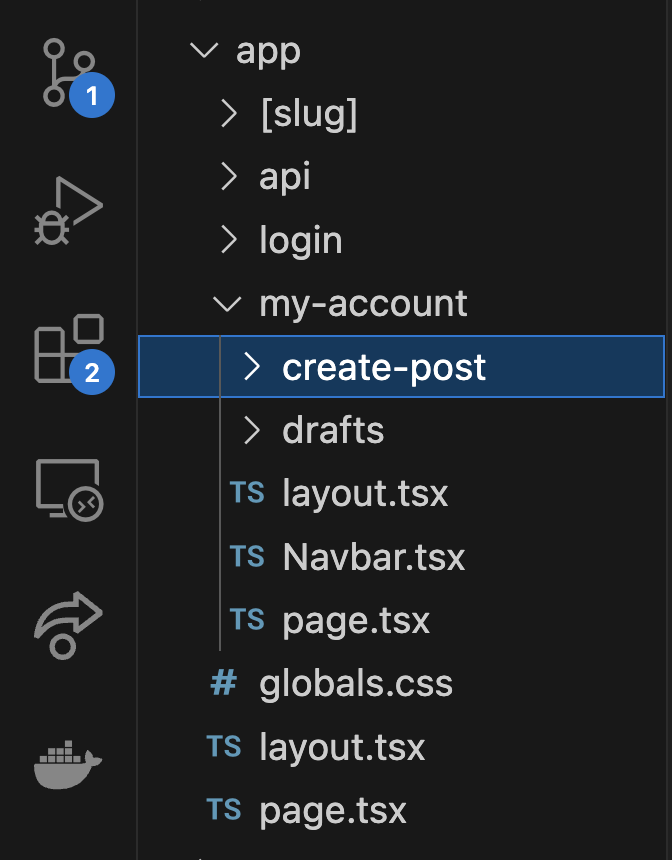
This is the file structure when opening up the code base on the Faust.js experimental package:
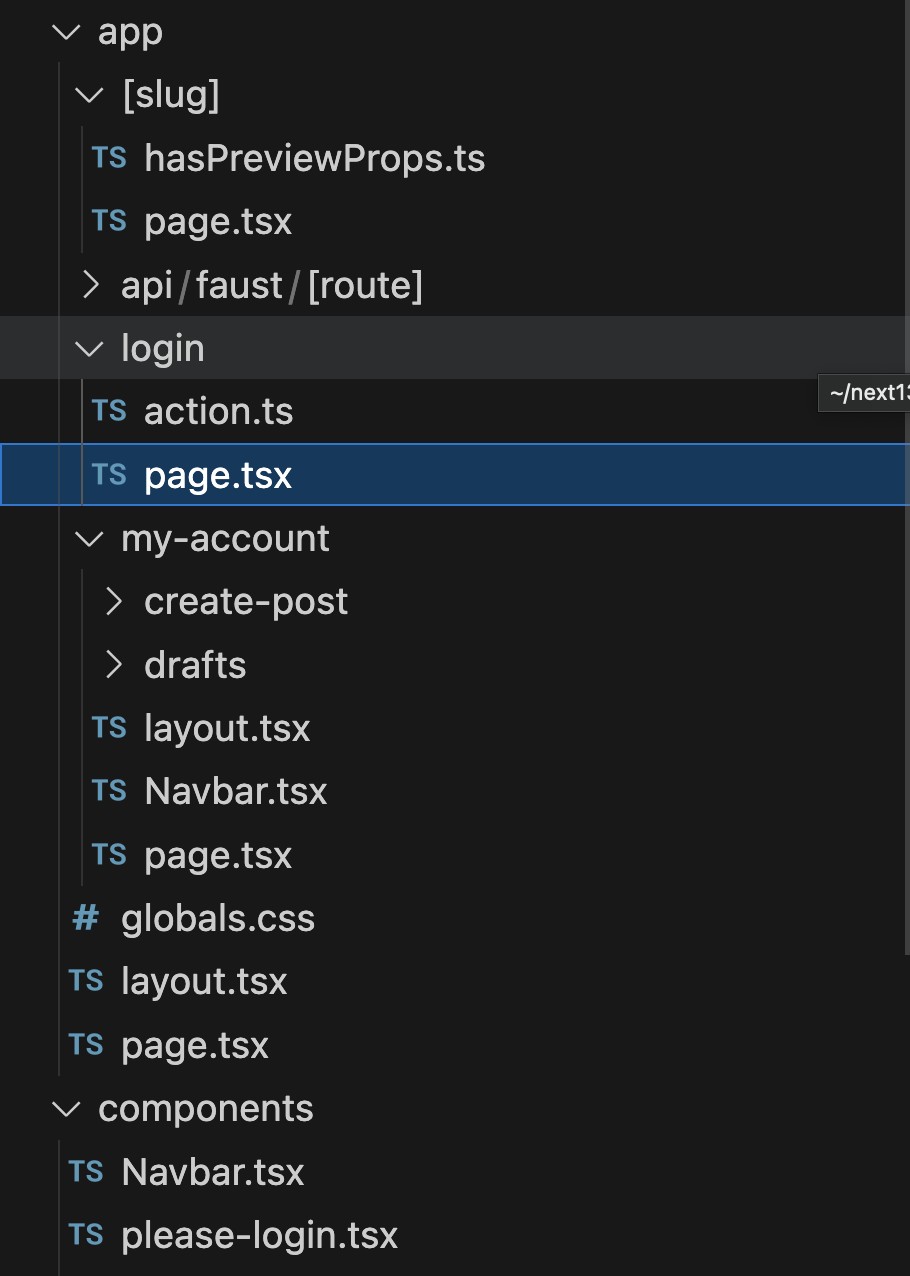
We have route segments, a dynamic route segment, and authentication out of the box. If you are unfamiliar with the basics of Next.js 14 and the roles of files and folders, please refer to my article here on that subject.
Fetching Data
Faust.js uses the experimental Apollo Client support for Next.js 14. getClient is a function that returns an ApolloClient, specifically for use in React Server Components (RSC). When making authenticated requests in the Next.js App Router from an RSC, the getAuthClient is used instead. Both are part of the @faustwp/experimental-app-router package.
Authentication
Let’s break down authentication In the example project. Under the folder my-account, you’ll find an example of getAuthClient in action in the page.tsx file:
import { PleaseLogin } from "@/components/please-login";
import { gql } from "@apollo/client";
import { getAuthClient, onLogout } from "@faustwp/experimental-app-router";

export default async function Page() {
  const client = await getAuthClient();

  if (!client) {
    return <PleaseLogin />;
  }

  const { data } = await client.query({
    query: gql`
      query GetViewerPublishedPosts {
        viewer {
          name

          publishedPosts: posts(where: { status: PUBLISH }) {
            nodes {
              id
              title
            }
          }
        }
      }
    `,
  });

  return (
    <>
      <div className="flex justify-center mb-2">
        <h2>Welcome {data.viewer.name}!</h2>
      </div>
      <div className="flex justify-center mb-4">
        <h3 className="font-bold underline text-blue-900">
          My Post Titles List
        </h3>
      </div>
      <div className="flex justify-center mb-12">
        <ul>
          {data.viewer.publishedPosts.nodes.map((post) => (
            <li key={post.id}>{post.title}</li>
          ))}
        </ul>
      </div>

      <form action={onLogout} className="flex justify-center">
        <button
          className="bg-green-500 hover:bg-green-600 text-white font-semibold px-4 py-2 rounded"
          type="submit"
        >
          Logout
        </button>
      </form>
    </>
  );
}

Code language: JavaScript (javascript)
At the top of the file we import the GraphQL template literal from the Apollo Client and the getAuthClient function from Faust.js.
Following the imports, we define an asynchronous default function named Page which will be the function used as the component.
We then get the Apollo Client by calling the getAuthClient function asynchronously and store it in the client variable.
After that, we have an authentication check if the client instance is null or undefined. If it is, this means the user is not authenticated and we render a JSX fragment to inform the user that they must be authenticated. If they are not authenticated, it directs them to a login page which is a component located in our app/components directory.
if (!client) {
    			return <PleaseLogin />;
  			}

Code language: JavaScript (javascript)
The next thing is some data fetching as we execute a GraphQL query asynchronously using the Apollo Client instance where we fetch the logged-in user’s name, post IDs, and titles.
 const { data } = await client.query({
    query: gql`
      query GetViewerPublishedPosts {
        viewer {
          name

          publishedPosts: posts(where: { status: PUBLISH }) {
            nodes {
              id
              title
            }
          }
        }
      }
    `,
  });
Code language: JavaScript (javascript)
Lastly, we render the JSX elements with the post’s data.
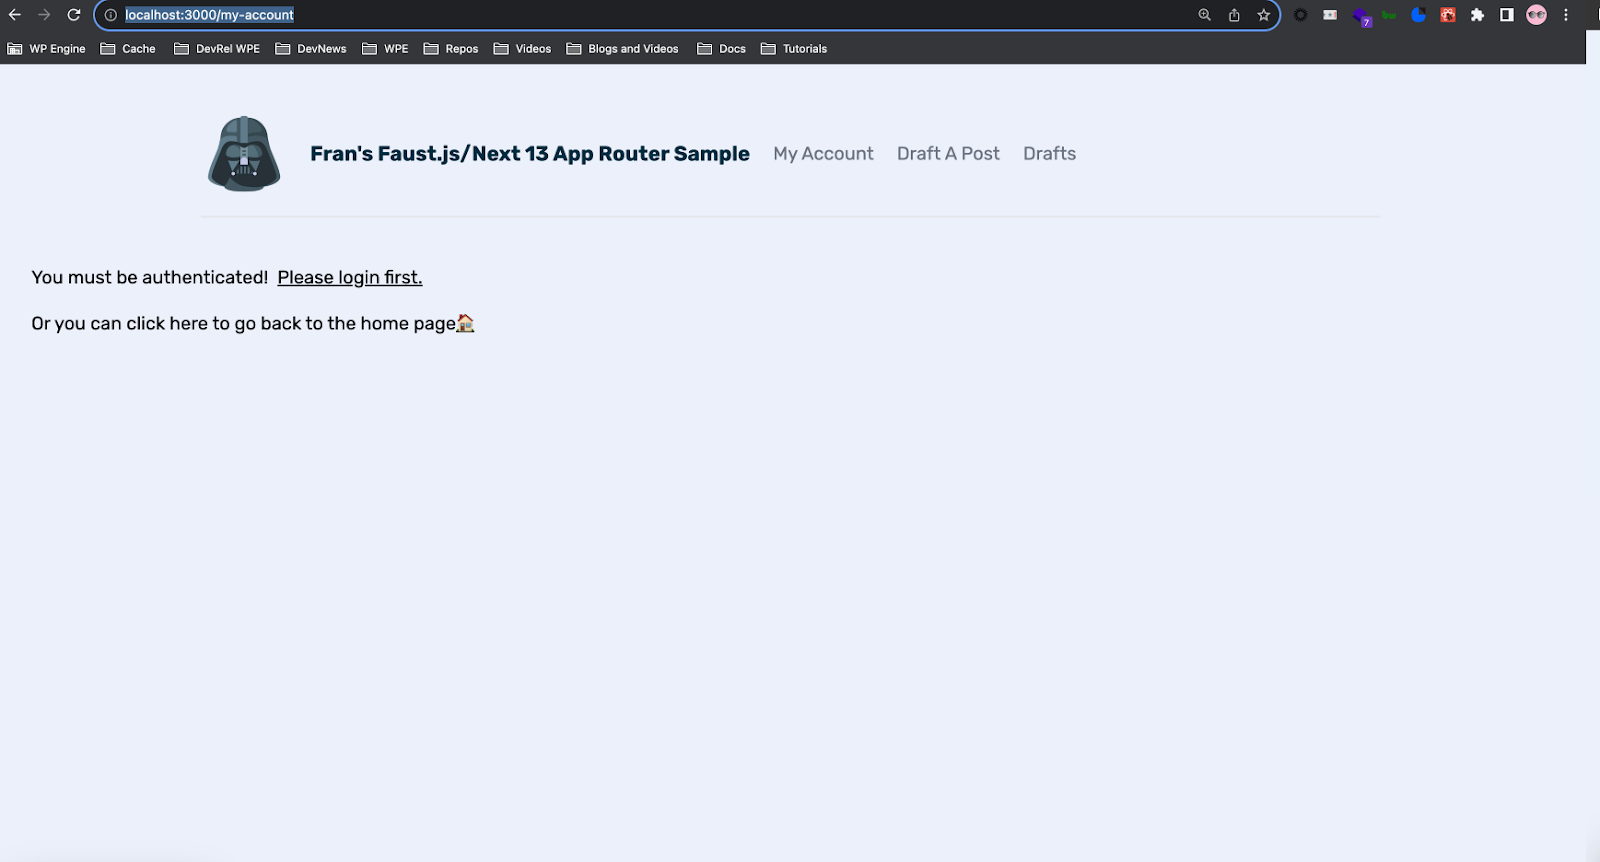
Let’s see what this part looks like in the browser. Run npm run dev in terminal and you should see this page if you try to visit http://localhost:3000/my-account without logging in:
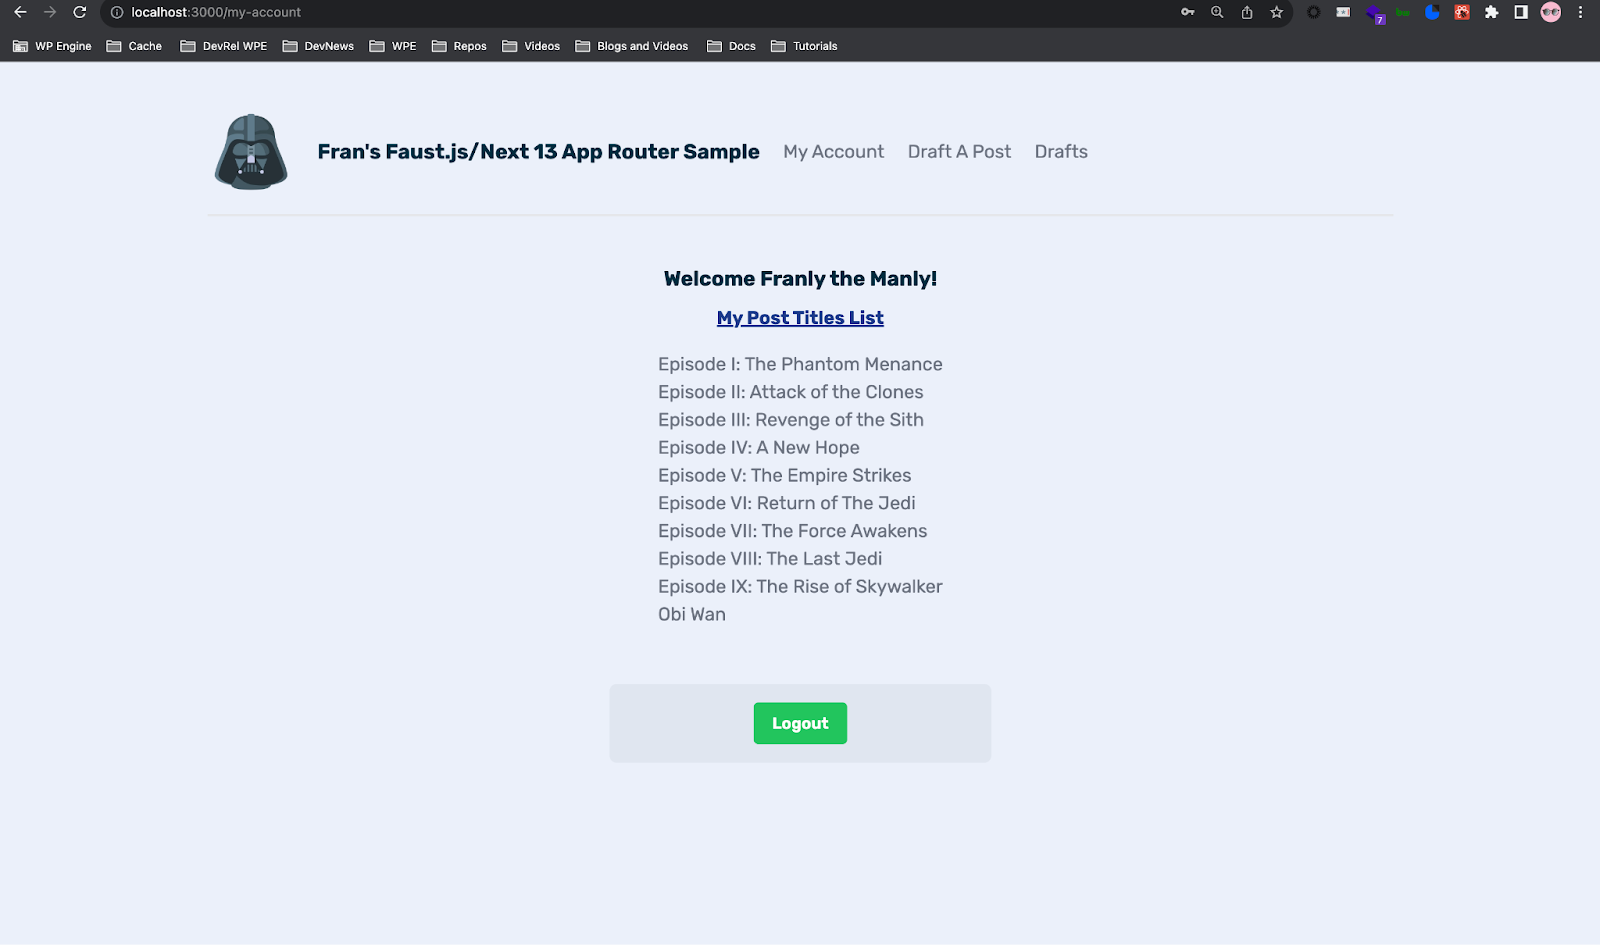
Once you log in, you should see this authenticated user’s landing page:
Login Server Action
Authentication in the experimental App Router is powered by two utilities, onLogin and onLogout. These are built on Next.js server actions and perform an action to log a user in and out using cookie caching and cookie removal, respectively. Let’s navigate to app/login/actions.ts:
"use server";

import { onLogin } from "@faustwp/experimental-app-router";
import { redirect } from "next/navigation";

export async function loginAction(prevData: any, formData: FormData) {
  const res = await onLogin(formData);

  if (res.error) {
    return res;
  }

  redirect("/my-account");
}

Code language: JavaScript (javascript)
At the very top of the file, we have the 'use server' directive by Next.js to indicate that this component should only run on the server. In this case, we are using this for server-side auth handling without exposing sensitive logic to the client.
Our imports are next with the onLogin function from Faust.js for handling the login process and redirect from Next.js to perform server-side redirection to the my-account path.
Following our imports, we have an async function called loginAction that will be called in response to a form submission. The function takes two parameters. prevData which is of type any and is used to pass any previous state or data. formData is an instance of FormData and carries the data from the login form.
Next, we call the onLogin function with formData as its argument. This returns a promise that resolves to the result of the login attempt.
Then, an if statement checks if the response object contains a error prop. If there is an error, the function returns the response object which will include the error details on the client.
Lastly, if there is no error, the redirect function is called to navigate the user to the my-account route which is done server-side, telling the user’s browser to navigate to that path as a result of the login action being processed.
Login Page File on the Client
Now that we have our Server Action to handle the login functionality on the server, we can use it in a client-side component for the page UI that will show on the browser to allow the user to input their login credentials and submit the data to authenticate.
Navigate to app/login/page.tsx:
"use client";

import { useFormState, useFormStatus } from "react-dom";
import { loginAction } from "./actions";

function SubmitButton() {
  const status = useFormStatus();
  return (
    <button
      className="bg-green-500 hover:bg-green-600 text-white font-semibold px-4 py-2 rounded"
      type="submit"
      disabled={status.pending}
    >
      {status.pending ? "Loading..." : "Login"}
    </button>
  );
}

export default function Page() {
  const [state, formAction] = useFormState(loginAction, {});

  return (
    <>
      <h2 className="flex justify-center">Login Here</h2>
      <form action={formAction}>
        <fieldset>
          <label htmlFor="usernameEmail">Username or Email</label>
          <input type="name" name="usernameEmail" />
        </fieldset>

        <fieldset>
          <label htmlFor="password">Password</label>
          <input type="password" name="password" />
        </fieldset>

        <SubmitButton />

        {state.error && (
          <p dangerouslySetInnerHTML={{ __html: state.error }}></p>
        )}
      </form>
    </>
  );
}

Code language: JavaScript (javascript)
The top of the file starts with the 'use client' directive which ensures that this component will only run on the client. After that, we have our imports:
The useFormState hook comes from react-dom and allows you to update state based on the result of a form action. The useFormStatus hook also comes from react-dom and this gives you status information of the last form submission. Both are still in experimental canary branches.
The loginAction is from our actions.ts file we made in this same directory to handle the login logic on the server.
Following that, we have a functional component that defines a SubmitButton which is responsible for rendering the submit button on the form. We then call the useFormStatus hook to get the current status of the form. It returns an object with a pending prop that indicates whether a form submission is in progress.
After that, we have our button element that displays the text ‘Login’ or ‘Loading’ depending on if a form submission is pending. This uses the pending status to disable the button during submission to prevent duplicate submissions.
function SubmitButton() {
  const status = useFormStatus();
  return (
    <button
      className="bg-green-500 hover:bg-green-600 text-white font-semibold px-4 py-2 rounded"
      type="submit"
      disabled={status.pending}
    >
      {status.pending ? "Loading..." : "Login"}
    </button>
  );
}
Code language: JavaScript (javascript)
The Page component is next which serves as the main component for this page file.
In this component, we initialize form state management using the useFormState hook with loginAction as the handler for form submissions.
Then we return JSX that renders the form and input fields with the submit button.
In the form element, it uses the action property that calls a function to run on the server. In this case, our function being called is formAction which will handle the form submission on the server and this is tied to the loginAction we are importing from our Server Action.
Lastly, we have the SubmitButton component that we created at the top of this file as well as a line that conditionally renders an error message if there is an error in the form’s state.
 return (
    <>
      <h2 className="flex justify-center">Login Here</h2>
      <form action={formAction}>
        <fieldset>
          <label htmlFor="usernameEmail">Username or Email</label>
          <input type="name" name="usernameEmail" />
        </fieldset>

        <fieldset>
          <label htmlFor="password">Password</label>
          <input type="password" name="password" />
        </fieldset>

        <SubmitButton />

        {state.error && (
          <p dangerouslySetInnerHTML={{ __html: state.error }}></p>
        )}
      </form>
    </>
  );
Code language: JavaScript (javascript)
This is what the flow looks like when you run it in the browser:
Handling WPGraphQL Mutations with Server Actions
We have gone over the boilerplate code that comes with the Faust.js App Router support package. Now, let’s take it and build on top of it, writing our own server action.
In this section, we will create functionality in our application that allows the user who is authenticated to create a post in a drafted state and then see the drafted post on a page via WPGraphQL mutation.
In order to follow along in this section, you can clone down and copy my GitHub repo here: https://github.com/Fran-A-Dev/next-14-faust-auth-example
The first file we want to look at is our file running the Server Action located at app/my-account/create-post/actions.ts:
"use server";

import { ApolloClient, gql, NormalizedCacheObject } from "@apollo/client";
import { redirect } from "next/navigation";
import { revalidatePath } from "next/cache";

const CREATE_POST_MUTATION = gql`
  mutation CreatePost($title: String!, $content: String!) {
    createPost(
      input: { content: $content, title: $title, status: DRAFT, authorId: "1" }
    ) {
      post {
        title
        content
      }
    }
  }
`;

async function createClient(): Promise<ApolloClient<NormalizedCacheObject>> {
  const client = await import("@faustwp/experimental-app-router").then(
    ({ getAuthClient }) => getAuthClient()
  );
  return client;
}

export async function addDraftPost(formData: FormData) {
  const client = await createClient();

  try {
    const { data } = await client.mutate({
      mutation: CREATE_POST_MUTATION,
      variables: {
        title: formData.get("title"),
        content: formData.get("content"),
      },
    });

    if (data?.createPost?.post) {
      console.log("Draft post created:", data.createPost.post);
    }
  } catch (error) {
    throw new Error("Could not create draft post.");
  } finally {
    revalidatePath("/my-account/drafts");
    redirect("/my-account/drafts");
  }
}

Code language: JavaScript (javascript)
At the top of the file, we use the directive to indicate that this code will run on the server.
We import the necessary modules and functions from the Apollo Client and Next.js for our GraphQL client and redirect as well as revalidation on the server for the new updated path when the user adds a post and gets redirected to that path.
Then we define our WPGraphQL mutation called CREATE_POST_MUTATION which is used to create a new post with a title and content in a draft status.
This asynchronous function, createClient, dynamically imports the Apollo client from the "@faustwp/experimental-app-router" module and returns it. The Apollo client will be used to make authenticated WPGraphQL requests.
async function createClient(): Promise<ApolloClient<NormalizedCacheObject>> {
  const client = await import("@faustwp/experimental-app-router").then(
    ({ getAuthClient }) => getAuthClient()
  );
  return client;
}


Code language: JavaScript (javascript)
Then we have a addDraftPost server action that is asynchronous and does the following:
- It initializes the Apollo client by calling the previously defined
createClientfunction. - It tries to execute the
CREATE_POST_MUTATIONusing the providedformData(which should have the title and content of the post). If the mutation is successful, it logs the details of the created draft post. - If any error occurs during the mutation, it throws an error indicating that the draft post could not be created.
- Regardless of success or failure, it will revalidate the cache for the path
"/my-account/drafts"and then redirect the user to the same path.
export async function addDraftPost(formData: FormData) {
  const client = await createClient();

  try {
    const { data } = await client.mutate({
      mutation: CREATE_POST_MUTATION,
      variables: {
        title: formData.get("title"),
        content: formData.get("content"),
      },
    });

    if (data?.createPost?.post) {
      console.log("Draft post created:", data.createPost.post);
    }
  } catch (error) {
    throw new Error("Could not create draft post.");
  } finally {
    revalidatePath("/my-account/drafts");
    redirect("/my-account/drafts");
  }
}


Code language: JavaScript (javascript)
Forms On The Server
Now that we have made our server action to run our WPGraphQL mutation and redirect every time a drafted post is successfully created, let’s add it to our form so it works.
The first file we will take a look at will be at app/my-account/create-post/CreatePost.tsx:
import SubmitButton from "@/components/SubmitButton";
import { addDraftPost } from "./actions";

export default function CreatePost() {
  return (
    <form action={addDraftPost} className="w-1/2">
      <label>
        <span>Title:</span>
        <input required type="text" name="title" />
      </label>
      <label>
        <span>Content:</span>
        <textarea required name="content" />
      </label>
      <SubmitButton />
    </form>
  );
}

Code language: JavaScript (javascript)
Starting at the top of the file we import our SubmitButton component that handles the form button submission and the addDraftPost function from the actions.ts file which is the server action we created.
Then we define the default function called CreatePost which renders a form that the user can input data into.
In the form element, the action prop is set to the addDraftPost function to call that function and handle the form submission on the server as we did earlier with our login form.
Lastly, we have our submit button for the user to press and submit the draft post data.
Next, let’s take a look at the SubmitButton component we are importing into this file from the components directory.
Nesting Components (Client & Server)
We have our WPGraphQL mutation that runs on the server to add a post in a drafted state. We also added Server Action to our CreatePost component to handle the post-data form submissions.
Similar to how Faust.js earlier in the article created a SubmitButton function in the same file as the login page, we will do it on the client in a separate file which will live in the components directory. Navigate to app/components/SubmitButton.tsx:
"use client";
import React from "react";

import { useFormStatus } from "react-dom";

const SubmitButton: React.FC = () => {
  const { pending } = useFormStatus();

  return (
    <button
      disabled={pending}
      className="bg-green-500 hover:bg-green-600 text-white font-semibold px-4 py-2 rounded"
    >
      {pending ? <span>Submitting...</span> : <span>Submit</span>}
    </button>
  );
};

export default SubmitButton;

Code language: JavaScript (javascript)
At the top of the file, we have the “use client” directive since this will be a client component.
Next, we import the React library and the useFormStatus hook which will provide us information about the status of a form, in our case if it is pending or not.
Following that, the SubmitButton component is defined as a functional component. Within the component, the useFormStatus hook is invoked to get the status of a form. The hook returns an object and it destructures the pending property from this object. If pending is true, it indicates that the form is in the process of being submitted, otherwise it is false and there is no ongoing operation.
Lastly, we return JSX in a button element. The disabled attribute of the button is based on the pending value. If pending is true the button will be disabled and if it is false the button will be enabled.
The button’s inner content changes based on the pending status. If the form is in the process of being submitted it shows “Submitting”, otherwise it shows “Submit”.
This is what the user flow should look like in the browser:
Nested Layouts
Next.js 14 makes it easy to nest layouts between route segments. This will allow us to keep a root layout that wraps nested layouts.
In our example here, we have a different layout and nav bar for the my-accounts route segment. The parent layout wraps around the nested layouts.
This comes in handy when you have a use case like this example where you have a public home page where any user can view it with a nav bar and layout which would be the parent. But when a user registers and becomes authenticated on an application, you want to give them a different nav bar and layout because they will have different access to features they would navigate to once authenticated.
This is the user’s layout and navigation that is not authenticated:
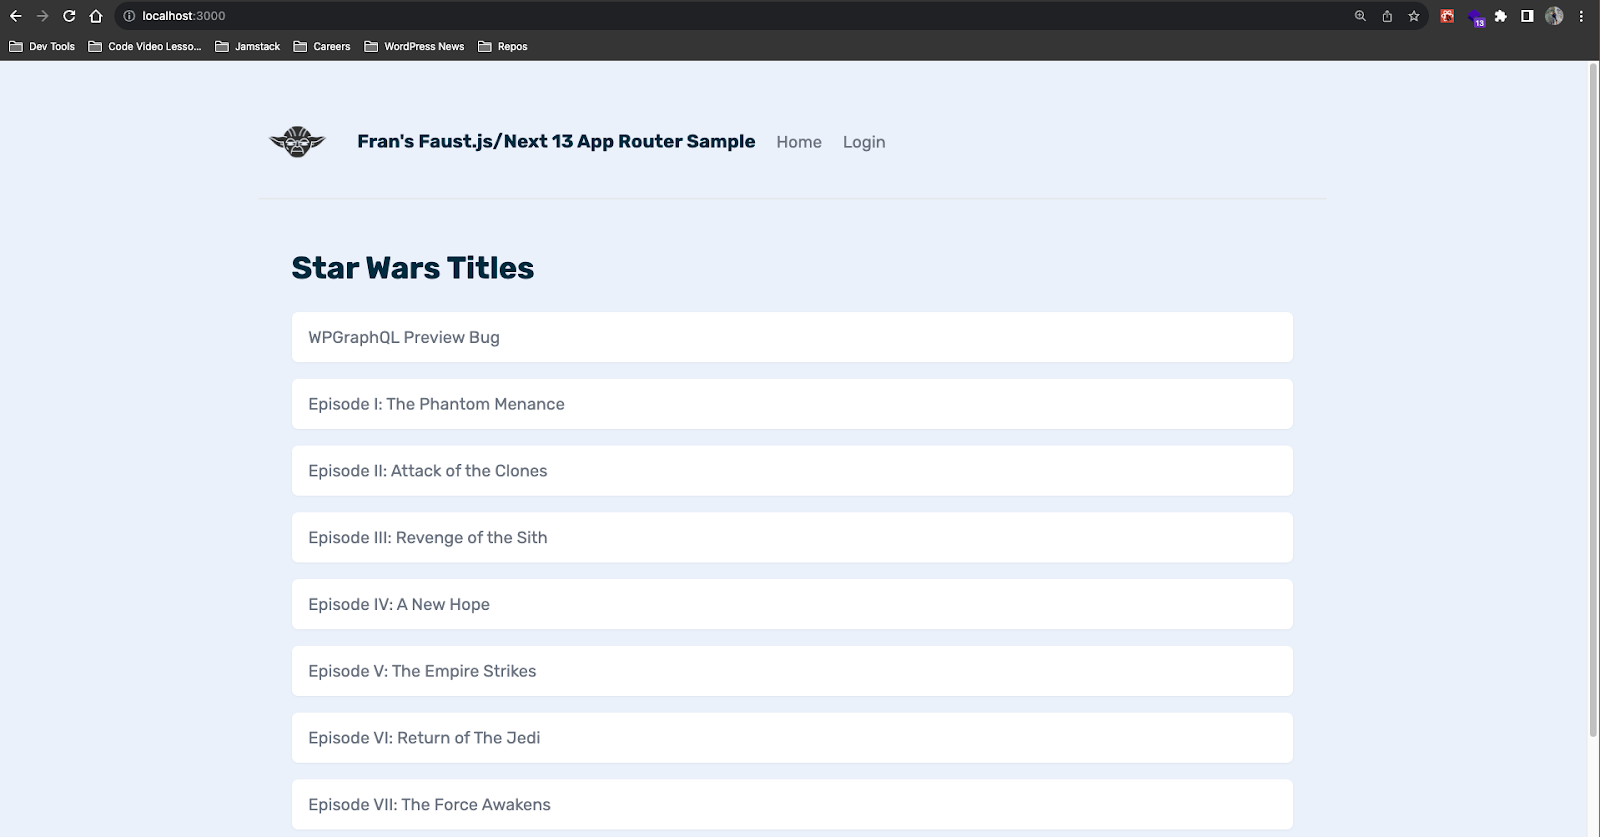
The Yoda image and navigation are for unauthenticated users with links to the home page and login page.
When a user is authenticated, they get this layout and navigation with a Darth Vader image and links to draft post capabilities and viewing drafts:

Conclusion
Faust.js with its App Router support for Next.14 is a new version of the headless WordPress framework on top of the latest version of Next. It introduces authentication handling out of the box, new ways to handle data, route segmentation, and files as well as rendering methods.
Overall, it makes it easier for developers to have a quicker time to ‘Hello World’ when creating headless WordPress applications.
As always, stoked to hear your feedback and any questions you might have on headless WordPress! Hit us up in our Discord!