This guide demonstrates how to build a full-stack headless WordPress application featuring a chatbot that provides accurate, contextually relevant responses using WP Engine’s new Smart Search AI MCP.
At the end of the article, we will have a chatbot that can call into your Smart Search AI MCP endpoint, which in turn leverages Smart Search to retrieve relevant content.
Table of Contents
Prerequisites
To benefit from this article, you should be familiar with the basics of working with the command line, headless WordPress development, Next.js, and the WP Engine User Portal.
Steps For Setting Up
1. Set up an account on WP Engine and get a WordPress install running. You can get a free headless platform sandbox here:
Headless
Platform
The all-in-one platform for
radically fast headless sites.
2. Add a Smart Search AI license. Refer to the docs here for adding a license After you add the license, opt in for the Smart Search AI MCP.
3. Navigate to the WP Admin of your install. Inside your WP Admin, go to WP Engine Smart Search > Settings. You will find your Smart Search AI MCP URL here. Currently, this shows your GraphQL endpoint. This is correct and what you want to see.
What you need to do is manually remove the /graphql and add /mcp.
So your endpoint should look like this after replacing it:
https://your-wpenginesite-0999A-atlassearch-fkdfjckuaa-uc.a.run.app/mcp
Code language: JavaScript (javascript)
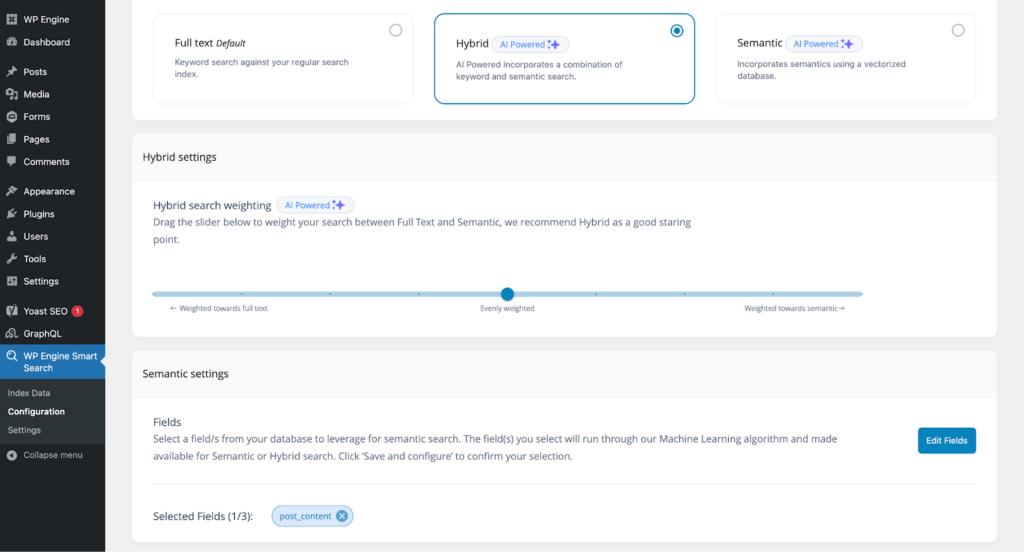
4. Next, navigate to Configuration, select the Hybrid card, and add the `post_content` and `post_title` fields in the Semantic settings section. We are going to use this field as our AI-powered field for similarity searches. Make sure to hit Save Configuration afterward.
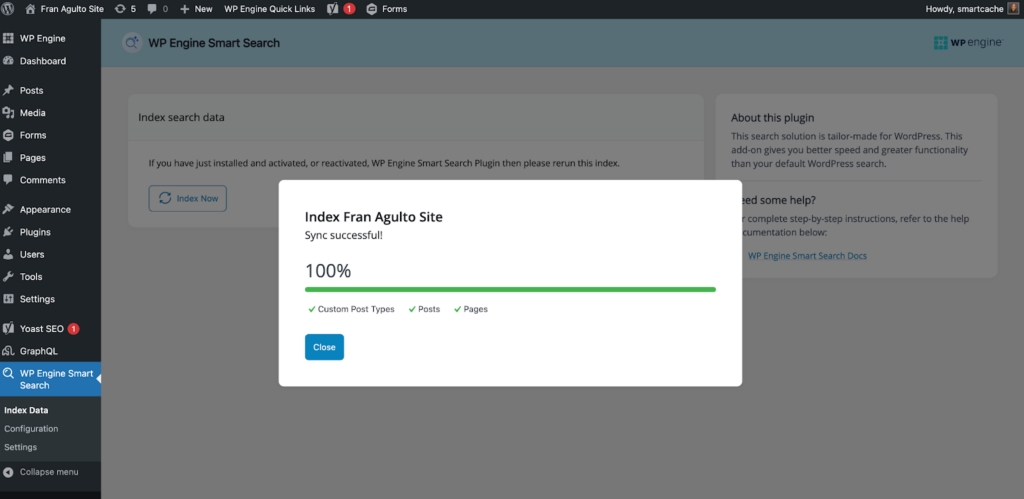
5. After saving the configuration, head on over to the Index data page, then click Index Now. It will give you this success message once completed :
6. Create an API account on Google Gemini (Or whatever AI model you choose, e.g., OpenAI API). Once created, navigate to your project’s dashboard. If you are using Gemini API, go to the Google AI Studio. In your project’s dashboard, go to API Keys. You should see a page like this:
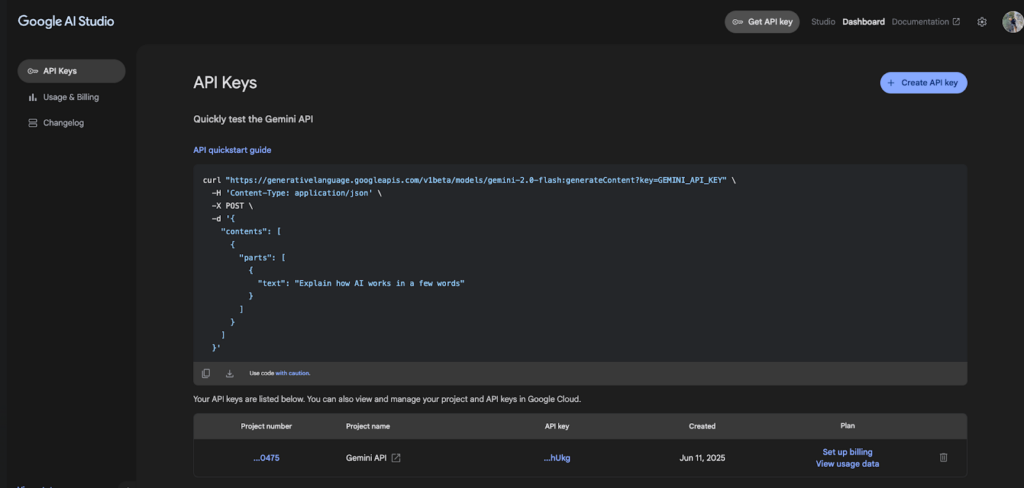
Generate a new key, copy, and save your API key because we will need this later. The API key is free on Google Gemini, but the free tier has limits.
7. Head over to your terminal or CLI and create a new Next.js project by pasting this utility command in:`npx create-next-app@latest name-of-your-app`
You will receive prompts in your terminal asking you how you want your Next.js app scaffolded. Answer them accordingly:
Would you like to use TypeScript? Yes
Wold you like to use ESLint? Yes
Would you like to use Tailwind CSS? Yes
Would you like to use the `src/` directory? Yes
Would you like to use App Router? Yes
Would you like to customize the default import alias (@/*)? No
Code language: JavaScript (javascript)
Once your Next.js app is created, you will need to install the dependencies needed to ensure our app works. Copy and paste this command in your terminal:
npm install @ai-sdk/google react-icons react-markdown @modelcontextprotocol/sdk @ai-sdk/react @ai

Code language: CSS (css)
Note: We are using Google’s AI sdk for this article. Please refer to the docs in relation to whatever AI model you choose. You can download their npm package.
Once the Next project is done scaffolding, cd into the project and then open up your code editor.
8. In your Next project, create a `.env.local` file with the following environment variables:
GOOGLE_GENERATIVE_AI_API_KEY="<your key here>"(if you chose another AI model, you can name this key whatever you want)

AI_TOOLKIT_MCP_URL="<your smart search mcp url here>"
Code language: JavaScript (javascript)
Here is the link to the final code repo so you can check step by step and follow along.
Calling The WP Engine Smart Search AI MCP Server From Next.js
The first thing we need to do is set up the request to Smart Search AI MCP with the Vercel AI SDK. Create a file in the `src/app` directory called `api/chat/route.ts`. Copy the code below and paste it into that file:
// IMPORTANT! Set the runtime to edge
export const runtime = "edge";

import {
  convertToCoreMessages,
  experimental_createMCPClient,
  Message,
  streamText,
} from "ai";
import { createGoogleGenerativeAI } from "@ai-sdk/google";

import { weatherTool } from "@/app/utils/tools";
import { StreamableHTTPClientTransport } from "@modelcontextprotocol/sdk/client/streamableHttp.js";

const httpTransport = new StreamableHTTPClientTransport(
  new URL(process.env.AI_TOOLKIT_MCP_URL || "http://localhost:8080/mcp")
);

const client = await experimental_createMCPClient({
  transport: httpTransport,
});

/**
 * Initialize the Google Generative AI API
 */
const google = createGoogleGenerativeAI();

export async function POST(req: Request) {
  try {
    const aiTkTools = await client.tools();
    const { messages }: { messages: Array<Message> } = await req.json();

    const coreMessages = convertToCoreMessages(messages);

    const smartSearchPrompt = `
    - You can use the 'search' tool to find information relating to tv shows.
      - WP Engine Smart Search is a powerful tool for finding information about TV shows.
      - After the 'smartSearchTool' provides results (even if it's an error or no information found)
      - You MUST then formulate a conversational response to the user based on those results but also use the tool if the users query is deemed plausible.
        - If search results are found, summarize them for the user.
        - If no information is found or an error occurs, inform the user clearly.`;

    const systemPromptContent = `
    - You are a friendly and helpful AI assistant
    - You can use the 'weatherTool' to provide current weather information for a specific location.
    - Do not invent information. Stick to the data provided by the tool.`;

    const response = streamText({
      model: google("models/gemini-2.0-flash"),
      system: [smartSearchPrompt, systemPromptContent].join("\n"),
      messages: coreMessages,
      tools: {
        // smartSearchTool,
        weatherTool,
        ...aiTkTools,
      },
      onStepFinish: async (result) => {
        // Log token usage for each step
        if (result.usage) {
          console.log(
            `[Token Usage] Prompt tokens: ${result.usage.promptTokens}, Completion tokens: ${result.usage.completionTokens}, Total tokens: ${result.usage.totalTokens}`
          );
        }
      },
      maxSteps: 5,
    });
    // Convert the response into a friendly text-stream
    return response.toDataStreamResponse({});
  } catch (e) {
    throw e;
  }
}
Code language: JavaScript (javascript)
This Edge API route wires your chat endpoint to both Google’s Gemini (via the Vercel AI SDK) and the Smart Search AI MCP server. It first creates a streaming-capable MCP HTTP transport pointed at AI_TOOLKIT_MCP_URL, builds an MCP client, and fetches the server-advertised tools at request time (client.tools()).
Incoming chat messages from the client are normalized with convertToCoreMessages, and two concise system prompts instruct the model on how to use tools: a “search” tool (backed by WP Engine Smart Search via MCP) and a local weatherTool. The prompts emphasize not inventing facts and summarizing search results (including the “no results” case).
With that context, streamText runs gemini-2.0-flash, exposes weatherTool plus all MCP tools (…aiTkTools) to the model, and streams the assistant’s reply back to the browser. The SDK may invoke tools during reasoning (up to maxSteps: 5). After each step, the handler logs token usage for basic observability.
Finally, toDataStreamResponse returns a chunked HTTP response so the UI can render tokens as they arrive—giving you a real-time, tool-augmented chat experience that queries Smart Search through your MCP server when needed.
Create UI Components For The Chat Interface
In this section, let’s create our components to render the UI.
Chat.tsx
In the `src/app` directory, create a `components` folder. Then create a `Chat.tsx` file. Copy and paste this code block into that file:
"use client";

import React, { ChangeEvent } from "react";
import Messages from "./Messages";
import { Message } from "ai/react";
import LoadingIcon from "../Icons/LoadingIcon";
import ChatInput from "./ChatInput";

interface Chat {
  input: string;
  handleInputChange: (e: ChangeEvent<HTMLInputElement>) => void;
  handleMessageSubmit: (e: React.FormEvent<HTMLFormElement>) => void;
  messages: Message[];
  status: "submitted" | "streaming" | "ready" | "error";
}

const Chat: React.FC<Chat> = ({
  input,
  handleInputChange,
  handleMessageSubmit,
  messages,
  status,
}) => {
  return (
    <div id="chat" className="flex flex-col w-full mx-2">
      <Messages messages={messages} />
      {status === "submitted" && <LoadingIcon />}
      <form
        onSubmit={handleMessageSubmit}
        className="ml-1 mt-5 mb-5 relative rounded-lg"
      >
        <ChatInput input={input} handleInputChange={handleInputChange} />
      </form>
    </div>
  );
};

export default Chat;
Code language: JavaScript (javascript)
This file defines a client-side React Chat component that ties together your message list, input field, and loading indicator. It declares a Chat props interface—containing the current input value, change and submit handlers, the array of chat messages, and a status flag—and uses those props to control its rendering.
Inside the component, it first renders the <Messages> list to show the conversation history. If the status is “submitted”, it displays a <LoadingIcon> spinner to indicate that a response is pending. Finally, it renders a <form> wrapping a <ChatInput> component wired to the provided input value and change handler, so users can type and submit new messages.
Messages Component
Staying in the `src/app/components` directory, create a Messages.tsx file. Copy and paste this code block in:
import { Message } from "ai";
import { useEffect, useRef } from "react";
import ReactMarkdown from "react-markdown";

export default function Messages({ messages }: { messages: Message[] }) {
  const messagesEndRef = useRef<HTMLDivElement | null>(null);
  useEffect(() => {
    messagesEndRef.current?.scrollIntoView({ behavior: "smooth" });
  }, [messages]);
  return (
    <div
      className="border-1 border-gray-100 overflow-y-scroll flex-grow flex-col justify-end p-1"
      style={{ scrollbarWidth: "none" }}
    >
      {messages.map((msg, index) => (
        <div
          key={index}
          className={`${
            msg.role === "assistant" ? "bg-green-500" : "bg-blue-500"
          } my-2 p-3 shadow-md hover:shadow-lg transition-shadow duration-200 flex slide-in-bottom bg-blue-500 border border-gray-900 message-glow`}
        >
          <div className="ml- rounded-tl-lg  p-2 border-r flex items-center">
            {msg.role === "assistant" ? "🤖" : "🧒🏻"}
          </div>
          <div className="ml-2 text-white">
            <ReactMarkdown>{msg.content}</ReactMarkdown>
          </div>
        </div>
      ))}
      <div ref={messagesEndRef} />
    </div>
  );
}
Code language: JavaScript (javascript)
The Messages component renders a scrollable list of chat messages, automatically keeping the view scrolled to the latest entry. It accepts a messages prop (an array of Message objects) and uses a ref to an empty <div> at the bottom; a useEffect hook watches for changes to the messages array and calls scrollIntoView on that ref so new messages smoothly come into view.
Each message is wrapped in a styled <div> whose background color and avatar icon depend on the message’s role (“assistant” vs. “user”), and the text content is rendered via ReactMarkdown to support Markdown formatting.
Chat Input Component
Lastly, staying in the `components/Chat` directory, we have the chat input. Create a `ChatInput.tsx` file and copy and paste this code block in:
import { ChangeEvent } from "react";
import SendIcon from "../Icons/SendIcon";

interface InputProps {
  input: string;
  handleInputChange: (e: ChangeEvent<HTMLInputElement>) => void;
}

function Input({ input, handleInputChange }: InputProps) {
  return (
    <div className="bg-gray-800 p-4 rounded-xl shadow-lg w-full max-w-2xl mx-auto">
      <input
        type="text"
        value={input}
        onChange={handleInputChange}
        placeholder={"Ask Smart Search about TV shows..."}
        className="w-full bg-transparent text-gray-200 placeholder-gray-500 focus:outline-none text-md mb-3"
      />
      <div className="flex">
        <button
          type="submit"
          className="p-1 hover:bg-gray-700 rounded-md transition-colors ml-auto"
          aria-label="Send message"
          disabled={!input.trim()}
        >
          <SendIcon />
        </button>
      </div>
    </div>
  );
}

export default Input;
Code language: JavaScript (javascript)
This file exports an Input component that renders a styled text field and send button for your chat UI. It takes an input string and a handleInputChange callback to keep the input controlled, showing a placeholder prompt (“Ask Smart Search about TV shows…”). The send button, decorated with a SendIcon, is disabled when the input is empty or just whitespace.
Update the page.tsx Template
We need to modify the src/app/page.tsx file to add the Chat component to the page. In the page.tsx file, copy and paste this code:
"use client";
import Chat from "./components/Chat/Chat";
import { useChat } from "@ai-sdk/react";
import { useEffect } from "react";

const Page: React.FC = () => {
  const {
    messages,
    input,
    handleInputChange,
    handleSubmit,
    setMessages,
    status,
  } = useChat();

  useEffect(() => {
    if (messages.length < 1) {
      setMessages([
        {
          role: "assistant",
          content: "Welcome to the Smart Search chatbot!",
          id: "welcome",
        },
      ]);
    }
  }, [messages, setMessages]);

  return (
    <div className="flex flex-col justify-between h-screen bg-white mx-auto max-w-full">
      <div className="flex w-full flex-grow overflow-hidden relative bg-slate-950">
        <Chat
          input={input}
          handleInputChange={handleInputChange}
          handleMessageSubmit={handleSubmit}
          messages={messages}
          status={status}
        />
      </div>
    </div>
  );
};

export default Page;
Code language: JavaScript (javascript)
This file defines our page component that leverages the useChat hook from the @ai-sdk/react package to manage chat state, including messages, input text, submission handler, and status.
Upon initial render, a useEffect hook checks if there are no messages and injects a default assistant greeting. The component returns a full-viewport flexbox layout with a styled background area in which it renders the Chat component, passing along the chat state and handlers.
Update The layout.tsx File With Metadata
We need to add metadata to our layout. Copy and paste this code block into the `src/app/layout.tsx` file:
import type { Metadata } from "next";
import { Inter } from "next/font/google";
import "./globals.css";

const inter = Inter({ subsets: ["latin"] });

export const metadata: Metadata = {
  title: "Smart Search RAG",
  description: "Lets make a chatbot with Smart Search",
};

export default function RootLayout({
  children,
}: Readonly<{
  children: React.ReactNode;
}>) {
  return (
    <html lang="en">
      <body className={inter.className}>{children}</body>
    </html>
  );
}
Code language: JavaScript (javascript)
This file configures the global layout and metadata for the app: it imports global styles, loads the Inter font, and sets the page title and description. The default RootLayout component wraps all page content in <html> and <body> tags, applying the Inter font’s class to the body.
CSS Note: The last thing to add for the styling is the globals.css file. Visit the code block here and copy and paste it into your project.
Test The ChatBot’s Dynamism
The chatbot should be completed and testable in this state. In your terminal run `npm run dev` and navigate to http://localhost:3000. Try asking the chatbot a few questions.
After you ask it a few questions related to your WordPress content, ask it something about a subject that is not in your WordPress content. The AI will try to fetch what you asked for knowing what tooling it has via MCP. It will know that the content does not exist in your WordPress site via Smart Search.
Now, try adding a new post with a title and content. It could be any topic. Publish the post and then ask the chatbot about the subject. It should give you the relevant content you are asking for in natural language.
You should see this experience in your browser:
Conclusion
We hope this article helped you understand how to create a chatbot with WP Engine’s Smart Search AI MCP server headless WordPress! Stay tuned for the next article on using this in traditional WordPress!!
As always, we’re super stoked to hear your feedback and learn about the headless projects you’re working on, so hit us up in the Headless WordPress Discord!