This tutorial will teach you how to build search functionality into your headless WordPress site using WP Engine Smart Search, Faust.js, and Advanced Custom Fields. It assumes a basic understanding of JavaScript, React fundamentals, GraphQL fundamentals, and WordPress.
By the end of this tutorial, you will be able to:
- Configure a WP Engine Smart Search license
- Create custom post types and fields using Advanced Custom Fields
- Run test queries to get ACF data using WP Engine Smart Search in the GraphiQL IDE
- Use Faust.js and Apollo Client to fetch ACF data
- Build out a search page in our Faust.js app
Table of Contents
About WP Engine Smart Search
WP Engine Smart Search is a paid Add-on for WP Engine customers that improves search for both headless and traditional WordPress applications. It takes over the default WordPress search functionality and aims to improve search relevance, support advanced search query operators, and add support for advanced WordPress data types. The key benefit of WP Engine Smart Search is that it returns more accurate search results and even integrates with ACF (custom post types, taxonomies, post meta).
You can follow this tutorial without using WP Engine Smart Search; however, the ACF data may not return in your search results as expected.
Read the WP Engine Smart Search documentation for information about how to configure a license.
Read our ‘What is WP Engine Smart Search?’ article for more general information about the plugin.
Requirements
Node and NPM
To get started, you must install both Node.js and npm. If you aren’t sure whether or not you have this software installed, you can run the following commands in your terminal:
node -v
npm -v
The terminal output should either tell you which versions you have installed or that it cannot find the commands node or npm to run them. Using a tool like nvm (Node Version Manager) to install and manage versions of Node.js on your machine can be helpful when working on multiple projects.
WordPress Site and Plugins
You will also need to have a WordPress instance created in WP Engine’s dashboard. Your site should have these plugins already installed:
WP Engine Smart Search
To use WP Engine Smart Search, you must first purchase a license from WP Engine. Licenses are currently available for Premium and Atlas plans.
To purchase a license for an Atlas plan, either select WP Engine Smart Search as an Add-on when signing up for a plan or purchase it through the Add-ons page of the existing plan.
Enable the WP Engine Smart Search License
We have a WordPress site in WP Engine’s portal with the required plugins.
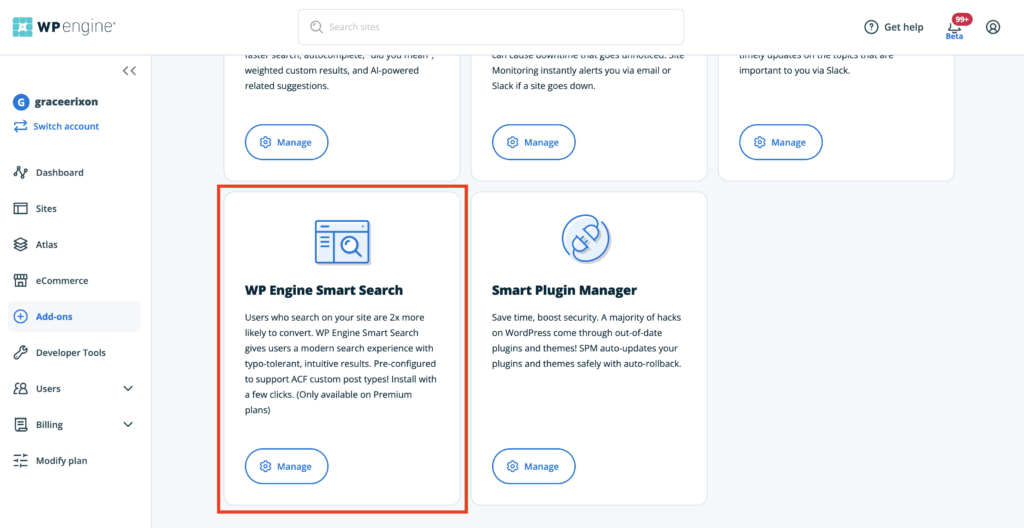
In the WP Engine User Portal, select the Add-ons tab in the left menu.
We already have a WP Engine Smart Search license, so you can click Manage and then Select environments.
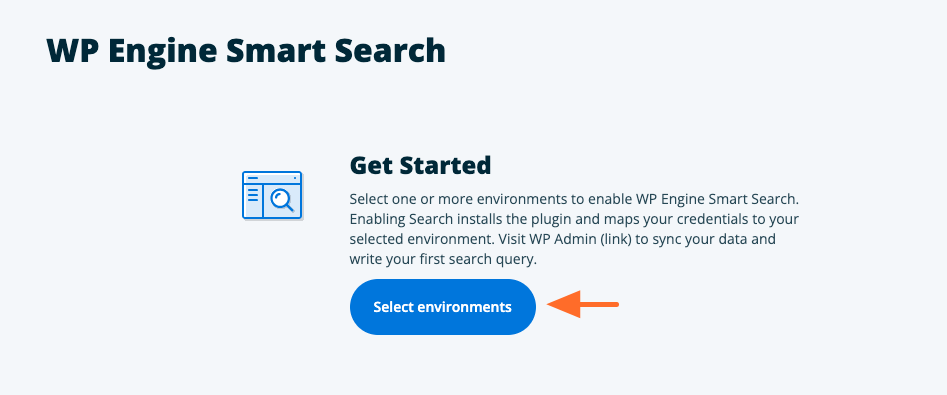
Find the site on which you want to add WP Engine Smart Search and select the checkbox next to its name. Click Add Environment and Confirm.
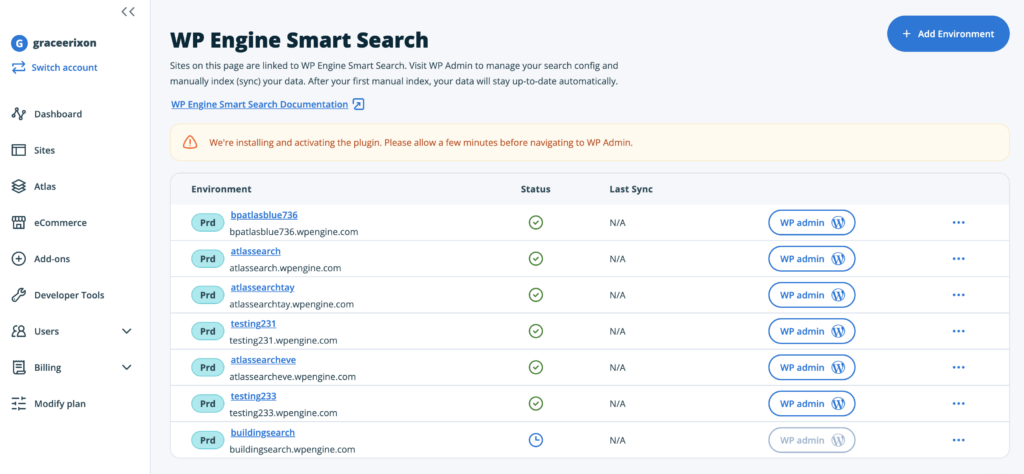
You should see a banner alerting you that the plugin is being installed and activated. It will take a minute for everything to get set up.
Set Up a Faust.js App
While we wait for the WP Engine Smart Search license, we can set up the Faust.js application for the front-end of our site. Faust.js is a JavaScript framework designed to make building headless WordPress sites easy!
To create a new Faust.js project, open up your terminal and run this command:
npx create-next-app \
    -e https://github.com/wpengine/faustjs/tree/main \
    --example-path examples/next/faustwp-getting-started \
    --use-npm
Code language: PHP (php)
You can name the site whatever you want.
Now, cd into your new app and copy the sample environment template:
cp .env.local.sample .env.local
Code language: CSS (css)
Finally, run the dev server:
npm run dev
You can now visit http://localhost:3000 to see your new project. Currently, the posts and pages you see come from our WordPress site at https://faustexample.wpengine.com. We will show you how to hook up your own WordPress site later.
Set Up WP Engine Smart Search
Let’s check if the WP Engine Smart Search license has finished applying to the new WordPress site! Reload the page, and the status symbol should show a green check mark. If you hover over this symbol, a pop-up should say, ‘WP Engine Smart Search is ready to use.’
Open up the WordPress Admin page for your site. Click on the Plugins page to see that the WP Engine Smart Search plugin was installed for us.
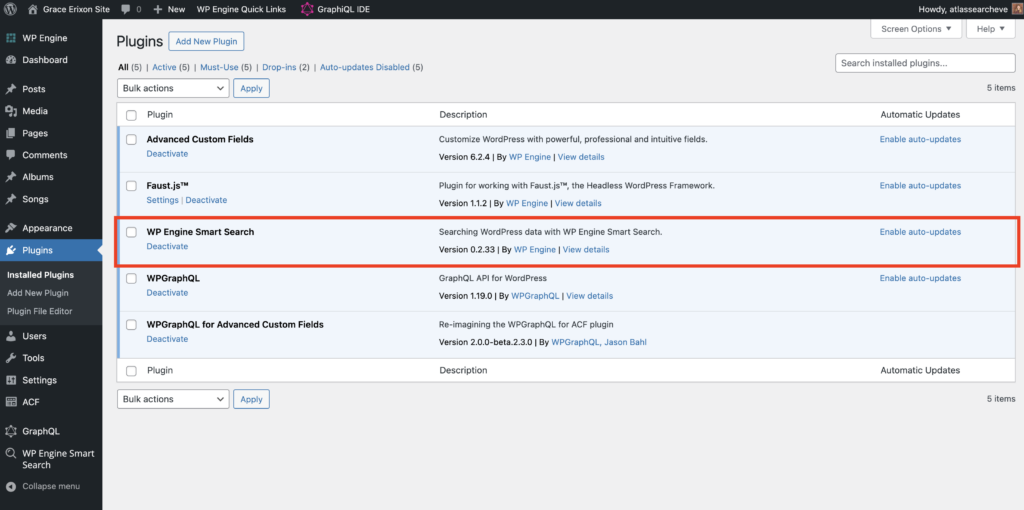
Then, go to the WP Engine Smart Search > Settings on the left menu. Here, you can see that the URL and Access Token were already set up for you as well.
Go to WP Engine Smart Search > Sync. Click the Synchronize Now button to connect all the data on our WordPress site with the WP Engine Smart Search plugin.
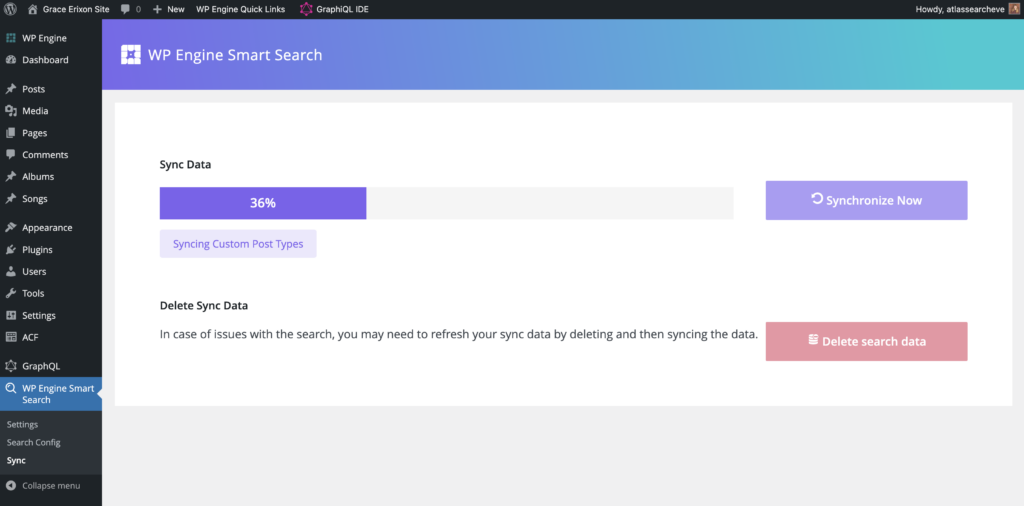
You only need to run this once – the sync is automatically updated whenever you add, edit, or delete content.
How WP Engine Smart Search Works
When a search request is detected in WordPress, WP Engine Smart Search intercepts it. We load the search configuration for search, which includes determining the fields to include and weighting configuration from the Search Config page that we will show later. The search query is executed against our ElasticSearch backend, and results are returned. WordPress hydrates the records for each result returned and returns the data to the original caller, such as HTML search or WPGraphQL.
The sync button iterates through all records for posts, pages, custom post types, etc. The plugin extracts data from each object type, including taxonomies and ACF fields. Each record is then synced (or indexed). Once completed, any changes to posts/pages/CPTs are incrementally synchronized as content is created, edited, or deleted.
Finish Setup of Headless Plugins
We just need to finish configuring a few other things before our site is ready to be built.
WPGraphQL Settings
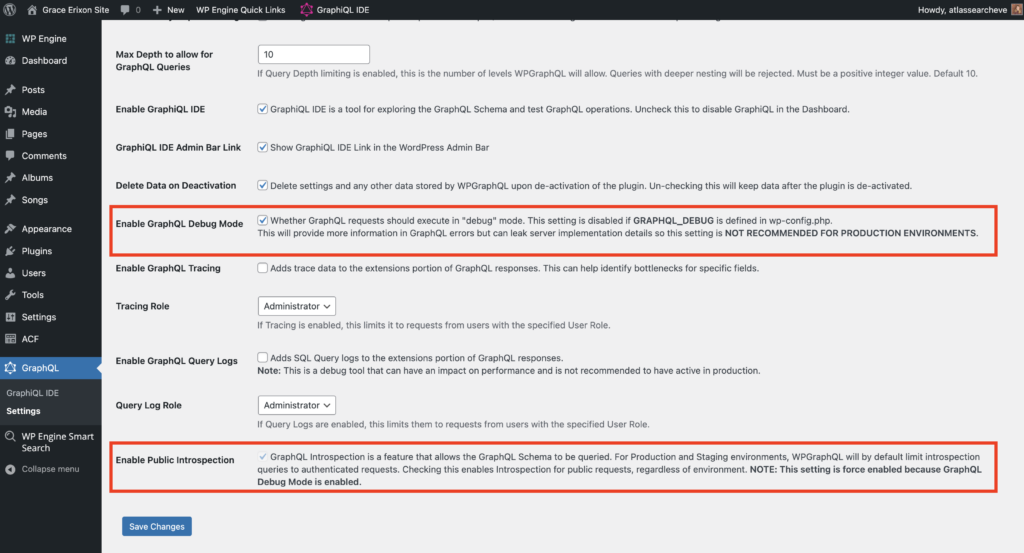
Navigate to the GraphQL > Settings page. Select the checkboxes to Enable GraphQL Debug Mode and Enable Public Introspection. Click Save Changes.
Faust.js Settings
Navigate to the Settings > Faust page. We need to set the Front-end site URL to our localhost where the Faust.js site is running.
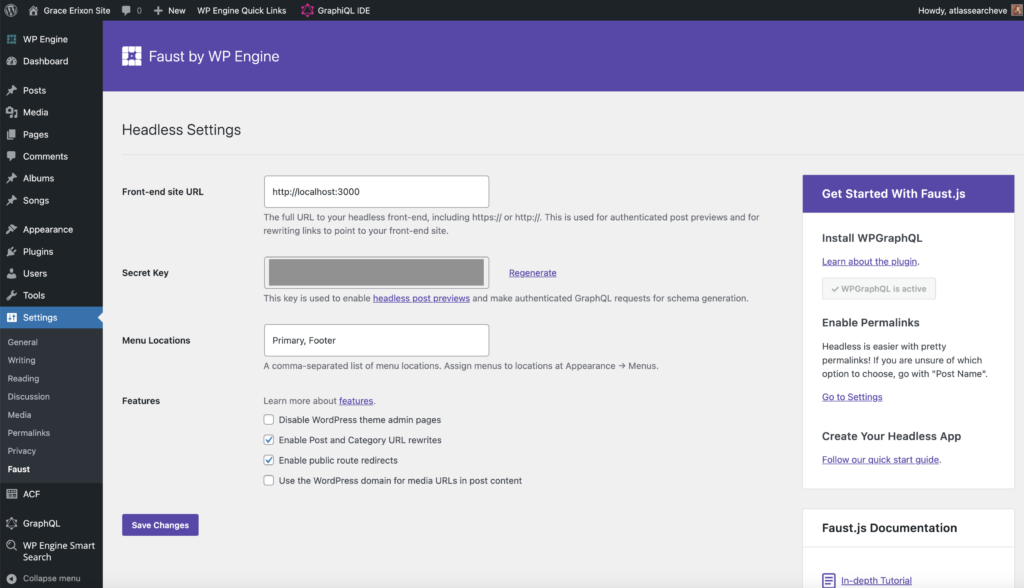
Then, copy the Secret Key. Open your Faust.js app in a code editor and paste the Secret Key into the .env.local file where it says FAUST_SECRET_KEY=YOUR_PLUGIN_SECRET as the new value.
Copy the URL of the WordPress site and paste that as the new value for NEXT_PUBLIC_WORDPRESS_URL.
Create ACF Data
For this tutorial, we must create two Post Types – Albums and Songs – with corresponding field groups.
Create Songs in ACF
Songs Post Type
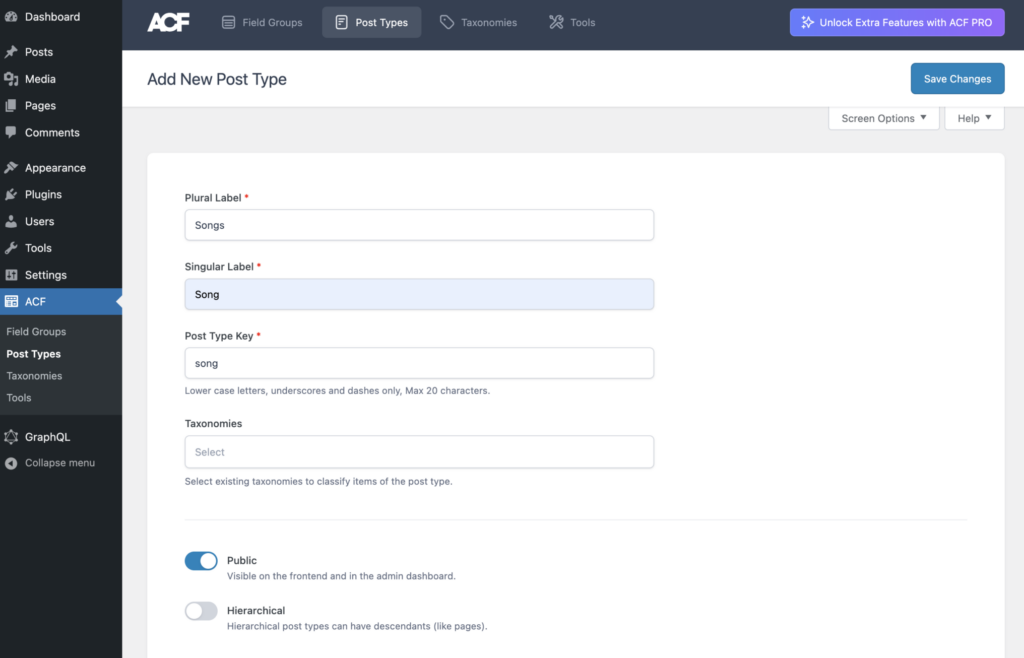
Let’s create our Songs post type first since it’s a bit simpler. We’ll go to ACF > Post Types in the WordPress Admin sidebar, bringing us to this page where we can add a new post type.
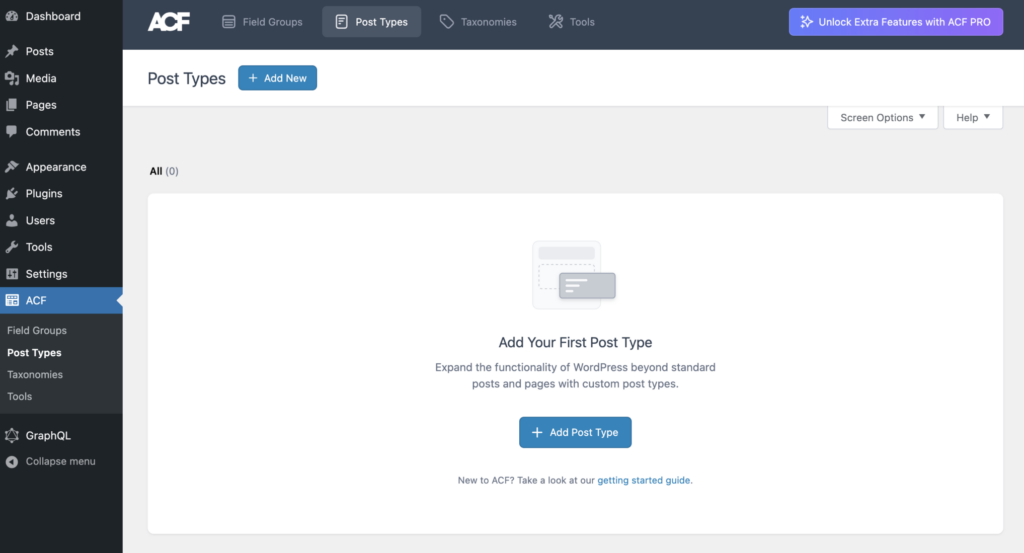
Click + Add New and fill out the following fields:
- Set Plural Label to “Songs”
- Set Singular Label to “Song”
- Set Post Type Key to “song”
The post type still needs to be shown in GraphQL so we can access the posts we create. Further down on this screen, click the slider for Advanced Configuration. Select the furthest right tab titled GraphQL and enable the Show in GraphQL slider. The autogenerated GraphQL Single Name and GraphQL Plural Name can be kept without editing.
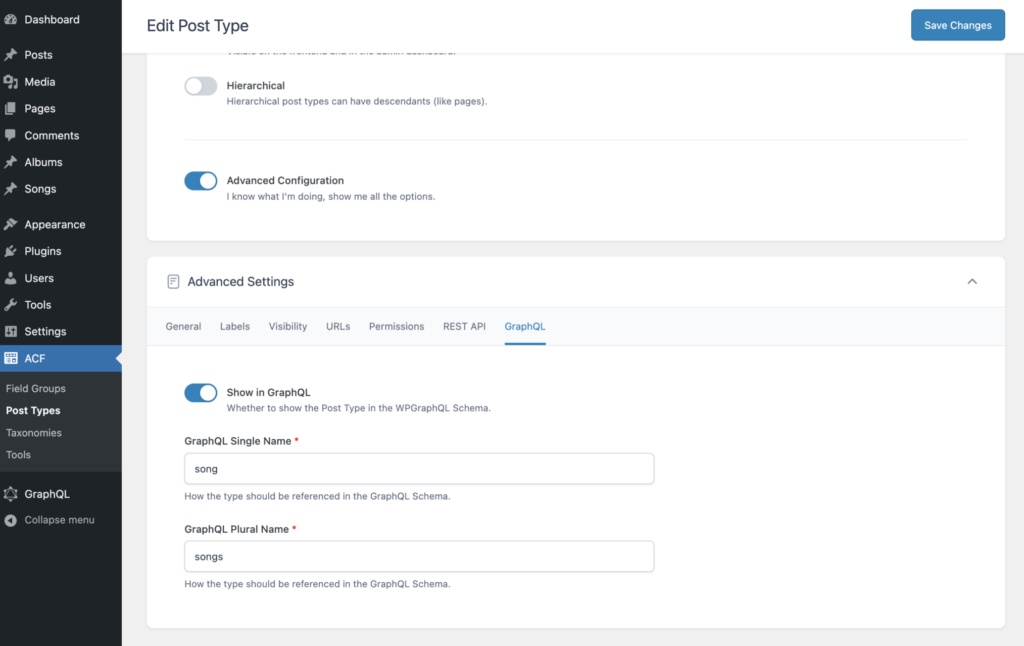
Then click the Save Changes button to create the new post type.
In the WordPress Admin sidebar, you’ll see that a menu item has been added for our new Songs custom post type.
Songs Custom Fields
After saving, you will get a success banner on the top of the screen alerting you that the Songs post type was created. There are several options underneath this message. Click on the first option to Add fields to Songs.
This will navigate you to the form to add a new field group and auto-fill the title of this field group as “Song fields.” We can create all the fields that should belong to a song within this form.
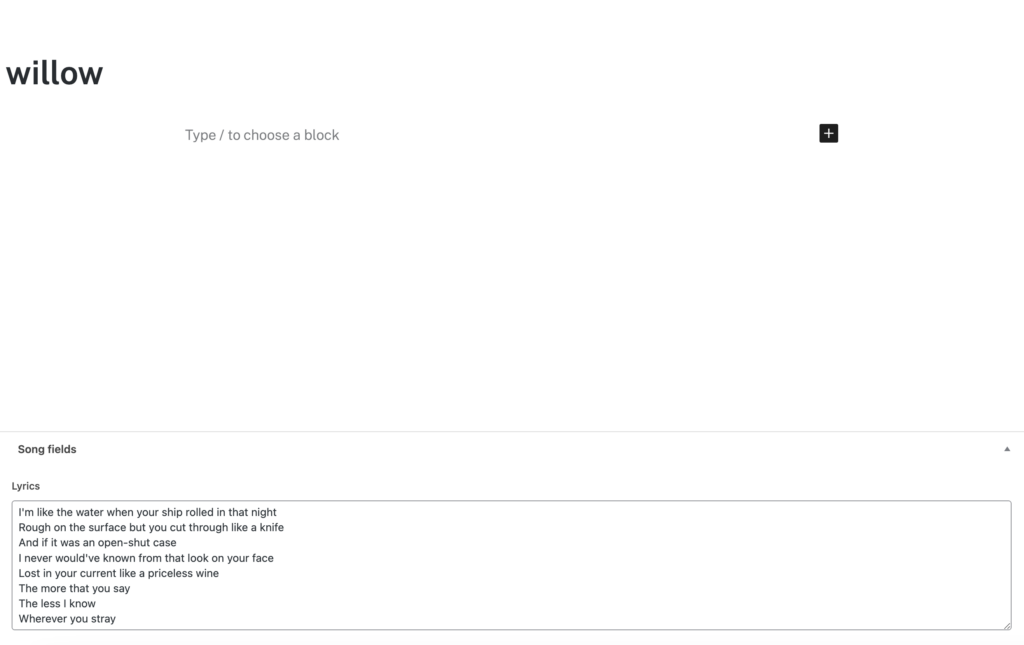
Our only field in this example will be the song’s lyrics. We’ll set the field up like this:
- Select Text Area for the Field Type
- Enter a Field Label of “Lyrics”
- Stick with the auto-generated Field Name of “lyrics”
Scroll down past the Fields section to the Settings section. Ensure the Rules say, “Show this field group if Post Type is equal to Song.”
Then, just below the Settings section (and the ACF PRO ad), in the GraphQL section, check the slider for Show in GraphQL to access this data in our frontend app.
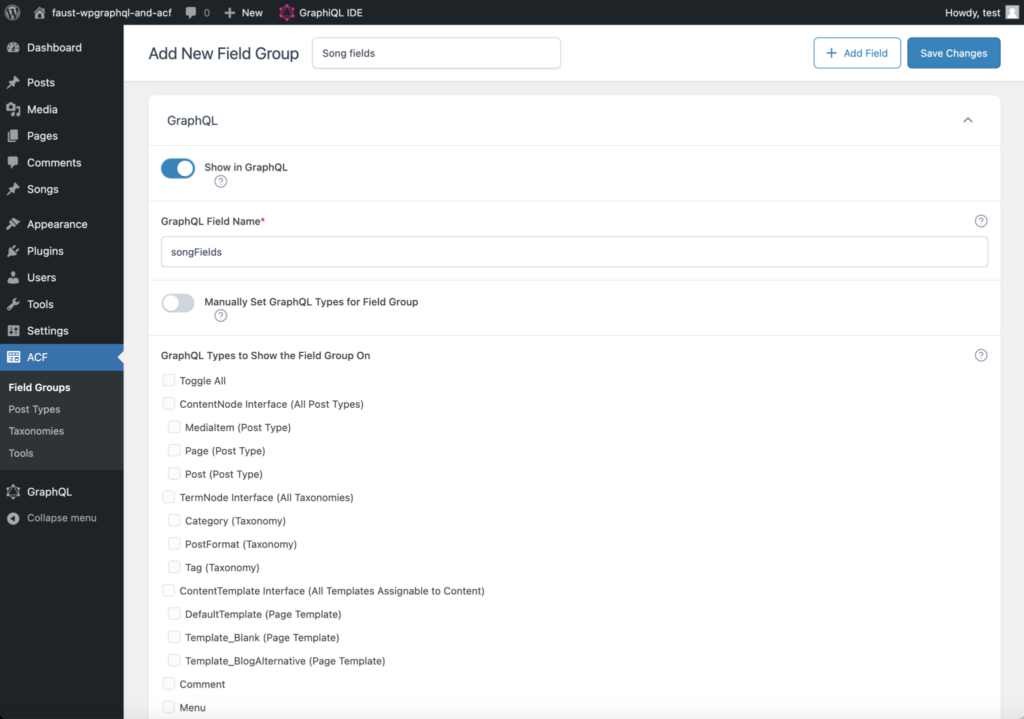
Click Save Changes at the top of the screen.
That’s it for our Songs custom post type and custom fields! Now, let’s turn to the Albums post type.
Create Albums in ACF
Albums Post Type
In the WordPress Admin sidebar, navigate again to ACF > Post Types to add a new post type.
Click + Add New and fill out the following fields:
- Set Plural Label to “Albums”
- Set Singular Label to “Album”
- Set Post Type Key to “album”
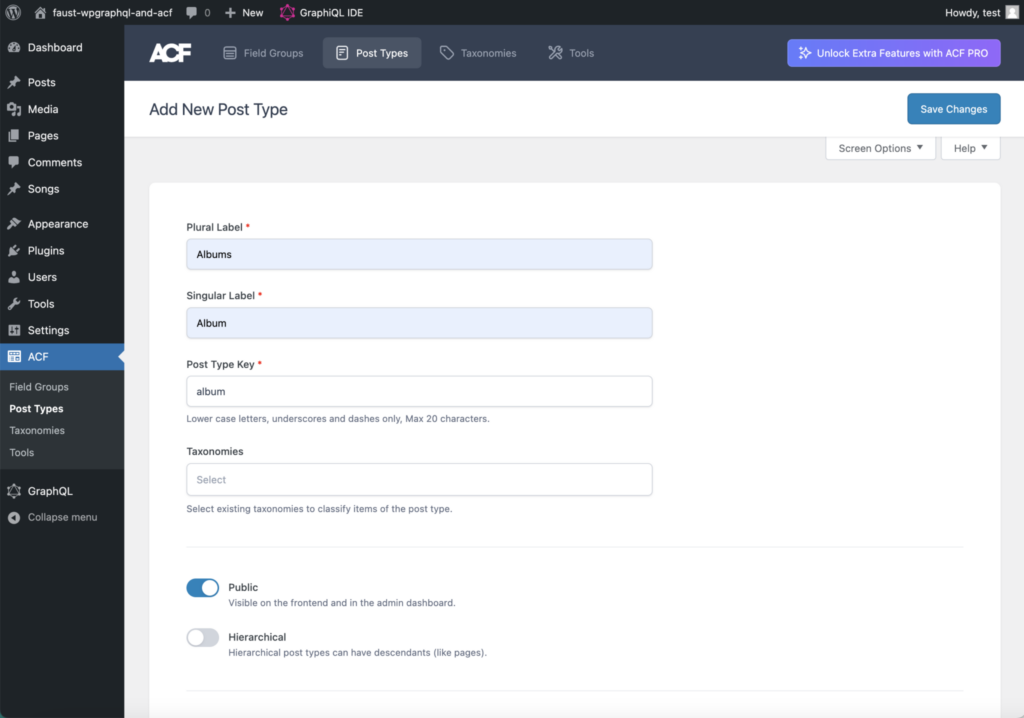
Just as we did with the Song post type, we need to enable the Album post type to be shown in GraphQL. Further down on this screen, click the slider for Advanced Configuration. Select the furthest right tab titled GraphQL and enable the Show in GraphQL slider. The autogenerated GraphQL Single Name and GraphQL Plural Name can be kept without editing.
Then click the Save Changes button to create the new post type.
In the WordPress Admin sidebar, you’ll see that a menu item has been added for our new Albums custom post type.
Albums Custom Fields
After saving, you will get a success banner on the top of the screen alerting you that the Albums post type was created. Click on the link to Add fields to Albums.
This will navigate you to the form to add a new field group and auto-fill the title of this field group as “Album fields.” We can create all the fields that should belong to an album within this form.
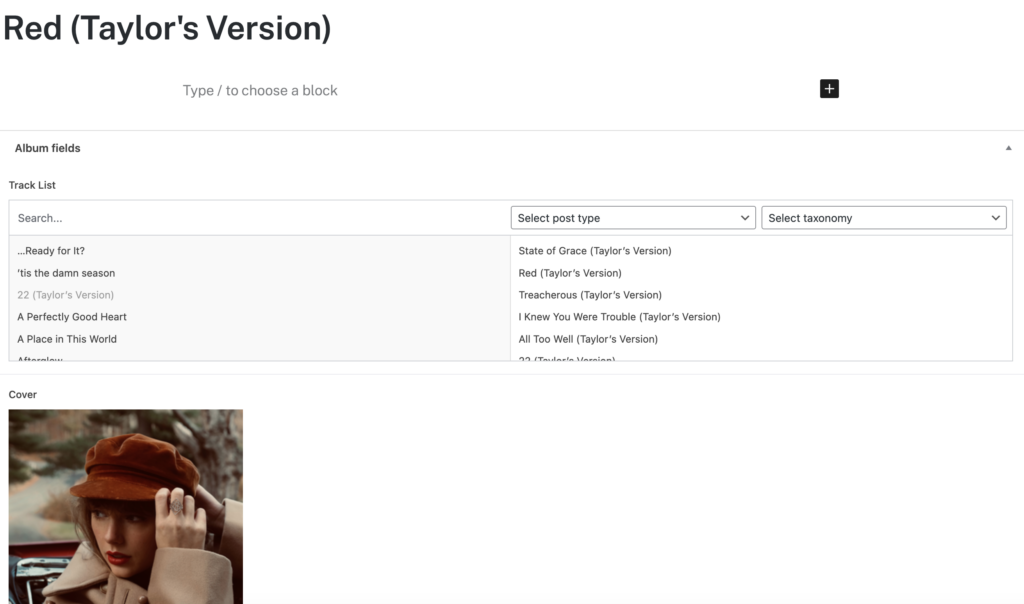
We’ll create the Cover and Track List fields similarly to how we did the lyrics field for Songs.
The Cover field will look like this:
- Select Image for the Field Type
- Enter a Field Label of “Cover”
- Stick with the auto-generated Field Name of “cover”
- Select “Image ID” as the Return Format
- Select “All” for the Library
The Track List field will look like this:
- Select Relationship for the Field Type
- Enter a Field Label of “Track List”
- Stick with the auto-generated Field Name of “track_list”
- Select “Song” for the Filter by Post Type
- Leave Filter by Taxonomy blank and leave all options for Filters checked
- Select “Post Object” for the Return Format
Finally, scroll down past the Fields section to the Settings section. Ensure the Rules say, “Show this field group if Post Type is equal to Album.”
Then, just below the Settings section (and the ACF PRO ad), in the GraphQL section, check the slider for Show in GraphQL to access this data in our frontend app.
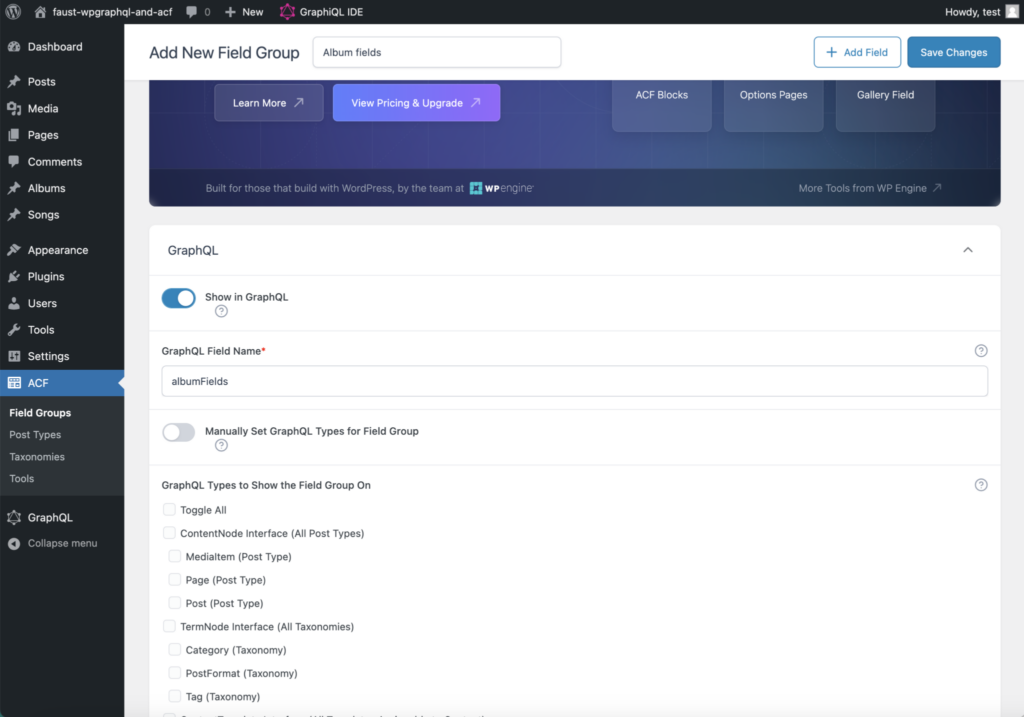
Click Save Changes at the top of the screen.
That’s it for our Albums custom post type and custom fields!
Populate with Data
You can populate the data with any of your favorite albums or songs. I entered all of Taylor Swift’s songs and albums to show results in this demo project. Here is a completed song with the title and lyrics:
Here is a completed album with the title, cover, and tracklist:
Enter enough content into your site that you can search by specific keywords to return different results.
Configure Search
WP Engine Smart Search provides settings that give us a lot of control over how the search results are returned. Navigate to the WP Engine Smart Search > Search Config page to see our options.
After adjusting the settings here, click the Save Config button.
Stemming vs. Fuzziness
Stemming

Stemming is the process of reducing a word to its root form or base word. This is the default search method of WP Engine Smart Search.
Stemming Search increases search relevancy because the plugin searches for an exact match of what was typed into the search form and a match of the stemmed (or root) word.
For example, if a user types in ‘running,’ the results will include all content that contains the word ‘running’ – the exact word they typed. But the results will ALSO include all content that contains the word ‘run’ – the stemmed (or root) word.
Fuzziness

The Fuzzy Search method, which can be toggled on or off, can be used as an alternative to stemming search.
Fuzziness uses a letter-per-word tolerance (or “distance”) in the search terms to handle typos in the search. Use the slider to specify the fuzzy distance (1 or 2), which determines how many letters can be wrong in each word users type into the search form.

For example, if the Fuzzy distance is 1, a search for ‘Txylor’s Vxrsion’ would return results for both ‘Taylor’s’ and ‘Version.’ (Each misspelled word in this example contains only one wrong letter.)
If the Fuzzy distance is set to the maximum distance of 2, a search for ‘Txxlor’s Vxxsion’ would return results for both ‘Taylor’s’ and ‘Version.’ (Each misspelled word in this example contains only two wrong letters.)
Prioritize Content
By default, WP Engine Smart Search searches all supported WordPress data type objects (such as Posts, Pages, CPTs, ACFs, etc.) by all of their supported fields (such as string, number, boolean, and other WordPress Data Type objects).
To limit what data can be searched or give more importance to specific fields to ensure highly relevant results, use the Searchable checkboxes and the Weight sliders.
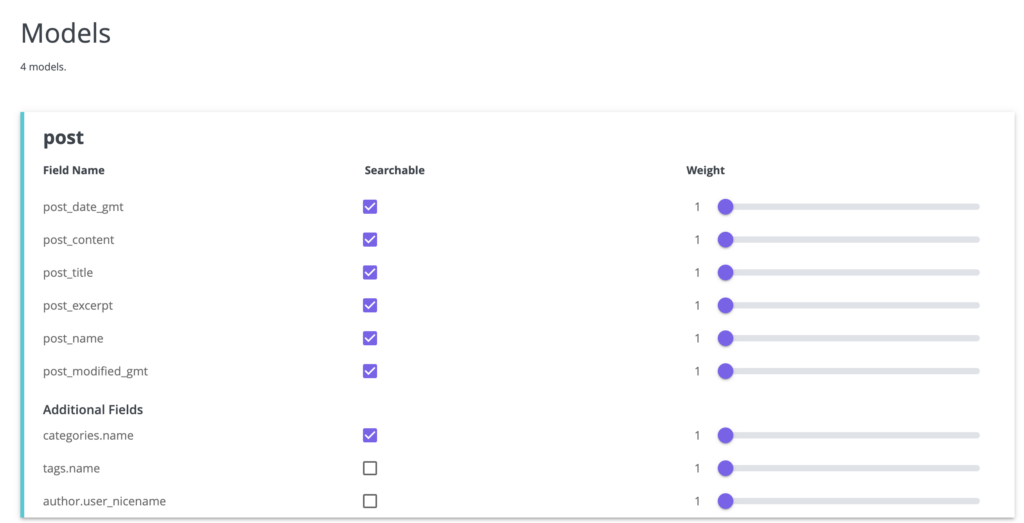
Searchable Checkboxes
The searchable checkboxes allow for the inclusion/exclusion of a field from the search. Check the items to be searchable and uncheck them to make them not searchable.
For example, for search results to only include songs and albums, keep those checked and uncheck all of the Searchable boxes in the pages and posts lists.
Weight Sliders
The field-level weight sliders allow for some fields to be considered more relevant when determining the order of search results. Use the sliders to assign different weights to the searchable data fields. A field with a higher weight will be given a higher priority in the search results.
For example, set Album and Song’s post_title fields to 20 and their lyrics fields to 10 so the Albums and Songs containing the search term in the title will appear before the songs where only the lyrics include the search term.
Write Test Queries Using GraphiQL IDE
At this point, our custom post types and custom fields have been created and populated with data, and we have chosen to add them to the GraphQL schema automatically. This means we are already set up to query for Songs or Albums data from our frontend JavaScript app! Let’s fire off a test query to try that out.
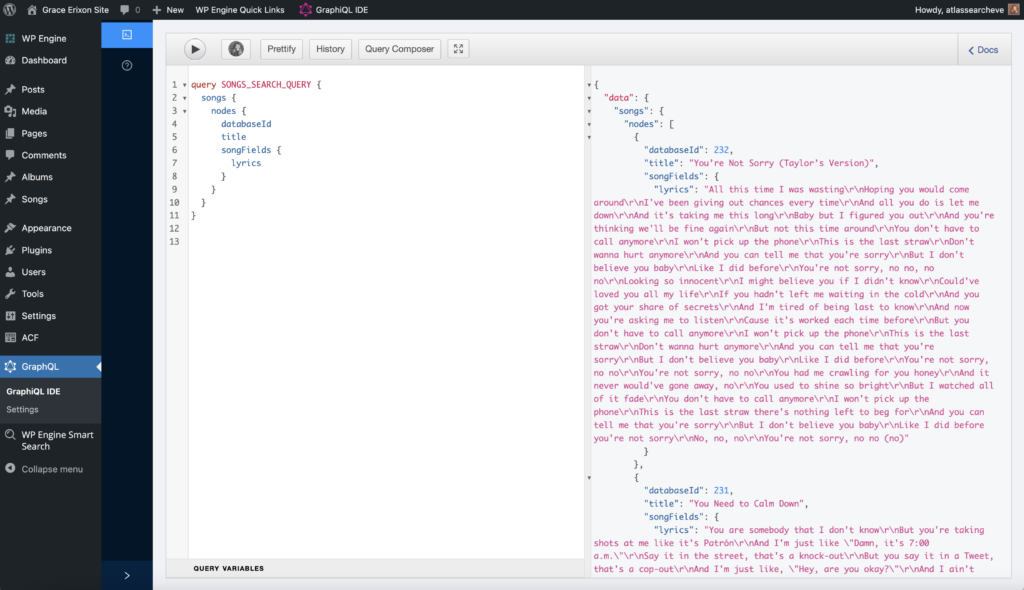
Head over to the embedded GraphiQL IDE that the WPGraphQL plugin provides and use the Query Composer to build a query using songs or albums. First, let’s just create a basic query to search for all songs and return the databaseId, title, and lyrics.
query SONGS_SEARCH_QUERY {
  songs {
    nodes {
      databaseId
      title
      songFields {
        lyrics
      }
    }
  }
}
Press the ‘play’ button to run this query, and we should get these three pieces of information about every song in the database back.
Build a Search Query
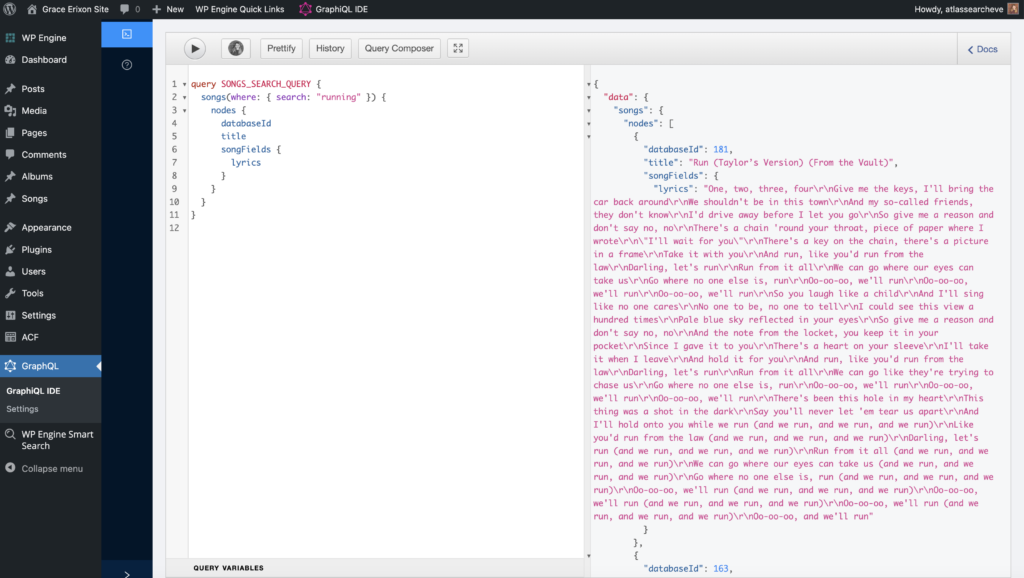
Now, let’s make this a search query so that the results are limited. In your query, on line 2, add (where: { search: "running" }) after songs. Your new query should look like this:
query SONGS_SEARCH_QUERY {
  songs(where: { search: "running" }) {
    nodes {
      databaseId
      title
      songFields {
        lyrics
      }
    }
  }
}
Code language: JavaScript (javascript)
Run the query, and you should see only results that contain the keyword you searched for (like ‘running’) in the title or lyrics of the song.
Build a Search Query with the NOT Operator
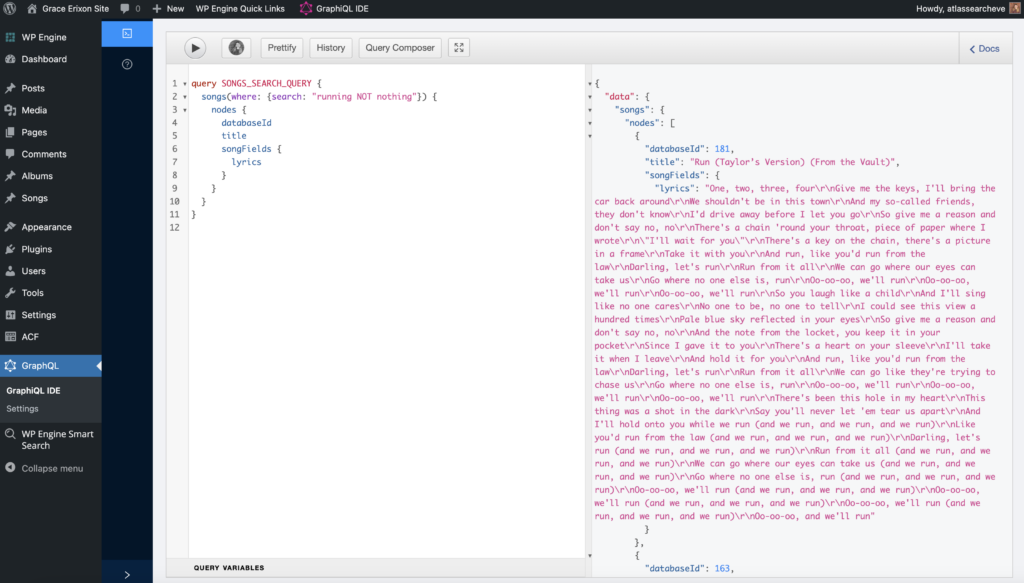
A great feature of WP Engine Smart Search is that it allows search operators. After ‘running’ in the search string, add ‘NOT nothing.’ This NOT operator will return songs that contain the word ‘running’ and do not contain the word ‘nothing.’
query SONGS_SEARCH_QUERY {
  songs(where: {search: "running NOT nothing"}) {
    nodes {
      databaseId
      title
      songFields {
        lyrics
      }
    }
  }
}
Code language: JavaScript (javascript)
Hit the ‘play’ button to view the results of that query. You can check that the second word, ‘nothing,’ is not included in the search results.
Build a Search Query with the AND Operator
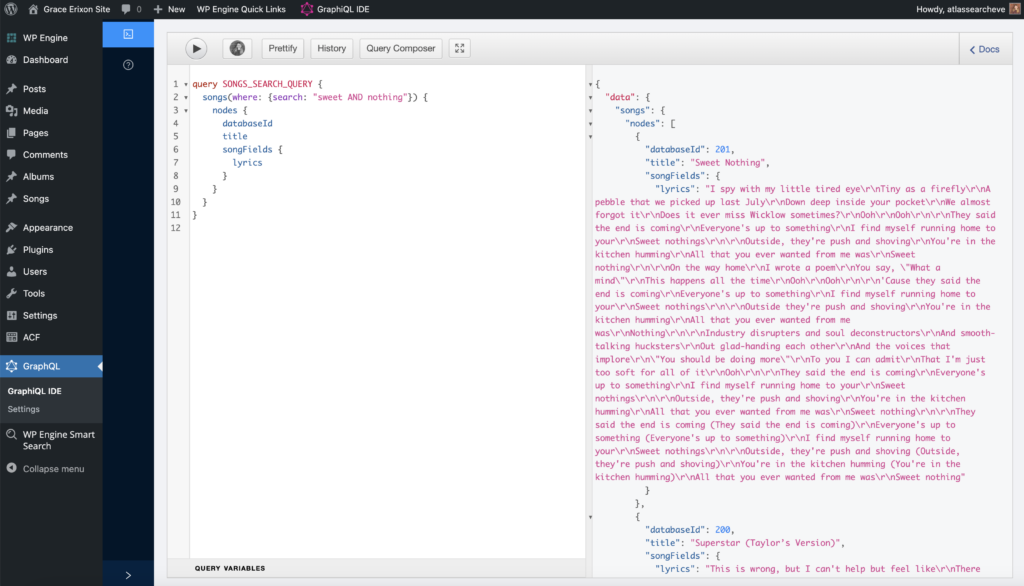
Then, we will do the opposite and use the AND operator. Change the search string to ‘sweet AND nothing.’ This AND operator will only return results containing the words ‘sweet’ and ‘nothing.’
query SONGS_SEARCH_QUERY {
  songs(where: {search: "sweet AND nothing"}) {
    nodes {
      databaseId
      title
      songFields {
        lyrics
      }
    }
  }
}
Code language: JavaScript (javascript)
Hit the ‘play’ button to view the results of that query. You can check that both words are contained in the results returned.
Build a Search Query with the OR Operator
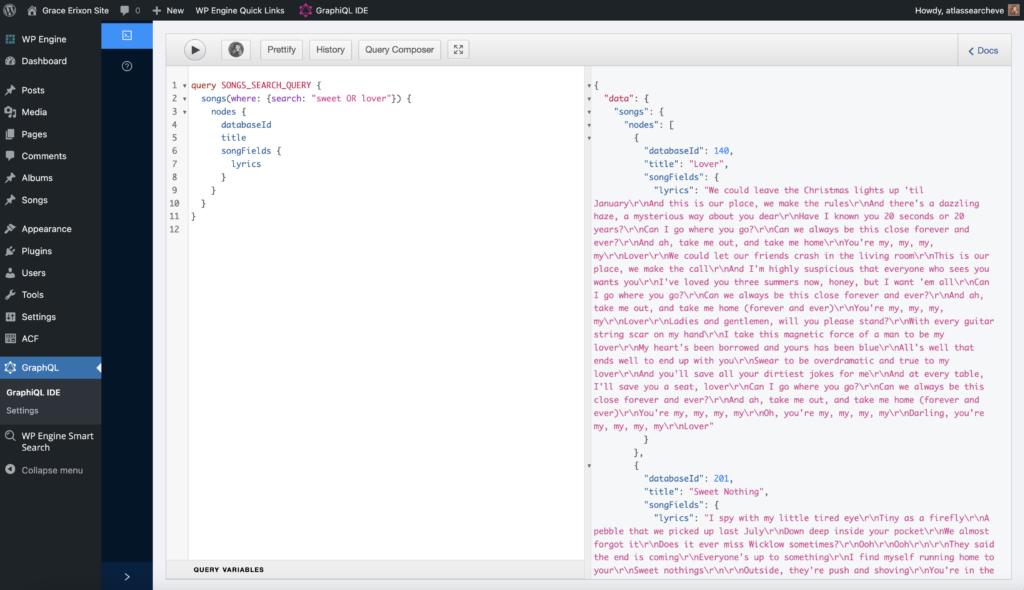
The last operator is OR, which will return results that contain either of the two words. Change the search string to ‘sweet OR lover.’
query SONGS_SEARCH_QUERY {
  songs(where: {search: "sweet OR lover"}) {
    nodes {
      databaseId
      title
      songFields {
        lyrics
      }
    }
  }
}
Code language: JavaScript (javascript)
Hit the ‘play’ button to view the results of that query. You can check that either word is contained in the search results.
Build a Search Query with a Variable
Starting fresh on our query, we want to create a search that will return both albums and songs dynamically. The user of our Faust.js site should be able to enter whatever search term they want instead of being locked into one specific string.
We can search through contentNodes, including all data rather than only songs or albums. We will return the id and title for both songs and albums that are returned. Then, replace the hard-coded search term from previous example queries with a dynamic variable called searchTerm.
Our completed search query should look like this:
query ACF_SEARCH_QUERY($searchTerm: String!) {
  contentNodes(where: {search: $searchTerm}) {
    nodes {
      ... on Song {
        id
        title
      }
      ... on Album {
        id
        title
      }
    }
  }
}
Code language: PHP (php)
Add the variable to the query variables section underneath our query and set it to a search term.
{
"searchTerm": "Taylor’s AND Version"
}
Code language: JSON / JSON with Comments (json)
Hit the ‘play’ button to view the results of that query. You can change the value of the variable to get different results.
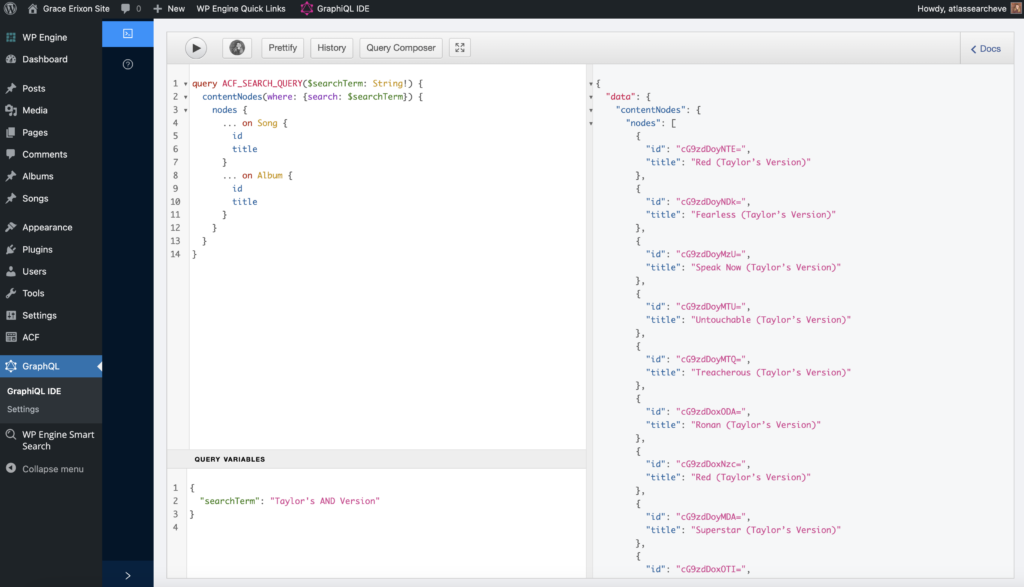
We have the search query that we need to return results from our ACF fields dynamically!
Build the Faust.js Front-end
Now, we can begin building the JavaScript application to display the search page and results!
If the site is not already running locally, start it by running npm run dev in the terminal. Navigate to localhost in your browser to see it running. It should currently show you the boilerplate starter project for Faust.js.
Open the Faust.js project in your code editor. First, we must create a new page to hold our search functionality. Inside the pages directory, create a new file called search.js.
First, we must import React and useState from "react" and useQuery and gql from “@apollo/client.”
import React, { useState } from "react";
import { useQuery, gql } from "@apollo/client";
Code language: JavaScript (javascript)
Then, we will use the same query we created in the GraphiQL IDE to get the search results into our Faust.js project. Set the results equal to a const variable and wrap it in the gql tags like this:
const searchTaylorSwift = gql`
  query ACF_SEARCH_QUERY($searchTerm: String!) {
    contentNodes(where: {search: $searchTerm}) {
      nodes {
        ... on Song {
          id
          title
        }
        ... on Album {
          id
          title
        }
      }
    }
  }
`;
Code language: PHP (php)
After this query, we will open a new function called SongFinder. Inside this function, we need to handle the results from that query. We can use React’s useState to set the search term value and use useQuery to run that search and collect the results. We will check if we get any results back. Then, we can create a function to handle the connection between the search form the user will enter requests into and the search results. Whenever someone submits the form, it will reset the value of the search term and run the new query.
const [searchTerm, setSearchTerm] = useState("");
  const { loading, error, data } = useQuery(searchTaylorSwift, {
    variables: { searchTerm }
  });

  const results = data?.contentNodes?.nodes;
  const haveResults = Boolean(results?.length);

  function handleSearch(event) {
    event.preventDefault();
    const values = Object.fromEntries(new FormData(event.target));
    setSearchTerm(values["search-term"]);
  }
Code language: JavaScript (javascript)
Underneath this, we will create the return statement for the function containing the JSX components the user will see. We will set up a form where onSubmit triggers the handleSearch function that we just set up to get new search results. Any time someone submits a search request, it will handle the loading time, check for an error or no results returned, and finally return and display the new results. As long as results are returned from the search, we will map through the array and display each album or song title.
return (
    <div className="songs-search">
      <form method="post" className="search-form" onSubmit={handleSearch}>
        <input
          type="search"
          name="search-term"
          placeholder="Search for a song…"
        />
        <button type="submit">Search</button>
      </form>
      <div className="songs-list">
        {loading ? (
          <p>Loading...</p>
        ) : error ? (
          <p>Error :(</p>
        ) : !haveResults ? (
          <p>No songs found.</p>
        ) : (
          results.map((item) => (
            <div key={item.id} className="songs-list-item">
              <h2>{item.title}</h2>
            </div>
          ))
        )}
      </div>
    </div>
  );
Code language: JavaScript (javascript)
In completion, our search.js page will look like this:
import React, { useState } from "react";
import { useQuery, gql } from "@apollo/client";

const searchTaylorSwift = gql`
  query ACF_SEARCH_QUERY($searchTerm: String!) {
    contentNodes(where: {search: $searchTerm}) {
      nodes {
        ... on Song {
          id
          title
        }
        ... on Album {
          id
          title
        }
      }
    }
  }
`;

export default function SongFinder() {
  const [searchTerm, setSearchTerm] = useState("");
  const { loading, error, data } = useQuery(searchTaylorSwift, {
    variables: { searchTerm }
  });

  const results = data?.contentNodes?.nodes;
  const haveResults = Boolean(results?.length);

  function handleSearch(event) {
    event.preventDefault();
    const values = Object.fromEntries(new FormData(event.target));
    setSearchTerm(values["search-term"]);
  }

  return (
    <div className="songs-search">
      <form method="post" className="search-form" onSubmit={handleSearch}>
        <input
          type="search"
          name="search-term"
          placeholder="Search for a song…"
        />
        <button type="submit">Search</button>
      </form>
      <div className="songs-list">
        {loading ? (
          <p>Loading...</p>
        ) : error ? (
          <p>Error :(</p>
        ) : !haveResults ? (
          <p>No songs found.</p>
        ) : (
          results.map((item) => (
            <div key={item.id} className="songs-list-item">
              <h2>{item.title}</h2>
            </div>
          ))
        )}
      </div>
    </div>
  );
}
Code language: JavaScript (javascript)
Finally, we will add a bit of styling to this page. Open the styles/_base.scss page and copy in the following SCSS declarations. Erase the current styles and copy in the new ones.
html {
	box-sizing: border-box;
}

*,
*:before,
*:after {
	box-sizing: inherit;
}

body {
	margin: 0;
	padding: 5%;
	font-family: -apple-system, BlinkMacSystemFont, "Segoe UI", "Roboto", "Oxygen",
		"Ubuntu", "Cantarell", "Fira Sans", "Droid Sans", "Helvetica Neue",
		sans-serif;
	-webkit-font-smoothing: antialiased;
	-moz-osx-font-smoothing: grayscale;
	color: #252527;
	background: #9daf9f;
	/* fallback for old browsers */
}

a {
	color: #252527;
}

.app {
	margin: 60px auto;
	padding: 0 40px;
	max-width: 800px;
}

.title {
	text-align: center;
}

.search-form {
	margin-top: 4rem;
	display: flex;
	justify-content: space-between;
}

.search-form input {
	width: 83%;
	padding: 1rem;
	font-size: 25px;
	border: none;
	border-radius: 6px;
}

.search-form button {
	width: 15%;
	border: none;
	border-radius: 6px;
	background-color: #7d8c7f;
	font-size: 1.1rem;
	cursor: pointer;
}

.songs-list {
	margin-top: 4rem;
}

.songs-list-item {
	border: 2px solid #7d8c7f;
	padding: 2rem;
	border-radius: 6px;
}

.songs-list-item+.songs-list-item {
	margin-top: 2rem;
}
Code language: CSS (css)
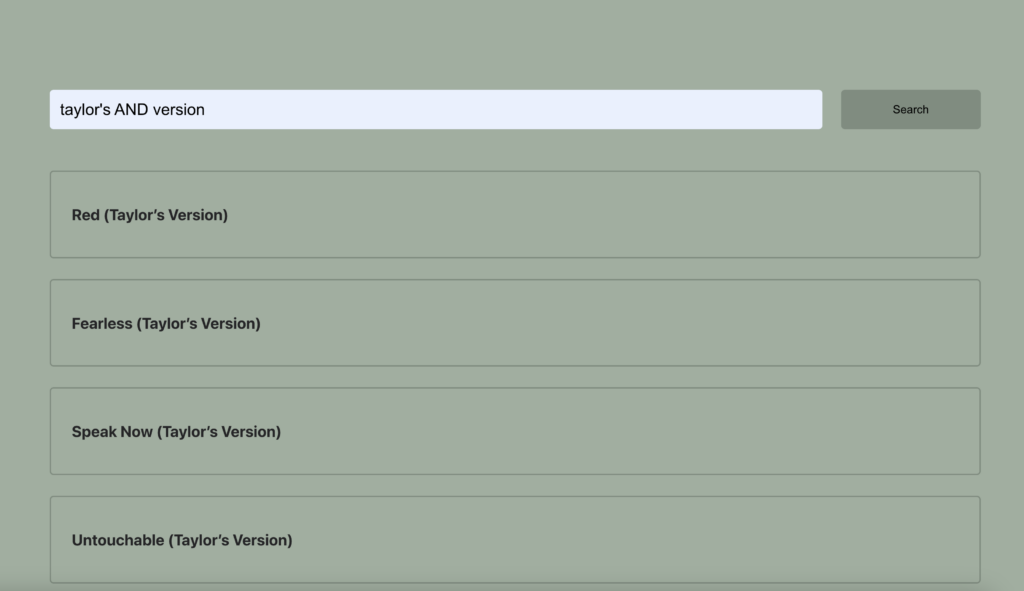
Now, let’s go to the page where the site is running locally and navigate to the /search route.
Try searching for ‘Taylor’s AND Version.’ It should return the same results as the GraphiQL IDE showed. You can also try searching for other search terms.
Done!
Congrats! You made a fully functional search page for headless WordPress!
Hopefully, this tutorial helped you understand how to leverage tools like Faust.js, ACF, and WPGraphQL to build headless WordPress sites and implement search functionality. To learn more, check out the WP Engine Smart Search documentation.
As you continue with headless development, join our Headless WordPress Discord community!
Looking for a place to host your headless WordPress project? Check out WP Engine’s Atlas platform.
Faust.js
The JavaScript framework
specifically for WordPress.
