
Having an established end-to-end workflow for your site development process with Git version control can allow you to onboard a new developer quickly, keep a history of changes and elevate the consistency and quality of products for clients. Build quickly with Local, stage and keep a history with Git and GitHub Actions, promote to the production website when ready, and continue the process by maintaining an up-to-date local environment with Local Connect.
This post is part of a series that helps set up an end-to-end workflow for developing sites.
- Part One: Set Up a Local WordPress Development Site
- Part Two: Git Version Control (in Local)
- Part Three: GitHub Actions for Deployments
- Part Four: Synchronize Production Data With Local Connect
In the previous post in this series, we initialized our Git repo, told Git what we wanted to track (and ignore), and published our code and history to GitHub. Next, let’s set up some GitHub Actions within our repository to trigger deployments to our WP Engine environments. Here are the key steps:
- Add the Deploy WordPress to WP Engine GitHub Actions to your repository, and
- Generate an SSH key: public key will go into the WP Engine SSH Gateway and assign the private key to your GitHub repo. This will allow the GitHub Action to access the appropriate WP Engine environment securely.
Add the WP Engine GitHub Actions for deployments
We will use the Deploy WordPress to WP Engine GitHub Action to add a few YAML-language files (.yml) to our Git repo. Each YAML file will represent the configuration for a corresponding branch from which we want to trigger deployment and the targeted WP Engine environment. Here is what we’re going for:
| Branch name | GitHub Action YAML filename | WP Engine environment |
|---|---|---|
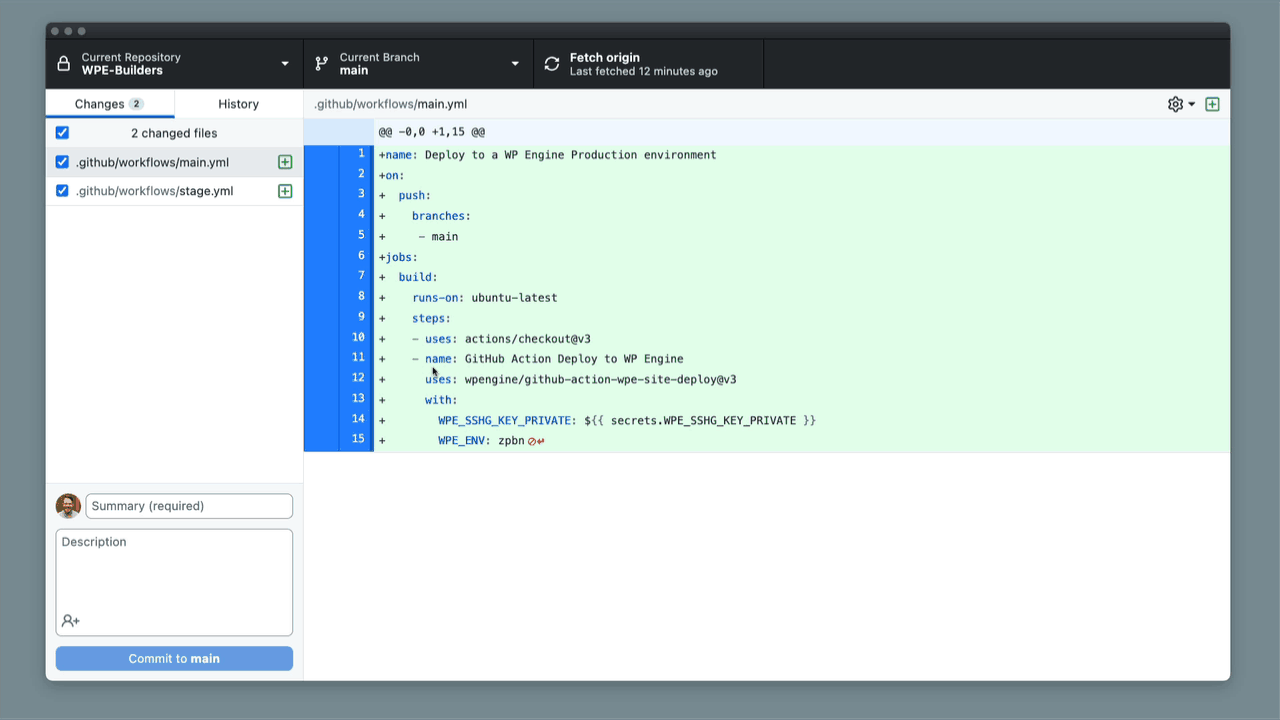
main | .github/workflows/main.yml (full source) | Production |
stage | .github/workflows/stage.yml (full source) | Staging |
dev | .github/workflows/dev.yml (full source) | Development |
We want the Staging and Development environments and their corresponding branches to represent our in-flight development work. In contrast, the main branch remains our pristine Git history and codebase.
This branching convention is a typical workflow, a hybrid model of git-flow (over ten years old!) and GitHub Flow. It enables you and any code collaborators to work simultaneously on other features or hotfixes simultaneously while continuously deploying.
If a new feature or discrete set of code changes are needed, we’ll branch off the main branch and create a new branch, for example, feature/new-header. We’ll work within our Local WordPress development environment to add the new header code, commit our changes, publish the feature/new-header branch to GitHub (for pull requests, remote collaboration, history, and backup), then merge the feature/new-header branch into the stage (or dev depending on how you prefer to work), and push the latest copy of the stage branch up to GitHub, which would trigger our GitHub Action to deploy GitHub’s stage branch to the WP Engine Staging environment. Then allow the client to review the work on the staging site.
This entire end-to-end process should be more evident by the end of this series when we take you through the whole cycle.
Tip
Dig in and learn!
WP Engine GitHub Actions utilize rsync to deploy code. By default, rsync runs in non-destructive mode, but you can override this behavior by passing additional FLAGS. Please visit the complete documentation to learn about all the options available, like running post-deploy scripts, linting PHP, and busting your environment’s cache.
For now, create and save two (or three if you want to set up the Development environment as well, but optional) new files within your Git repo, commit the changes, and push them up on the main branch. At the very least, we’ll want .github/workflows/main.yml and .github/workflows/stage.yml files within our wp-content/ directory with the following configuration code:
stage.yml (full source)
name: Deploy to a WP Engine Staging environment
on:
  push:
    branches:
     - stage
jobs:
  build:
    runs-on: ubuntu-latest
    steps:
    - uses: actions/checkout@v3
    - name: GitHub Action Deploy to WP Engine
      uses: wpengine/github-action-wpe-site-deploy@v3
      with:
        REMOTE_PATH: "wp-content/"
        WPE_SSHG_KEY_PRIVATE: ${{ secrets.WPE_SSHG_KEY_PRIVATE }}
        WPE_ENV: <your_install_name_here>
Code language: JavaScript (javascript)
Pay close attention to the following arguments in the above code and replace them with the necessary variables:
- Branch name (highlighted on line 5) – the branch name that will trigger the deployment to the targeted environment upon push.
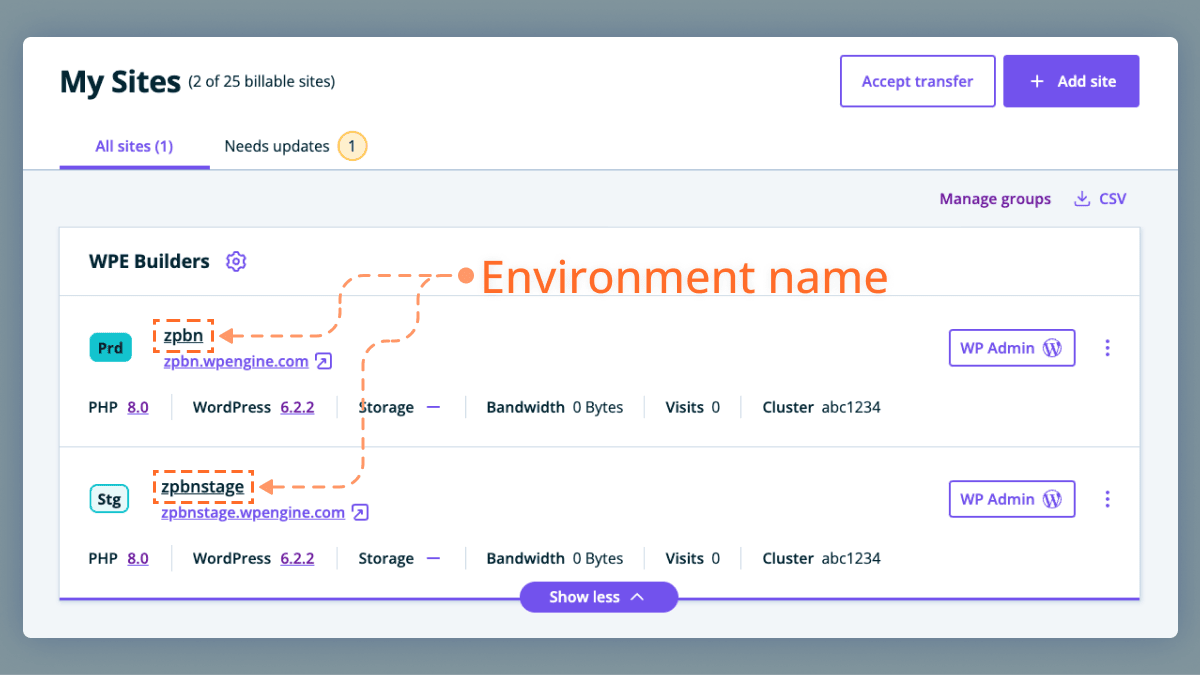
REMOTE_PATH(highlighted line 14) should point to the final environment’s targeted location.WPE_SSHG_KEY_PRIVATE(highlighted line 15) will reference the private SSH key that we assign to our repository.WPE_ENV(highlighted line 16) should represent the WP Engine targeted environment name, which you can find in your WP Engine Portal’s ‘My Sites’ area.
Don’t worry. Suppose you commit and push the new GitHub Actions. In that case, they will not successfully trigger anything yet, because we need to add our SSH keys for GitHub to deploy to WP Engine. That’s next.
Generate SSH keys for deployments
Whether you already have an SSH key in WP Engine’s Portal, I recommend creating a unique key for your deployments, which enables you to swap it out and only affects the deployment process.
Open up the command-line interface of your choice (Terminal, iTerm) and run the following commands:
Generate a new SSH key. Be sure to replace the last bit with your own file name.
Hit enter or return to leave the passphrase blank.
ssh-keygen -t ed25519 -f ~/.ssh/wpe_gha_wpebuilders
Code language: JavaScript (javascript)
Add public SSH key to WP Engine portal
We must add your newly generated SSH key to the WP Engine user portal.
- Visit the User Portal > Profile > SSH Keys area
- Click the ‘Create SSH key’ button (top, right side)
- We’ll need to copy your newly created SSH key’s public file. Open your command line tool and run the following command to copy the public key to your clipboard:
cat ~/.ssh/wpe_gha_wpebuilders.pub | pbcopy(Be sure to replace the last bit with your file name) - Paste the public key into the ‘New SSH key’ modal and click the ‘Add SSH key’ button
You should now see your SSH key among the ‘My SSH keys.’
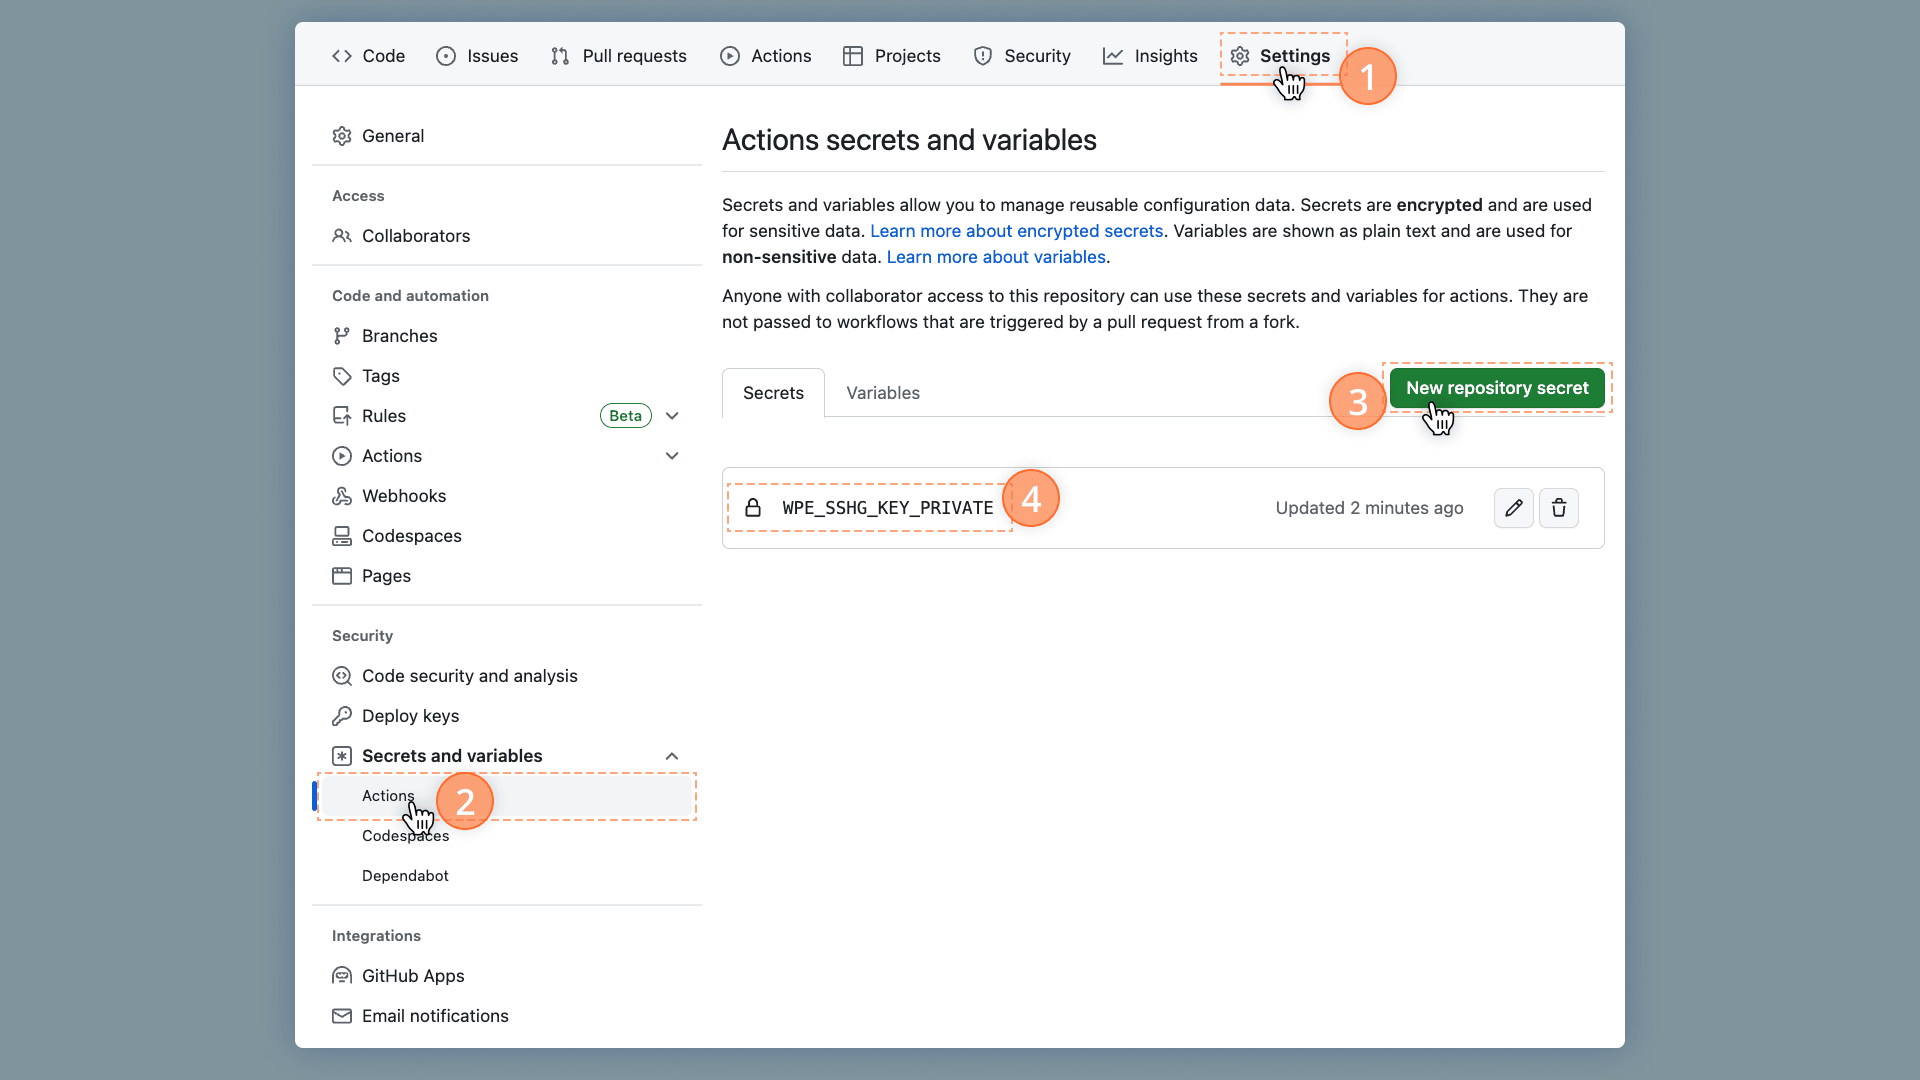
Add private SSH key to GitHub
- Go to your GitHub repo’s Settings tab > Secrets > Actions
- Click the ‘New repository secret’ button (top, right side)
- We must copy your newly created SSH key’s private file contents. Open your command line tool, and run the following command to copy the private key to your clipboard:
cat ~/.ssh/wpe_gha_wpebuilders | pbcopy(Be sure to replace the last bit with your file name) - Paste the private key into the ‘Secret’ field and the ‘Name’ field should be:
WPE_SSHG_KEY_PRIVATE, and click the ‘Add secret’ to save.
Tip
Consider using a GitHub Organization
If you plan to use GitHub to host your repositories solely and expect to collaborate with various developers (in-house and freelance). Consider setting up a GitHub Organization, allowing you to share an organization-level secret across different GitHub repos like your deploy SSH key.
Test it out
We’ve added our GitHub Actions to our repository and generated and assigned our SSH keys. Now, you should be able to trigger a successful deployment by either:
- Go to your GitHub repository’s Actions tab and trigger an Action, or
- Push up some code on one of the branches to trigger a new deployment.
What’s next?
We should have targeted branch-to-environment deployments successfully set up. This will allow us to specify whether we want certain developers to have access to merge into our dev, stage, or main branches, which can all be controlled through our GitHub user settings.
Perhaps Senior Engineers should have permission to merge branches into the main branch, but Junior Engineers would only be allowed to open Pull Requests against main, but not merge. How you manage these permissions are entirely up to how you want to facilitate your workflow, and GitHub offers a lot of flexibility.
Next, we’ll want to ensure that our developers have access to the latest production data, and we can easily leverage Local’s Connect to do it.