
This post is part of a series that helps set up an end-to-end workflow for developing sites.
- Part One: Set Up a Local WordPress Development Site
- Part Two: Git Version Control (in Local)
- Part Three: GitHub Action for Deployments
- Part Four: Synchronize Production Data With Local Connect
So, let’s go over everything we’ve accomplished up to this point:
Set up a Local site for a local development environment where we can experiment and tinker with new features.
Set up Git version control of our Local site’s wp-content/ directory to watch changes to the Frost theme and the Yoast SEO plugin.
Established our GitHub remote repository with WP Engine’s GitHub Actions to trigger environment targetted deployments based on the branch we’re pushing our changes to.
Undoubtedly while we were setting up this process our client and editorial team have been busy making changes on the production site by adding and changing content, and we want to make sure that we always have the latest data on our Local site. This is where Local Connect can truly help.
Local Connect will allow us to connect to any of our WP Engine environments (Development, Staging, Production) and we can choose to pull down files or just database information. In our case we just want to pull down the database changes that the client and their team have been making.
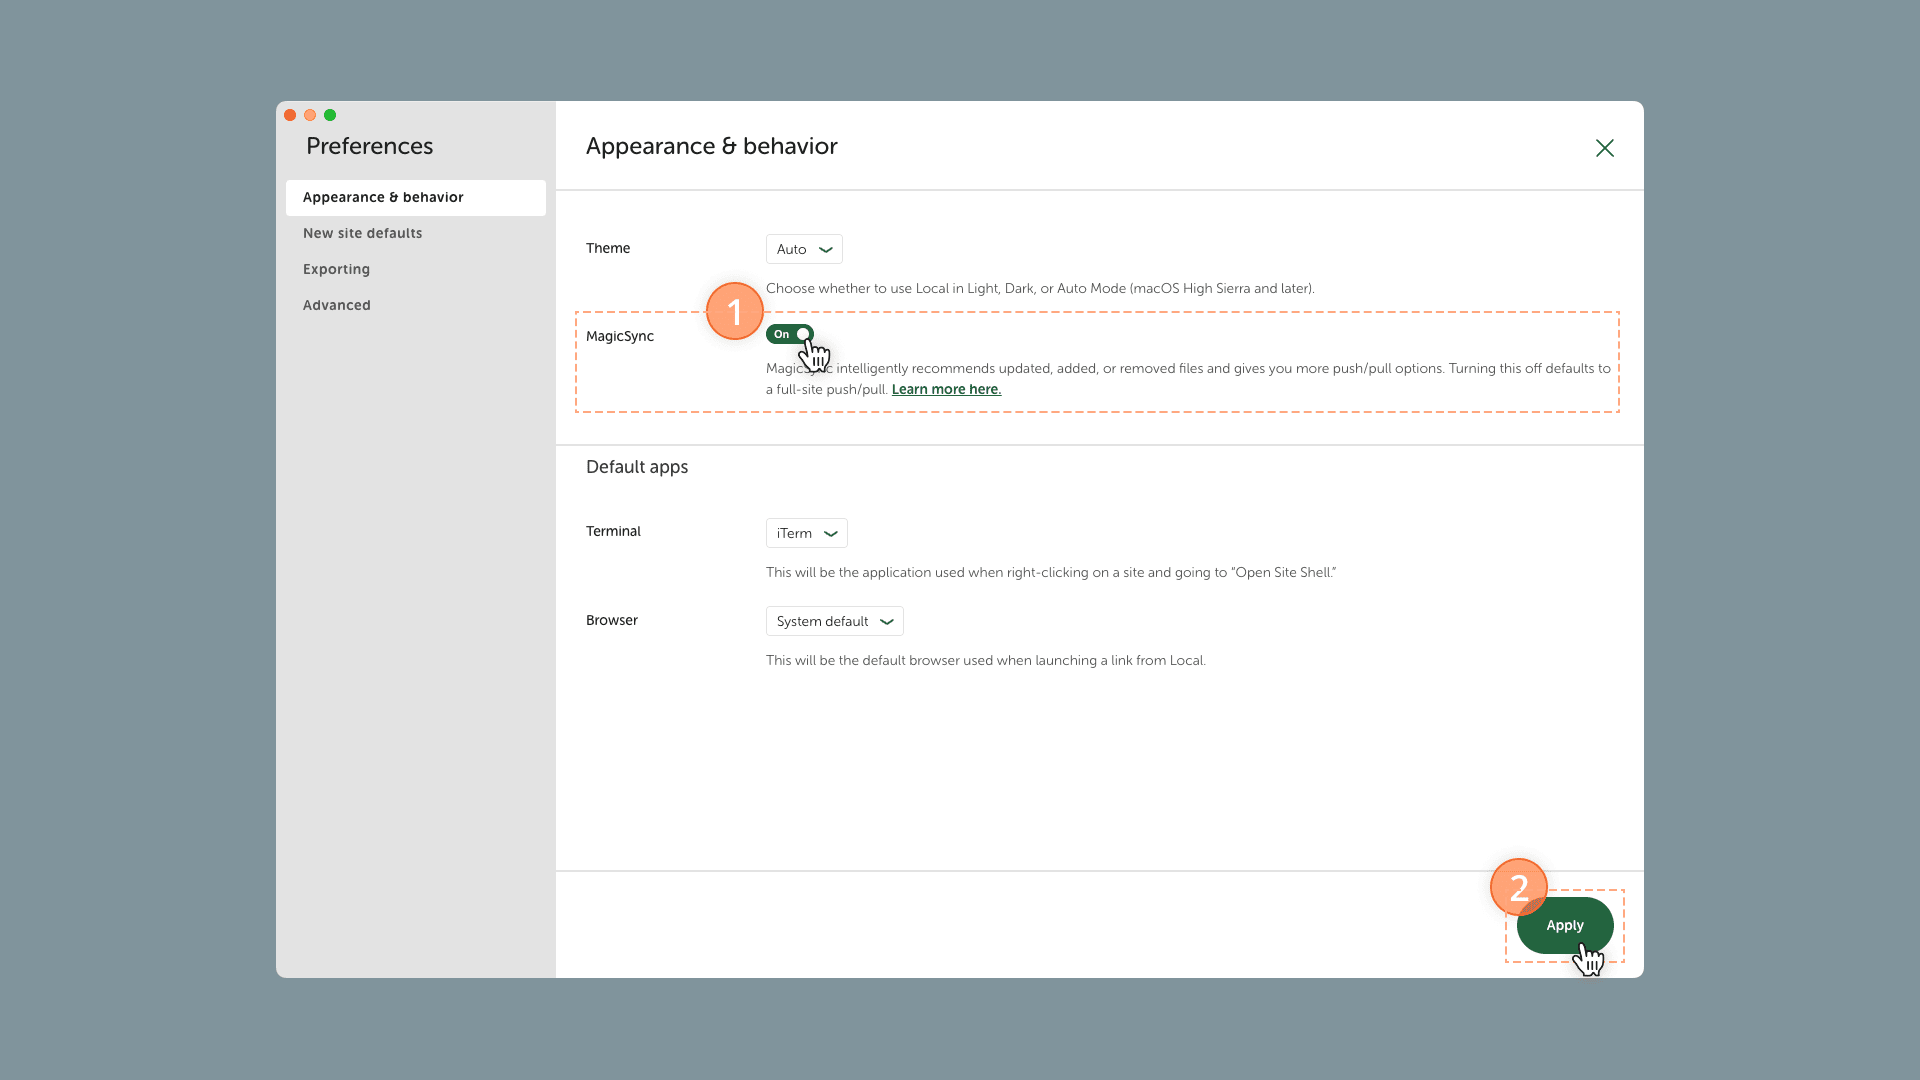
Enable Local’s MagicSync
Before proceeding, let’s ensure we have Local’s MagicSync enabled, which will provide greater detail in our synching capability, including database-only synching.
Launch Local app’s Settings > Appearance & behavior and enable MagicSync.
Setting up Local Connect
Full instructions on how to set up Local Connect with WP Engine can be found in Local’s documentation, but we’re going to step through it here as well.
1. Enable API access in the WP Engine portal
Visit the API Access area in WP Engine’s portal, and verify that API access is enabled for the account.
2. Generate API credentials
While on the API Access page and after verifying that API access is enabled then click the ‘Generate Credentials’ button (top-right). This will trigger a modal pop-up, which will have the generated API credentials. Leave this open while you proceed with the next steps, because we’ll need to copy and paste these keys into Local.
3. Log in to WP Engine in Local
You should see a ‘Connect host’ button in the bottom-right of Local. If you click it a pop-up with open with an option to log in to WP Engine. Once you click the ‘Log in’ for WP Engine there will be fields for both your API Username and API Password. These are the items that we left open in WP Engine’s portal (last step).
Be sure to copy and paste your API credentials into Local and click the ‘Connect to WP Engine’ button to finalize the process.
If your credentials are correct then you should now see an option in the bottom-right for ‘Connected to no host selected’. Click on it and choose the ‘WP Engine’ option. This will complete the connection to WP Engine.
Tip!
Access Local’s Connect in multiple locations
You can access Local’s Connect options in two places. The bottom right, while on a Local site’s overview, or using the ‘Connect’ (cloud icon) along the left-hand sidebar.
Pulling down data with Local Connect
Great, now we’ve established an API connection from Local to WP Engine. Now, we want to connect to the pertinent environment and pull down the latest Production site’s database information.
First, make sure you have your site selected in Local. This should be the same site you created at the beginning of this tutorial. Then in the bottom right there are two cloud icons: one to Push and one to Pull from WP Engine. We want to Pull down data and will choose the ‘Pull from WP Engine’ option.
Once we’ve clicked the ‘Pull from WP Engine’ icon a sync pop-up will open. Along the left-hand side is a drop-down, which allows us to select which WP Engine site we want to pull data from. (Remember, WP Engine sites each have the option to have multiple environments.) Once we choose the appropriate site then another drop-down will appear, which will allow us to choose which environment within the site we want to pull data from. In our case, we want to pull the latest data from the Production site. So, be sure to choose the Production environment.
With our site and environment chosen, we just need to check the box underneath to ‘Include [the] database’.
You’ll notice that the right-hand side offers a directory and file browser. We do not currently want to sync any files and just want the database. So, be sure to uncheck all the files and folders in the right-hand browser. You can use the topmost ‘Filename’ checkbox to de-select them all at once.
Last, be sure to click the ‘Pull from WP Engine’ button, which will sync the Production environment’s database into your Local site and even replace all the domain URLs for you.
It is important to note that your Local site’s database will be overwritten with the production database’s information, which will also include any previous WordPress users you may have created locally. Of course, you can use WP-CLI with Local to add new users as needed.
If you need more granularity of what database tables you’re pulling down then you may want to consider utilizing WP Engine’s WP Migrate DB Pro plugin.
Wrapping up
At this point in our series, you should have a full end-to-end workflow for staging features and even promoting approved features to a production environment. Congratulations!
Here are some next steps you may want to consider:
- Create a branch naming convention for new features or bug fixes and document them for the team.
- Establish a cadence for how and when your team might want to consider updating a staging environment with production information.
- Enable PHP Linting (
PHP_LINT: TRUE)in your WP Engine GitHub Action deployments. - Consider utilizing Composer to manage dependencies in your codebase.
Hopefully, your team should thrive if you establish consistent workflows. Please reach out to @dcook or @wpebuilders if you have any questions or comments. Thanks!
Get the latest headless and modern
WordPress tutorials in your inbox.