In this walk-through tutorial, you will learn how to create a headless WordPress site with multi-lingual functionality using Next.js, Next.js internationalized routing, Polylang, WPGraphQL, and the WPGraphQL Polylang extension. This tutorial assumes a fundamental understanding of Node.js, React/Next.js and its data fetching methods and routing, WPGraphQL, Apollo Client and WordPress.
Prerequisites
- Node.js and npm installed
- Code editor (Visual Studio Code is what I use)
- A WordPress host with an install already spun up (WP Engine is my go to) or a free demo environment with Local.
- A Github repository and account
By the end of this tutorial, you will be able to:
- Use the Polylang Plugin with its WPGraphQL extension
- Understand and use Internationalized routing in Next.js
- Create a home page with multi-lingual posts content
- Create single post detail page with multi-lingual post detail content
The Polylang WordPress Plug-in
The Polylang WordPress plugin enables multi-lingual site capability for numerous languages for your WordPress content. This is valuable because this allows you to create content and pages that are localized to your users that speak different languages. There is a pro version. For this tutorial, we are going to use the free version. Let’s install the Polylang plugin and quickly cover how it is traditionally used.
Login to your WP Admin and Install Polylang/WPGraphQL extension
Login to your WP Admin. From Plugins > Add new menu, search for WPGraphQL, install it then search for Polylang. It will be the first plugin that populates in the WordPress plugin directory. Install and activate the plugin.

Check Pretty Permalink Settings
All of the code in this tutorial is set around having the Post name option selected for your permalink settings. To modify this setting, open the Settings > Permalinks menu in the WP Admin dashboard.

Once the plugin is activated, you will see a new item on the side menu called Languages. Navigate to Languages > Settings > URL modifications. Click to the options "The language is set in pretty permalinks, Hide URL language information for default language, Remove /language/ in pretty permalinks." These three settings allows us to:
- have our language
URLset to the directory of that language instead of a subdomain - hides the URL for our default language so it is not prepended by the code of that default
- Removes the language in permalink so you don’t have the entire string of the language in the link

Install Polylang WPGraphQL Extension
Next, we need to expose Polylang’s languages and translations for our post in the GraphQL schema. Go to the WPGraphQL for Polylang github repository page here: https://github.com/valu-digital/wp-graphql-polylang
Once you do that, click on the green code button and go to the bottom of the dropdown and download the zip file.

Now go back to your WP admin. From the Plugins > Add new menu, go to the upload plugin button at the top. Click that and it will bring up a choose file box. Click on that and choose the zip file you downloaded from the WPGraphQL Polylang repository. You can now activate and install it.

Posts/Post Polylang Language Feature
The next step is to start populating some data in English and Spanish. Navigate to Post in the menu. When you get into the Post edit page, you will now see an American and Mexican flag. This is the Polylang plugin at work. It ties a single post type together with its translations you add to it. In this case English and Spanish. I am a bit of a Star Wars nerd, hence the Star Wars content but you can use any content you like.

Once you click into the editor interface, you can see on the right side menu an option for Languages. When you click on that then click on the pencil icon, it lets you toggle between your English and Spanish versions.


That is how you setup the polylang plugin for WordPress in a traditional approach. When you visit your site, you will have the translator of your browser appear and you can toggle back and forth between English and Spanish. You can use whatever translator you want but bing translator is my favorite and most reliable.
Constructing our GraphQL queries for translated posts
Now that we have our posts data and extended the WordPress and Polylang data schema with a GraphQL layer using WPGraphQL and its extension, let’s build our queries to grab that multi-lingual post data from WordPress.
In your WP Admin, go to the GraphiQL IDE and using the query composer, create this query shown here:

  query posts($language: LanguageCodeFilterEnum!)  {
      posts(where: { language: $language }) {
        edges {
          node {
            id
            excerpt
            title
            slug
            language {
              code
              locale
            }
          }
        }
      }
      generalSettings {
        title
        description
      }
    }
Code language: PHP (php)
The Polylang plugin and WPGraphQL extension is allowing the $language to be the variable and requiring the LanguageCodeFilterEnum! to be the required value. When you query the language variable as an object in your composer and hit the play (➡️) it will give you all the posts in that language. Change it to "ES" to get Spanish translations back. Stoked!!🥳

Get Next JS Headless WP Starter cloned and running locally
Since this is not a ground up tutorial on React and Next.js fundamentals, I have a demo site built for you already that utilizes Next.js and its data fetching capabilities with SSG, Apollo Client, Next.js Internationalized routing and Dynamic Routing. Go to your terminal and clone down the repository with this shell command:
git clone [email protected]:Fran-A-Dev/nextjs-polylangwpgql.git
After cloning, run npm install and open the files. The file structure in my Next.js starter has a components folder pages folder, lib folder, public folder, and a styles folder. I have scaffolded this starter to include static site generation data fetching method, the Apollo Client instance, dynamic post page routing and Next.js internationalized routing.
Next.js Internationalized Routing
Now that you have the starter site cloned, let’s break down things on the front end starting with internationalized routing on Next.js. When you are doing Headless WordPress and have users visiting your site that speak different languages, internationalizing your content is crucial to having a great user experience.
We started this tutorial learning how to internationalize our content in WordPress traditionally and decoupling with WPGraphQL. In this next section, we will put it all together by connecting it with our front end and explore its internationalization feature. There are many different approaches to doing internationalization with Next.js. In our tutorial we are going to use router and link to switch translated content from WordPress.
Next.js makes it seamless and easy to set up internationalization through a configuration object with the property i18n and within that object, you define your key which is locale with the default locale you want and its translations. Locale is the syntax used to define language and is a UTS identifier for standardized format for defining locations and language. In this case, English is the default and Spanish is the translated. Navigate to next.config.js file in the root of the project to see the code.
module.exports = {
  reactStrictMode: true,
  i18n: {
    locales: ["en", "es"],
    defaultLocale: "en",
  },
};
Code language: JavaScript (javascript)
Configuring this allows Next.js to know what available locales we have in our app and each page when it gets rendered.
Link to filter between languages
Now that Next.js knows what languages by locales we have, we need to set up a link we can click on to filter between the languages on posts. Go to components/Navbar.js in the project. You should see this code within the file:
import Link from "next/link";
import { useRouter } from "next/router";
import styles from "../components/Navbar.module.css"

export default function Navbar() {
  const { locale: activeLocale, locales, asPath } = useRouter();

  const availableLocales = locales.filter((locale) => locale !== activeLocale);

  return (
    <div className="container">
      <nav>
        <ul>
          <li>
            <Link href="/">
              <a className={styles.home}>Home</a>
            </Link>
          </li>

        </ul>
        <ul>
          {availableLocales.map((locale) => {
            return (
              <li key={locale}>
                <Link href={asPath} locale={locale}>
                  <a className={styles.toggle}>{locale.toUpperCase()}</a>
                </Link>
              </li>
            );
          })}
        </ul>
      </nav>
    </div>
  );
}
Code language: JavaScript (javascript)
Let’s break this file down and explain what Next.js is doing here. First, we need to program a way to list all the locales available, which locale the user is currently active on and the actual path of that locale. I am doing this by using the destructured useRouter hook with next/router imported at the top of the file with this line:
import { useRouter } from "next/router";
Once that is imported, I set up my router, I put a new constant at the top of the component and destructure to extract all the locale constant variables that are supported in my application:
const { locale: activeLocale, locales, asPath } = useRouter();
The locale variables seen above are all my locales, the actual active locale that the user will be on when viewing the page and the path that reflects the locale that they are on. The next step is to only show the user the locales that are not active so that the user can know what locale they can link to besides their current default on the page.
To accomplish this, I created a constant and called it availableLocales. I set it equal to locales and I filter through that array of locales. Filtering through that array of locales, we return only the locales that are not equal the active one.
const availableLocales = locales.filter((locale) => locale !== activeLocale);
Now that is done, I need to pass this into my return statement in my list of links to make it an actual Link with next/link to display a clickable link which will act as our toggle between our two different locales with the correct path as shown in these lines:
         <li>
            <Link href="/">
              <a className={styles.home}>Home</a>
            </Link>
          </li>

        </ul>
        <ul>
          {availableLocales.map((locale) => {
            return (
              <li key={locale}>
                <Link href={asPath} locale={locale}>
                  <a className={styles.toggle}>{locale.toUpperCase()}</a>
                </Link>
              </li>
Code language: HTML, XML (xml)
Breaking this down more granularly, in the <ul> I take my available locales constant and map through it returning the <li> list item, and inside I replace the value within the <a> tag with locale as the value and make the letters upper case.
Now focusing in the Link component in Next.js, it already has built in locale changing capabilities.
<Link href={asPath} locale={locale}>
What is happening here is I added a new prop of locale and I set it equal to locale to change the locale from English to Spanish and vise versa. Then, we have to pass the link it should navigate to in relation to where the user is currently located. So we use the asPath variable from our useRouter hook that we destructured and in the href we set it equal to asPath. Now that this is set, the user can click on the link in the Navbar to toggle back on forth for the proper language and its path.
Once I finished this Navbar.js file, I wrapped the component in the pages >_app.js file so my entire app has access to it across the pages.
Apollo Client/GraphQL setup
This project does use apollo and GraphQL. In this demo, I chose to just create a lib folder with a apollo-client.js file to make an apollo instance. I also did not use .env.local which is a Next.js convention to not show environment variables and allow Next to detect those. In this demo’s case, I am directly putting that endpoint into the function.

Adding our GraphQL Queries
In the previous section, we enabled Next.js internationalization functionality and added a Link in our Navbar that allows users to toggle the available locales or languages on the site. Lastly, we need to add the queries we made with WPGraphQL in our WordPress admin to our front end.
Multi-Lingual Posts on the Home Page
Remember our GraphQL query we made with the language variable at the beginning of this walk-through tutorial? Go to the pages/index.js/ file and here we see it at the bottom being queried within our getStaticProps function:
export async function getStaticProps({ locale }) {
  const apolloClient = getApolloClient();

  const language = locale.toUpperCase();

  const data = await apolloClient.query({
    query: gql`
    query posts($language: LanguageCodeFilterEnum!)  {
      posts(where: { language: $language }) {
        edges {
          node {
            id
            excerpt
            title
            slug
            language {
              code
              locale
            }
          }
        }
      }
      generalSettings {
        title
        description
      }
    }
    `,
    variables: {
      language,
    },
  });
Code language: JavaScript (javascript)
You can see with the above code snippet that we are querying for all posts and their different languages tied to their default English setting. We are using Apollo client for the client side help to fetch this data along with setting the constant of const language = locale.toUpperCase();to provide and call the filter we have that we made within the Navbar.
WPGraphQL/Polylang Single Post query
We have our project set up now where we have our home page displaying all of our posts with the ability to click the link at the top of the navbar and switch paths between English and Spanish.
The next thing we need to do is create a query in our GraphiQL IDE back in the WP Admin to get a single post and its translation. Heading back into our query composer, create a query that looks like this:

This query is asking for the single post type with the variable being the slug, with the fields we want to grab along with the available translation and the language being the variable. When you query your variables via slug and language and press play in the GraphiQL IDE, you will get back the single post you want by its slug and its available translated version.
Dynamic Route Page and Single Post Query
The final steps we need to walk through are the dynamic routes page in our Next.js front end and setting up the query we just made for the single post to show up. This will allow users to click on the post they want to see on the home page, route them to that single post’s detail page dynamically. When they are on the post detail page, users can continue to be able to filter between English and Spanish.
Navigate back to the Next.js project and go to pages/posts/ [postsSlug].js. At the bottom of the file within getStaticProps, you will see our query:
export async function getStaticProps({params, locale}) {
const { postSlug } = params;
const language = locale.toUpperCase();

const apolloClient = getApolloClient();

  const data = await apolloClient.query({
    query: gql`
    query PostBySlug($slug: String!, $language: LanguageCodeEnum!) {
      generalSettings {
        title
      }
      postBy(slug: $slug) {
        id
        content
        title
        slug
        translation(language: $language) {
          id
          slug
          content
          title
          language {
            locale
            slug
          }
        }
      }
    }
Code language: PHP (php)
This is similar to our Home page query. The difference is we now are asking for a single post with our dynamic routes page and path to the that particular post detail page. When displayed, we will see our specific fields to that single post we asked for with the ability to toggle back and forth on its language translations.
Next, let’s focus on our getStaticPaths function, we can statically pre-build the static paths with our pre-built pages on our app since we have dynamic routes for the details of each page.
export async function getStaticPaths({ locales }) {
  const apolloClient = getApolloClient();

  const data = await apolloClient.query({
    query: gql`
      {
        posts(first: 10000) {
          edges {
            node {
              id
              title
              slug
            }
          }
        }
      }
    `,
  });
Code language: JavaScript (javascript)
I destructured the context of locales so I can have all the locales variables.
Now we are creating all the paths for only the existing default routes here.
const paths = posts.map(({ slug }) => {
    return {
      params: {
        postSlug: slug,
      },
    };
  });

Code language: JavaScript (javascript)
What we need to do is have a way to add on the locales for our existing paths. This is done here:
  return {
    paths: [...paths,
      ...paths.flatMap((path) => {
        return locales.map((locale) => {
          return {
            ...path,
            locale,
          };
Code language: CSS (css)
In the return statement, I have an array open and I am spreading out the paths that already exist which are default routes. The trick here is to spread out another instance of paths and then I use the flatMap method to go deeper into another level of array with the locales. The flatMap method is like the map method but it allows you to flatten out arrays that have a top level array, in this case the default paths and flatten them out into the top level array.
Then for each path, it returns a new map statement mapping through the locales and returning the path and the locale together.
Run the demo locally
We are almost done. All you have to do now is go to your terminal, run npm run dev and get your browser up on localhost:3000.
You should see this on your browser with the Navbar showing the available locale and language not in use which is Spanish:

Now click on the link and it should translate and you should see the same posts displayed with their Spanish translations:

Click on one of the Spanish post displayed and it will take you to the details page of that post and its path.
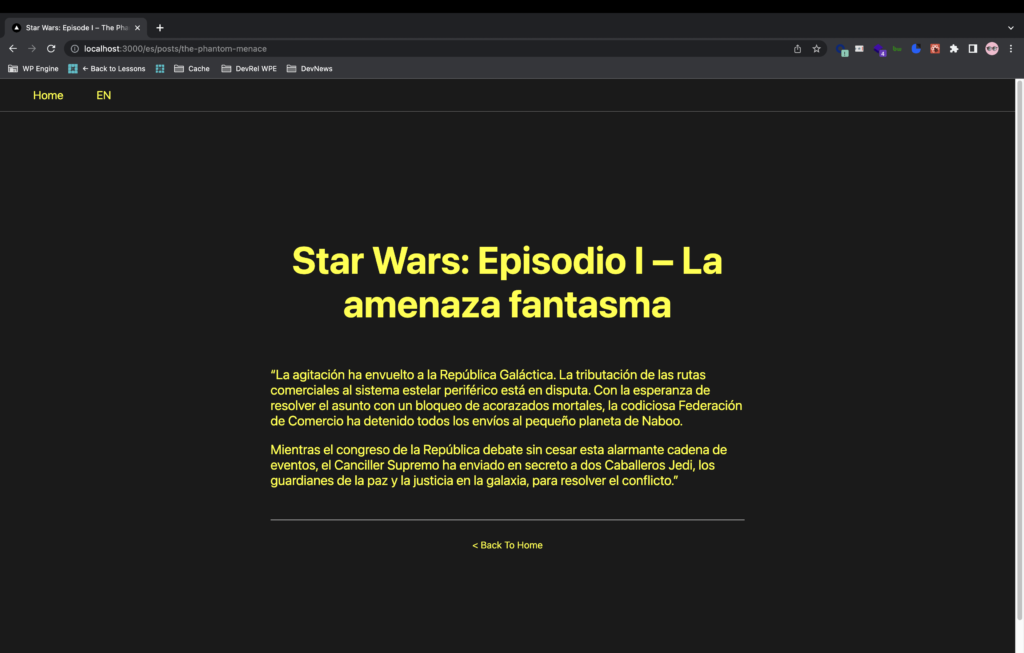
Lastly, click again on the link atop the EN link at the top of the Navbar to switch this post detail page to its default English version:

Done!! Stoked! 🎉
We are finished with this walk through tutorial! Jamstoke! With this tutorial, we hope you take away the importance of adding multi-language capability on your sites and apps, leveraging tools like WPGraphQL and all its extensions like Polylang, Next.js internationalized routing as well as Next.js fundamental features.
This is just one way of approaching multi-language Headless WordPress. I would love to hear your thoughts and your own approaches and builds. Hit me up in our Discord!
Here is the demo once again so you can follow along, make it your own and add on to it if you like on my GitHub.
Click here if you want to see the site live! If you are looking for headless WordPress hosting, my site is on the Atlas platform.