Get Started


Key Takeaways
Advanced Custom Fields (ACF) is pivotal in WordPress development. ACF Pro can now be installed via Composer, enhancing dependency management for developers.
ACF 6.1 streamlines data structuring for sites. Custom post types and fields can now be set up within ACF, simplifying the site-building process.
ACF empowers dynamic content creation. With ACF Blocks, developers can create custom blocks for non-technical users to manage easily in Gutenberg.
Enhance WordPress experiences with ACF’s versatile features. ACF’s flexibility and integration capabilities make it a go-to tool for building engaging and powerful websites.
Advanced Custom Fields (ACF) is almost synonymous with WordPress development. Powering more than 4.5 million sites, this plugin has helped WordPress grow to new heights. You know the plugin. You’ve probably built with the plugin. But are you taking full advantage of it?
In this session, we’ll take a rapid-fire look at some of the lesser-known ways you can leverage ACF to build your most dynamic, powerful, and engaging WordPress experiences yet.
Speakers:
- Iain Poulson, Senior Product Manager at WP Engine
- Rob Stinson, Product Marketing Manager at WP Engine
Session Slides:
Transcript:
Iain Poulson: Hello, and welcome to our session on the Advanced Custom Fields plugin. I’m Iain Poulson, the Product Manager for ACF at WP Engine, and I’m here joined by Rob Stinson, who’s our Product Marketing Manager. Today, we’re going to take you through a fairly rapid session of seven things you didn’t know you could do with Advanced Custom Fields plug-in, some things that are fairly new, and some things that are lesser known. And functionality that we’re going to center around a fictitious site that Rob has designed, so we’re fans basically of real examples rather than abstract stuff, but we’re also big fans of movies.
So this site is a celebration of the best period of cinema, probably, arguably, the movies of the ’90s, and so the site is based around recognizing and awarding the most popular and the best loved films of the ’90s. The site needs to showcase movies and allow users to vote for their favorite, and in true Rob style, the site looks great. So let’s get started, and start from the beginning, and get ACF installed. Tell me how, Rob.
ROB Stinson: Cool, thanks, Iain. Yeah, thanks, man. It does look pretty good, doesn’t it? It’s been a good bit of time designing it, had some fun. So we’ve won the contract. We’ve got the project and we’re kicking things off, and the first thing we’ve done was if it identified, that this makes sense firstly, for ACF. We’re going to need to set up a whole bunch of custom fields for some custom post types, and do some interesting templating and stuff like that. ACF is the tool for the job here. So of course, we first need to install ACF, and that is number one here. So typically we know that you could just grab the plug-in as a zip file, and upload it into the WordPress admin, nice and simply.
That’s the standard way of installing a plug-in, but we also know that developers these days like to manage their dependencies a little bit differently. I like to typically manage it within the code, and within PHP world, that’s typically done with Composer. Now you’ve been able to install WordPress plugins from the WordPress.org repo for some time quite easily with Composer, but it’s been a little bit harder to do with premium plugins like ACF Pro.
But the most recent release a couple of weeks ago, actually, about a month ago, we’ve actually enabled the ability to install ACL Pro now via Composer, which is fantastic, so we’re going to do that right now. So how to do this is, step number one, you need to add the ACF Pro Composer Repo URL to your composer.JSON file. Step number two is, you’re going to create an auth.JSON file for your credentials, and you’re going to place that in the root of your project, both locally and on the way to where we’re deploying to and the credentials that you need for that file are now available in your account area on advancedcustomfields.com.
So if you log in, you’ll see a licenses area, and there’s a few extra tabs and stuff like that, you can actually grab the whole chunk of code, copy and paste the whole thing, or you can grab the individual username and password, and bring it over to the file that you’ve created, the auth.JSON file.
And the third step, we run the Composer command, so that’s nice and easy, a 3-step process, but fantastic because it means that, like I said, developers who like to sort of have a little bit more fine tuned control over how they manage their dependencies of their project, you can now do this with ACF Pro, which is fantastic. Of course there’s more documentation on it, so just to go deeper and just to see how it all unpacks, jump over to the docs on the website, and you should be good to go. Cool, I’m going to throw up to Iain for number two.
Iain Poulson: Right, now let’s talk about setting up the data for the site. So custom post types, they’re pretty fundamental in WordPress in how you build a site that isn’t just about posts or pages. It’s the custom post type feature that came in whatever WordPress version way back turns it into a proper CMS, and it’s usually the first step that developers do when they’re building out the sites. And that’s always been something that’s happened outside of ACF. Historically, you either register a post type with code, or use another plugin to do that, but it’s the part of the journey that connects quite well with ACF. So as part of ACF 6.1, that functionality is coming to the plugin, so it’s the natural starting point of the journey.
You want to build a site with data structure data, you’re going to build a post type. You’re going to add fields to it, and then you might add some taxonomies, and then you start editing that data. So yeah, that’s something we’ve put into 6.1, and it’s pretty exciting to have that full flow of building in CMS. So let’s look for the VHS award site. We’re going to need to structure our data and get WordPress doing what we need it to do, so in terms of the post type, because we don’t want to use posts and pages, we’re going to create a custom post type for movie, to store the movie data, the data object or the data model, but obviously in WordPress terms, that’s a custom post type.
We want to classify the movies with a taxonomy so we can allow users to easily see movies of a type of genre, and then you’re going to get the easy front-end viewing, the simple URLs that allow you to access movies of certain genres. And we’re going to need some extra fields to store structured data around a movie, so we want, for example, the director is a text field. We’ll need the year the movie came out as a number, and we’re going to need some form of relationship to relate movies to each other, and of course, we need to store the number of votes that it’s going to get, and that’s the number field.
So let’s just have a quick look in ACF 6.1 how are we going to do that. So this is the ACF 6.1 screen, and you’ll notice slightly different, we’ve got the menu on the sidebar. It’s ACF now, not just custom fields, and this is the post type screen. So this is just me setting up the movie post type. It’s the simplest workflow here, of just adding a singular label for the post type, which is movie, the plural label, and it’s automatically generated the post type key. The public setting is set on as default because I want it visible in the front-end, the post type, and I want to be able to edit it in the admin.
So once that’s saved and added, the nice thing about the connection here with ACF is the fact that the next step in the journey is we’ve created the post type, do we want to add fields to the post type, or do we want to link existing fields to the post type, or create a taxonomy? So we can do that all from that point here, so and obviously we do need to go and add those fields. OK, so clicking on that notice to add new fields to the movie post type, we get the Field Group Editor, and it’s pre-populated down at the bottom in the settings Metabox.
So the location rules are set already to say, show these fields, when you’re editing the post type of movie, and then you can go ahead and add your fields, which I’ve already done here in the screenshot. So we’ve got the director, the year, and the votes, and the related movies. Then of course, we can register the custom taxonomy that we talked about, adding the genre, and connecting the genre taxonomy to the post type of movies. But these are fields that we’ve added that are attached to the movie object, but what about fields that we need to store data that might be more global or site-wide? Rob, what have we got for that?
Rob Stinson: Cool, thanks for that, Iain, looking good. Our content model is coming along nicely, but we’re not done yet. Now we’ve already covered installing ACF Pro via Composer, and we just looked at custom post types, and custom taxonomies in ACF. Now those two things that are very, very fresh, but the third thing I want to cover now, it’s an oldie, but a goodie. And so it’s been in the plugin for quite a number of years now, but not everyone knows about it, and not everyone fully understands the value of this, so we’re going to look now at global fields with the options page.
Now typically, you think about a custom field and how it stores data for a particular post, or a page, or a custom post type. But sometimes we have a need to store data that is associated site-wide, and a great example on our wonderful VHS awards site is this kind of top notification, or promotional, bar. And this is a bar that we want to persist across every single page of the site Home page, you go to a movie page, it’s there. You go to the About page, or a Contact page, or a Blog page, this little bar sits across the whole site no matter where the user navigates to, so this doesn’t make sense to associate that relevant data with a post or a movie.
It’s something that should be associated with the site. So we want to be able to toggle this bar on and off because we want to set things up, but perhaps we are want going to want to turn this on at certain times of the year. We might have a particular promotion or a campaign, so we want the ability to have a Boolean field, so we can toggle this thing on and off. Also, we want to be able to update the text of the called action itself, or in the button, so of course, custom fields make a lot of sense for that.
Now to set up an options page, which is what the feature is within ACF which allows us to do this, step number one is, typically in your functions, .PHP file, or you can, of course, register it elsewhere, perhaps a plug-in that you’re developing. But you’re going to register the options page itself, and there’s a few little configurations around in the settings there that you can do. You can have a single options page, but you can also actually have multiple, and you have them sort of nested, so child pages, or parent pages and things like that, so you can do interesting things.
For ours, ours is pretty simple. We’re just setting up a notification bar here, so we just need the single page, so step one is register that Options page. Step two, as we would normally, we would create a field group. We’d call it promo bar fields, or something like that, or notification bar fields, and you can see there I’ve got my Boolean field at the top, so true or false is the promo bar active. And then I’ve got a text field for message, a text field for the button text, a URL field for the button link, and then we might have a notice type as well, but perhaps we want to have alerts or promotional-style notices, and perhaps we do some interesting conditional styling based on whichever is selected there.
So we add our field group, and we add our fields, and step three is just down below that. As you know, in the location rules, we can now select Options page is equal to– and you see the site settings that I’ve got there– that is the Options page that I registered in step number one. And so with all that done, in the WordPress admin now we see over on the left hand side, in our admin bar we’ve got Site Settings, and we click on that, and we see all the fields, as we would expect.
And we can turn the notification bar on or off. We can update the text, update the button, and then that data will be made available to our templating, and so the templating experience with data fields within an options page is broadly the same as what you would do otherwise. There’s a couple of little nuances around how you specifically target the fact that this is an Options page and not a post, but jump into the documentation on advancedcustomfields.com, and it walks you all through how to handle that. Number four, I’m going to throw it back to you, Iain.
Iain Poulson: Thanks, Rob, yeah. I just want to now talk about how we programmatically register fields with ACF. So creating fields in ACF is super easy with the Field Editor user interface, the kind of thing we know and love, we’ve seen earlier on, but there are other ways to define fields. ACF allows us to export both JSON and PHP files with field definitions, and that can be used to create fields.
But did you know that, actually, there is in the ACF community, a package called the ACF builder that allows you to create fields using kind of a fluent API with PHP code? It’s actually a third party package, and it’s called the ACF Builder Package from StoutLogic. Yeah, the GitHub link’s there. Basically, it allows you to create fields straight from code without knowing the intricacies of how ACF needs the field data in PHP. It uses a really kind of expressive way of doing that. It makes it reusable and portable.
You can commit the field definitions because with PHP files to your version control, it’s easy to collaborate. It’s easy to send to your deployment mechanism, and you also kind of take away the Field Group editor UI, so you’re defining those fields in code that then stops clients from having to touch the UI, so let’s have a quick look how we do it. To install it, because it’s a package– we’ve talked about Composer earlier. This is a Composer package that you can install with the following command, Composer acquire StartLogic, the vendor, ACF Builder, and then this is what the code looks like.
You’re kind of instantiating an instance of the Fields Builder, and you’re giving it the slug of what would be the field group. And then you’re saying, in this field group, let’s add a text field called Director. Let’s add a number field called Year, and then importantly, we’re going to set the location for the field group to appear on the post type of movie.
And all of this does a lot for you without you having to think about it, so you give it the director name for the field label, and it will go ahead and, obviously, create the slug or the key for the field without you having to add that, so it takes away a lot of typing, a lot of thinking, and a lot of error-prone creation. And then the second part is where you load that field definition into ACF, and it will build the field group out for you.
Rob Stinson: All right, so number 5 here, bidirectional relationships. Now, this is an interesting. I think I remember this specific project I worked on back in the day in my agency days where I actually figured this out, and it was kind of a game changer. So if this is not something you’ve done with ACF before, pay attention, because this is a really useful thing, so let’s look at an example. Looking at, of course, our VHS awards site, we’ve got a roster of say 100 films, and there’s different ways of, obviously, connecting these things.
We have our genre custom taxonomy before. We might have a couple of different fields that sort of handle things like tags or grouping, so bidirectional relationships are useful when you want to create a specific type of two-way connection between two posts, or in our case, two movies. So for our example, let’s just say we’ve got these three films in our database, and they’re all animated, so we want to create a bidirectional relationship with them.
Now what that means is that say we’ve got our first film here, “Toy Story,” great movie, and we identify that there’s two other related films that we want to associate that. So we could create a Relationship Field for our custom post type, which is movies, and we would have a Relationship Field there, and we would select the movie, “The Lion King,” and Princes Monon– I’m so sorry. I keep stumbling over this word. I’m butchering it, but the film’s called “Princess Mononoke.” Ha, ha, ha. Please don’t hate me. I’m just struggling to pronounce that word for some reason.
And we identify that these two films are related, so we select them from the Relationship Field. Now in this instance, it would make sense that, yes, “The Lion King,” for example, is related to “Toy Story,” and therefore “Toy Story” is related to “The Lion King.” So perhaps normally we would go over to the “Lion King,” edit screen, and then we would find “Toy Story,” and we would add it there, but we’re doubling up our work there. So what a bidirectional relationship does is that it automatically creates that connection for us, which is really, really useful.
So once we add, for instance, “The Lion King” to “Toy Story,” “Toy Story” is automatically added to the “Lion King,” and that’s really, really useful. It saves a lot of time for content creators and content managers. It reduces the risk of forgetting, or perhaps you might remove one from one post, and then forget to remove it from the other. It really, really simplifies the content editing experience, so a really useful thing that can be used, especially on interesting sites like this one. So how do we do that? Well, there’s two ways to do this currently, and I’ll talk about a third thing, maybe, that’s coming down the track later this year.
So how it’s done is, number one is, you can do this in code. So just with the ACF Pro plug-in installed, you can write code to do this. And you can write a function that hooks into the ACF Update Value Filter, and this filter runs before a value is saved and basically what it does is, it grabs the current post that you’re editing, and identifies the post ID of the post that’s been added, and then updates the other post, and does that sort of matching in the background for you, so quite useful.
A little bit of code, so as long as you’re comfortable with that, it’s not too heavy lifting. But again, there’s a link there, or a URL, that you can check out in the Advanced Custom Fields docs to see how you can do that. Option two, though, is no code, which is kind of nice some of the time. So this is actually an ecosystem plug-in called ACF Extended. It is available on WordPress.org, and what it does is, it just brings that feature into the ACF UI itself.
So if you’ve installed this extension, ACF Extended, and you’ve got ACF Pro installed, you’ll see an option that when you create a Relationship Field, there is a bidirectional toggle that you can turn on, and then you can establish that to a collection right there from within the UI, which is pretty handy. Now things are coming along really interestingly with this project, but let’s not lose our head with it, or should we? Iain, over to you.
Iain Poulson: Yeah, Thanks Rob. It is worth calling out headless when it comes to ACF. ACF has headless support, so yeah, underlying headless sites, decoupled nature of sites. There’s a lot of API communication going on, and ACF has API support. The REST API we added natively into ACF as of 5.11, or 5.11, and we support GraphQL with WP GraphQL plugin, which has an ACF add-on for WP GraphQL, so ACF supports headless sites. It has integration with the WP Engine Headless WordPress program for proper headless WordPress sites, but let’s talk about just a kind of a real world example of how you would take the data that’s in our VHS WordPress site, and use it in a decoupled way.
So for example– hear me out– people are basically voting on the VHS award site, and they’re going to be– I think we put an arbitrary date– they’ve got to vote until the end of the certain date, and we’ll see what’s the most popular. We’ve got our local cinema, and it’s doing a double bill of the most voted ’90s movies. So they’ve got, at the cinema, they’ve got their billboard, and it’s online. It’s connected to the web, and we can dynamically power what is showing on that billboard, so we need to connect to our WordPress site.
For example, the billboard is a simple node app, we need to fetch the data from the VHS site, so let’s just have a quick look how we might do that with a custom REST API endpoint, and as I said before, we’ve got GraphQL support. It can be done both ways, but this is probably a simpler example to show. So first of all, we’ll create a function that basically gets the data that we need, so just going through this, it’s a WP query that is saying, I want movies, or post types of a type of movie, but I only want two. But I also want to order it by the ACF Field, which is the field name is votes, and we’re ordering it in a descending order, so we’re going to get the top, and we’re going to get the top two.
And then next, we’ll create a custom REST endpoint, which is using the callback function that we created in the previous slide, and that is just going to give us an endpoint that we can hit to go and get the two movies. So what that actually looks like in reality– and this is just testing– so the URL is vhsawards.com, the WP-JSON, and then we gave it a namespace of VHS Version 1 in case we ever want to change the API, and we’ve just got a very simple URL structure of popular.
And that is just returning a JSON object with two items, the top two voted ones, which just so happened to be “Fight Club” and “Goodfellas,” which are pretty good, so yeah. That’s definitely good to show how ACF powers decoupled and headless sites, but it’s pretty hard to talk about WordPress at the moment without mentioning blocks. I can’t believe we’ve got so far without even mentioning blocks. What have you got for us, Rob, to change that?
Rob Stinson: We definitely need to talk about blocks. Before I do, I realized that just before when we were looking at number five around bidirectional relationships, I hinted at a third way of doing it. I didn’t cover it, so all I want to say is watch this space because we’re planning, we have on the roadmap, to look at adding better bidirectional relationship support natively into the plugin itself, so you can facilitate that stuff just within the ACF plug-in without the need for third party stuff, so just watch this space, no commitments on timing. That is something that we’re looking at.
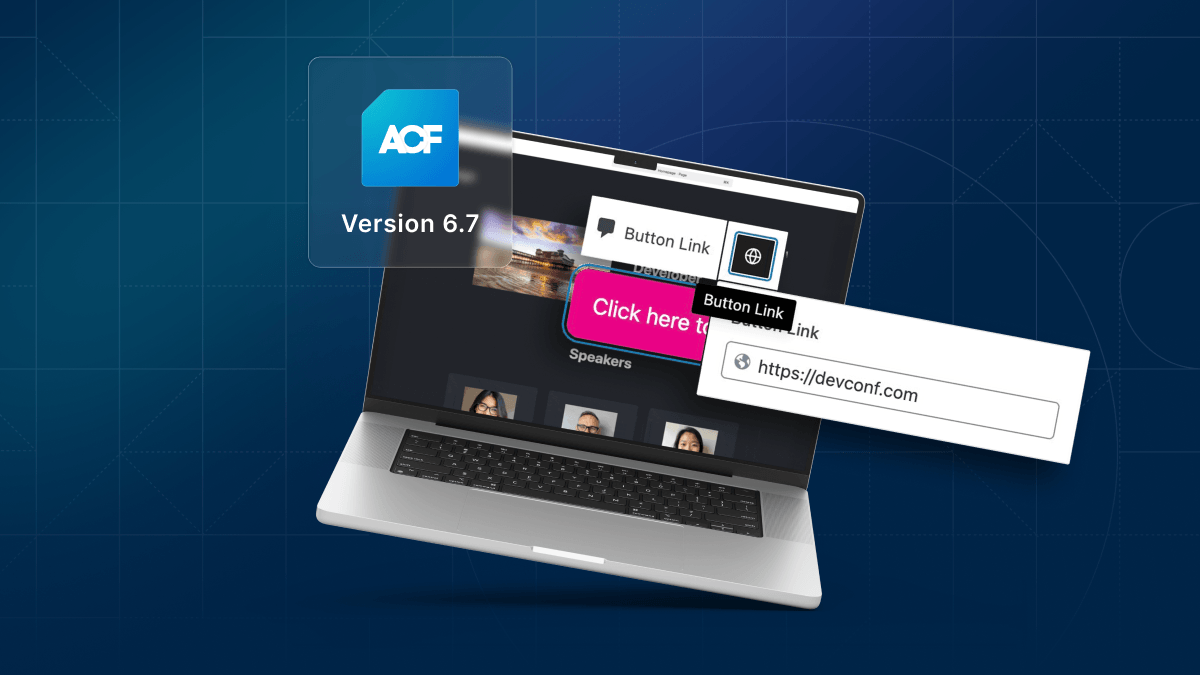
So number seven, yes. Let’s look at creating a custom block with ACF. Now most people know that you can do this in ACF now, but not necessarily everyone has tried it. So if you’re in that camp and you’re a long-time ACF user, and you haven’t used the custom block functionality now, watch this, because it may just prompt you to see the value in this feature. But how are we going to use this for the VHS Awards? Perhaps we want to have a block component for our site that we can add various places, and that’s the beauty of a custom block, or any block, is that it can be used and placed on pages and posts throughout the site, and we want to create a custom call to action block.
Now this is a pretty simple block, and you can definitely do more interesting things with custom blocks. We’ll keep it simple now. But this blue banner, call to Action Block, we want to be able to place in the Home page, or maybe on some blog posts and things like that, encouraging the readers and the site visitors to click that button, and go through, and vote for their favorite ’90s film. So how would we build this custom block with ACF? And the reason we’re doing it as a custom block is it’s got a unique design to it.
It’s got this interesting background gradient going on for this repeating dot pattern, and we realized it’s easier for us to build this out as the custom block with that fine tuned control that gives us, versus what we could perhaps do with blocks that are off the shelf with WordPress core. So how do we do this? Step number one is we register our custom block, typically in functions.PHP, or wherever you’re writing this kind of code. Nice and simple, and we point to the directory of where the template files will ultimately be for our custom block, so that’s step number one.
Step number two, we create our field group, and we add our fields. So for our Called Action block, we want to have text, button text, button link, and background color, as well. Perhaps we want to give the option for some variation on styling for this. Number three is we’re going to, in the location rules, we’re going to select block, and we’re going to say is equal to, and we’ve registered the CTA block just previously, and that’s why it’s available to us there in that dropdown. Now we move to our template file, so all the fields and everything are set up, and now we’re going to be doing some of our templating. Now, templating is different in some ways to how you would, perhaps, traditionally template with ACF.
But in many other ways, it’s very, very similar, so a lot of the patterns that you typically employ for your development, you’ll be using as you build out your custom blocks, which is fantastic. So we will, in our project, we’ll say it’s our custom theme. We have a blocks directory, then we have a CTA directory, which matches the block that we have registered, and then typically you would have three template files, block.JSONsomething.PHP, which is our HTML markup, and then dot CSS for our styling.
So this is the block type JSON, and this is sort of where we’ve registered the block, but this is how we can figure things a little bit more, and there’s a lot you can do here around configuration and various native Core features that you can toggle on, or turn off, make available to your custom block. So definitely check out the documentation on this and understanding what can be done, because this is really where you can, like I said, configure how that block is made available, and displays, and the features, the core features that you can pass through to your custom block.
We then have our template file, our PHP file, and you can see here I’m just sort of setting up variables interacting with Get field, interacting with our field data there, a little bit of very simple conditional logic on our styling there, and then our HTML for our block itself. And then I’m not going to walk through the CSS. You know what CSS is, and I’m sure you could probably write better CSS than what I’ve written here, but you get the idea. You have a CSS file for the styling of your block, and you can see we have some interesting things around fonts, and the radial, gradient background for that sort of dot background, which is kind of fun.
But again, the reason we’re creating this custom block is because we want it to sort of really fine tune our CSS, our styling, so we can really implement the design that we’re working towards. And just to show you what this looks like in the Editor, you can see, we can select our Called Action block, you can light wide. We can interact with our fields, add the text for the text and the button, and add a link for the button, as well, and that is a very nice-looking custom block for which we can pass through to our content editors.
Iain Poulson: Yeah, thanks, Rob. What a good-looking sight. We really do need to put that live. That is awesome. Right, let’s just go over what we’ve talked about today. So we went through how to install ACF Pro, but with Composer. We talked about how to register custom post types and taxonomies in ACF. We looked at registering global, or site-wide, fields with an options page, and we’ve looked at a different way to register fields programmatically with a package.
Rob’s delved into relationships and how to create bidirectional relationships. We’ve touched on headless with ACF, and Rob’s now just done a great example of creating a custom block with ACF with hardly anything apart from some PHP, HTML, and CSS, and no react at all going on, so that’s really good. This has been great, Rob. What are the votes? What have we come out as?
Rob Stinson: Look, for me, it comes down to this– the greatest film of the ’90s is undeniably Robin Williams’ “Hook.” A lot of nostalgia wrapped up for me in that, I love that film. What about you, Iain?
Iain Poulson: For me, it’s got to be Kevin Costner’s “Robin Hood, Prince of Thieves.” It’s a classic. Forget the bad hair, the mullets, the dodgy English accent which isn’t even an English accent. It’s the greatest Robin Hood film of all time, and that is a hill I’m willing to die on.
Rob Stinson: Ha, ha, no, fair enough. Look, thanks, everyone, for hanging out. I hope you learned something, and we’re really looking forward to seeing what you build with ACF, cheers.