Get Started


Key Takeaways
Editing your website footer can enhance user experience and SEO. Optimizing your footer with relevant links and information can improve site navigation and search engine indexing, ultimately benefiting your brand.
Footer updates should include legal and contact information changes. Keeping your footer up to date with accurate details like address, phone number, and legal links is crucial for maintaining credibility and compliance.
Utilize WordPress theme customizer and widgets for footer editing. Leveraging these tools allows for easy customization of your footer elements, enhancing the overall look and functionality of your website.
Creating a custom footer menu can streamline navigation and engagement. By organizing links in a footer menu, you can help visitors easily access different parts of your site, leading to increased interaction and satisfaction.
Are you looking for ways to edit the footer on your WordPress website?
A footer is a basic website element, found at the bottom of most web pages, and it’s typically reserved for important links or information pertaining to your site, including your privacy policy, a sitemap, or contact information.
While editing a website footer can be somewhat cumbersome (depending on your website theme), it certainly doesn’t have to be. There are a few different ways you can edit your footer to make it more useful for your site visitors.
In this article, we’ll show you how to edit the footer on your WordPress website, including step-by-step instructions for different ways to get it done. Here’s what we’ll cover:
Your WordPress Footer:
What Is It?
The footer on your WordPress website is the area found at the bottom of (generally) every page across your site.

Most quality WordPress themes come with an editable footer you can tailor to your specific needs. Common changes to a WordPress footer might include adding or removing links, using custom code to make a unique footer across your site, or creating custom footers for different pages.
While you may be inclined to rely on your default footer settings, the footer can do more than you might expect. As you look to optimize your site, the footer can be valuable real estate that not only helps site visitors find exactly what they’re looking for but also assists with your site’s SEO.
That’s because common footer elements such as internal links and links to a sitemap can help search engines index your site more efficiently.
Additionally, you can use your footer to interlink with social media channels, building your site’s traffic and further optimizing things like domain authority and search engine rankings.
Why Edit the WordPress Footer?
As noted above, most WordPress themes come with a footer area you can edit and personalize with specific details and links for your site.
Editing your website footer to ensure it includes helpful information is not only important for SEO. Ultimately, creating a footer that helps site visitors find what they’re looking for will lead to a better user experience.
When it comes to editing a website footer, standard elements you might want to add or edit can range from copyright and contact information to links pointing to other parts of your site (e.g. the About page, Contact page, or Blog) or social media channels.
While those options provide a great starting point, editing the existing information and adding additional elements to the footer of your WordPress site is all about showcasing the unique ingredients that make your site, your brand, or your business stand out.

Many web users are accustomed to finding the information they’re looking for in a website’s footer, and making it easy for them to locate will translate into easier navigation and higher engagement across your site.
While improved SEO and a better user experience are some of the larger reasons for editing the footer on your website, other reasons might include:
- Updating Contact Information
If your business (or your client’s business) has changed its address, phone number, or email address, you’ll want to update this information in the footer to ensure that it’s accurate and up to date. - Updating Legal Information
If your business’s Privacy Policy or Terms of Service has changed, it’s important to update the links in the footer, ensuring that users can access the most up-to-date information. - Adding or Removing Links
As your website evolves, you may want to add or remove links from the footer to reflect changes in the site’s structure or content. For example, if you’ve added a new product or service, you may want to add a link to the corresponding page in the footer. - Design Refresh
While using a new theme or undertaking a larger design refresh will often yield more results, editing the footer of your site can help improve an outdated design, offering a “quick fix” as opposed to more time-intensive alternatives. You may choose to make similar updates to the header of your site, offering a refresh across the top and bottom of each web page. - SEO
As noted above, editing the footer of your WordPress site can improve SEO, and updating it might be included in a larger SEO improvement project across your site. Making sure your footer includes helpful; links, including a link to your sitemap, will help search engines index your site and rank it more favorably.
You may also want to remove the footer altogether, which you can find out more about in this article.
All in all, your reasons for editing the footer on your website will be as unique as your site itself. Understanding how to make those edits, however, will also depend on a few specific elements (such as your website theme).
How to Edit Your WordPress Footer
Now that you know what the footer is, as well as why you might want to edit it, let’s take a look at how you can make changes to your website footer.
Open the WordPress theme customizer
Each theme is unique, but generally, to begin editing your website footer, you’ll open the WordPress Theme Customizer from your Admin dashboard (by selecting Appearance > Themes > Customize).
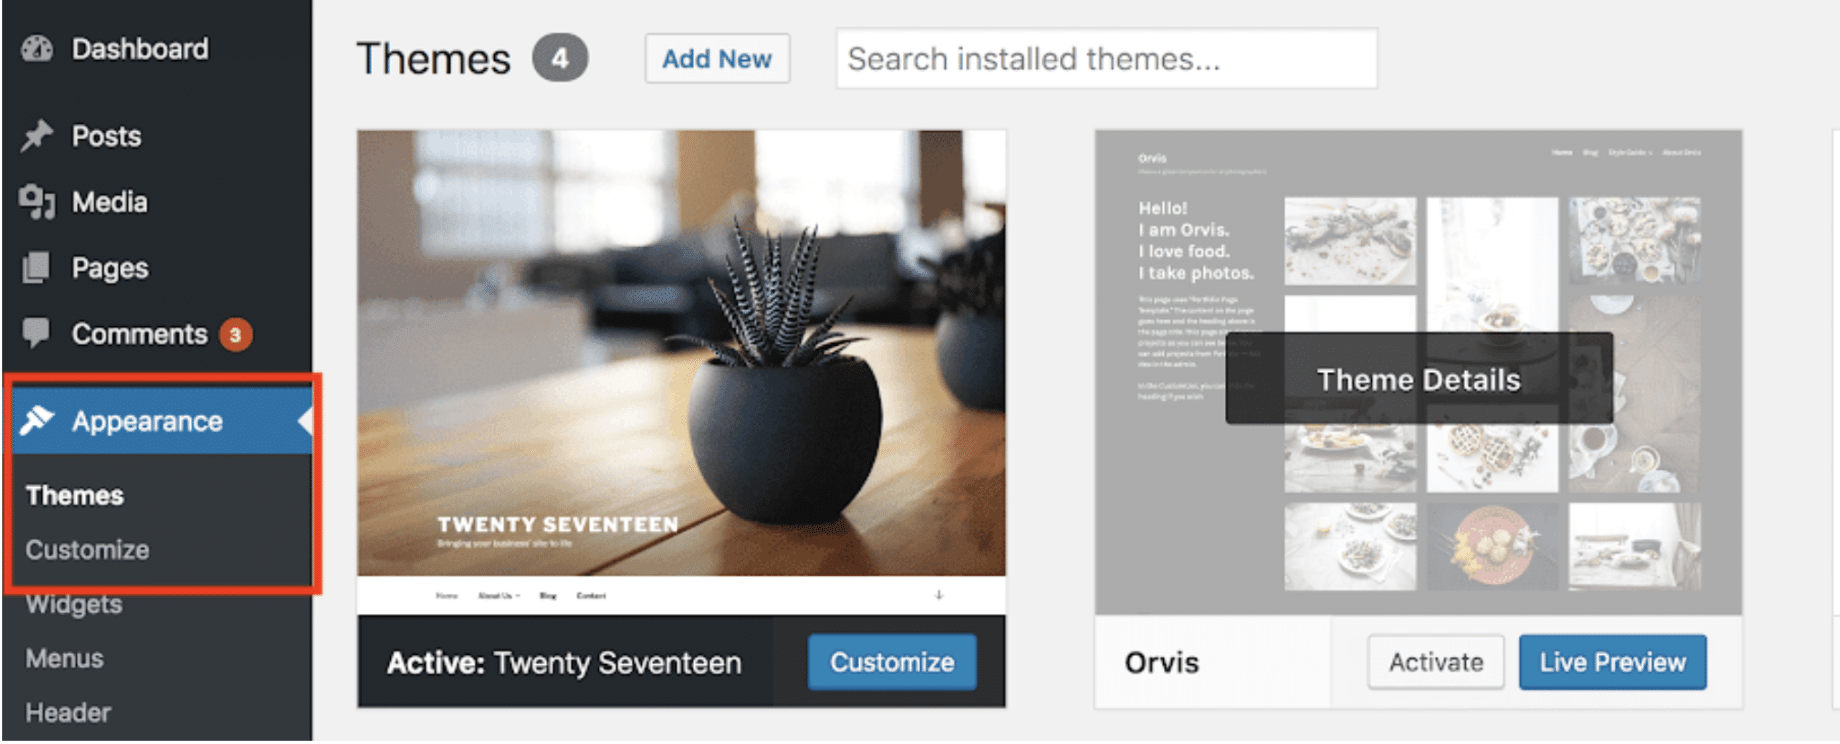
Once the Customizer is opened, you’ll see different options on the left-hand side of your screen for editing your theme. Look for options pertaining to the “footer” area (it may be called some variation of “footer” ).
In some themes, this may be through the “Widgets” tab (more on editing the footer with widgets below).
In newer WordPress themes, such as Twenty Twenty-Three, which enables Full Site Editing, you can simply click into your footer area (after opening the Customizer) and edit it using the same type of block functionality found in the WordPress Block Editor.

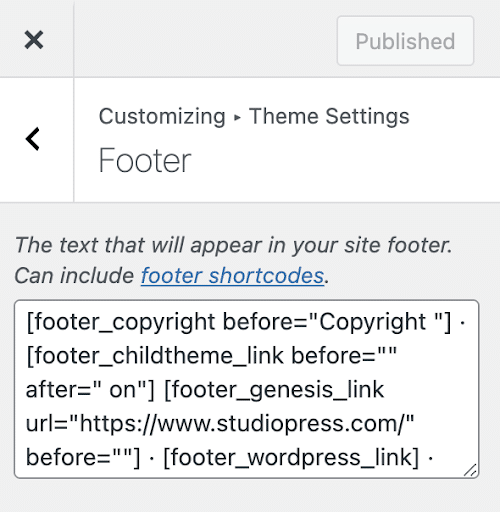
Each theme will offer a different approach via the Customizer. Using the Magazine Pro theme, for example, you can edit your website footer by clicking through “Theme Settings” to “Footer,” where you can use a variety of Genesis shortcodes for adding the elements you want.
Many themes make it easy to edit the footer via the Customizer, with pre-defined fields for common footer elements such as copyright information or links to the About Us page.
Using Widgets to edit your site footer
Another way to edit your website footer is with WordPress Widgets. Under “Customize” in your Admin dashboard, click on “Widgets” to pull up a menu of all the available Widgets on your site. These are typically commonly used elements you can add to your site and should include options for editing your footer.

As noted above, other themes will provide different ways to use Widgets for editing the site footer. Using the Twenty Twenty-Two theme, for example, you can add widgets to the footer area the same way you would add blocks to a page.

Once you’ve added or updated the widgets available for your theme, save the changes to see them reflected live on your website footer.
Create a footer menu
Another way to edit your WordPress website footer is by creating a custom menu, which can be added to the footer as a Widget.
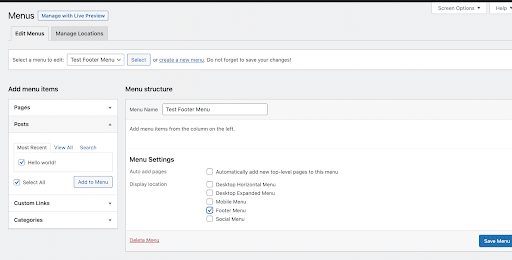
To create a menu, click on the “Menus” tab under “Appearance” and select “create a new menu” near the top of your screen.
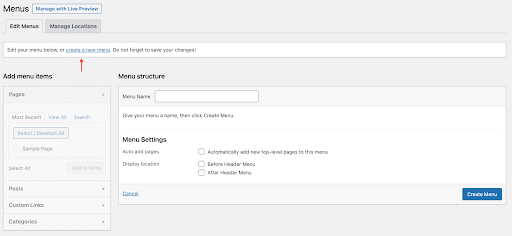
If it’s the first time a menu has been created on your site, you’ll see “Create your first menu below.” Enter a name for the new menu (it should be something that helps you easily find it again), select the footer location under ”Menu Settings,” and click on the “Create Menu” button on the bottom right.
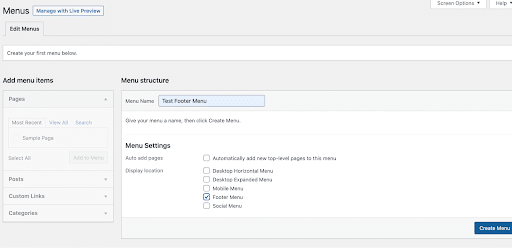
This will create your new menu, and you can begin adding links to it by selecting pages, posts, or categories from the left-hand column. Once you’ve selected the menu items you want, click “Save Menu” on the bottom right to save your changes.
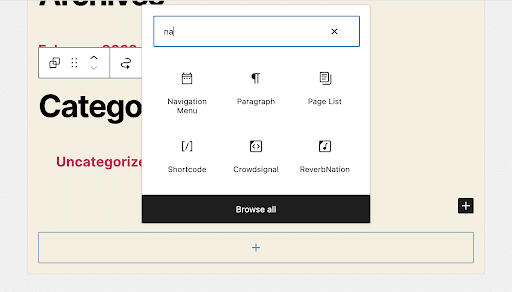
The new menu can now be added to the WordPress footer Widget area. Navigate to the Appearance > Widgets page in your WordPress admin panel. Next, click the “+“ icon to bring up all available blocks, and search for the “Navigation Menu” block.
Once you’ve selected the “Navigation Menu” block, click on the “Select Menu” dropdown, which should include the new menu you’ve just created.
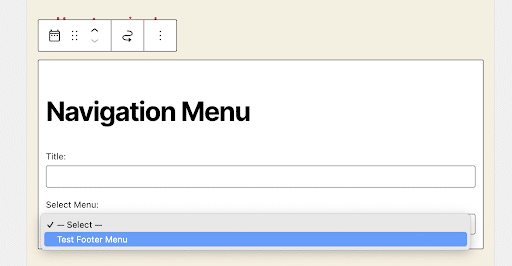
Select your new menu and add a new title (instead of “Navigation Menu”) if you prefer. The title will appear above the menu in your footer.
From there, simply click the “Update” button to save your changes and your new footer menu should be visible on your site.
Add HTML script to the footer
You can also edit your WordPress website footer using HTML script, which will allow you to insert a number of elements into your footer, such as custom code, images, or social media icons.
For starters, you can use HTML to add some of the common footer elements mentioned above such as contact information, copyright information, or links to your privacy policy and terms of service.
You can also use HTML to add custom code, such as tracking codes for analytics, to your footer. HTML can also be used to customize the appearance of your footer with things like images, different font sizes, and colors, or even adjustments to the layout.
To add HTML to your WordPress footer, select Appearance > Customize from your Admin Dashboard. In the Customizer, you’ll select the Footer option specific to your theme and then you’ll need to select the Widget area where you want to add HTML.
Click “Add a Widget” and select the “Custom HTML” Widget from the list. Drag and drop the Custom HTML Widget to the Widget area you’ve selected. From there, you can open the Custom HTML Widget and paste your HTML code in the content area. Save your changes and preview your site to see how the HTML code displays.
Remove the “Powered by WordPress” watermark
Last but not least, you may want to remove the “Powered by WordPress” tagline when editing your website footer.
To remove this text, which is found at the bottom of many WordPress sites, simply click into the Customizer via Appearance > Customize, and find your editable footer area.
From there you should be able to find different options for editing your footer, including a tab titled “Copyright.” Click on this tab and then delete the existing text—you can add your own copy or leave it blank.
Make sure to save your changes, and then preview your site to make sure the edits worked.
If finding the editable footer text proves unwieldy, you can also remove “Powered by WordPress” manually, although the process is a bit more technically involved.
First, make sure you have a backup of your theme’s functions.php file. At WP Engine, we also always recommend that you make any changes to your site using a staging or local development environment (i.e. not in live production).
Once you’ve ensured you have a backup and you’re working in a safe environment, select Appearance > Editor, and find the “functions.php” file from the list of theme files.
Once you find functions.php, add the following code snippet to the end of the file:
function remove_footer_admin() {rn echo '';rn}rnadd_filter('admin_footer_text', 'remove_footer_admin');This particular code uses a filter to modify text that’s displayed in the WordPress admin footer. By adding an empty string as the new text, “powered by WordPress” will be removed from your site.
Once the code has been added, click “Update” to save your changes and you should be good to go.
Conduct a Site Check
Once you’ve made edits to the footer on your WordPress site, it’s a good idea to perform a site check to make sure everything is working the way you want it to.
This doesn’t need to be a comprehensive site audit, however, you may want to check things like links, design and layout, or site responsiveness. Furthermore, editing the footer might affect other functionality across your site, so it’s also advisable to check things like forms or the checkout process ( if you have an eCommerce site) after your footer edits are complete.
You should also keep an eye on general site performance, as making any edits to your site could have an impact on a particular plugin or your larger website theme. By and large, you shouldn’t expect any negative impacts from editing your site footer, but it’s always better to be safe than sorry, and a quick check of your site’s essentials will give you peace of mind.
Bonus: Creating a Custom WordPress Footer
While many of the above steps are focused on adding specific customizations to your WordPress website footer, you can also create custom footers for different parts of your site, i.e. specific pages or categories.
Creating custom website footers for your WordPress site is a little more hands-on than editing a footer through the Customizer or Widget area and requires a combination of custom page templates and conditional logic.
To begin, you’ll need to create a new page template for the page or pages where you want your custom footer to appear.
Start by creating a new PHP file in the theme directory for your WordPress site. Once the new file has been created, add the following code snippet at the top:
u003c?phprn/*rnTemplate Name: Custom Footerrn*/rn?u003eReplace “Custom Footer” with the name of your page template.
From there, you’ll add the HTML and PHP code for your custom footer. You can use any HTML, CSS, or JavaScript to create your design. Make sure to add any necessary WordPress functions or tags to display content dynamically, such as get_footer() to include the default footer or wp_nav_menu() to display a custom menu.
Once you’ve added your code, save the template file and upload it to your theme directory.
From there, you’ll edit the page or pages where you want to use the custom footer and select the “Custom Footer” template from the “Page Attributes” panel on the right side of the editor.
Save your changes and preview your pages to see your custom footer in action. You can repeat these steps to create as many custom footers as you want, using conditional logic to display them based on different criteria, such as page type, category, or tag.
As an example, you can add the following code to your custom footer template to display different content based on the page type:
u003c?phprnif ( is_front_page() ) {rn // Add code for front page footerrn} elseif ( is_page( 'about' ) ) {rn // Add code for about page footerrn} else {rn // Add code for default footerrn}rn?u003eReplace “about” with the slug or ID of the page where you want to use the custom footer. You can also use other WordPress functions and conditional tags to display different content based on other criteria.
Conclusion
As you optimize different parts of your website, the footer can be valuable real estate that helps site visitors find what they’re looking for while giving your site an SEO boost.
There are a number of reasons you might update or edit your WordPress website footer, but common reasons often include updating copyright information, links, or contact details.
While editing the footer on your WordPress site is relatively easy, it will differ slightly depending on the theme you’re using.
Regardless of how you choose to update your website footer, making adjustments and adding your own personal touch to this portion of your website will go a long way in helping your site stand out.
Want to find out more? Read more about our industry-leading WordPress platform, as well as our expansive library of educational WordPress resources.