Get Started


Key Takeaways
Releasing a WordPress plugin is simpler than perceived. Publishing a plugin to the WordPress Plugin Directory involves creating a Readme.txt file with essential plugin details.
Versioning and updating are crucial for user notification. Keeping the plugin version updated and maintaining a detailed changelog ensures users are informed of updates.
Submission to WordPress.org is straightforward. Submitting the plugin involves filling out a short form on the WordPress website.
Screenshots and banner images enhance plugin visibility. Including visual elements like screenshots and banners in the plugin directory improves user engagement and understanding.
Releasing a WordPress plugin can seem like a daunting task that only super talented PHP developers are capable of. But releasing a plugin doesn’t have to be as scary as you may believe! In fact, publishing a new plugin to the WordPress Plugin Directory can be fairly simple.
This article won’t necessarily go into the details of creating plugins, rather it will cover the steps needed to actually get your plugin launched and available in the WordPress.org directory for the benefit of every WordPress site in the world. For reference, this example used the WordPress Plugin Boilerplate as a starting point for the plugins and they were open sourced using GitHub (definitely recommended).
Readme.txt
The first thing you need to have in order for WordPress to accept your plugin is a Readme.txt file. It contains all of the information related to your plugin and is what WordPress uses to generate pages for your plugin on the WordPress.org directory (like the Description, Installation, and Screenshots tabs).
The format for the Readme looks like this:
=== Plugin Name ===

Contributors: yourname

Donate link: http://yoursite.com

Tags: business, directory

Requires at least: 4.3

Tested up to: 4.3

Stable tag: 4.3

License: GPLv2 or later

License URI: http://www.gnu.org/licenses/gpl-2.0.html
A simple description
== Description ==
A longer description with a
- list

- of

- features
== Installation ==
This section describes how to install the plugin and get it working.
1. Upload [`plugin-name`](link-to-github.zip) to the `/wp-content/plugins/` directory

2. Activate the plugin through the 'Plugins' menu in WordPress
== Frequently Asked Questions ==
= Is this a cool plugin? =
Yes
== Screenshots ==
1. Desktop view
2. Mobile view
== Changelog ==
= v1.0.0 =

* Initial release
A full example can be found here. A handy validator is also available to check if your Readme is up to par.
Changelog and Versioning
It’s important to keep the version number of your plugin up to date so, if nothing else, users can be notified when there are updates to it. Updating the changelog is as simple as adding a new entry to the changelog section in the Readme. There are a few different outlooks on versioning and what should constitute as a major or minor release; I like to consult the Semantic Versioning 2.0.0 site for reference on that.
As an example, let’s say you ship your plugin at version 1.0.0. Then the next day you fix a little bug or add a little functionality that you forgot when you first published the plugin. Before you’d deploy the plugin to the WordPress directory (more on how to do that later), you’d update the changelog section in the Readme to something like this:
== Changelog ==
= v1.0.1 =
* Fix a thing that allows users to do a thing
= v1.0.0 =
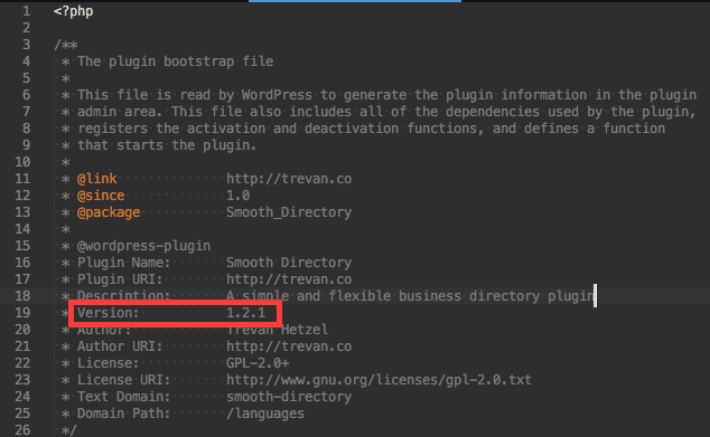
* Initial releaseThen (this is important), you need to update the version number in the plugin bootstrap file. You should be familiar with the bootstrap file if you’re writing a plugin, but for reference it’s the file that gives WordPress information about the entire plugin via the comment block at the top.
Submit to WordPress.org
With a Readme in place and extensive testing done, you’re ready to submit the plugin to WordPress! This is the easiest part of the whole process. Simply go to https://wordpress.org/plugins/add/, log in with your WordPress account (or create one), and fill out the short form.
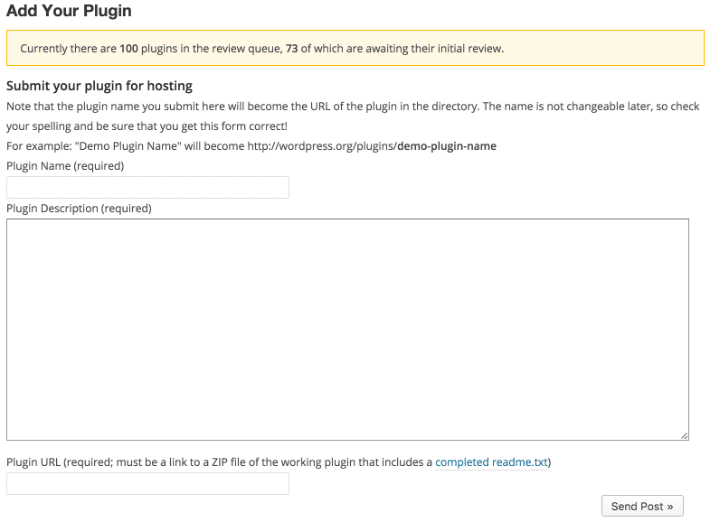
Be careful that you don’t use the name “WordPress” in the name of the plugin. They will reject the plugin if you do so. They will also reject the plugin if you include the name of a trademarked product or if your plugin starts with the name of another plugin. For example, when attempting to submit a plugin that extends Ninja Forms, if you included “Ninja Forms” in the name in any capacity, you’d receive an email like this:
We’re no longer accepting plugins that include a trademarked product name or term as the name or slug of a plugin. Nor are we accepting plugins that include the name of another plugin at the beginning of the name/slug.
Make sure you take the time to write a lovely description and then drop the link to your plugin in a ZIP file in the last field. Using GitHub for plugin development makes it really easy to have a publicly available ZIP.

Once you submit the plugin, sit back and wait! Both of my plugins were accepted within about two days. You’ll get an email with information on the new SVN repository if it’s accepted. Which brings us to the next step – deploying!
Deploy with SVN
Once the plugin is accepted, it’s still not live yet. You have to actually upload the files to the SVN repository WordPress provides you with. This article walks you through getting logged in through the terminal pretty quickly. Basically, you create a folder on your computer, check out the SVN repo, copy your plugin files into the newly created /trunk folder, and push it back up.
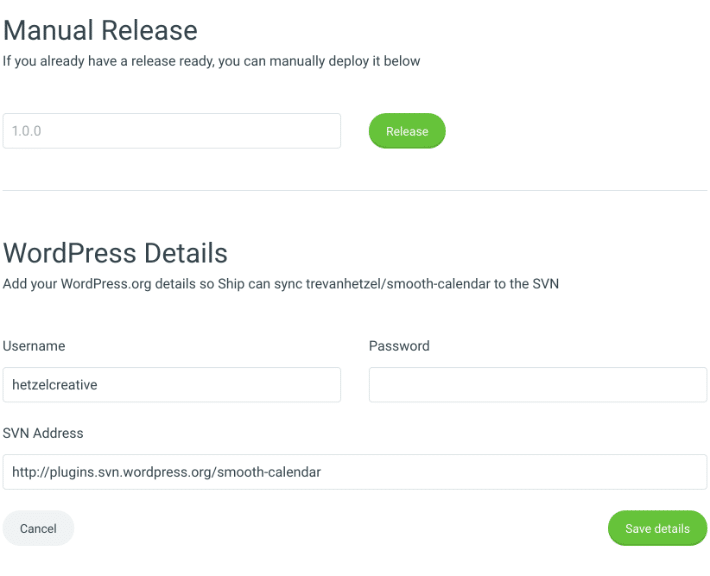
For the best deployment process and maintainability, it’s important to use releases or tags whenever you deploy. Just as you update the version number in your plugin file and changelog, you should also be issuing new releases in GitHub. It’s actually required to do this in order to use Ship.
Finally, once you get signed up with Ship and select your repo to hook up to it, you can deploy your first release (make sure the name matches the release name in GitHub). After that, as long as you fill in the form under the WordPress Details heading, Ship will just deploy whenever a new release is issued in GitHub.
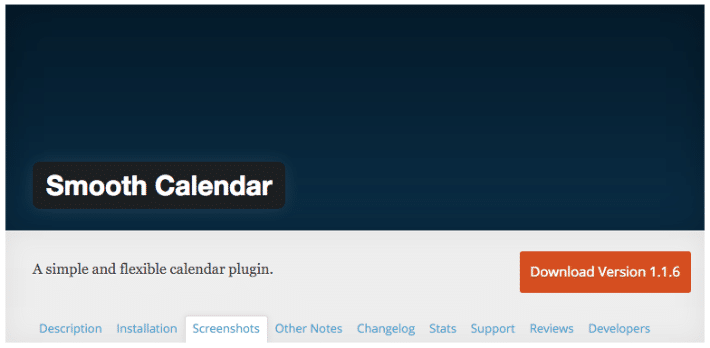
Screenshots and Banner Images
Displaying screenshots of your plugin is super important to help people visually see what it looks like and to give them an idea of how it works. These screenshots will show up on the WordPress.org plugin directory page (here’s a calendar plugin’s screenshot page, for example) and when a user adds a plugin on their site through the Plugins page.
Banner images aren’t as important as screenshots, but they make your plugin look a little more impressionable. The banner image is the big image that’s shown at the top of the WordPress.org plugin directory page.
To get these images to show, you have to place them in the /assets directory of your SVN repo. Unfortunately, you can’t use Ship for this as it only deploys the /trunk folder, so you’ll have to consult this article again to get logged in to your SVN repo.
To keep things simple, stick to naming your screenshots screenshot-#.png (where `#` is the number). Doing it this way allows you to easily reference the images in the Readme to give them a description.
== Screenshots ==
1. Desktop view
2. Mobile view
For example, the description “Desktop view” from the Screenshot section in the Readme will match up to screenshot-1.png in the /assets folder.
For the banner, you actually need two versions of the same image – one for normal screens and one for retina screens. The names of the banner images should be banner-1544x500.png and banner-772x250.png.
The end
That’s it! If you followed along, hopefully your code was accepted and you’re ready to start getting the word out about your awesome new plugin. Just remember to always update the Readme, changelog, and issue releases whenever you update the plugin.
To ensure every element of your site performs at an optimal level, choose a hosting solution specifically designed for WordPress, like WP Engine, because all of our offerings are designed with WordPress in mind!