Get Started


Key Takeaways
Shortcodes in WordPress offer versatile content functionality. Shortcodes enable inserting specialized content easily, enhancing user experience and content management.
Custom shortcodes provide tailored solutions. Creating custom shortcodes allows for unique functionalities, improving content personalization and engagement.
Implementing shortcodes requires basic PHP knowledge. Understanding PHP basics is essential for utilizing and customizing shortcodes effectively.
Optimizing shortcodes enhances content consistency. Centralizing content updates through shortcodes ensures uniformity and efficiency across the website.
If you’ve been using WordPress for any length of time, you’ve probably already used some shortcodes.
Shortcodes are handy little snippets that let you insert some kind of special functionality into your content that wouldn’t otherwise be possible. As an example: lots of image gallery and slider plugins give you a shortcode that you can simply insert into your content anywhere you like to make the proper images appear there. Shortcodes usually look something like this:
[example shortcode]
In other words: shortcodes cause something special to happen wherever they’re placed in your text.
But you’re not limited to pre-defined shortcodes; you can define custom shortcodes to do whatever you want! They can be simple, complex, or anything in-between.
In this series, we’ll start with a simple shortcode, and work our way up to some more intricate (and even more useful!) examples.
Note: we’ll be working mainly with PHP here, specifically in your theme’s functions.php file. If you aren’t using a child theme (or a custom/starter theme that’s ok to edit without fear of updates overwriting your changes), you’ll want to create a child theme before starting.
Also note: You don’t need any PHP knowledge to go through this post, but knowing at least the basics will help. The code involved here is fairly simple, and we’ve tried to make it as easy as possible to copy and customize. We’ll explain each piece of the code as we go, but if you’re completely new to WordPress theme PHP, be aware that a bit of bad code in your functions.php file can break the site.
A Useful Simple Shortcode Example
Let’s say we want a shortcode that injects a special author-info section into a post, like this:
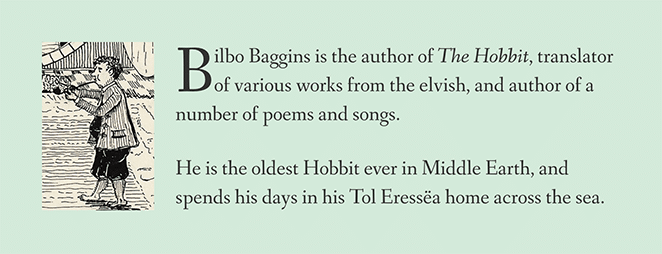
Instead of creating and styling the box, image, and text in the WordPress visual editor, we’ll just create a shortcode to output that whole thing with a simple snippet!
(Side note: WordPress has better ways of working with author profiles, but we’re sticking with this example because it nicely demonstrates how easy it is to use shortcodes for putting specific blocks of content on a page.)
Step 1: Add the Shortcode in Your Theme’s functions.php File
You’ll be using the add_shortcode function to give your shortcode a name, and tell WordPress what it should do any time the shortcode is used. Add this line to your theme’s functions.php file:
[php]add_shortcode( 'author_bio', 'create_author_bio' );[/php]It doesn’t really matter where inside functions.php, but to avoid conflicts, We’d recommend putting it at the very end. (If the file ends with a closing ?> tag, though, it should go just before that, not after.)
Before we go any further, let’s break that line down a little bit, so that we understand what’s actually going on here. The two bits of text, or “arguments,” inside the parentheses aren’t special, really; they’re just names. Let’s go over what each one means:
- The first argument: in this case,
author_bio– tells WordPress the actual name of your shortcode. This will be the text that users can type, in brackets, to use the shortcode. So with this code as written,[author_bio]will be our shortcode to trigger our author bio box.
This text could be anything, but it’s always best to try to be unique. That way, you won’t run the risk of your shortcode name conflicting with somebody else’s from another installed plugin or theme. - The second argument: in this case,
create_author_bio– points WordPress toward the actual PHP function it should execute whenever this shortcode is used. We’ll create that function in the next step; for right now, we’re just letting WordPress know what its name is going to be. (This name should also be unique, to avoid conflicts.)
So if it helps, you could think of the code like this:
[php]add_shortcode( 'when_you_see_THIS_shortcode', 'do_THIS' );[/php]If you’re interested in more nitty-gritty detail, check out the add_shortcode Codex entry.
Step 2: Create the Function to Handle the Shortcode
Now we need to actually make the function we just named!
Since we just told WordPress in the last step that the name of our function is create_author_bio, our code should now look like this, once we’ve got the new function added:
[php]add_shortcode( 'author_bio', 'create_author_bio' );

function create_author_bio(){
//Code goes here!
}[/php]
You may notice this function doesn’t actually do anything yet; all that’s inside of it is a comment. We’ll take care of that in the next step. For now, we just want to point out that there are really only two pieces here: the registration of the shortcode, and the function that happens whenever it’s used. WordPress PHP can look intimidating, but it’s really that simple!
Side note: it doesn’t matter if the create_author_bio function comes after the add_shortcode function or before it. Order isn’t important in this case.
Step 3: Make the Function do Something
Now all that’s left is to make our function do what we want!
A function like this could do anything, but no matter what, it should eventually return a single value (such as a string of text or a number). That value could be any length or complexity, but whatever the function returns is what will appear wherever our shortcode is used.
For our purposes, this will just be some simple HTML. Here’s the markup to add our author image and bio inside an <aside> element with a custom class (but don’t put this anywhere just yet; we’re just looking at it as a preview for the moment):
[html]
<aside class="author-bio-box">
  <img src="https://upload.wikimedia.org/wikipedia/en/1/1f/Bilbo_Baggins_Tolkien_illustration.jpg">
  <p>Bilbo Baggins is the author of <cite>The Hobbit</cite>, translator of various works from the elvish, and author of a number of poems and songs.</p>
  <p>He is the oldest Hobbit ever in Middle Earth, and spends his days in his Tol Eressëa home across the sea.</p>
</aside>
[/html]
Eventually, we’ll use that author-bio-box class on the first line to style the bio with CSS. (We’ll use a class instead of an ID, just in case you want to add more than one author shortcode for content written by multiple authors.) But remember, this could be anything we want to put into the page!
Now, all we need to do is have our shortcode’s function return the above HTML!
Since the functions.php file should only contain…well, PHP functions (and also for tidiness), We’ve removed the line breaks and spaces between those HTML elements we just looked at and tucked them into a string (inside of single quotes). But functionally, it’s still the same HTML snippet we just saw above, and this is how our final PHP code should look:
'<aside class="author-bio-box"><img src="https://upload.wikimedia.org/wikipedia/en/1/1f/Bilbo_Baggins_Tolkien_illustration.jpg"><p>Bilbo Baggins is the author of <cite>The Hobbit</cite>, translator of various works from the elvish, and author of a number of poems and songs.</p><p>He is the oldest Hobbit ever in Middle Earth, and spends his days in his Tol Eressëa home across the sea.</p></aside>'
We’re done with PHP! Once we’ve saved our functions.php file with the above final code in it, any author can simply enter [author_bio] in any page or post, and the above HTML will appear in the shortcode’s place!
Plus, the really cool thing is: if we ever need to update our bio, we won’t need to edit every single place it appears! Instead, all we need to do is edit the code in our functions.php file, and it will be updated everywhere all at once. Neat, huh?
However, to make the most out of this, we’ll probably want to add some special styling to the bio box.
Step 4: Add Some CSS
The shortcode isn’t great without some styling, so let’s add it! You may need to adjust some of the values a little bit, depending on your own site’s fonts (the one in the image above is Fanwood Text) and what CSS rules are already in place. Or you may just want to try something different!
This CSS could be copied into your (child) theme’s style.css file, or if you’re running WordPress 4.7 or above (which you should be!), you can just paste this CSS into the “Additional CSS” box in the Customize screen:
[css].author-bio-box {
background: #d4ead9;
padding: 2em;
overflow: auto;
font-family: Fanwood Text;
font-size: 1.2em;
line-height: 1.4em;
}
.author-bio-box img {
float: left;
max-width: 128px;
height: auto;
margin: 0 1em 0 0;
}
.author-bio-box &amp;amp;amp;gt; p:first-of-type:first-letter {
font-size: 3.1em;
line-height: 1;
float: left;
margin-bottom: -.2em;
}
.author-bio-box &amp;amp;amp;gt; p:last-of-type {
margin: 0;
}[/css]Now things should be looking much better. But feel free to play around with the CSS to make the author box your own and make it feel at home on your site!
Recommended: Make the Function “Pluggable”
This isn’t specific to shortcodes, and it isn’t strictly needed for the code to work, but it is best practice, and this is a good time to mention it.
First, a little background on how PHP works:
Remember how we got to name our create_author_bio function ourselves? Well, there’s nothing special about the name create_author_bio; we could have just as easily named our function anything we wanted to (though it’s best if the function name gives you at least a little bit of a hint as to what it does, which is why we chose create_author_bio).
But here’s the thing: if two PHP functions are named the same thing, the result will be a fatal error that will prevent the site from loading, since PHP won’t have any idea which function is the right one. PHP doesn’t guess, so it just stops.
And it’s not only our code we need to worry about; a WordPress site might use code from dozens or maybe even hundreds of different developers, depending on the installed plugins and themes. If the same function name is used twice, everything breaks down!
That’s bad, and obviously, we want to make sure that never happens.
We can do that by making our function “pluggable;” in other words, telling WordPress not to create our function if another one of the same name already exists. It’s elegantly simple; we just wrap our existing code inside of this easy conditional statement:
[php]if( !function_exists( 'create_author_bio' ) ){

//Our existing PHP goes here!

}[/php]
That conditional if expression just checks to be sure that a function named create_author_bio doesn’t already exist. All our PHP code we’ve used so far can just be moved inside of that statement, between the { } braces.
It’s still best to name functions as uniquely as possible, though! Making our function pluggable only avoids a fatal error. So if there was a naming conflict, our shortcode still wouldn’t work, but at least the site would still be up and nothing else would be broken.
Conclusion

That’s it! Hope you’ve enjoyed creating a custom author bio shortcode! If you’ve followed along, all you need to do is type [author_bio] anywhere in a page or post and your code will appear!
This shortcode can easily be adapted to output anything to a page. A gif, a custom block of HTML and/or JavaScript, an image or video…anything you want!
However, while this example is useful if you just need to output a single, static value onto the page somewhere, it’s not very flexible. It will always return the exact same thing every time, and we often need shortcodes to be more adaptable than that.
Good news: we’ve only covered the basics of shortcodes, and they’re capable of much, much more!