Get Started


Key Takeaways
Custom meta boxes in WordPress offer enhanced content flexibility. Meta boxes allow for additional information beyond standard options like categories and tags, enabling tailored content structuring.
Understanding meta box creation basics is crucial for customization. Even with plugins available, grasping underlying concepts empowers developers to build tailored solutions.
Security measures like nonces are vital for data integrity in meta boxes. Implementing nonces ensures data authenticity and safeguards against unauthorized access.
Developers should test meta box implementations locally before deploying live. Local testing prevents potential errors and ensures a smooth transition to production.
Custom meta boxes allow additional information to be added to posts, pages, and custom post types, apart from the standard meta boxes that are automatically available to use right “out of the box” in WordPress, which are included in the WordPress core. Whether you were aware of it or not, you’ve been using meta boxes…
Custom meta boxes allow additional information to be added to posts, pages, and custom post types, apart from the standard meta boxes that are automatically available to use right “out of the box” in WordPress, which are included in the WordPress core.
Whether you were aware of it or not, you’ve been using meta boxes for awhile now. Things like dashboard widgets, editor, custom fields, featured image, categories, and tags are examples of meta boxes.
How to Create a Custom WordPress Meta Box
What happens when you need to create an additional meta box, maybe something a little more custom for your project? There are existing plugins out there that help create custom meta boxes, which can be great options. Even if you decide this is the route you are going to take, it is still important to understand the basic concepts of what is going on under the hood of custom meta boxes.
We will be going over concepts at a very high level when we create this very simple meta box. When we’re done, we will have a custom meta box that will allow us to enter a product title.
Even though we are starting off simple, keep in mind that this idea can be expanded for more complex needs. There are a lot of options and additional features that can be included in a custom meta box. Things like check boxes, file upload, etc. are all possible features of a custom meta box. This tutorial assumes that you are familiar with CSS, which is needed to style the fields. We will not be going into great detail to discuss styling, but this is something that can easily be done after your meta box is up and running.
Developing the Custom Meta Box
Custom code for meta boxes can be included in functions.php or in a plugin. This example will include the needed code in the form of a plugin. This can be copied step by step to make a complete file that is ready to use.
The Codex is Your Guide
The Codex will be your best friend, if it isn’t already. Different arguments have different options, and the Codex will explain this in great detail. It’s worth mentioning that the Codex is something you should get to know well.
Test Locally First
Here is the one and only disclaimer for this tutorial. Please try this in a local development environment first. Although we all appreciate a little adventure in our lives, no one likes the white screen of death, especially on a live site. We are going to go step by step through this tutorial, and there are dependencies that occur as we move through it. Because of this, there is a good chance that doing a save midway through may cause an error.
Step One: Create and Put Heading into Plugin
Creating a plugin might sound complex, but not all plugins have to be hundreds of lines. Plugins can be very simple, and this is a great example of that. If you go to the wp-content folder, you will see a plugins folder. Make a new folder called custom-post-meta-box with a custom-post-meta-box.php file in it. This is the file you will be working from.

When creating a plugin, make sure this information appears before any of your custom code:
<?php

/*

Plugin Name: Custom Meta Box

Plugin URI:  www.yourwebsite.com

Description: Creates a meta box in WordPress

Version:     1.0.0

Author:      Your Name

Author URI:  www.yourwebsite.com

License: GPL2

*/
Activate the Plugin
Even though we did not put any code in there yet, we can activate the plugin by going to Plugins and looking for Custom Meta Box and choosing Activate. Please keep in mind that nothing will change quite yet.

Optional CSS
This is optional, but if you plan on adding some custom css, copy this into your plugin file. Be sure that the .css file is found in the css folder of your plugin.
function cmb_add_admin_styles() {

wp_enqueue_style('cmb-admin', plugins_url( 'custom-post-meta-box/css/admin.css' ) );

}

add_action( 'admin_enqueue_scripts', 'cmb_add_admin_styles' );
Step Two: Adding the Meta Box
The add_meta_box function is used to create custom meta boxes. This function is only responsible for registering and displaying custom meta boxes.
function cmb_add_meta_box() {

add_meta_box(

'custom_post_metabox',

'Our Products',

'cmb_display_meta_box',

'post',

'normal',

'high'

);

}

add_action( 'add_meta_boxes', 'cmb_add_meta_box' );
Take a look at the dashboard, the title “Our Products” is showing up, but there isn’t a text field for us to enter our text.

Step Three: Adding the Meta Box Field in the Admin
We need to make sure that there is a label and field for the information. By using html, this is possible.
function cmb_display_meta_box( $post ) {

wp_nonce_field( plugin_basename(__FILE__), 'cmb_nonce_field' );

$html = '<label id="product-title" for="product-title">';

$html .= 'Product Title';

$html .= '</label>';

$html .= '<input type="text" id="product-title" name="product-title" value="' . get_post_meta( $post->ID, 'product-title', true ) . '" placeholder="What is the Product Title?" />';

echo $html;

}

// this echoes a single stream of html
See how things are wrapped in the <label>? We get to see the descriptive text “Product Title” which helps the user understand what the field is and what type of information should be entered. Also note that there is placeholder text, which also adds helpful information.
Your input may not be as wide. Some custom css was done so all the placeholder text could be shown; the label has a width of 100%.
Step Four: Saving the Data and the Importance of Using a Nonce
You may have entered text in Step Three and realized that it isn’t actually being saved or being displayed on the page. This step is really where all the magic happens.
function cmb_save_meta_box_data( $post_id ) {

if ( cmb_user_can_save( $post_id, 'cmb_nonce_field' ) ) {

if ( isset( $_POST['product-title'] ) && 0 < count( strlen( trim( $_POST['product-title'] ) ) ) ) {

$product_title = stripslashes( strip_tags( $_POST['product-title'] ) );

update_post_meta( $post_id, 'product-title', $product_title );

}

}

}

add_action( 'save_post', 'cmb_save_meta_box_data' );

function cmb_display_product( $content ) {

if ( is_single () ){

$html = 'The Product Title is: ' . get_post_meta( get_the_ID(), 'product-title', true );

$content .= $html;

}

return $content;

}

add_action('the_content', 'cmb_display_product');

function cmb_user_can_save( $post_id, $nonce ) {

$is_autosave = wp_is_post_autosave( $post_id );

$is_revision = wp_is_post_revision( $post_id );

$is_valid_nonce = ( isset( $_POST[ $nonce ] ) && wp_verify_nonce( $_POST [ $nonce ], plugin_basename( __FILE__ ) ) );

return ! ( $is_autosave || $is_revision ) && $is_valid_nonce;

}
There’s a few things going on here. Basically, the cmb_save_meta_box_data function is what we need for all the saving to take place. We will be focusing on security with a nonce value. This is a security measure that makes sure data to be saved is coming from the correct source. Also, we want to make sure that the post is not an autosave or a revision. Then the nonce will be validated and the user can save.
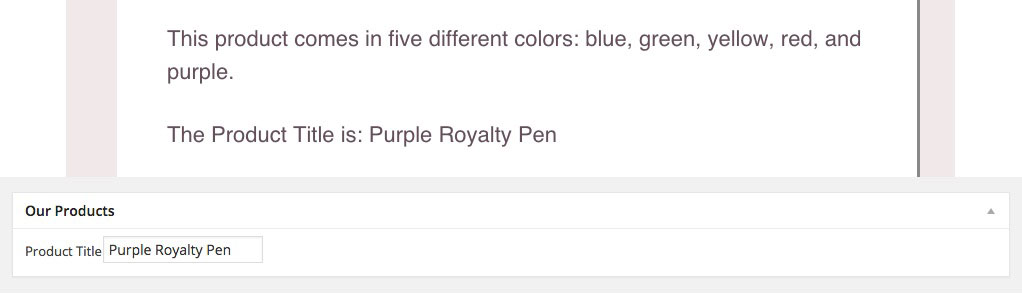
Now that we can safely save, this is how the meta information appears on the page. As you can see, it could easily be styled, but it does work and data is saved.
Further Reading and Homework
As you can see, in just a few steps, you can have a custom meta box. Like most development projects, there are multiple ways to achieve the same thing, so you may find other approaches to this same task.
We took a look at custom meta boxes at a very high level so you may want to take a deeper look at these concepts. If you find yourself having a greater need for custom meta boxes, here are some great sources for further discovery:
Or, check out our library of resources! Our commitment to developers doesn’t end at our world-class hosting for WordPress websites and 24/7 support—we’re also committed to giving back to the community through high-quality resources for continued learning.