Get Started


Key Takeaways
Alert messages can significantly boost conversions. Implementing alert boxes on WordPress sites can lead to conversion rates of over 9%, making them a valuable tool for increasing signups and engagement.
WordPress plugins simplify alert box creation. Utilizing plugins like Popup Maker streamlines the process of creating and customizing alert boxes, enhancing user experience and interaction.
Custom alert boxes can be coded without plugins. For those who prefer a hands-on approach, creating alert boxes using code and CSS is a viable option, offering flexibility in design and functionality.
Enhance your site with alert boxes for improved engagement. Whether through plugins or custom coding, incorporating alert messages can effectively communicate important information, promote offers, and capture visitor attention.
If your website gets a solid number of visitors, but signups or conversions are lower than you’d like, you’re not alone. There are tons of resources available to help increase your traffic—but getting that traffic to take the right actions on your site is another story.
One possible solution is using an alert box. This is a powerful and simple tool that can dramatically increase conversions on your WordPress site. What’s more, it’s very easy to create and customize this feature.
In this article, we’ll cover what an alert box is and why you should use one. Then we’ll show you how to make your own alert box in WordPress. Let’s dive in!
What Is an Alert Message?
An alert message is exactly what it sounds like. It’s an alert that appears on a website to notify visitors that something has occurred. You may know this feature better as a “popup” or “alert box.”
Alert boxes in WordPress usually take one of two forms. You may see a popup that appears on the screen, or a bar that runs along the top of your page (sometimes called a “hello bar”).
Why Create an Alert Message?
Alert messages are typically used to notify (or alert) users of something important happening on your site. For example, you might use a WordPress alert box to let visitors know about a special sale on a product they might not see otherwise, or of a series of featured posts.
Another very common use for this feature is to capture visitor email addresses. Many WordPress alert box plugins can be set to pop up when a user moves their cursor away from the site (to close the tab or press the back button, for example).
These “last-minute” alerts can be a great way to capture the contact details of visitors before they leave, potentially resulting in a conversion down the road. These alerts can be extremely effective—the best-performing popups have a conversion rate of over 9 percent. In other words, they’re well worth the effort to implement.
Creating an Alert Message With a Plugin
Thanks to WordPress plugins, creating your own alert boxes is simple. We’ll walk you through every step using the powerful (and free) Popup Maker plugin.
Step 1: Download a Plugin (Such as Popup Maker)
The first thing you’ll need to do is pick up a dedicated plugin. As we mentioned above, the free Popup Maker plugin is well-reviewed and a solid choice.
To install this tool, head to your WordPress dashboard and navigate to Plugins > Add New. Search for “popup maker,” and it should be the first entry:

Then click on Install Now. When it’s finished installing, don’t forget to activate the plugin by selecting Activate. Note that while Popup Maker itself is free, some features require a premium plan to use.
Step 2: Create a Popup
With Popup Maker installed, you should see a new entry in your WordPress sidebar that’s named after the plugin. Click it to open up a list of all your popups. At first it will be empty, but you’re about to remedy that.
To create a popup, click on Add New Popup at the top of the screen. This will open the WordPress editor:

When you visit this screen, a tutorial will appear showing you how to create a popup. The first thing you’re asked to do is enter a name, so you can identify the popup later.
After that, you can enter an optional title that will appear within the popup as a headline. In the main editor field, you can also enter the content you want to display in the popup. If you just want to create a simple contact form, you can also use a predefined shortcode.
These shortcodes are found under a new button with the Popup Maker logo in the toolbar:

Click on Subscription Form to insert a basic contact form for capturing emails. The text for the fields and privacy disclaimer can be customized by clicking on the form and selecting the edit button. There are a number of options for styles and layout, in addition to text.
Step 3: Configure Triggers for Your Popup
With your popup form created, the next step is to configure its triggers. These determine when the alert box appears.
On the popup editor screen, scroll down to Popup Settings and select Triggers from the list. Then click on Add New Trigger:
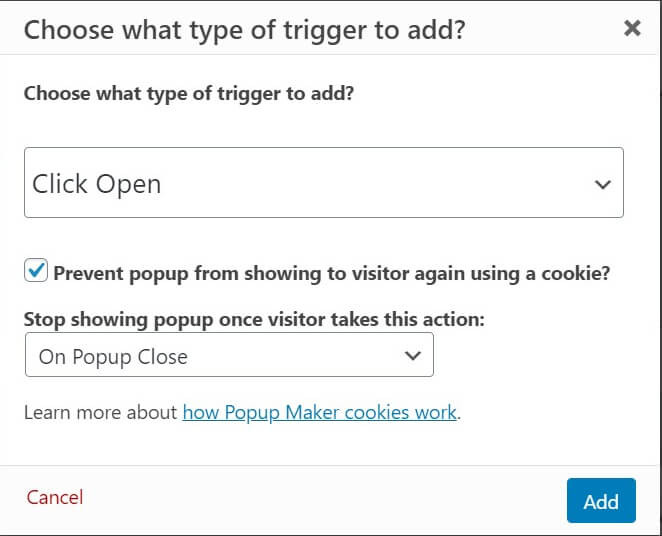
The base Popup Maker plugin contains three options here: Click Open, Time Delay/Auto Open, and Form Submission. You can also select Exit Intent as a trigger if you’re on a premium plan—this is the option to use if you want the popup to appear when a user tries to leave your site.
You can also adjust which pages the alert box appears on under the Targeting tab. Make sure to customize this setting if you want to exclude certain pages or device types from seeing the alert.
Step 4: Style Your Alert Box
Finally, you can change the appearance of your new alert box to better match your site’s theme. In the Popup Settings area, select Display. There, you can change where the popup appears on the screen (including as a top bar), set its size and position, and choose from one of several available themes:

When you’re finished, make sure to select the Publish button to save your changes and activate your popup.
Creating an Alert Message Without a Plugin
If you prefer to not use a plugin, you can also create an alert box yourself using some code and a little elbow grease. You’ll need to edit your header.php file and add some CSS to your site. For this example, we’ll create an alert bar at the top of the page.
Step 1: Edit Your header.php File
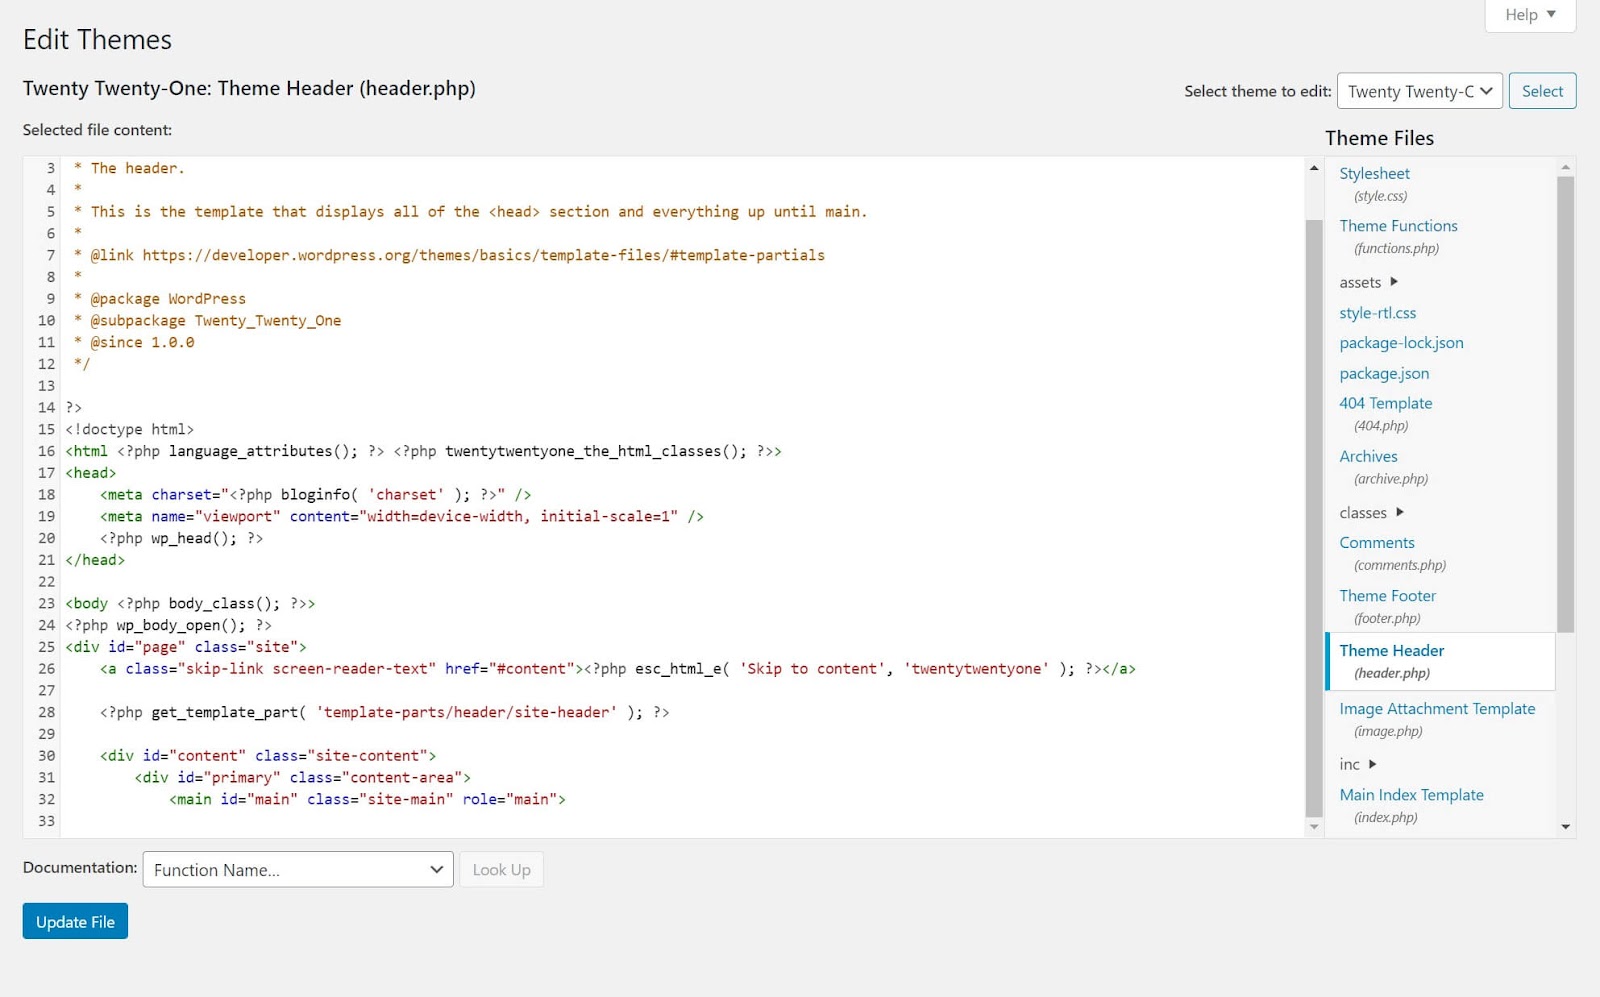
The first thing you’ll need to do is add some code to your header.php file. This can be accessed using the WordPress Theme Editor. From your dashboard, navigate to Appearance > Theme Editor. Then select Theme Header (header.php) from the sidebar on the right:
Copy and paste the following code into the file at the end of the <head> section:
<div class="alertbar">All items 20% off!</div>
Here’s what the file should look like after this addition:
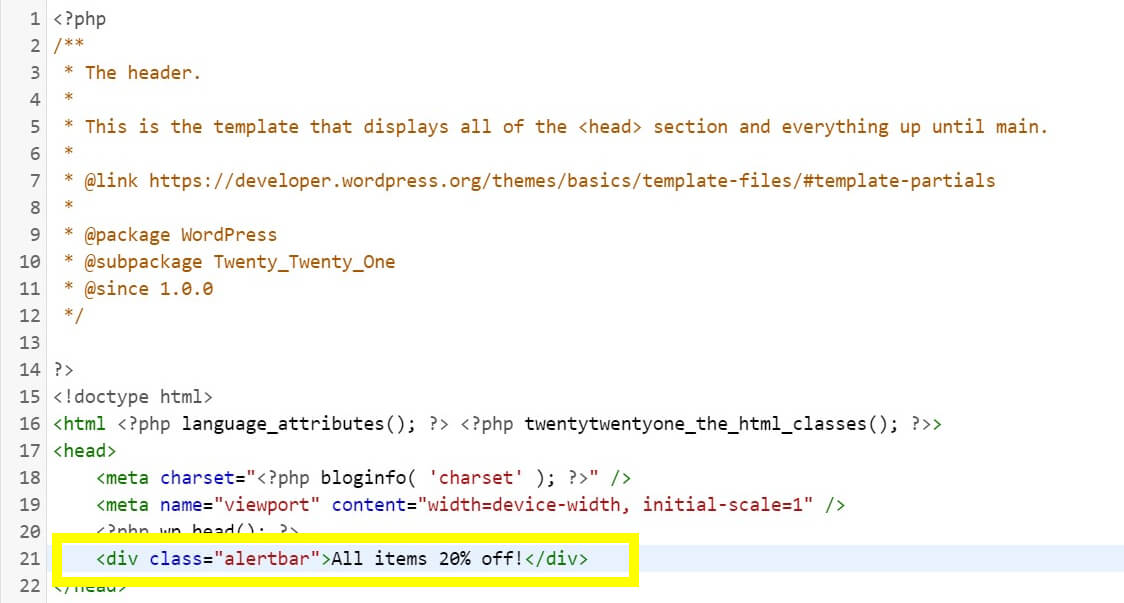
This will display the message “All items 20% off!” in your alert bar. You can customize the text however you like.
Step 2: Add Custom CSS
Finally, you’ll need to use Cascading Style Sheets (CSS) to style your alert. You can add CSS using the WordPress Customizer.
To do so, head to your WordPress dashboard and navigate to Appearance > Customize. This will open your site in the Customizer. In the sidebar, select Additional CSS. This opens a code box where you can enter custom CSS.
Paste the following code into the text field:
.alertbar {
background-color: #A9A9A9;
color: #FFFFFF;
display: block;
line-height: 45px;
height: 50px;
position: relative;
text-align: center;
text-decoration: none;
top: 0px;
width: 100%;
z-index: 100;
}
Here’s what the alert looks like:

The above code creates a dark grey bar with white text—but you can tweak the colors and size however you like to match your theme. When you’re done, click on Publish to save your changes.
Enhance Your Site With WP Engine
Whether you’re looking to increase email signups or need a simple way to notify visitors about special offers, an alert box is an elegant and effective solution. Implementing one on your WordPress site can dramatically increase your conversion rate.
You can implement an alert box with a WordPress plugin such as Popup Maker. You can also code one yourself relatively easily with a bit of CSS. Either way, you’ll get a customizable alert that’s designed to increase signups and conversions.
If you want to enhance your site even further, learn more about our industry leading WordPress hosting and make sure to check out our hosting plans!