Get Started
Continuous Integration with DeployBot
Tags:
Key Takeaways
DeployBot enables Continuous Integration with WP Engine. Developers can push changes to GitHub or Bitbucket, triggering automatic deployments to WP Engine via SFTP.
Initial setup requires creating an SFTP user on WP Engine with no directory restrictions. This ensures smooth integration with DeployBot for CI/CD processes.
Testing deployments is easy with DeployBot. Simply git push a code change to trigger automatic deployments or manually deploy if set to ‘Manual.’
Remember to build files on DeployBot servers for CSS or JS changes. This ensures proper compilation and compression during the deployment process.
If your team is interested in using Continuous Integration (CI) or Continuous Deployment (CD) methods with WP Engine, DeployBot is one of the most useful tools available. In this CI/CD pipeline, developers push changes to GitHub or Bitbucket. DeployBot detects changes and triggers a deploy of these changes to WP Engine. In the process you can also trigger build scripts for your CSS or JavaScript if needed.
Initial Setup
When using DeployBot as a Continuous Integration tool with WP Engine, file changes made in GitHub or Bitbucket are deployed to WP Engine using SFTP. Before getting started, be sure you have created an SFTP user on WP Engine with no directory restrictions. To begin using CI/CD methods with DeployBot, follow these simple steps:
- Log into deploybot.com
- First, authorize your Github or Bitbucket account to connect your repository.
- Next, create an environment for your project.
- Under Servers & Settings click “Add a server” and choose “SFTP” under the server options
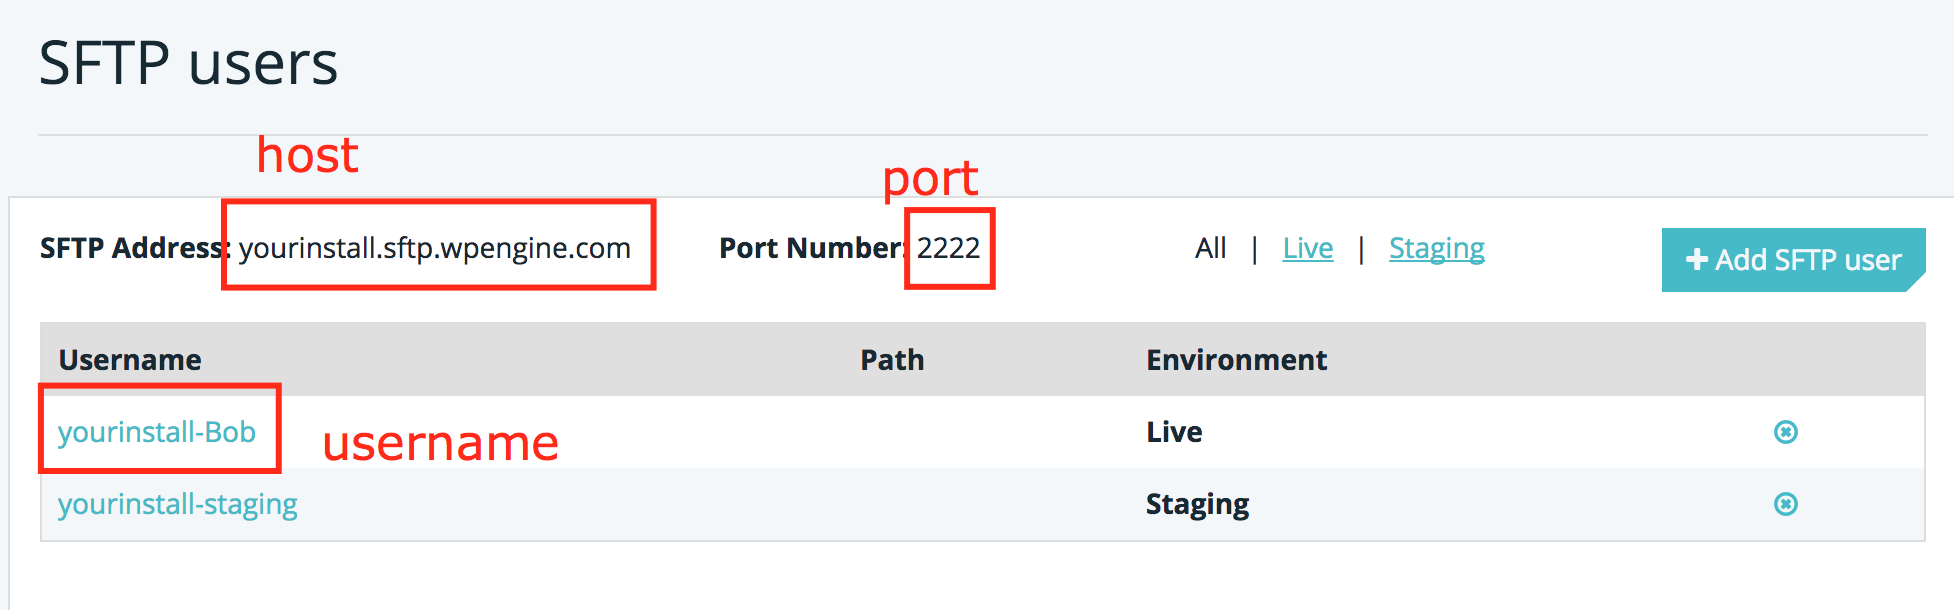
- Next you will enter a name, as well as the SFTP login credentials for your site:
- Host: This is the “SFTP Address” field from the SFTP page on WP Engine
- Port: 2222
- Destination path: If left blank this will be the root of your website. You can configure Deploybot to only deploy to a specific directory if you are working with multiple branches on the same site.
- Username: Same as Username shown in the SFTP user list on WP Engine
- Password: Same as Password set for the SFTP user on WP Engine
- Last, choose whether deployments should be manual or automatic. This can be set or adjusted under General Settings.
- Automatic deployments happen whenever code is pushed to your remote repository on Github or Bitbucket
- Optional: If you are versioning files which should be built, compiled, or compressed (typically JS or CSS) it is best to build these files on the DeployBot server in the deployment process.
- In the “Compile, compress, or minimize your code” window ensure the default container is selected and enter your commands to compile your code.
- Save changes
Test Setup
After the initial setup of your server, you can test your deployment server with DeployBot. To test, simply git push a code change (this can be something as minor as a space or comment). If your deployments are set to “Automatic” this will trigger DeployBot to deploy to your site using SFTP. If your deployments are set to “Manual,” you will also need to trigger your deploy after the git push.
Caveats
- Remember that you will only see record of your commits on Github or Bitbucket. This is because code changes are deployed via SFTP to WP Engine.
- If you have added or removed files on your site via SFTP and not Github or Bitbucket, these changes are not automatically synced to your remote repository. In cases where files need to be deleted, you should remove them via SFTP and then git push with the –force flag.
- If you are versioning files which have to be built (processed and/or compressed) such as CSS or JS, the build process should happen on DeployBot servers as a general best practice.
- If your build scripts have specific dependencies, they should be ignored in the git push process using the .gitignore file.
NEXT STEP: Best practices when developing with version control