


WP Engine Site Migration Plugin
WP Engine Site Migration is a new WordPress plugin that simplifies the process of moving any WordPress website to WP Engine or Flywheel. Allowing site migrations from just about any WordPress host or local hosting environment, WP Engine Site Migration is easy, fast, and secure.
NOTE
Need to migrate a website to WP Engine manually? Check out the Manual Migration Guide instead.
Minimum Requirements
To perform a successful migration, the source and destination environments should meet the following minimum requirements.
- WordPress 5.0
- PHP 5.6
- MySQL 5.0
- WP REST API enabled
- A modern browser such as Chrome, Firefox, Safari, Edge
- Internet Explorer not supported
- Also check the Limitations section of this article for caveats with multisite, eComm sites, etc.
Migrate a Site
Migrating a site to WP Engine using the Site Migration plugin involves three main steps:
- Prepare the WP Engine site
- Install the WP Engine Site Migration plugin on the source site
- Enter the migration details into the plugin to start the migration
Prepare the WP Engine Site
The first step will install the plugin on the WP Engine destination site and generate the connection information necessary to start a migration.
- Open the Sites page in the User Portal
- Click the destination environment name
- Need to add an environment? Learn how here.
- In the secondary lefthand menu for the environment, select Site migration. (You may have to expand the Manage dropdown section)
- Select the Automated migration tab

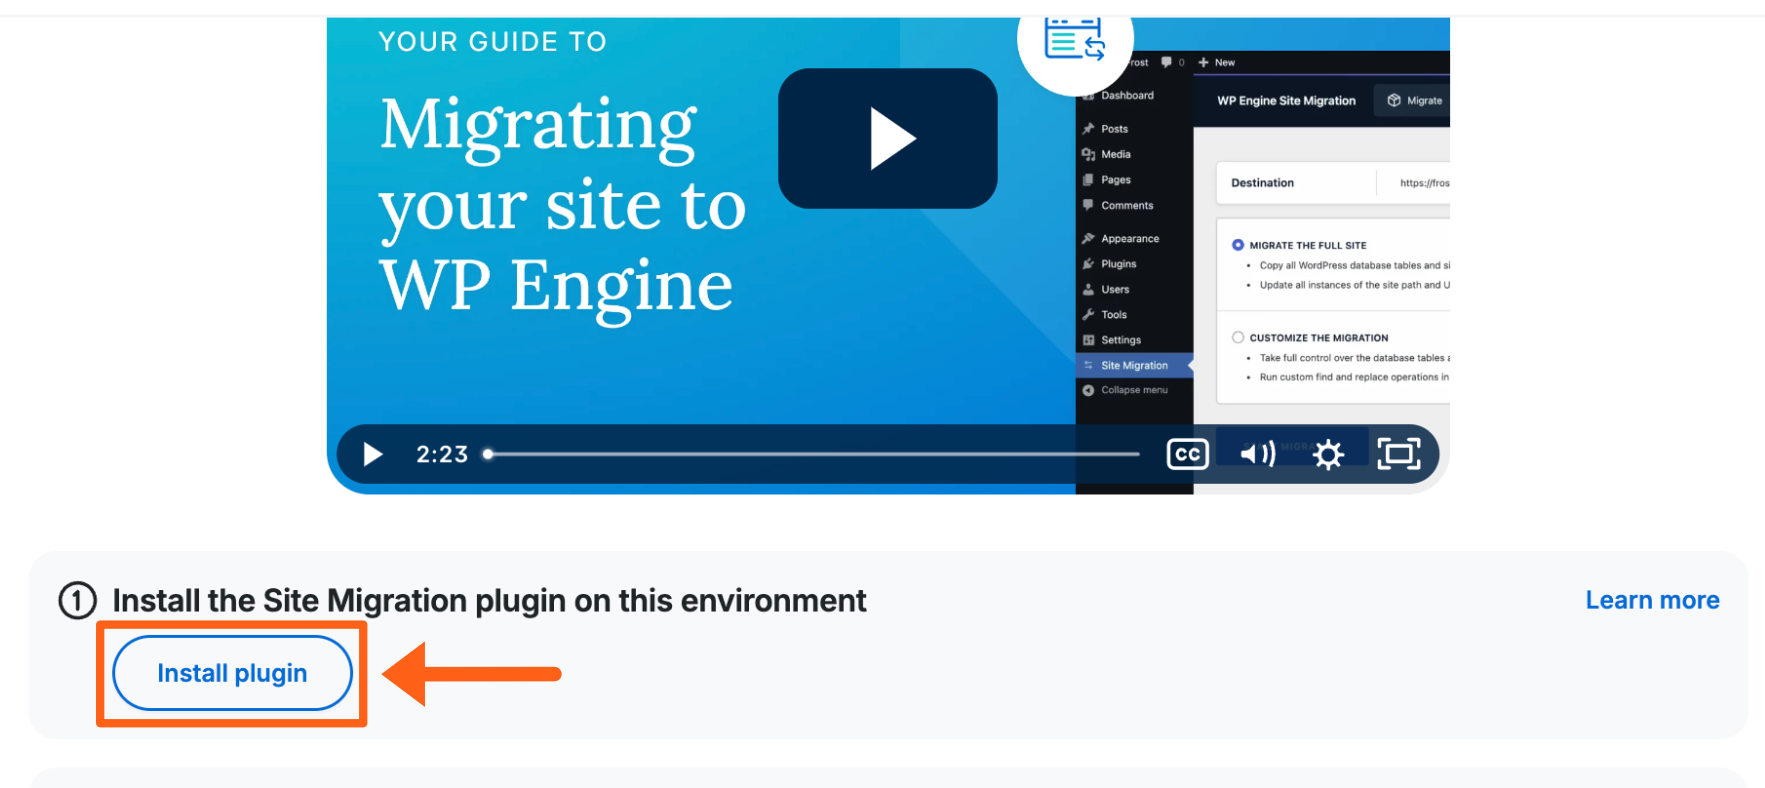
- Click Install plugin
- This will take a moment to both install the plugin on the WP Engine site and generate the necessary connection details.
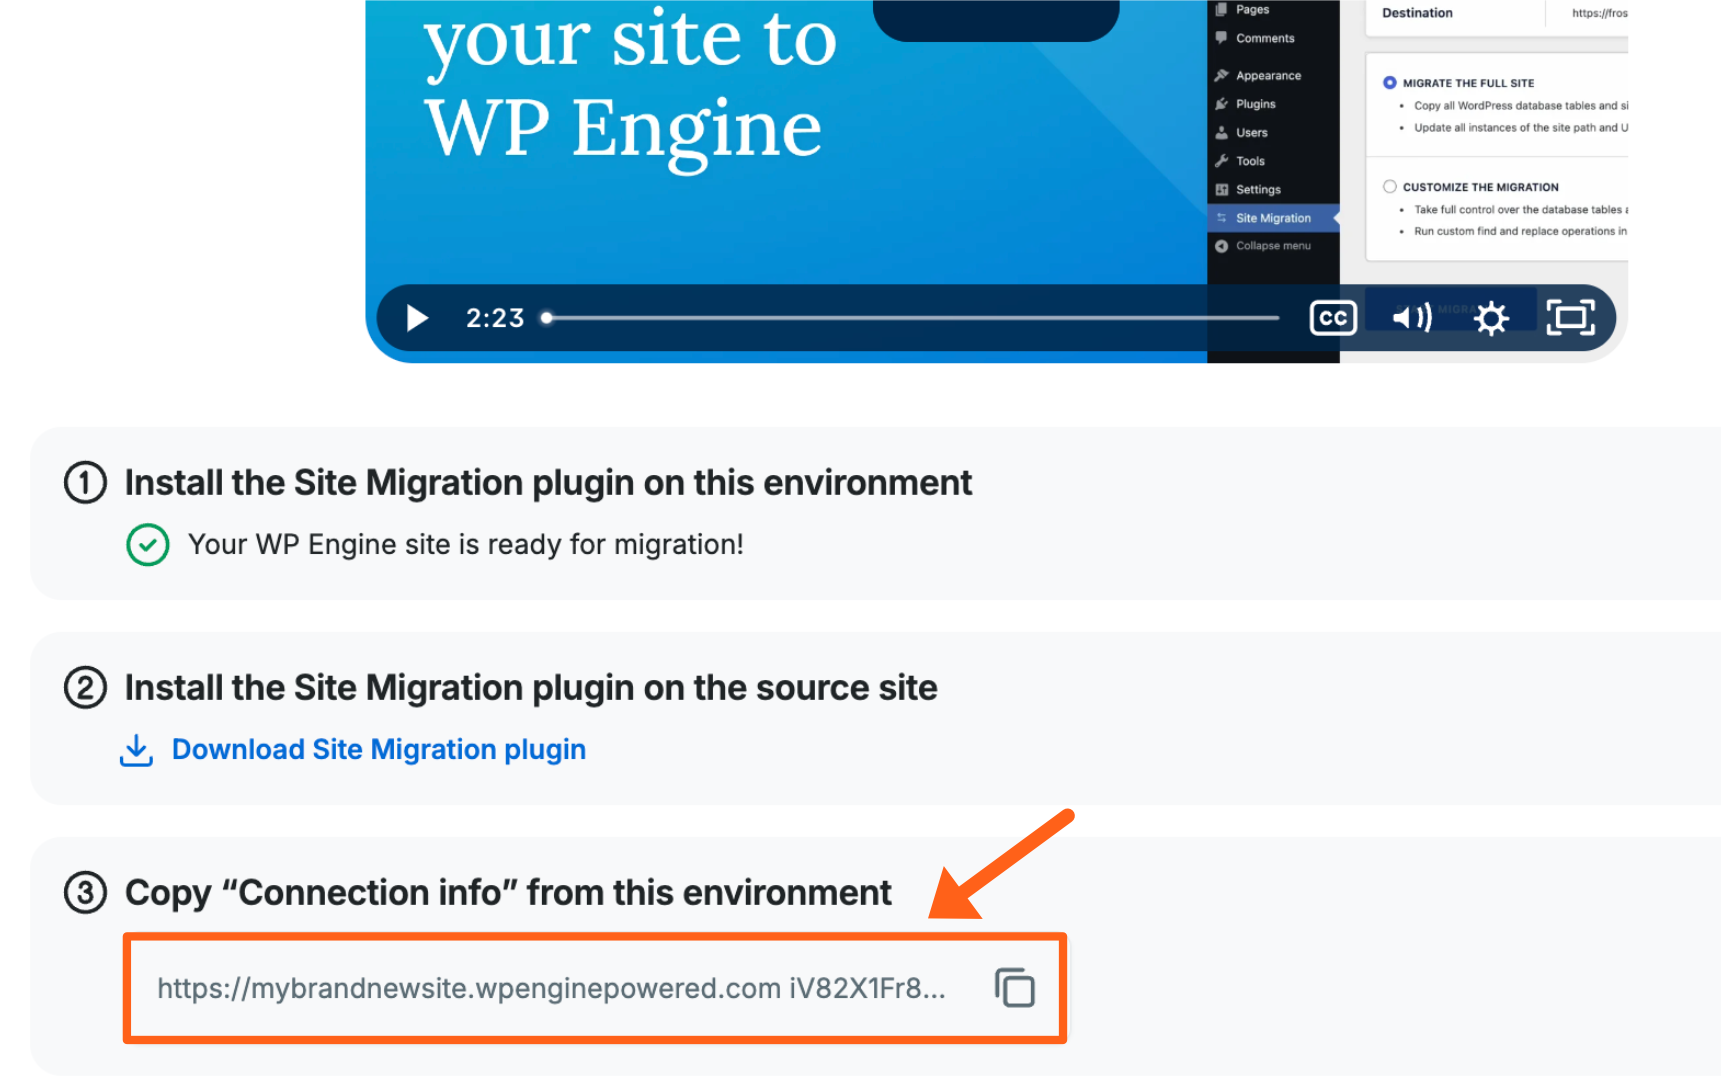
- Once it’s installed you should see a green check and a success message that says “Your WP Engine site is ready for migration!”
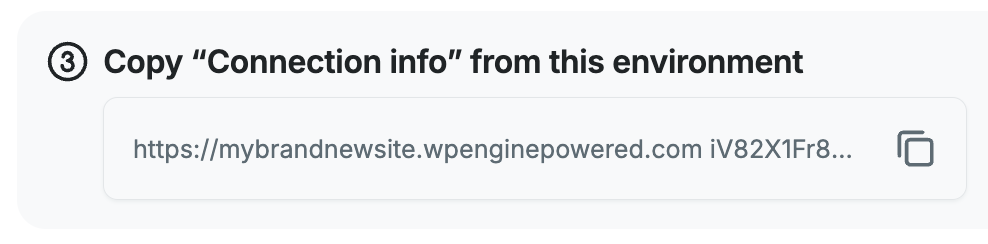
- You should see connection information generated after the plugin is installed, under step 3, which you will copy in a later step. You can copy it now or leave this browser tab open so you can come back and copy it later.
- You should see connection information generated after the plugin is installed, under step 3, which you will copy in a later step. You can copy it now or leave this browser tab open so you can come back and copy it later.
Install Plugin on the Source Site
In this second step, you will download and install the plugin on the source site at your previous host.
- Still on the same page in the WP Engine User Portal, click Download Site Migration plugin.
- Be sure to take note of where the file is saved so it can be found easily in the next step!

- Be sure to take note of where the file is saved so it can be found easily in the next step!
- Now open the wp-admin dashboard of the source website on the previous web host, in a new browser tab
- This is the site on the previous host, not the WP Engine site.
- Keep the WP Engine User Portal open in a separate tab so you can come back to it later.
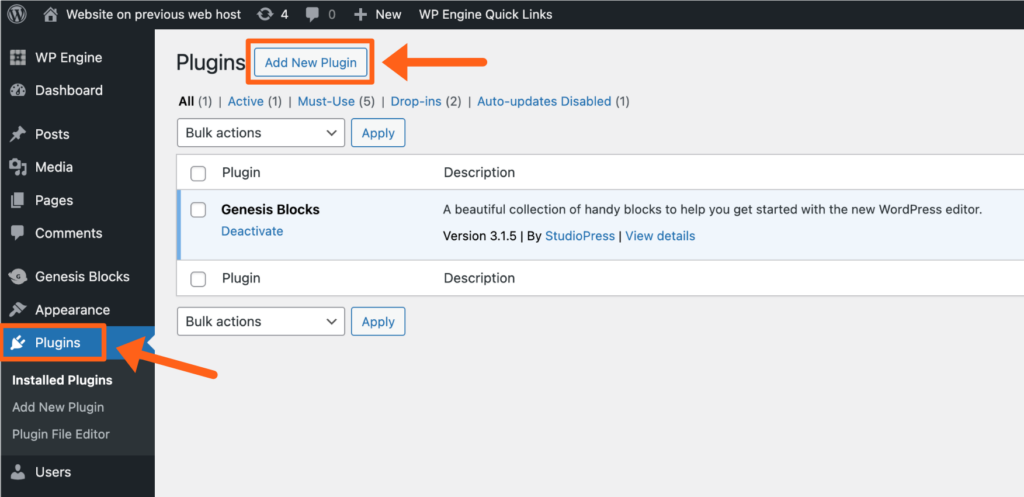
- From the menu, select Plugins
- Click the Add New Plugin button
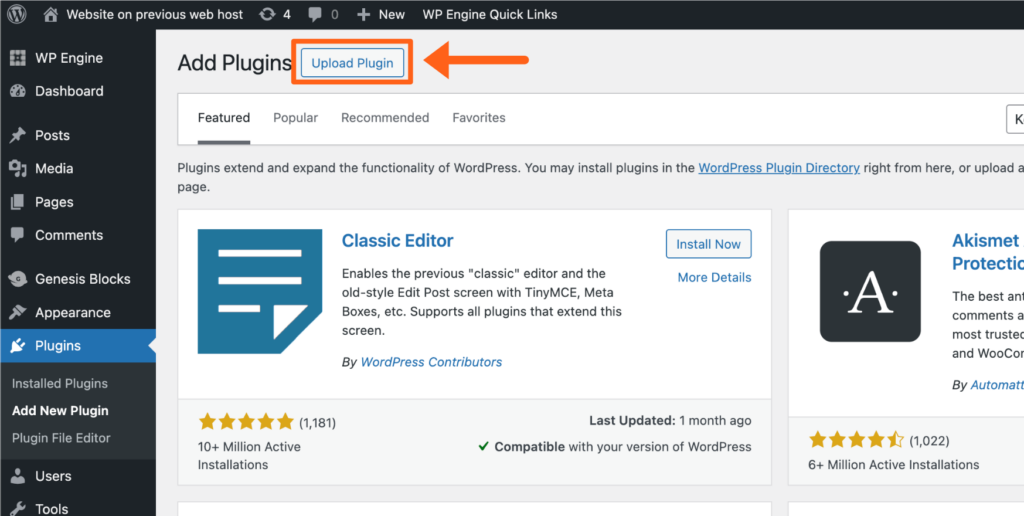
- Click the Upload Plugin button
- Click Choose File to locate and select the downloaded plugin ZIP file from your computer
- Click Install Now
- Click Activate Plugin
Migrate the Site to WP Engine
In the third step, you will input your connection information, adjust the migration settings, and then initiate the migration.
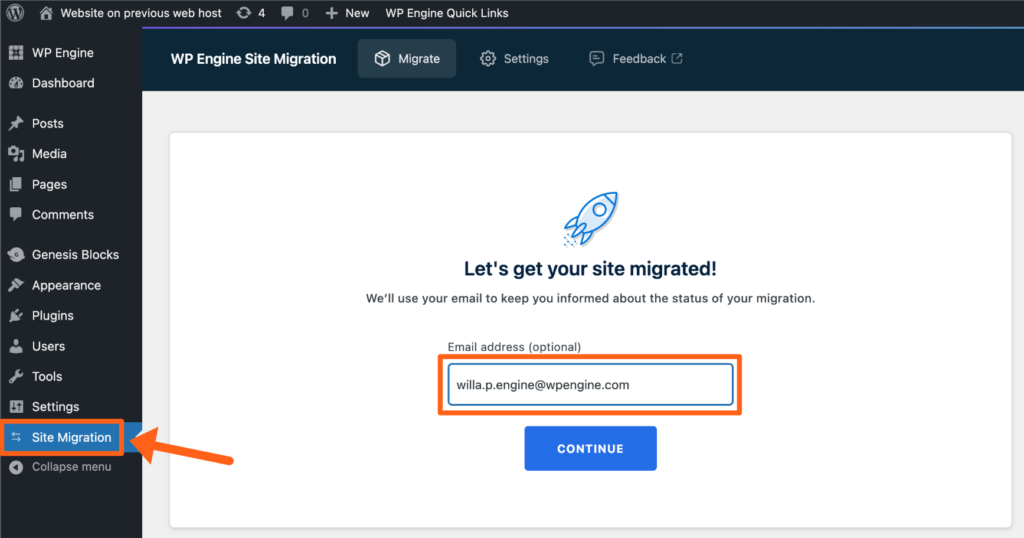
- On the source site at the previous web host, select Site Migration from sidebar in the wp-admin dashboard
- Optional – Enter an email address for migration status notifications
- Click Continue
- On the Site Migration page in the WP Engine User Portal copy the connection information that was generated in the preparing the WP Engine site step, if you don’t have it copied already.
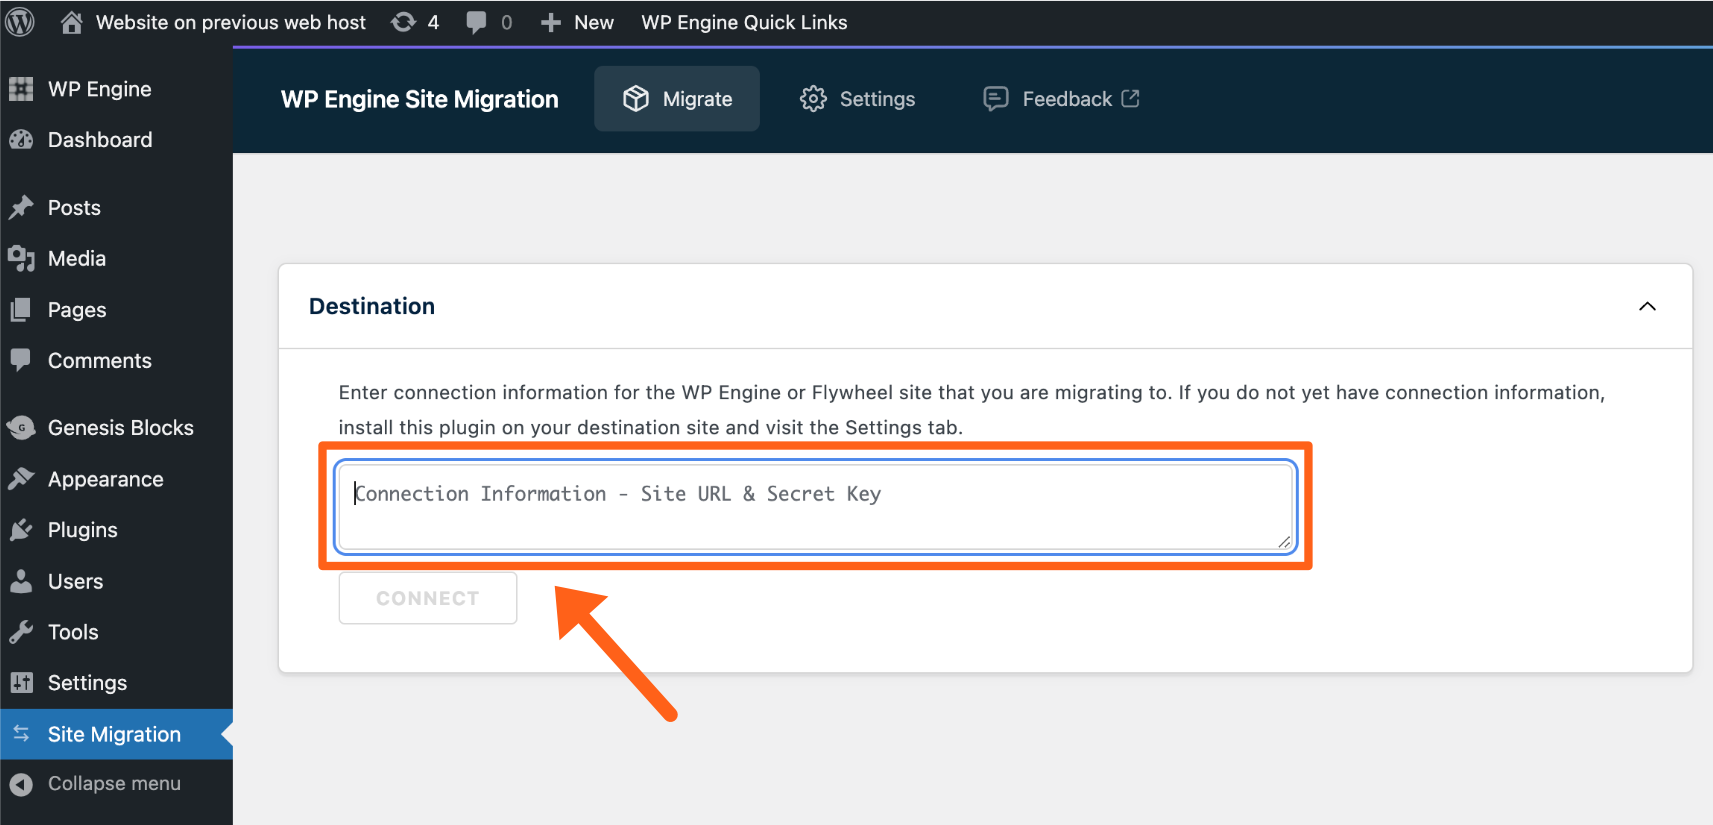
- Back on the site at the previous web host, go to the Site Migration plugin page, paste in the connection information, and click CONNECT
- Choose From 2 Migration Options (shown in the picture below):
- MIGRATE THE FULL SITE – This option is recommended for most sites.
A full site migration will:- Copy WordPress database tables, and files* in the wp-content directory.
- *This will exclude disallowed plugins and other files such as logs, backups, and caches that are known to slow down migrations or otherwise cause issues on our platform.
- Update all instances of the domain name in the database, including serialized data. View the full article for details on our new Automated Search and Replace.
- Copy WordPress database tables, and files* in the wp-content directory.
- CUSTOMIZE THE MIGRATION – The custom option gives more flexibility when migrating. Specific files or database tables can be excluded which you may not want to migrate or that might cause a migration to fail.
A custom migration can be configured to include or exclude:- Database tables
- Media uploads
- Themes
- Plugins
- Must-use Plugins
- Other files in the wp-content directory
Additionally, migration options can be adjusted for the database search and replace, replacing GUIDs, excluding transients, and more.
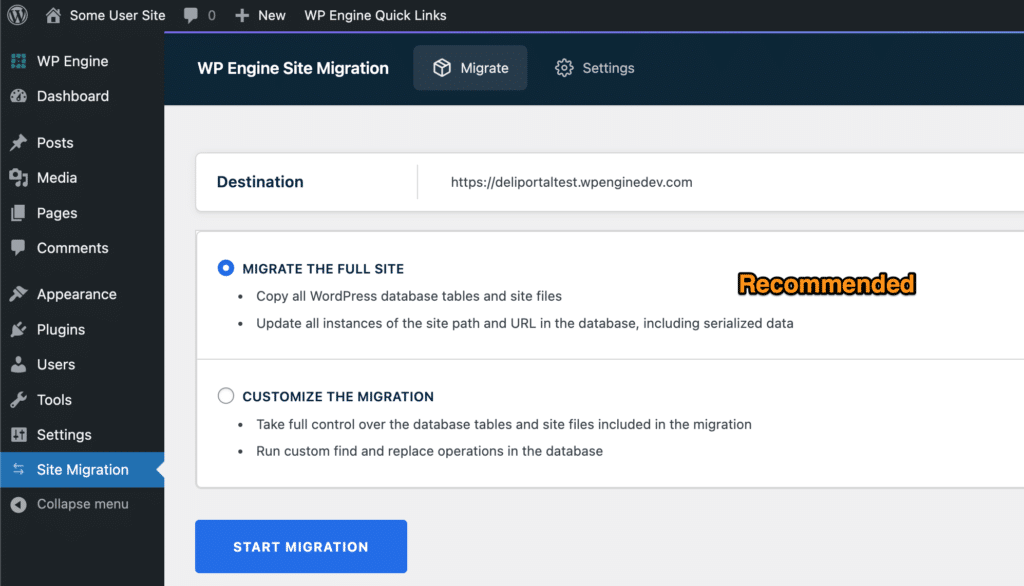
- Click Start Migration
A status page will be displayed detailing the migration progress. Migration completion or failure notifications will be sent to the email address provided once the process has finished.
If the migration fails, you can check the Limitations and Common Issues sections of this article to help in troubleshooting any migration issues.
Second Migration
A fourth step is optional, to run the migration plugin again. A second migration is not always necessary, but it may be helpful in situations where the source site has changed since the previous migration. For example, changes to the database such as new posts, pages, or user-generated content may require a second migration to sync content just prior to pointing the DNS to WP Engine.
Second migrations can be completed much faster by customizing the migration and use the following techniques to include only what has changed.
- In the Database panel, expand the Tables sub-panel and select only the tables that have changed.
- In the Media Uploads panel, choose Push media uploads by date and include only new and modified files after the date of the last migration.
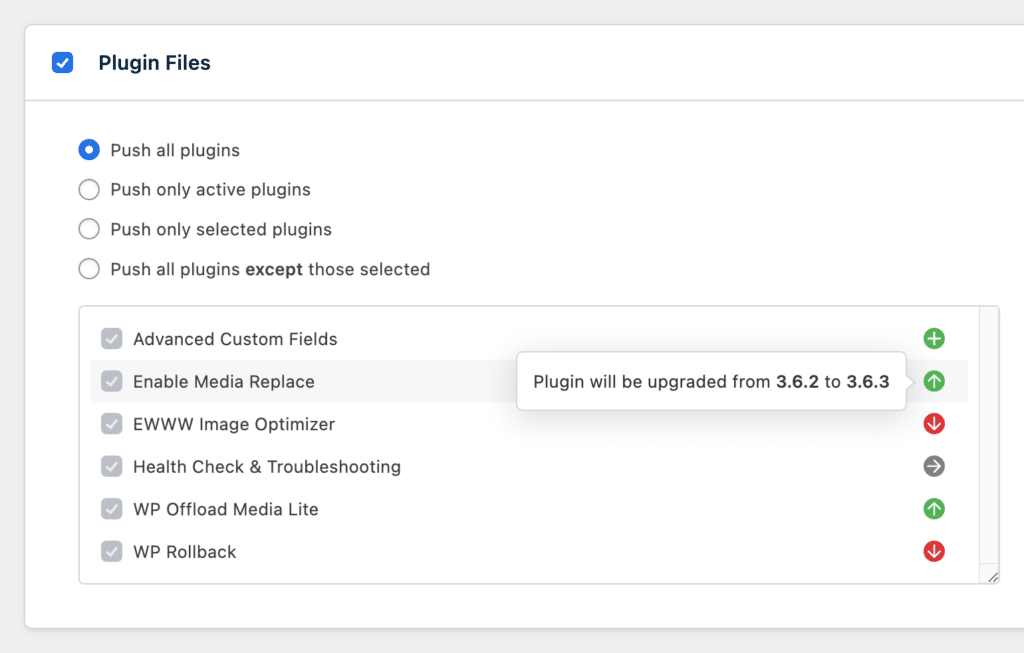
- In the Themes and Plugins panels, helpful icons and tooltips next to each theme and plugin name indicate whether the result of the migration will cause the version to be added, upgraded, downgraded, or remain the same. To speed up the migration, choose Push only selected themes/plugins and select only the items that have been added or upgraded since the last migration.
After Migrating
Once the site is migrated a migration success or failure email will be sent to the email address provided. Test the site on WP Engine and confirm everything loads as expected.
Add Domain and Go Live
The last step is to take the domain live on WP Engine. When complete, this process will send any visitors to the domain to the site hosted on WP Engine.
To go live, add the domain in the WP Engine User Portal then point DNS to WP Engine. Learn how to go live with a domain here.
Add SSL (Optional)
When pointing DNS to WP Engine’s new advanced network or Global Edge Security, WP Engine adds SSL and CDN automatically. Learn more in this guide.
To add an additional third-party SSL, learn how to do so here.
Limitations
Currently there are some caveats when working with the WP Engine Site Migration plugin. As we continue to modify and improve the plugin, these may change in the future.
Multisite Migrations
Multisite networks can be migrated if the WP Engine site has been converted to a multisite before the migration. At this time, individual subsites cannot be migrated using the plugin.
eCommerce and Other Dynamic Sites
Dynamic sites that change frequently due to eCommerce sales or other user activity require special consideration. For example, it’s a good idea to put the source site into maintenance mode to prevent data loss during a migration.
While the WP Engine Site Migration plugin is capable of migrating these dynamic sites, we recommend that eCommerce customers continue to use the WP Engine Automated Migration plugin and follow the eCommerce Migration Process.
New documentation for migrating eCommerce sites with the WP Engine Site Migration plugin will be available in the future.
Root Files
The WP Engine Site Migration plugin does not currently support migrating files outside of the wp-content directory, such as those that exist in the website’s root directory. If root files are needed, consider manually migrating the files via SFTP or using the WP Engine Automated Migration plugin.
Common Issues
The following issues may cause a site migration to fail:
Connecting to a Multisite with a Custom Primary Domain
When connecting to a multisite on WP Engine with a custom primary domain, the following error may occur: Failed attempting to unserialize the response from the remote server.
To successfully connect to the multisite, ensure that the connection information contains the custom primary domain, not the wpengine.com domain.
Rewrite Rules & Access Restrictions
WP Engine has deprecated support for .htaccess files. As a result, if the source site uses Apache and .htaccess files to handle rewrite rules or restrict access to certain directories, then those behaviors will not carry over to the WP Engine site.
Similarly if the source site uses NGINX to configure rewrite rules or restrict access, then additional steps may be required to maintain those behaviors on the WP Engine site.
In both cases, rewrite rules and access restrictions can be configured on the WP Engine site using the Web Rules Engine.
Security Plugins
Security plugins, such as Wordfence, which include a Web Application Firewall (WAF) are known to cause issues with migrations. When a migration occurs, many consecutive requests take place between the source and destination, which can trigger the rate limiting behavior of these security plugins. Disabling such plugins during a migration can improve the chances of success.
Basic Authentication
Migrating to a private site that is using Basic Authentication requires a username and password to be provided along with the connection information in order to establish a connection. The plugin will prompt for these credentials if Basic Authentication is detected.
Migrating from a private site that is using Basic Authentication may prevent a connection from being established. The plugin will attempt to detect the Basic Authentication credentials automatically, but this is not always possible depending on the host. Disabling Basic Authentication on the source site may improve the likelihood of establishing a connection.
Failed Loopback Request
If a failed loopback request is detected prior to starting a migration, then an error panel will appear that prevents the migration from starting until a successful loopback request is detected. Possible causes of failed loopback requests include basic authentication and hostname resolution.
In the case of hostname resolution, the server hosting the site needs to be able to resolve the hostname of your site. The plugin uses wp_remote_post() to make requests to your site at http://example.com/wp-admin/admin-ajax.php. If you can’t ping your site’s hostname from the server, the plugin will not be able to dispatch the background processes necessary to perform the migration. Work with the site administrator or hosting provider of the source site to correct any issues with hostname resolution.
Contacting Support
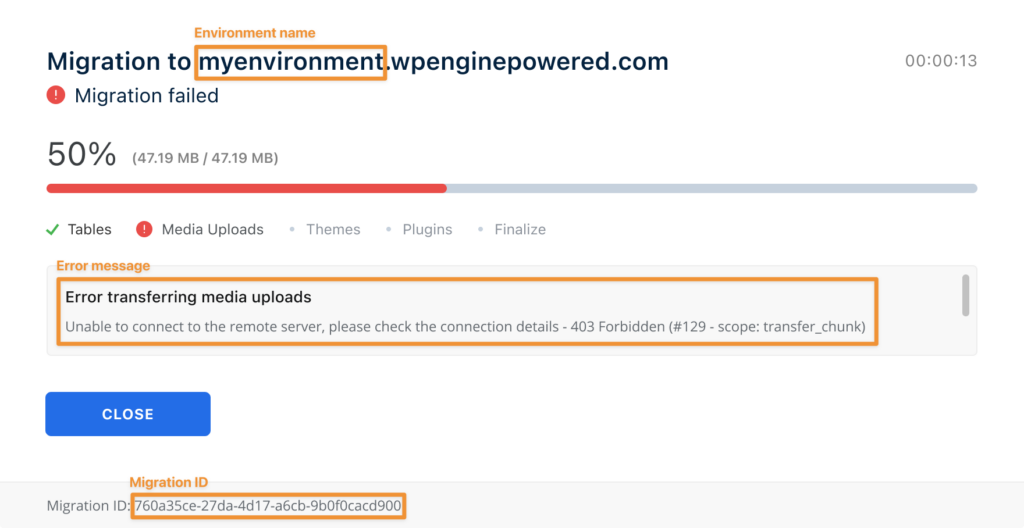
If you’re unable to resolve a migration error on your own, reach out to WP Engine Support for additional help. When contacting Support about a Site Migration plugin failure, please have the following information available.
- Environment name
- Error message
- Migration ID
This information can be found on the migration error status page that will display after the migration fails.
Alternatively, this information can also be found by clicking the link in the migration failure notification email.
Issues After Migrating
The following are common issues that may occur after a successful migration:
PHP and WordPress Version
If the site is not displaying or functioning correctly after a successful migration, compare the version to the previous environment.
- PHP version can be changed in the User Portal using this guide.
- WordPress version can be changed in the User Portal using this guide.
Domain Configuration
The domain configuration may cause issues with redirects or pages loading incorrectly or insecurely post-migration. We recommend ensuring the domain is added to the WP Engine User Portal, and pointing DNS WP Engine, as this will also apply SSL. Additionally, a search and replace may be necessary to ensure all domain references within the website are using the intended domain.
- Learn how to add a domain here.
- Learn how to point DNS here.
- Learn more about SSL here.
- Learn how to run a search and replace here.
Server Configuration
WP Engine servers have many custom configurations that could cause unexpected behavior changes on a newly migrated site. A full list of platform settings and availability can be found here.
- WP Engine does not use the .htaccess file. Alternatives to common .htaccess directives can be found here.
- Certain plugins are disallowed on WP Engine. A full list of disallowed plugins can be found here.
- WP Engine excludes many default WordPress pages from server caches. However, custom URLs (such as a login or checkout page) may need to be excluded from server caching to function as intended. Learn more about cache exclusions here.