Get Started
Web Rules Engine
Tags:
Key Takeaways
The Web Rules Engine (WREn) allows self-management of site traffic behaviors. Leaders can now easily control access, headers, and rewrites without .htaccess rules, enhancing site security and performance.
Web Rule order is crucial for functionality. Understanding the priority of rules ensures effective traffic management and security implementation.
Bulk copying and deleting web rules streamline rule management across environments. This feature simplifies the process of maintaining consistent rules and configurations.
Web Rules Engine empowers leaders to proactively manage site security and performance. Leveraging this tool can enhance user experience and protect against potential threats.
The Web Rules Engine is a User Portal-based service that enables you to self-serve site rules as an alternative to .htaccess rules. The service currently supports management of the following rule types: IP-based Allow/Deny rules, response headers, and rewrite rules.
Overview
The Web Rules Engine (WREn) enables you to self-manage certain site traffic behaviors from the User Portal, such as:
- Disallowing IP or IP Range access to protect against malicious attacks and other negative site behavior
- Allowing IP or IP Range access for known good actors
- Preventing direct access to private files
- Restricting traffic from specific countries or regions
- Modifying cache-control headers and security headers
- Redirecting a page
- Rewriting a page URI
For those who previously leveraged .htaccess file rules to self-manage and control these behaviors, the Web Rules service can now be used instead via the User Portal.
Add Web Rule
To add access, header, and rewrite rules for any environment:
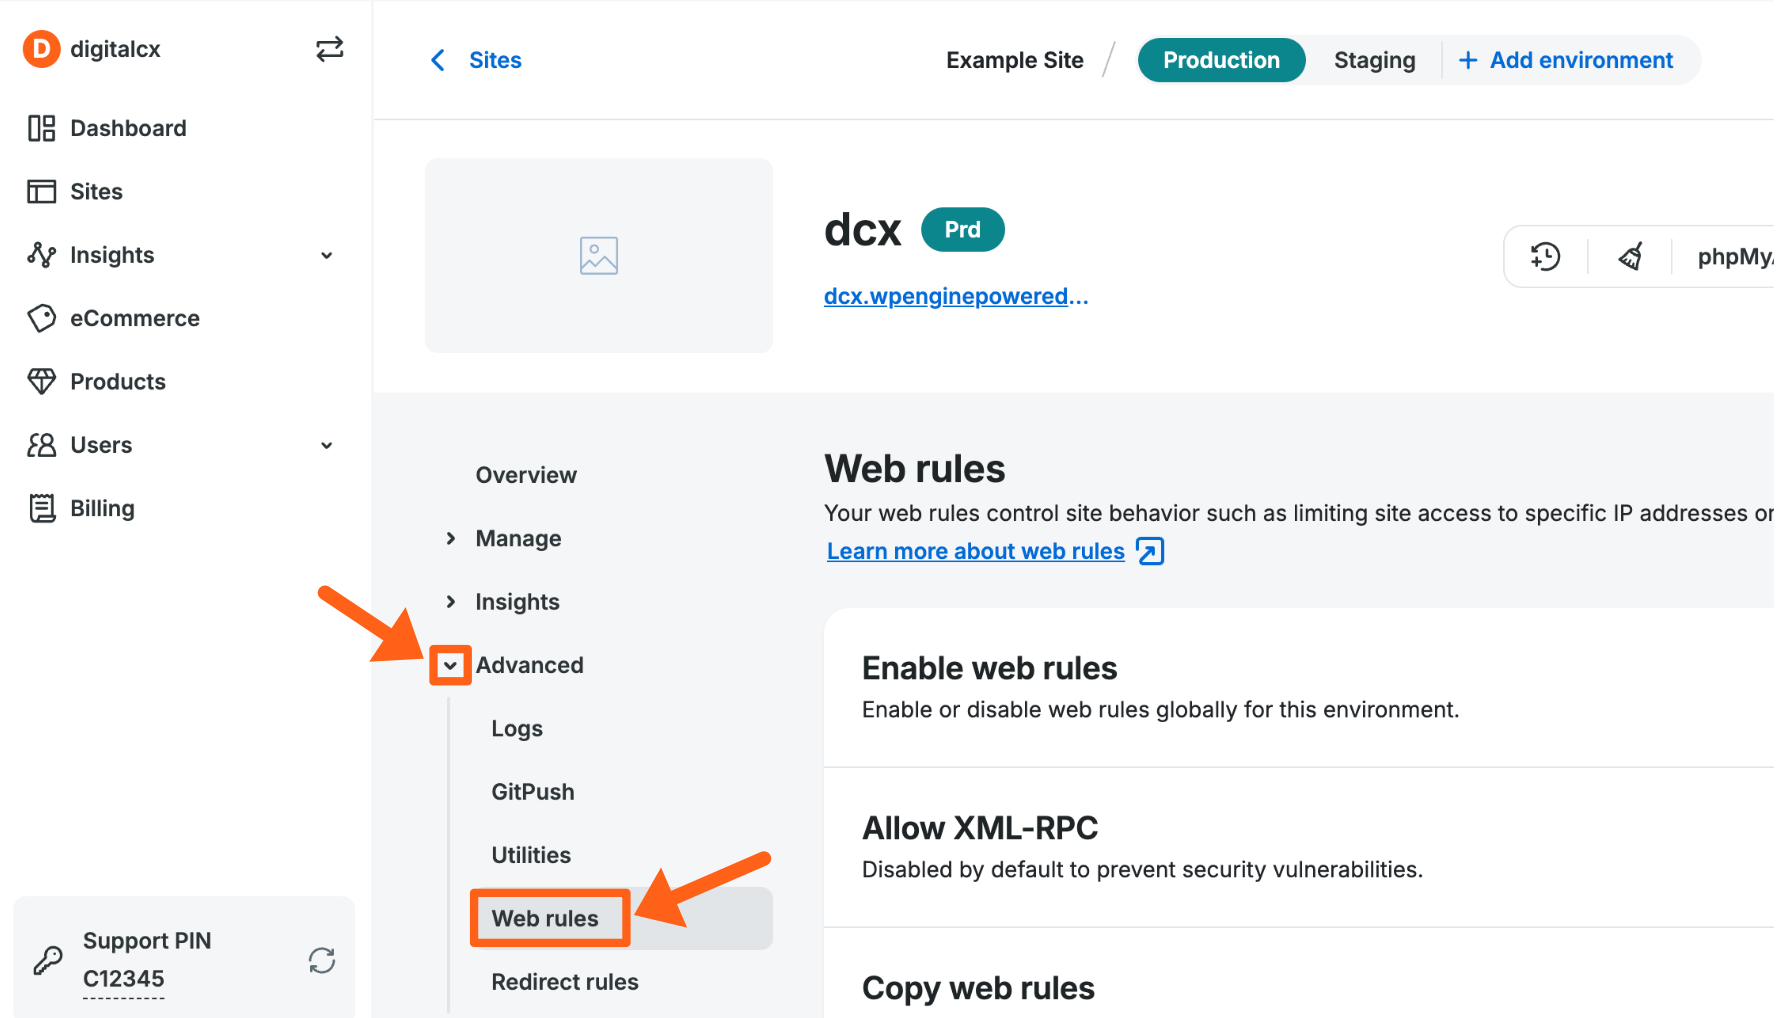
- From the Sites page, select the environment name
- Click Web Rules in the secondary lefthand menu. (You may have to expand the Advanced dropdown section)
- Next, you can choose the Access rules tab, the Header rules tab, or the Rewrite rules tab to manage a specific type of rule.
- Then, click Add Rule
Web Rules functionality is enabled by default on all environments, but can be disabled (EX: when troubleshooting) by selecting Disable web rules.
Add Relative Rule
Users with existing web rules have additional options for adding new rules in relation to existing rules. This can be useful when creating rules whose order is significant.
- Open the Web Rules page
- Locate an existing rule
- Click the 3 dot menu icon to the right
- Select an insert option:
- Insert rule above – Creates a rule above the selected. The new rule will be read first and have higher priority, i.e. an exception to a more broad rule placed below.
- Insert rule below – Creates a rule below the selected. The new rule will be read second.

Copy Web Rule
Web rules can be copied from one environment to another environment on the same account. Rules will be copied as-is and will include access, header, and rewrite rules. Duplicate rules on the destination environment will not be copied, so as to not cause any conflicts. Both source and destination should have their rules cleaned up prior to copying.
Bulk Copy Web Rules
- From the Sites page, select the environment to copy web rules from.
- Click Copy web rules.

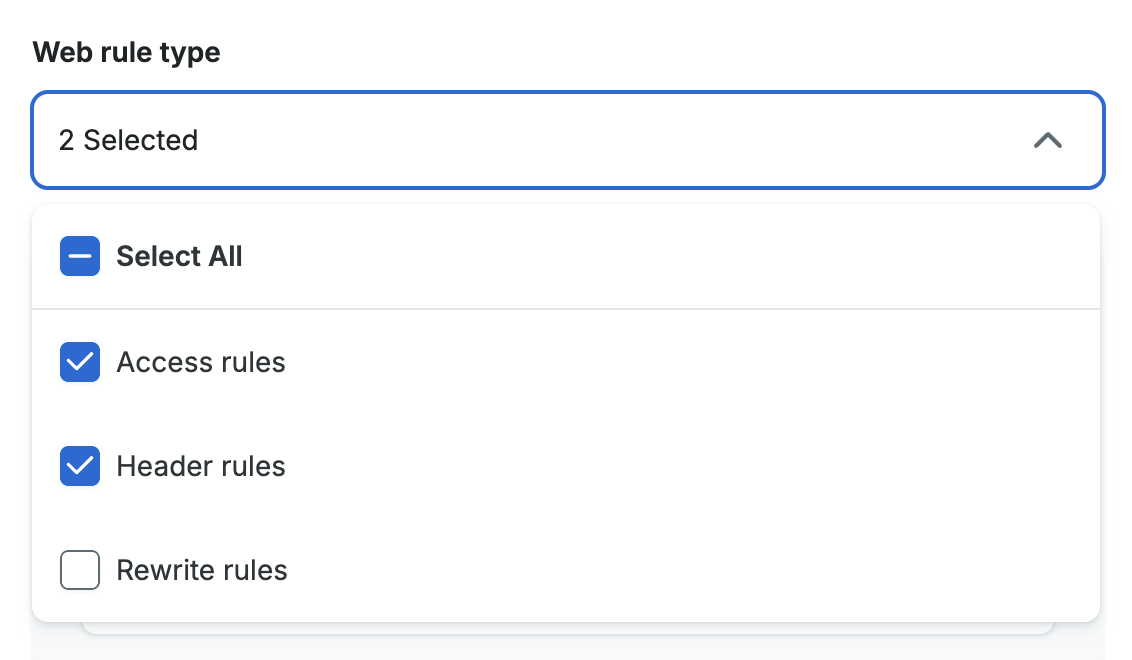
- Select the web rule types that you want to copy. The types include Access rules, Header rules, and Rewrite rules. This will copy all rules of the selected rule types that exist on the current environment.
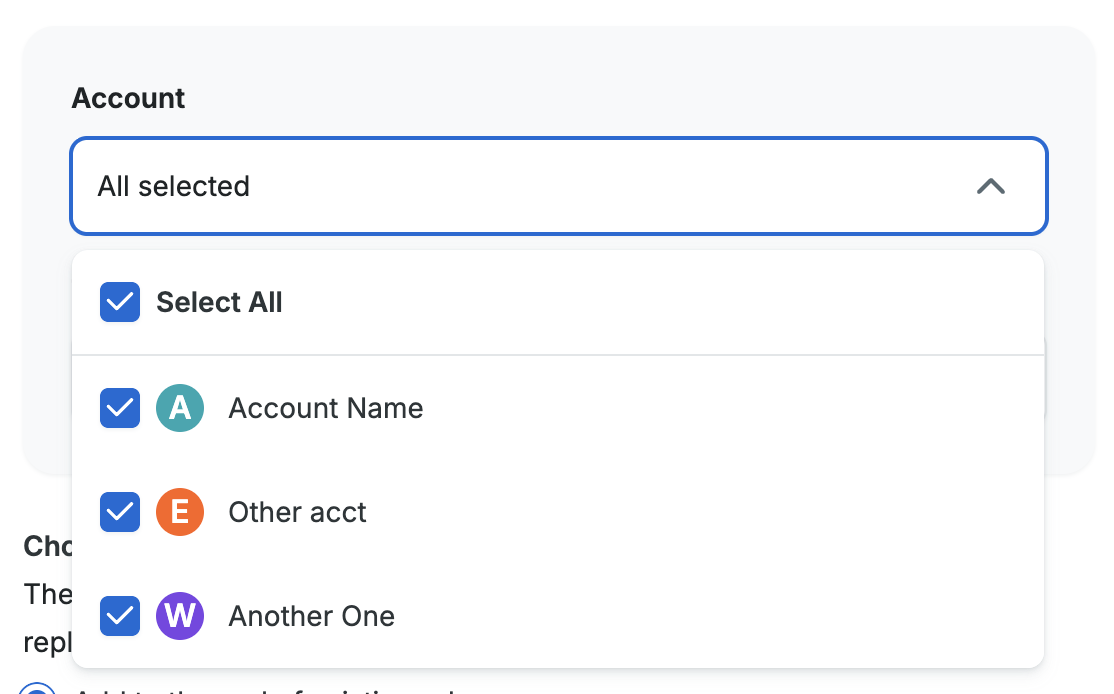
- Select the accounts that you want to copy web rules to. This will populate the next field with all of the environment names from the chosen accounts.
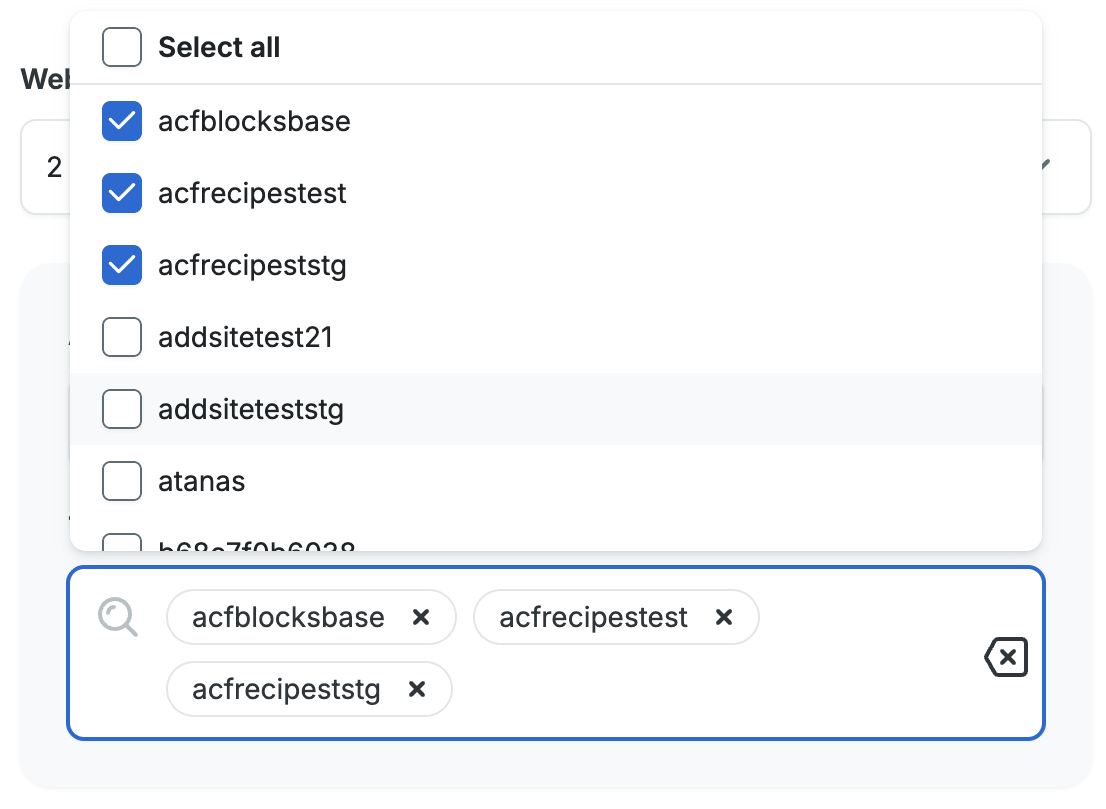
- Select the destination environment(s) to receive the rules.
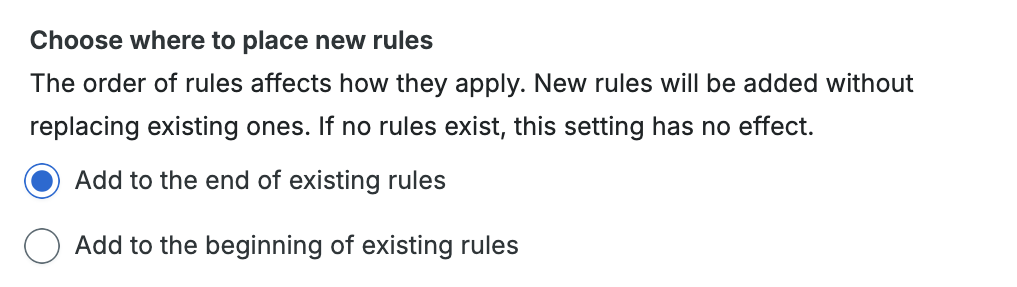
- Choose the order to insert the rules. You can choose to add the rules at the beginning or at the end of the rules that already exist for the chosen environments.
- Click Copy Rules to begin the copy process.
Copy a Single Rule
To copy a single rule to another environment or multiple environments:
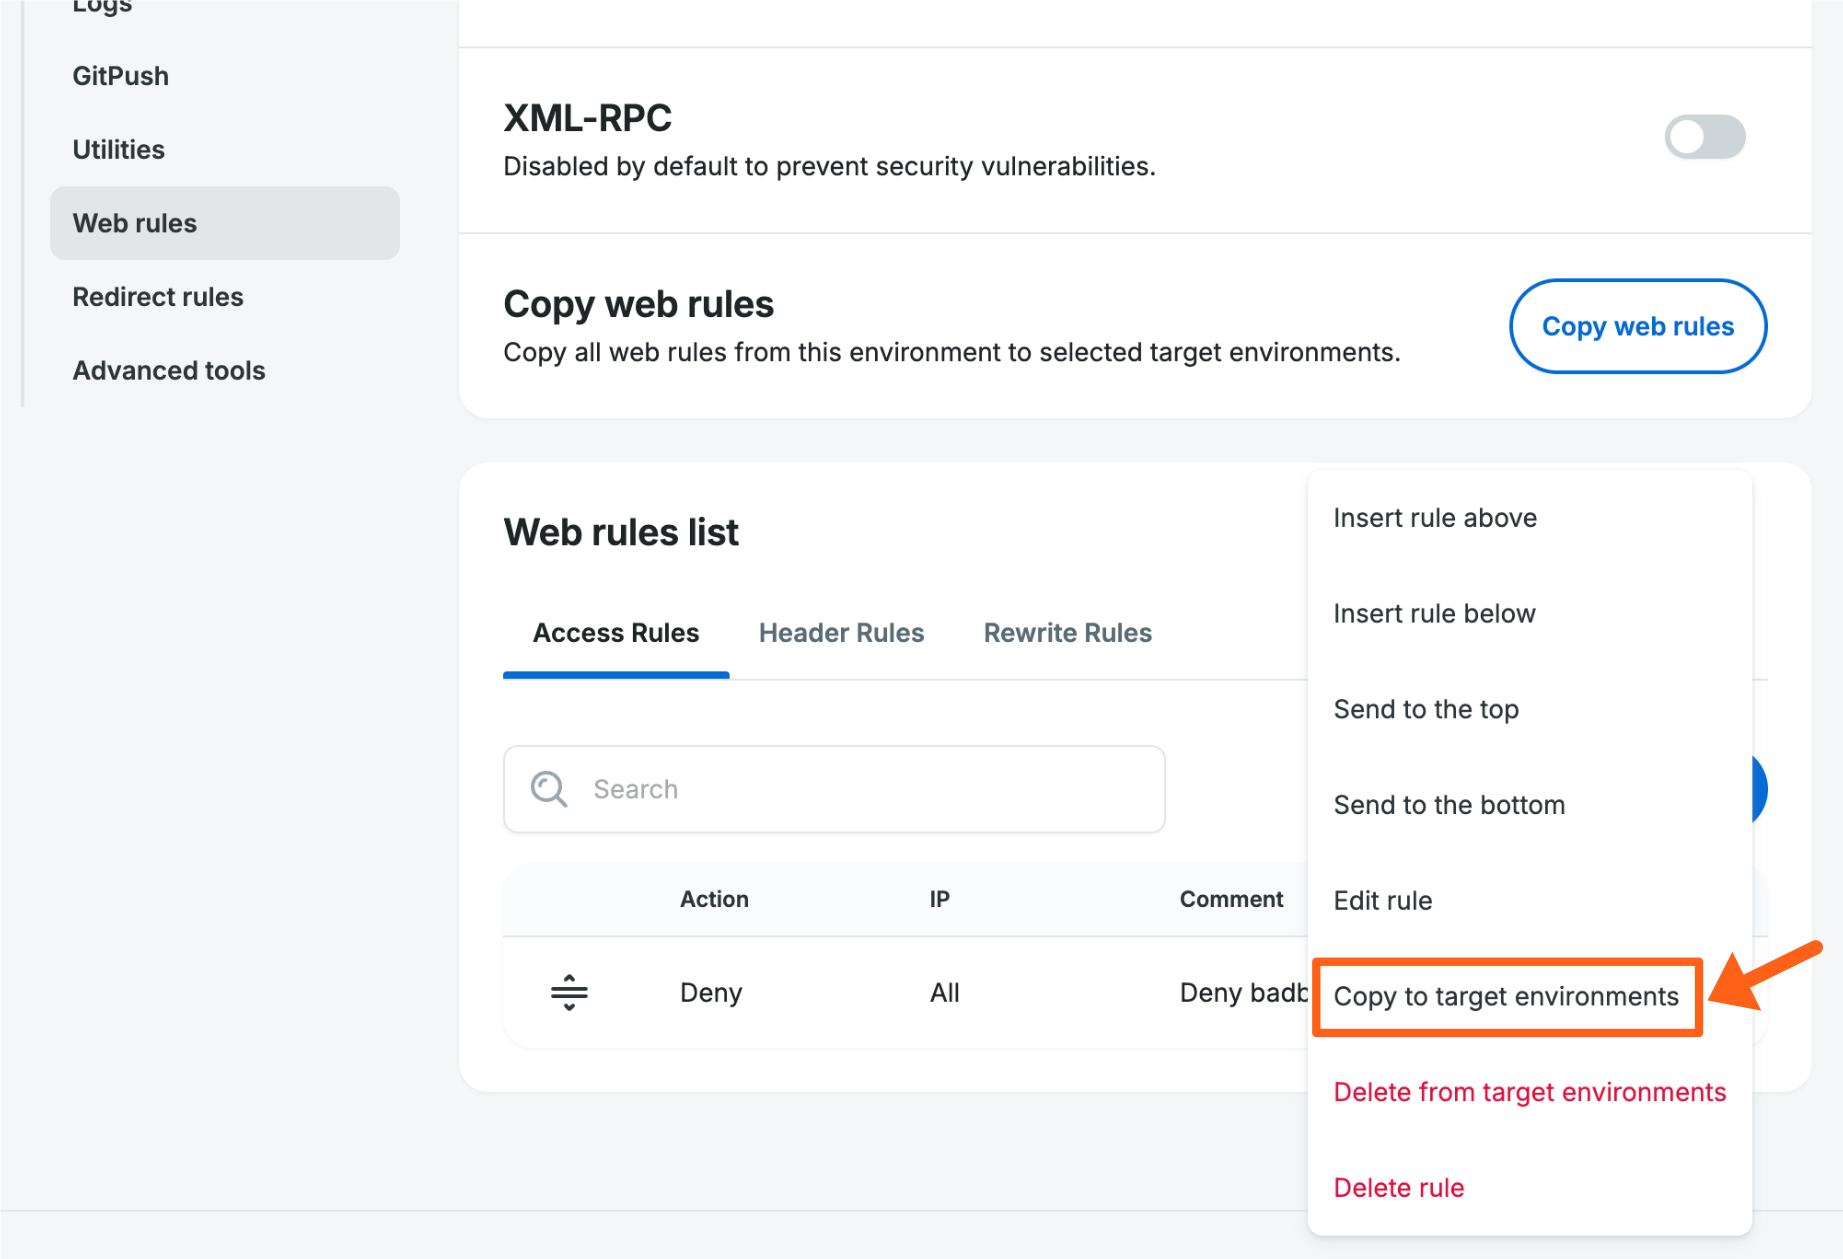
- Locate the rule you’d like to copy.
- Click the 3 dot menu icon to the right of the rule in the table and select Copy to target environments.
- Select the accounts that you want to copy web rules to. This will populate the next field with all of the environment names from the chosen accounts.
- Select the destination environment(s) to receive the rules.
- Choose the order to insert the rules. You can choose to add the rules at the beginning or at the end of the rules that already exist for the chosen environments.
- Click Copy Rule to begin the copy process.
Edit Web Rule
- Open the Web Rules page for an environment.
- Select the appropriate tab for the type of rule that you want to edit (Access Rules, Header Rules, or Rewrite Rules).
- Click the 3 dot menu icon to the right of the rule that you want to edit.
- Select Edit rule.

- Make the necessary changes.
- Click the Edit rule button in the bottom right of the popup to revalidate and apply the update.
Delete Web Rule
- Open the Web Rules page
- Locate the rule you wish to edit
- Click the 3 dot menu icon to the right
- Select Delete rule

Bulk Delete Web Rules
You can now bulk delete items in web rules tables. This option is available for all 3 web rules tabs (Access rules, Header rules, and Rewrite rules).
To bulk delete web rules:
- From the overview page for an environment, click Web rules in the secondary lefthand menu. (You may have to expand the Advanced dropdown section).
- Select the tab for the type of rules that you want to delete (Access rules, Header rules, or Rewrite rules).

- Check the boxes next to each web rule that you want to delete in bulk.
- Select the Delete option from the Bulk actions dropdown.

- Click the Apply button in the top right of the table.
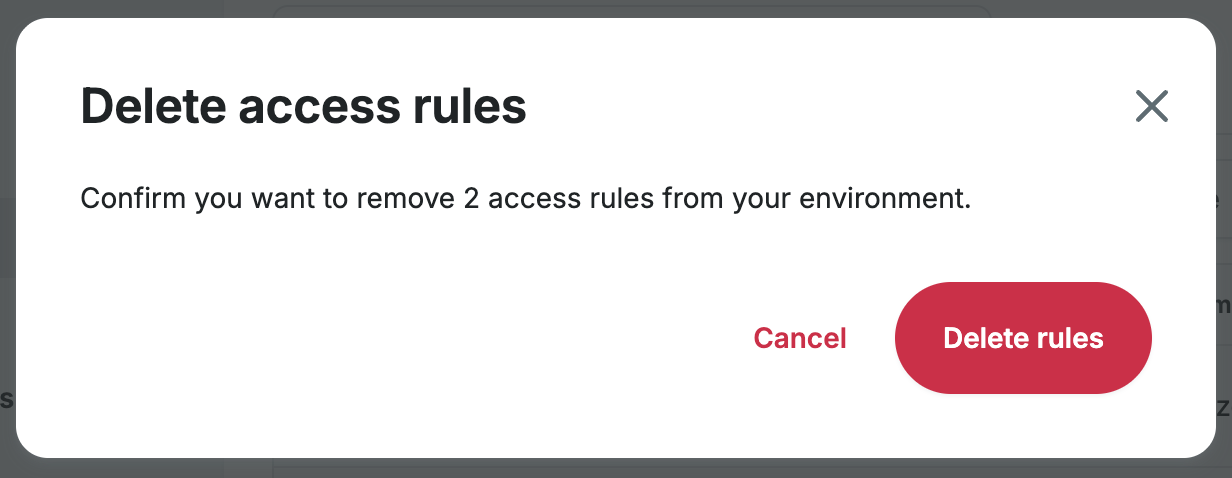
- Confirm your bulk deletion by clicking the Delete rules button in the popup.
Delete Rule Across Multiple Environments
To delete a rule across multiple environments at once, select the menu next to the rule then click Delete from target environments.

A prompt will then display a list of the environments this rule is also applied to, and only rules that are an exact match will be detected. The list will show all environments your user has access to, across all WP Engine accounts. Select the environments you’d like to delete the rule from, then click Delete rule.

Web Rule Order
The order Web Rules are placed in the list can be critical to how they function because many rules can have an impact each other. Web Rules are read from top to bottom, and rules that are read first take priority.
Another way to visualize this is that exceptions to the rule are listed first. For example, if you want to block an IP range but allow a single IP within that range, you will need two rules. The rule listed first will allow the IP address, and the rule listed second will block the IP range.
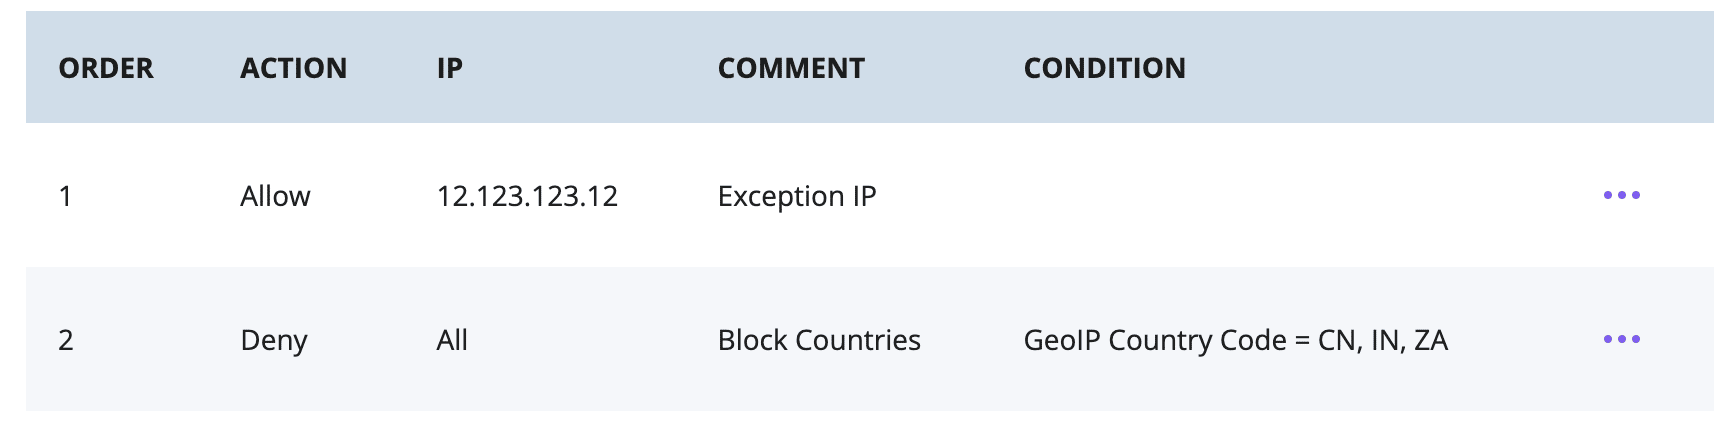
If a specific exception is allowed higher on the list, the priority will apply for all subsequent rules. In the following example, the bottom two rules deny several countries and a user agent. The rule at the top, allowing a specific IP, is read first and has the highest priority over any rules below it. Therefore, the topmost rule will allow this IP even if it is located in one of the blocked countries OR utilizing the blocked user agent.

With regard to rewrite rules, the first rule whose conditions are met for the request will take effect. If a URL is impacted by multiple rewrite rules, the topmost rule will trump the other rules that may apply to that specific URL. If a more general rewrite is placed first, this could impact lower rules down the road. Being specific with your RegEx and rule order can prevent unintended rewrites from occurring.
Rules can be rearranged, if needed, using the drag-and-drop functionality on the left. Adding a rule relative to another rule can make implementing new rules easier. It’s recommended to use the relative adding method when possible, rather than manually rearranging each rule later, to ensure the order is applied as intended.

Rules can have comments added to help prevent confusion and subsequent damage to the rule order over time. For example, the rule to allow a single IP must be above the rule blocking the country this IP is located in, as an exception. Adding notes can help keep this order clear as the rules list changes or grows:

Bulk Move Web Rules
There are now multiple options for bulk moving items in web rules tables, including moving up or down one space and moving to top or bottom. This is available for all 3 web rules tabs (Access rules, Header rules, and Rewrite rules).
To bulk move web rules:
- From the overview page for an environment, click Web rules in the secondary lefthand menu. (You may have to expand the Advanced dropdown section).
- Select the tab for the type of rules that you want to move (Access rules, Header rules, or Rewrite rules).
- Check the boxes next to each web rule that you want to move within the table.
- Select the action that you want to perform from the Bulk actions dropdown.

The choices for move actions are:- Move up/down: These 2 options will either move all of the selected rules up one space or down one space in the table list from their current position.
- Send to top/bottom: These 2 options will either move all of the selected rules to the top or bottom of the table list.
- Click the Apply button in the top right of the table to apply your bulk move action.
Allow or Deny XML-RPC
XML-RPC is considered out-dated and is prone to both attack and spam. In most cases the WordPress® API can be used instead of XMP-RPC, however you may find some applications still require access to xmlrpc.php.1
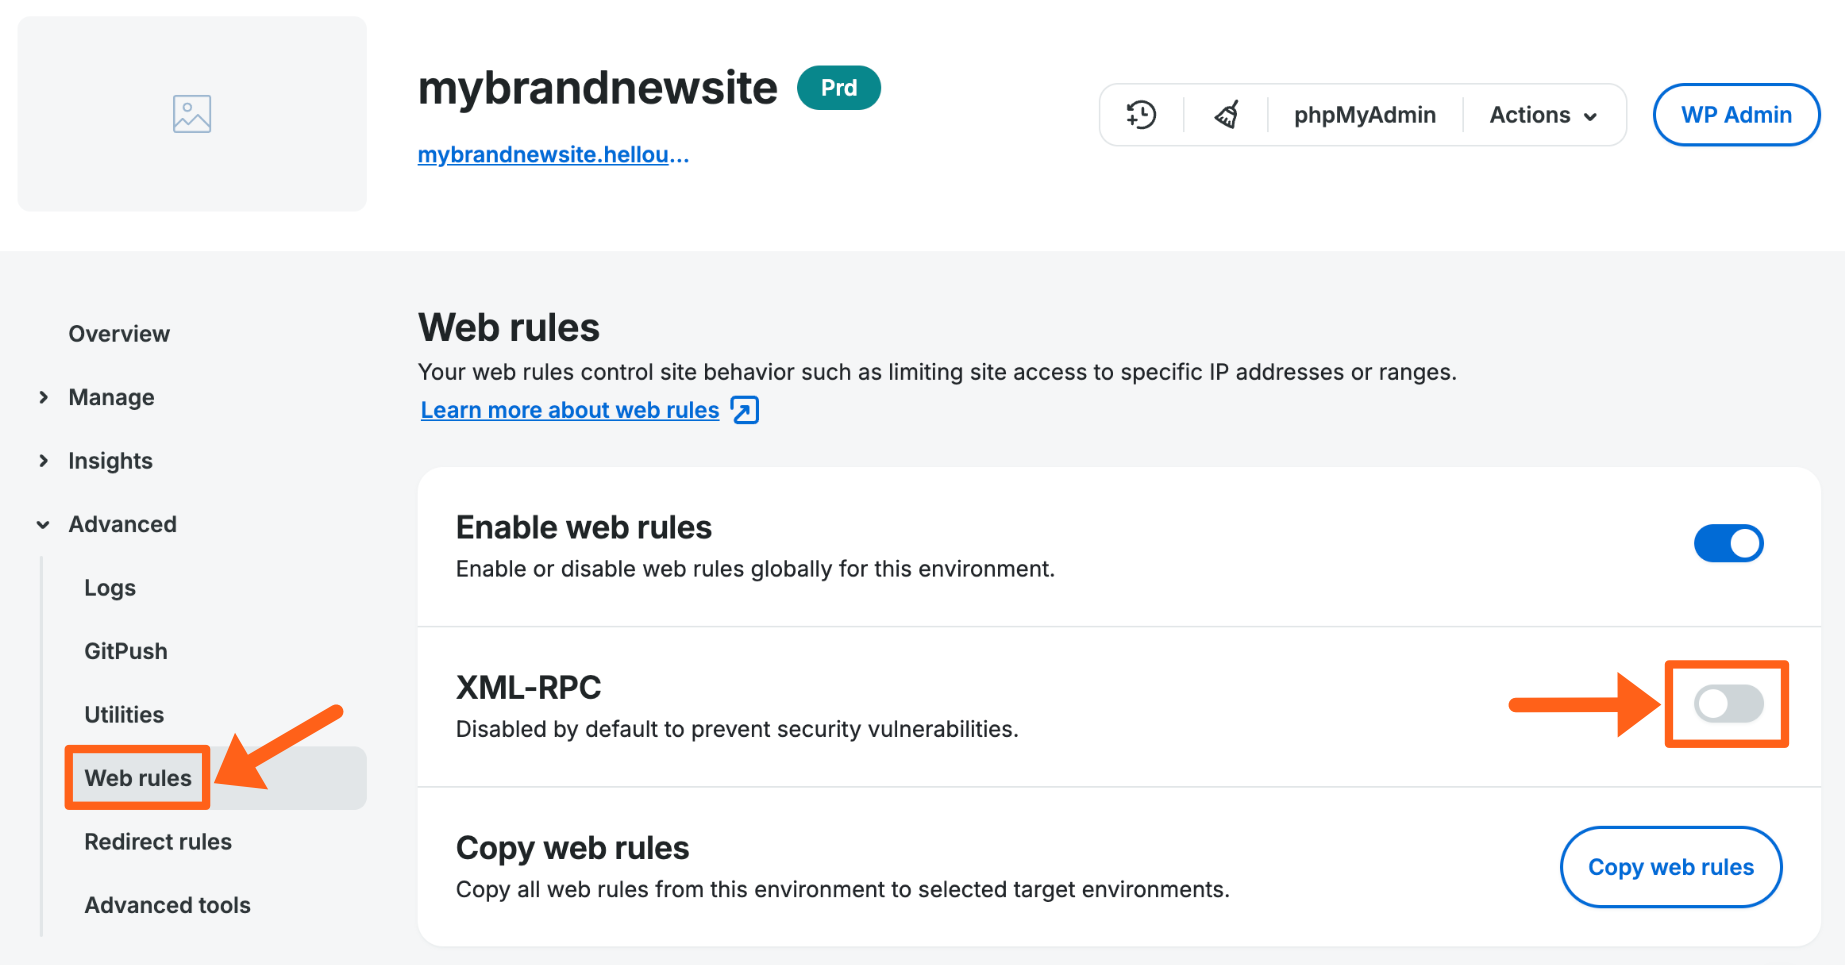
XML-RPC can be set to allow or deny access via a simple toggle on the Web Rules page for each environment.
- Toggle XML-RPC on to allow or off to block XML-RPC requests. For security it is recommended to leave XML-RPC off unless you are sure that you need it for a specific purpose.
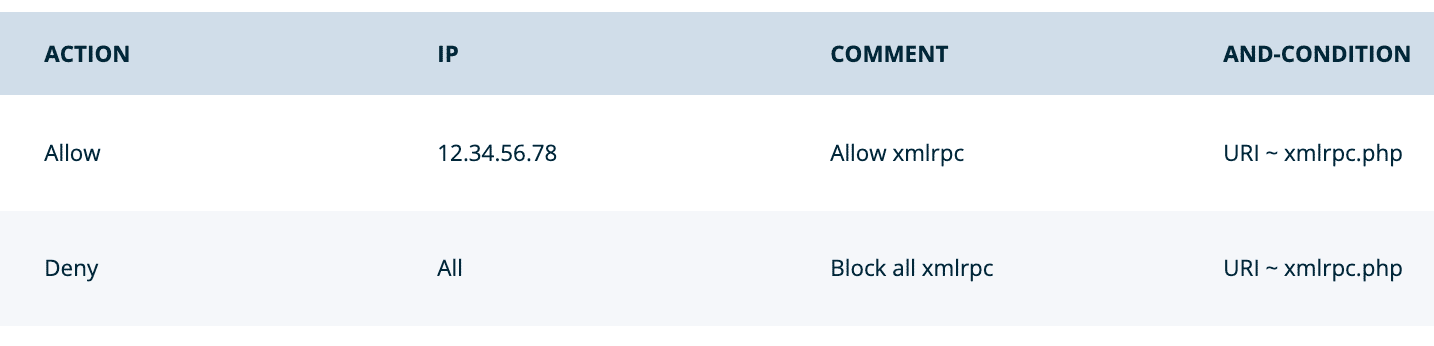
If you choose to allow XML-RPC, we recommend some additional custom access rules to keep it secure. By creating two custom access rules you will first limit the IPs that can access xmlrpc.php, then a second rule (placed directly below the first) will deny all others. For example:
First Rule – Grants limited access to xmlrpc.php:
- Action: Allow
- IP: [IP(s) to allow]
- Conditions:
- Type: URI
- Operator: Regex matches (~)
- Value:
xmlrpc.php
Second Rule – Block all IPs not specified above:
- Action: Deny
- IP: All
- Conditions:
- Type: URI
- Operator: Regex matches (~)
- Value:
xmlrpc.php
Attach and-conditions
And-conditions are combined using the boolean “and” operator. This means that all conditions applied to the rule must be met for the rule to take effect.
To add a condition click the + Add and-condition button as shown below when adding Access Rules, Header Rules, and Rewrite Rules.
Conditions are combined with operators to define how the condition should be met. The value is then defined manually to declare what condition specifically should be met.
| Condition | Purpose |
|---|---|
| URI | URI to match in source. EX: /somepage |
| QUERY_ARG | Query arg to match in source. EX: input_this do not preface with the query indicator ? |
| REQUEST_METHOD | Request method of page. EX: POST |
| HEADER | Header sent with request. EX: User-Agent |
| GEOIP COUNTRY CODE | ISO Country code. Uses MaxMind database. EX: US |
| IP | IP address of request. |
| Operator | Purpose |
|---|---|
| Equal to (=) | Value matches exactly. |
| Not equal to (!=) | Value must be excluded exactly. |
| Regex matches (~) | Use RegEx to define a dynamic value which must be included. |
| Negative regex matches (!~) | Use RegEx to define a dynamic value which must be excluded. |
Example And-Conditions
Domain name:
To add a condition that only applies your rule to a specific domain name, you can use a condition that looks for the HOST header. For the Value field you will add the domain name that you want the rule to be applied to. You will use the domain only, with no protocol as shown in the example below with example.com.
- Click the + Add and-condition button when adding your new rule.
- Use the following values for each option:

- Type: Header
- Name: HOST
- Operator: Equal to (=)
- Value: example.com
- After all of your other values are set for your rule, click Add rule to save your rule and your added and-condition.
Query String:
The query string condition allows you to apply a rule only when there is a matching query string in the URL. Query strings are parameters added to the end of a URL to allow for customization of a page.
Query strings start with a question mark (?) character at the end of a URL. Each parameter of the query string is separated with the ampersand (&) character. Each parameter has a name and value which are separated by the equal sign (=) character.
An example query string might be:
https://examplestore.com/abc-shirt?color=red&size=large
The example is a web page of a shirt for sale, and the added query string parameters are color (red) and size (large).
- Click the + Add and-condition button when adding your new rule.
- Select Query string for the Type field.
- Select one of the four comparison types for the Operator field. The regex options let you match against patterns instead of exact text. Read more about regex here.
- Equal to (=)
- Not equal to (!=)
- Regex matches (~)
- Negative regex matches (!~)
- For the Value field, type the text or regex pattern that you want to match or negative match. For the above example query string, if you were trying to target shirts where the query string specifies the color red, then you would add an equal to value of:
color=red.
- After all of your other values are set for your rule, click Add rule to save your rule with your added condition.
User Agent:
To add a condition that only applies your rule to a specific User-Agent like a web browser, you can add a rule that looks for the User-Agent header. The following example adds a rule that only applies to a version of the old Internet Explorer 6 browser. You may want to apply this condition to an Access Rule for example if you want to block traffic coming from a specific outdated browser.
- Click the + Add and-condition button when adding your new rule.
- Use the following values for each option:
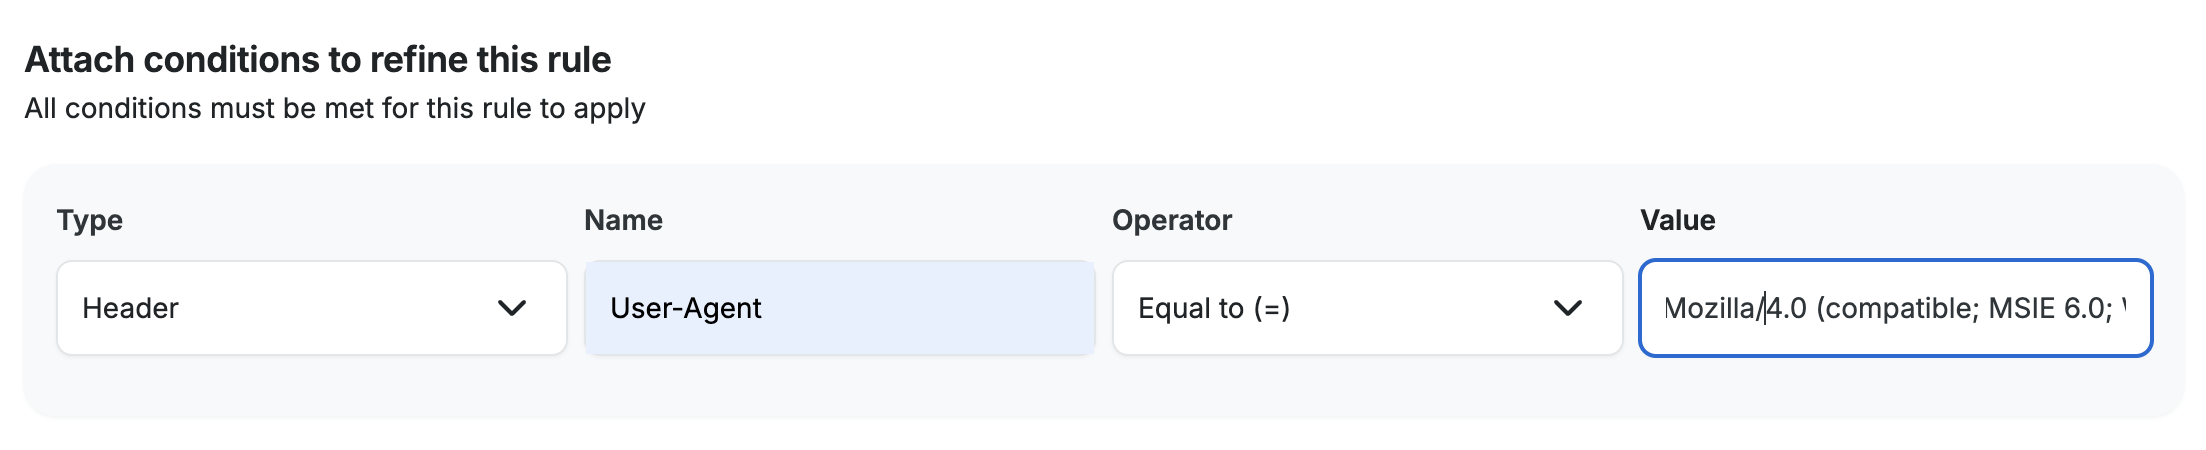
- Type: Header
- Name: User-Agent
- Operator: Equal to (=)
- Value: Mozilla/4.0 (compatible; MSIE 6.0; Windows NT 5.1; SV1)
- After all of your other values are set for your rule, click Add rule to save your rule and your added and-condition.
For the above example we pulled this User-Agent string from the access logs for an environment. Read more about viewing log details here.
The example user-agent entry in the log details would look like this: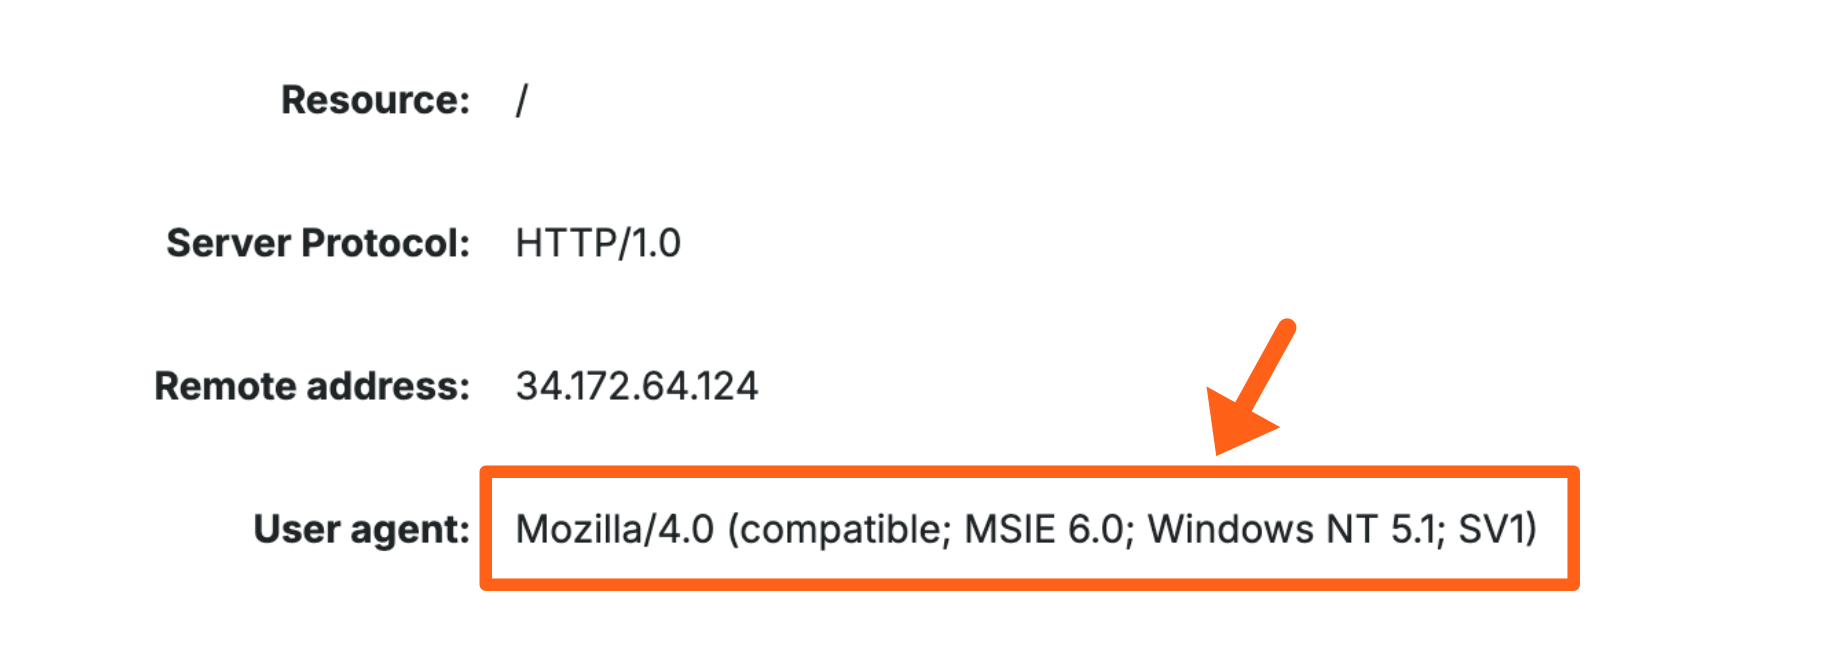
Access Rules
Access rules can allow you to manage the flow of traffic to a website with certain restrictions. For example, access rules can be used to block an IP range. Access rules are read in cascading order, can be set for IP or IP ranges, and can have certain conditions applied. Private IP addresses and ranges, like those used for local network (LAN) configurations, cannot be blocked.
- Open the Web Rules engine
- Select Access Rules
- Click Add rule
- Enter the rule
- Click Add Rule to validate and save the new rule
- Once your web rules have been validated and applied, they will populate in the rule table

Access Rule Examples
Below are some examples of common rules you may use. Rules can be modified as necessary, for example switching deny and allow, or using an IP range versus a single IP.
Be cautious when denying access to critical pages (such as wp-admin), as developers and external services can also lose access if not allowed.
- Deny an IP address:
- Action: Deny
- IP: [IP address to deny]
- Conditions: None are needed

- Deny a bot by way of its user agent:
- Action: Deny
- IP: All
- Conditions:
- Type: Header
- Name: User-Agent
- Operator: Regex matches (~)
- Value: [Name of the user agent] EX:
badbot

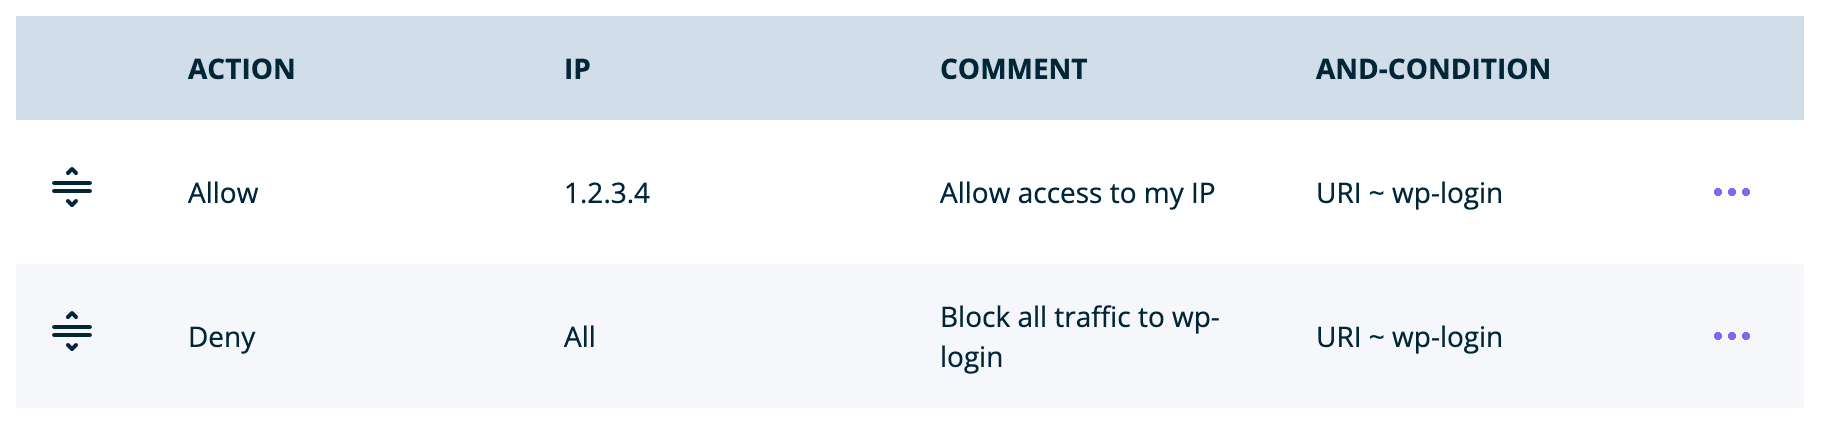
- Allow a single IP address access to wp-login and deny all other IPs access (It’s recommended to restrict wp-login instead in most cases where wp-admin should be restricted, so as to not cause potential issues.)
- First rule (should be placed above the second rule):
- Action: Allow
- IP: [IP address to allow]
- Conditions:
- Type: URI
- Operator: Regex matches (~)
- Value:
wp-login
- Second rule (should be placed below the first rule):
- Action: Deny
- IP: All
- Conditions:
- Type: URI
- Operator: Regex matches (~)
- Value:
wp-login
- First rule (should be placed above the second rule):
- Deny traffic from non-US GeoIPs:
- Action: Deny
- IP: All
- Conditions:
- Type: GeoIP Country Code
- Operator: Not equal to (!=)
- Country Codes: [‘US – United States’]

- Block specific countries from accessing a website:
- In this example, block China, India, and South Africa.
- Action: Deny
- Comment:
Block China, India, and South Africa - Conditions:
- Type: GeoIP Country Code
- Operator: Equals (=)
- Value:
CN, IN, ZA

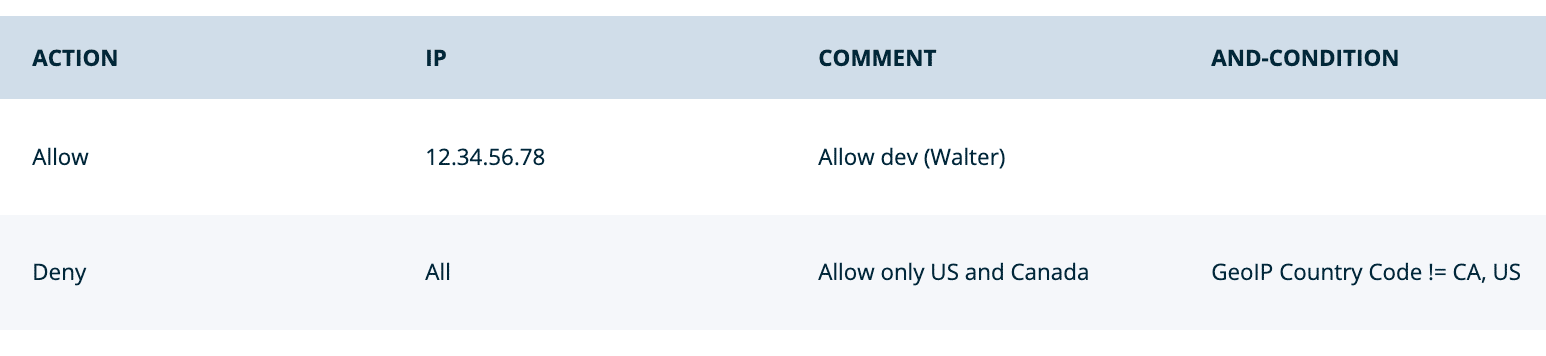
- Only allow traffic from specific countries, block all other countries:
- In this example, allow traffic from the United States (US), Canada (CA) and block all others.
- Action: Deny
- Comment:
Only allow US and Canada - Conditions:
- Type: GeoIP Country Code
- Operator: Does Not Equal (!=)
- Value:
US, CA

- Block country, but allow a specific IP within that country:
- If you want to block an entire country then grant access to a specific IP within that country, you would create an Allow rule for the specific IP and place it before the broader country block. Be sure to name the rule with an identifiable phrase, as the order here is important.
- Block traffic based on referrer (such as spam referrers):
- In this example, block the spam referrer “baddomain.com”.
- Action: Deny
- Conditions:
- Type: Header
- Name: Referer
- While the word “referer” here is spelled incorrectly, this is the correct spelling for this particular usage. Learn more here.
- Operator: Regex matches (~)
- Value:
baddomain.com

IP and CIDR Standardization
The list of IPs and CIDRs for every access rule are sorted, CIDR blocks are standardized, and duplicates are removed. The standardized list is always equivalent to the original. It will not allow or block anything that wasn’t in the original list.
For example:
177.47.19.194/30,
177.47.19.198/30,
177.47.18.106/29,
200.219.195.250/30
Will be standardized to the equivalent:
177.47.18.104/29,
177.47.19.192/30,
177.47.19.196/30,
200.219.195.248/30
Header Rules
Using the Web Rules Engine, response headers can be set. This section can be used to add Nginx security headers or to modify cache behavior via cache control headers. Header rules function the same as access rules; they are read in cascading order and can be set/unset by header name.
- From the Sites page, select the environment name
- Click Web Rules (You may have to expand the Advanced dropdown section)
- Select Header Rules
- Click Add rule
- Enter the rule, then click Save
For header rule conditions, see Attach and-conditions.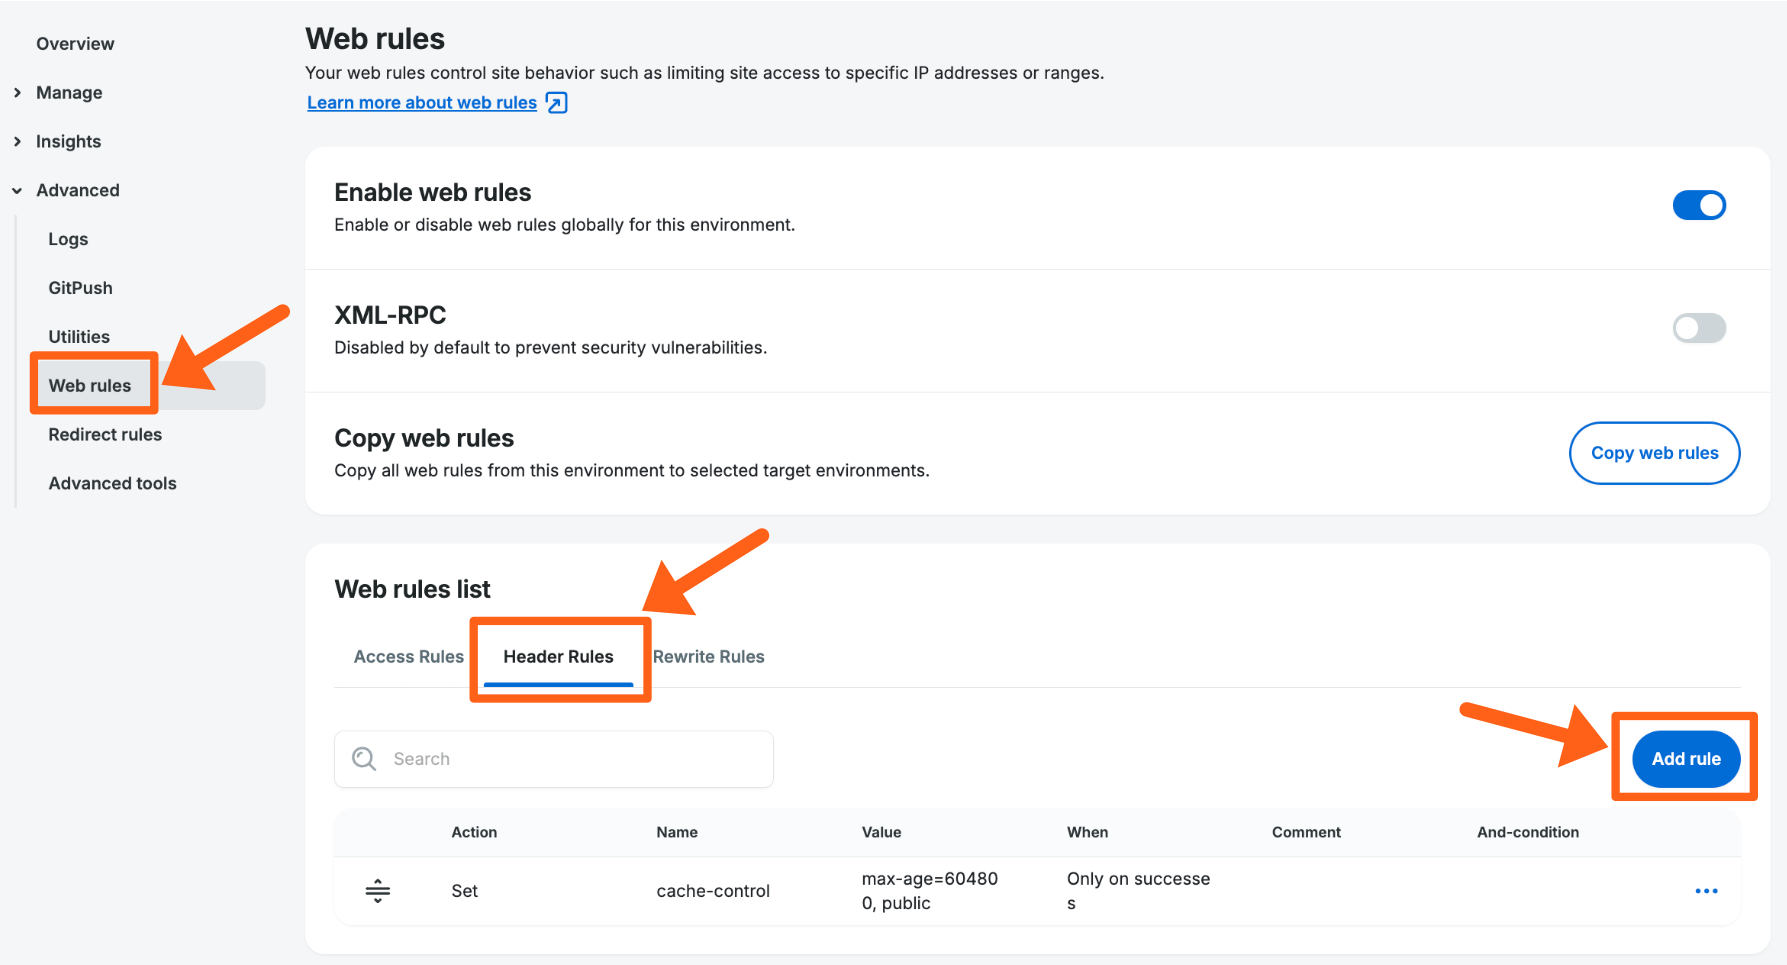
Header Rule Examples
- Set a header to allow all access control for 2xx status responses:
- Action: Set
- Name:
Access-Control-Allow-Origin - Value:
* - When: Only on successes
- Conditions: None are needed

- Unset Set-Cookie header for all responses:
- Action: Unset
- Name:
Set-Cookie - When: All responses
- Conditions: None are needed

- Set Cache Control for URIs in /resources:
- Action: Set
- Name:
Cache-Control - Value:
max-age=604800, public - When: Only on successes
- Conditions:
- Type: URI
- Operator: Regex matches (~)
- Value:
/resources/

- Set HSTS header for 2 years, include subdomains, and preload:
- Action: Set
- Name:
Strict-Transport-Security - Value:
max-age=63072000; includeSubDomains; preload - When: Only on successes
- Conditions: None are needed

- Prevent indexing in the default *.wpengine.com URL
- Action: Set
- Name:
X-Robots-Tag - Value:
noindex, nofollow - When: All Responses
- Conditions:
- Type: Header
- Name:
Host - Operator: Regex matches ~
- Value:
.wpengine.com$

- Set content-security-policy header – Policies should be tailored to each site, the example below should not be copied exactly. Report URI has a tool to help generate headers based on the provided parameters.
- Action: Set
- Name:
Content-Security-PolicyorContent-Security-Policy-Report-Onlymay be used - Value:
[enter custom policy] - When: Can be set as either, if the header should present on all responses or only 2XX
Restricted Headers
Certain headers are restricted from Web Rule functionality either because they conflict with platform features or are unsupported.
x-powered-byserverdatex-orig-cache-controlnr-enabledx-cachex-cache-groupx-cacheableX-pass-why- Any header that includes
WPE
Rewrite Rules
Using the Web Rules Engine, rewrite rules can be added to Nginx. A rewrite can be used to change the URL requested by a client and route the client to a new location. Rewrite rules are read in cascading order. Conditions can be applied to a rule to limit when that rule is triggered. The first rewrite rule whose conditions are met is triggered. Note that the source of a rewrite rule acts as an implicit URI condition.
- From the Sites page, select the environment name
- Click Web Rules (You may have to expand the Advanced dropdown section)
- Select Rewrite Rules
- Click Add rule
- Enter the rule, then click Save
See Attach and-conditions here.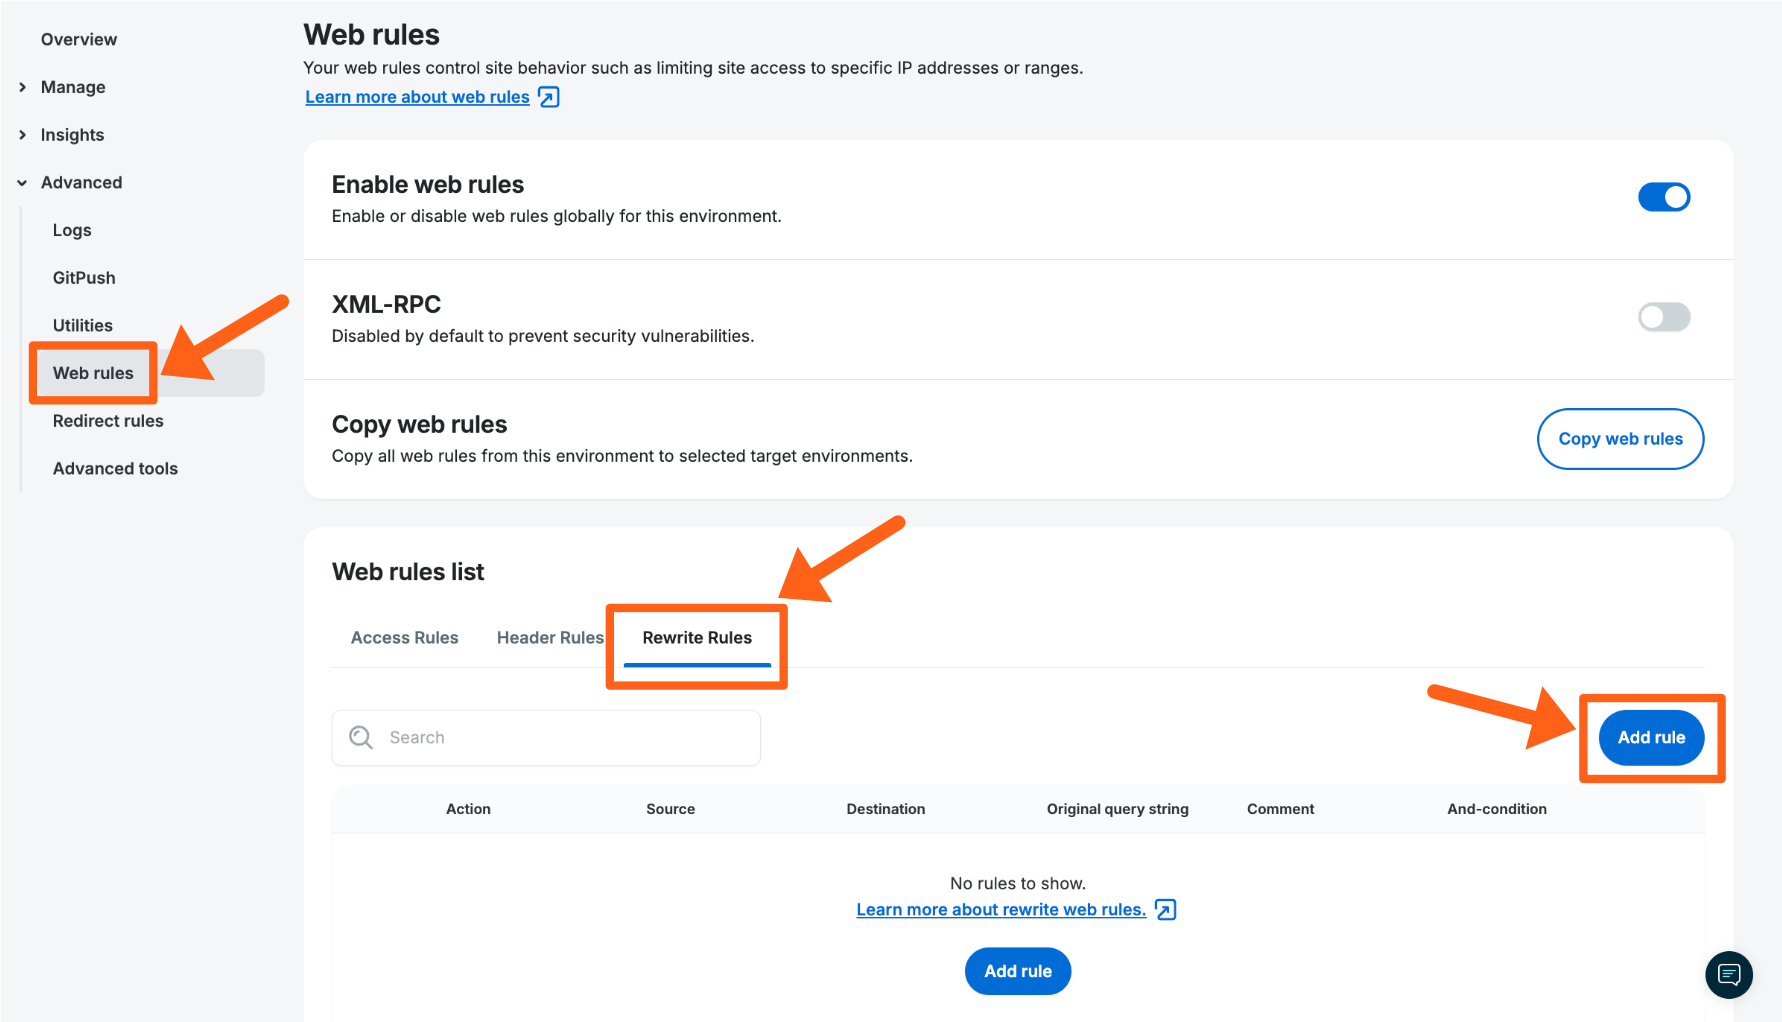
Rewrite Rule Fields
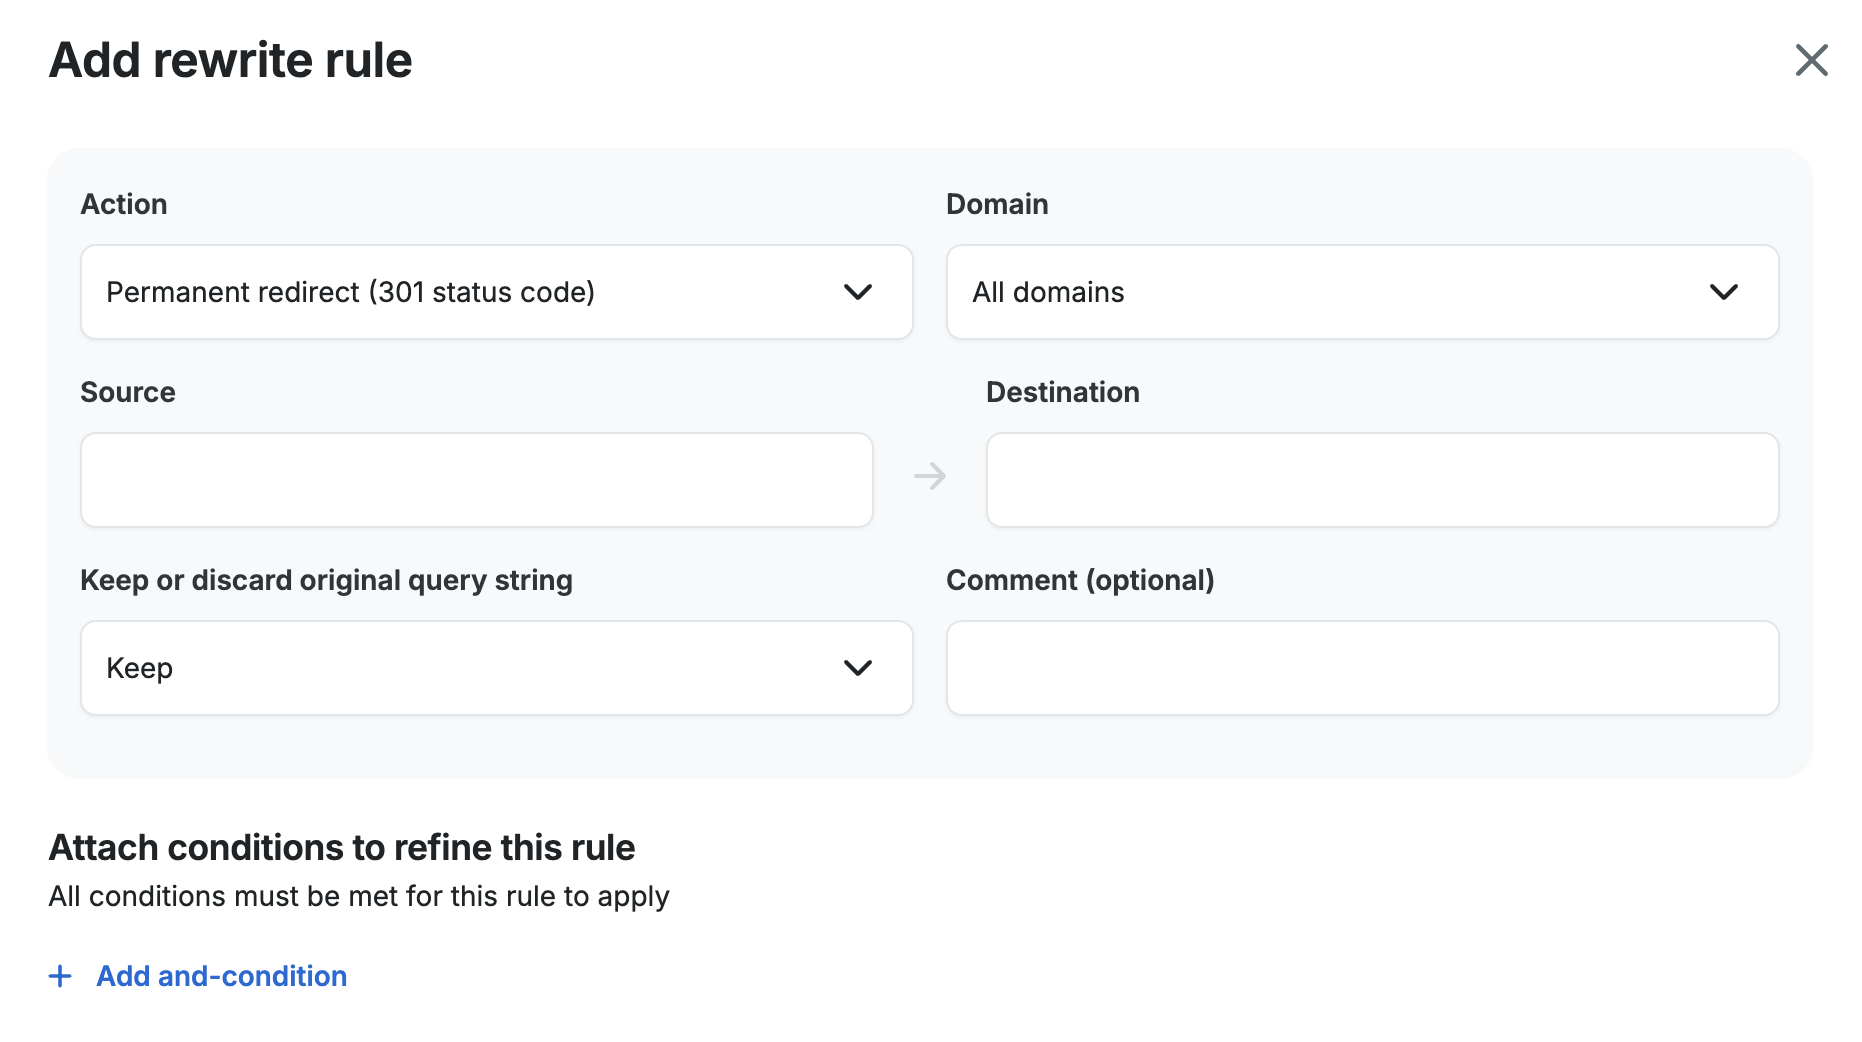
- Action: The rewrite action defines what type of rewrite to perform. Supported actions:
- Permanent redirect (301 status code): Permanent redirects respond to the client with the 301 status code and directs the request to the location defined in the rule destination.
- Temporary redirect (302 status code): Temporary redirects respond to the client with the 302 status code and directs the request to the location defined in the rule destination.
- Internal rewrite: The internal rewrite action responds with content from the rule destination without redirecting the client to another URI. For example, a request for
/page-1may be rewritten internally to/page-2, such that the contents of/page-2are returned to the client without the client being aware the content is from/page-2.
- Domain: The domain name you select will restrict your rule to only redirect requests made to the selected domain. Since multiple domain names can be used for a single site, this allows you to make separate redirects for each domain name. If you leave it set to the default of All domains, it will apply your rewrite rule to redirect all of the domain names you have added to the site.
When you select a specific domain name, it will be added to the rule as an And-condition as shown in the screenshot below. It uses theHeader=HOSTcondition to apply the domain name condition to the rule.
- Source: The rule source is a regular expression (RegEx) that must match the original request URI, including the query string, for the rewrite to happen. The rule source regex may contain named and numbered capture groups to be referenced in the rule destination.
- Destination: The rule destination defines the target URI for the rule. It may be a static URI, or it may include references to capture groups from the rule source. New query string arguments can be added in the rule destination. Additionally, original query string arguments may be preserved via the “Keep or Discard Original Query String” option.
- Keep or Discard Original Query String: For each rewrite rule, you may declare whether to keep or discard the original query string of the request. Keeping the query string is the default behavior. If the rule destination has a query string and the rule preserves the original query string, original query string arguments will be appended to the rule destination.
Please note, at this time there is no response code condition in Web Rules (eg. only redirect if a 404 is returned).
Rewrite Rule Examples
- Simple 301 redirect
- Action: Permanent
- Domain: All domains
- Source:
/oldpage/ - Destination:
/newpage/ - Original Query String: Keep
- Conditions: None are needed

- Rewrite only if user agent matches
- Action: Internal
- Domain: All domains
- Source:
^/index.html - Destination:
bot.html - Original Query String: Discard
- Conditions:
- Type: Header
- Name:
User-Agent - Operator: Equals (=)
- Value: [Enter user agent] EX:
badbot

- Redirect based on country code
- This example will redirect all traffic to a URL based on the requester’s country (United States in this example). This can be modified to include or exclude countries based on the conditions set. Web Rules references MaxMind’s ISO country code database.
- Action: Permanent
- Domain: All domains
- Source:
^/someurl - Destination:
https://newurl.com/ - Original Query String: Discard
- Conditions:
- Type: GeoIP Country Code
- Operator: Equal to (=)
- Country Codes: US

Capture Group Examples
Rewrite rules’ source and destination parameters support named and numbered regular expression capture groups.
Capture groups allow you to contain and use multiple characters as a single unit, i.e. a variable. When capturing a group from the source, it can then be easily appended into a specific location of the destination. A capture group is created by surrounding the target characters in parentheses. Because the content contained by the capture group will typically vary, RegEx should be used to capture the range expected phrases. For a review, see our RegEx guide and see some helpful RegEx resources.
- Redirect with a capture group
- Action: Permanent
- Domain: All domains
- Source:
(.*) - Destination:
https://www.example.com/$1 - Original query string: Discard (this is already contained in the capture group)
- Conditions: None are needed

- Restructure URL with capture group
- Action: Permanent
- Domain: All domains
- Source:
/oldpage-(.*)/ - Destination:
/newpage-$1/

- Numbered capture groups
- By default, capture groups are referenced in numerical order. The first group is 1, the second 2, and so on. This can be used to rearrange information in the destination URL.
- Source:
/oldpage-(d+)/(.*) - Destination:
/newpage/$1/$2
- Source:

- Named capture group
- This capture group is assigned a name. This allows for better readability and documentation. A named capture group is denoted using
?P<capturegroupname>followed by any relevant RegEx that should be used for that capture group.- Source:
/oldpage-(?P<number>d+)/ - Destination:
/newpage/$number/
- Source:

- Concatenating characters to capture groups
- If static characters should be concatenated with contents of a capture group, wrap the capture group reference in curly braces “{}”.
- Source:
/oldpage-(d+)v1 - Destination:
/newpage-${1}v2
- Source:

Bulk Import Rewrite Rules
You can now bulk import redirect rules on WP Engine as as rewrite rules. Upload formatted redirects/rewrites as a .txt file or a .csv file, with one redirect per line, through the User Portal’s Web Rule page. View the Bulk Import Formatting Examples for Rewrite Rules section below for examples.
To access the bulk upload feature, click the Bulk upload button on the Rewrite Rules tab of the Web Rules page for an environment, as shown in the screenshot below:
After clicking the Bulk upload button you’ll see an option to drag and drop, or click to upload a file from your computer:
After selecting a file, click the Add rules button to complete the import. You’ll see 2 success messages. One when the import is successful and another when the rules have successfully been applied to the server.
Bulk Import Formatting Examples for Rewrite Rules
Rules should be formatted with the source listed first and the desination following section. One rule (including source and destination) should be listed per line. For complex redirect patterns use regex (regular expressions). Read more about regex here. The following is an example file showing five different acceptable rules:
/oldpage/ /newpage/
/oldpage-(.)/ /newpage-$1/ ^/index.html newpage.html ^/someurl https://newurl.com/ (.) https://www.example.com/$1
/oldpage-(d+)/(.*) /newpage/$1/$2
/oldpage-(?Pd+)/ /newpage/$number/
/oldpage-(d+)v1 /newpage-${1}v2
In the Bulk upload popup window you’ll also notice 2 buttons for downloading a .txt and a .csv sample of the import formatting.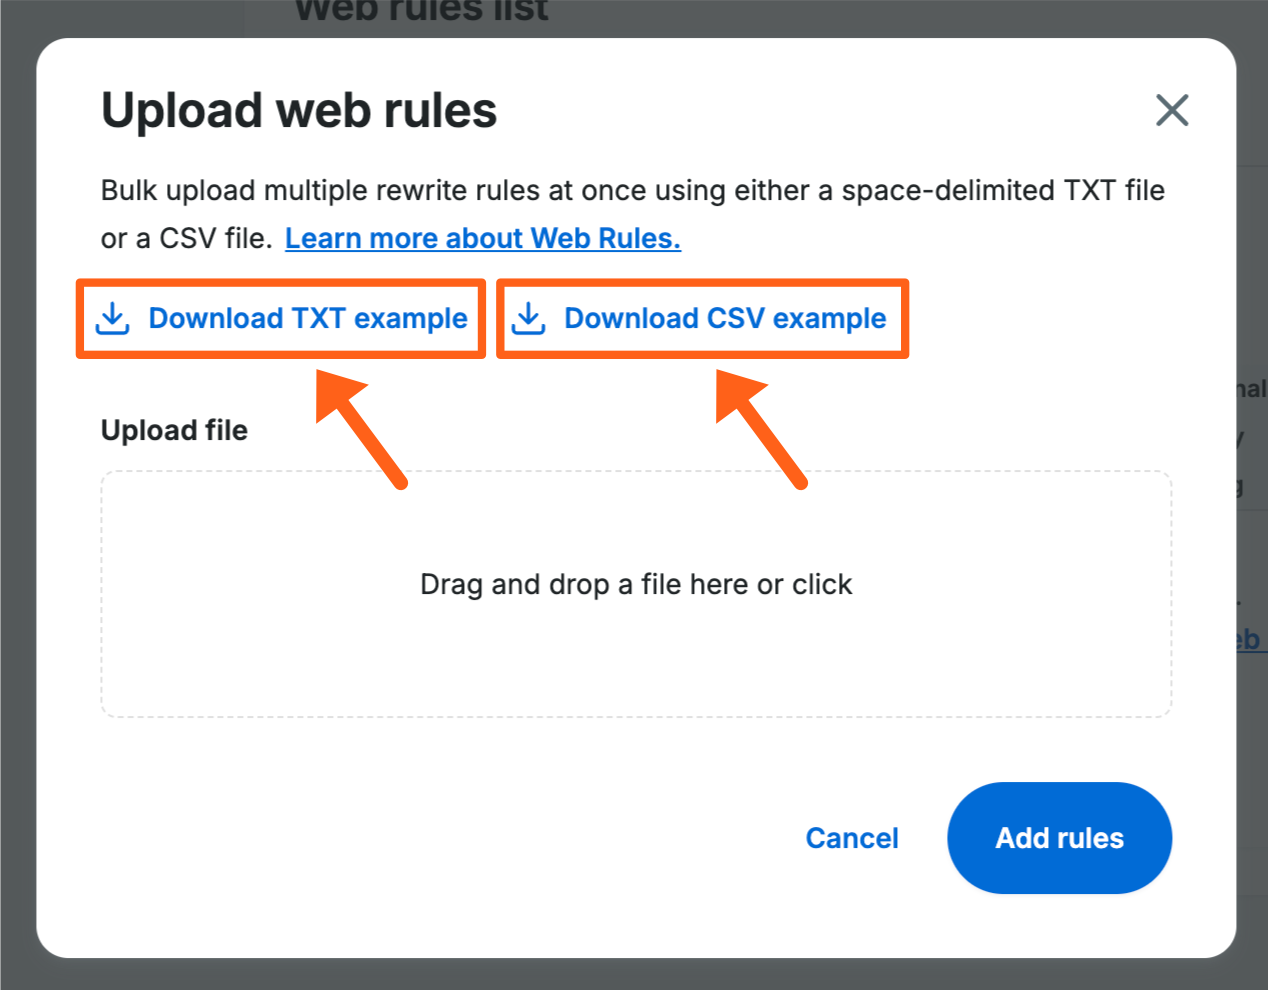
We have a soft limit of 1000 rewrite rules per environment because that is the point at which noticeable performance issues may be seen. This is because all rules have to be processed by the server before every page load. If you have a high number of redirects we suggest exploring the use of regex patterns to cover multiple redirects wherever possible. This can drastically reduce the number of rewrite rules that have to be processed by the server.
Rewrite Rules Bulk Import Errors
You may see errors if the redirects in your file are not formatted properly.
Some examples are:
- Whitespace characters are not allowed.
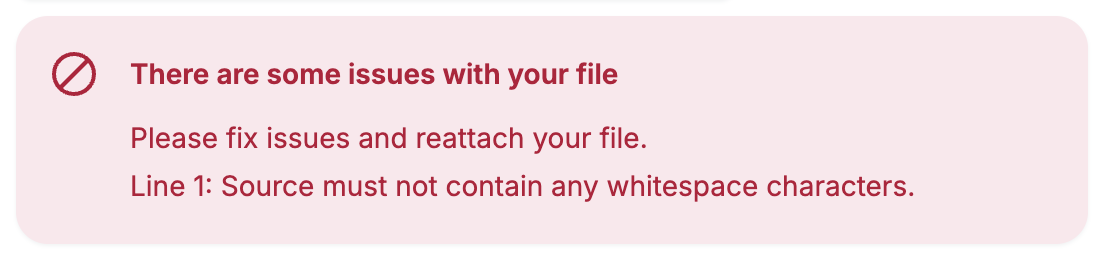
It is not best practice to have whitespace characters in URLs. If your URLs do have whitespace characters, you can replace them in your file with the URL encoded representation of a whitespace character:%20.
Example:/white space testwould change to/white%20space%20test - Invalid regex.
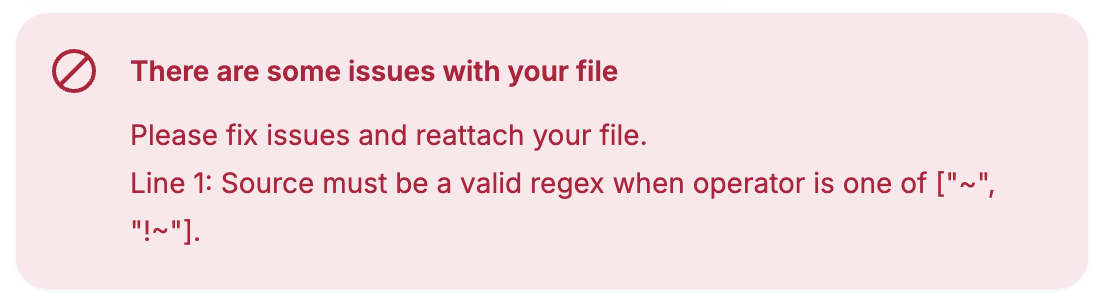
If you see this error, someone on your team that is familiar with regex (regular expression) patterns, will need to review the regex patterns used in the redirects within your file. Web developers are often familiar with regex and may be a good source of assistance.
You can review our regex article for regex basics and example regex patterns.
If you are unable to determine the cause of the errors in your file, you can contact our Support Team for troubleshooting assistance.