Get Started
Sites and Environments
Tags:
Key Takeaways
A ‘Site’ at WP Engine includes Production, Staging, and Development environments. These environments operate independently, enhancing development workflows by providing visibility, flexibility, and security.
Site names can be changed anytime to better describe the three environments within. Environment names, however, are unique and cannot be changed, even if deleted.
Sandbox Sites are non-billable and include a single Development environment. They are designed to simplify WordPress website development and do not count towards the plan’s total Site limit.
Environments are separate instances of WordPress that operate independently within a site. Each site can have up to one environment.
Deleting a site also deletes all environments within it. Backups should be downloaded before deletion, and only ‘Owner’ level users can delete sites.
To add a Sandbox Site, click the Create a sandbox button during the Add Site workflow. Premium dedicated server accounts may add a domain to Sandbox Sites as needed.
At WP Engine, a “Site” refers to a group of up to three environments: Production, Staging, and Development. Despite being grouped visually in the User Portal, these environments functionally operate independently, so site managers never have to worry about changes to one environment impacting another.
With sites and environments, development workflows are enhanced by becoming more visible, flexible, and secure. For example, if a production website has an issue, copy to staging and troubleshoot and resolve the issue securely on a separate installation of WordPress®.1 Alternatively, use development to create and test a new design, then copy those changes to production.
Another important distinction is that “Site” names are much more flexible, and can be changed any time to better describe the three environments within. Environment names cannot be changed, even if deleted, and are unique to the specified instance of WordPress. Additionally, environment names are used to create the unique temporary CNAME attached to the environment (eg. somesite.wpenginepowered.com).
Prefer to watch a video?
About Sites
A “Site” can be thought of as an organizational container for up to three related, but physically separated, installations of WordPress. This streamlines the process of organizing and deploying related environments for a website during development stages and ongoing testing processes.
Create Site
- Log in to the User Portal
- On the Sites page, click Add Site

- What type of site would you like to add? Select Get Started below one of the following options:
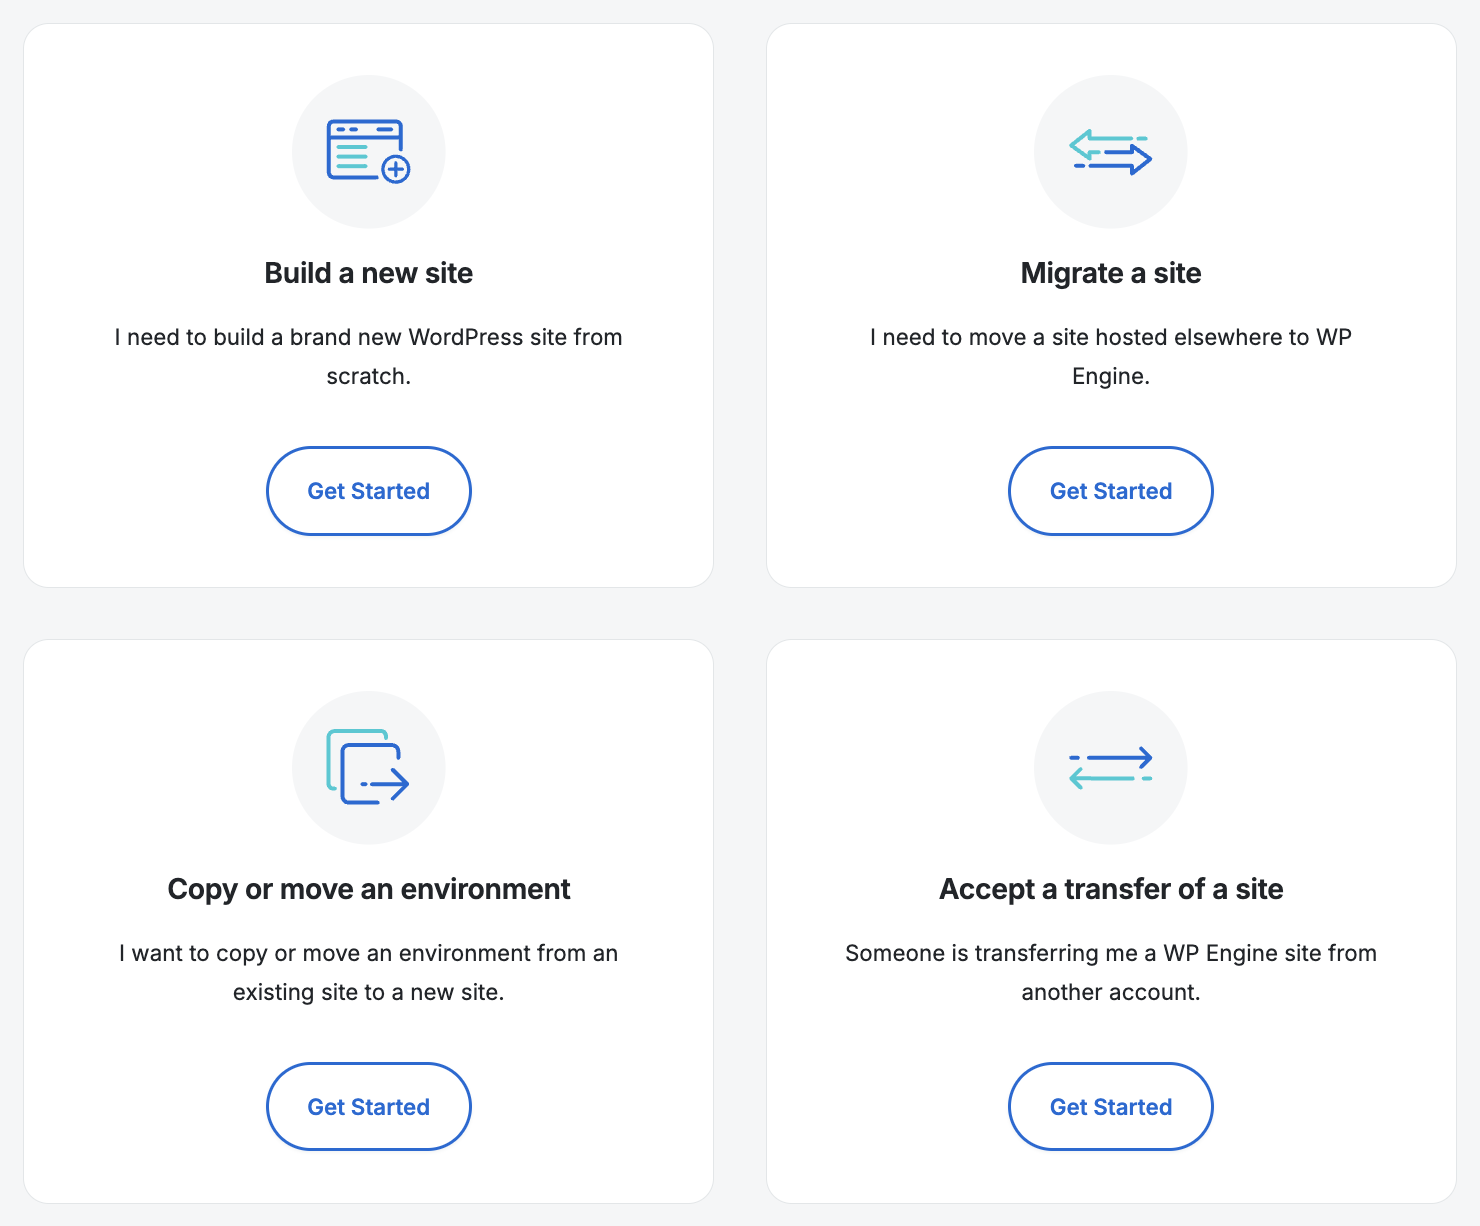
- Build a new site (Most common) – Build a new WordPress site from scratch. This allows several additional options:
- Option 1: A fresh install of WordPress, including the Genesis Pro theme.
- Option 2: A fresh install of WordPress, including items from a preset template, such as a Genesis Pro starter site or an eCommerce store.
- Migrate a site – Move a site hosted elsewhere to WP Engine. If you choose to Migrate a site then you’ll be asked if you want a Standard (automated), or Manual migration.
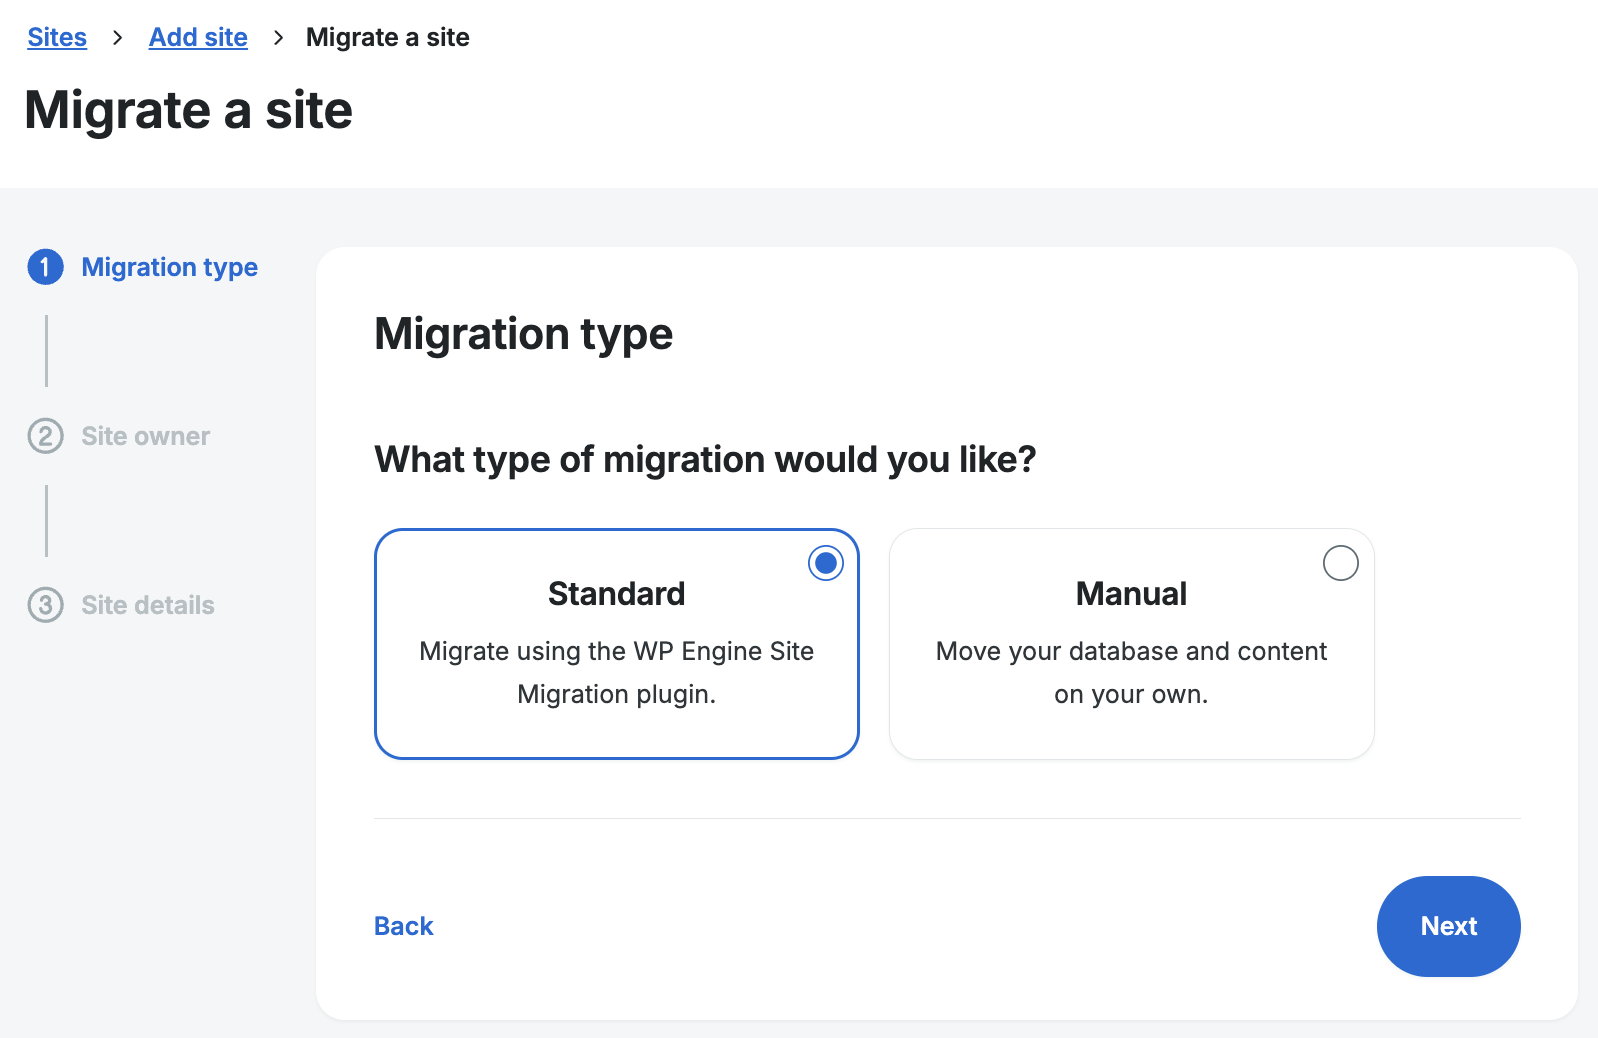
- Standard: If you choose Standard and click Next then you’ll continue on to step 4 (Site Owner) below to finish adding the site. After the site is added you’ll be redirected to the site’s Site Migration menu to start the Automated Migration process.
- Manual: If you choose Manual then you’ll see instructions to Import your database manually after adding the site. After selecting Manual you’ll also see a section below where you’ll be able to upload your wp-content folder, add a notification email address, and click Next, before moving on to step 4 (Site Owner) below. This creates a ticket for our support team and they’ll email you when they successfully upload the wp-content folder to your site, or if they have any complications. These tickets are usually completed in the same day. Read more about the manual migration process here.

- Copy or move an environment – Copy or move an environment from an existing site to this one.
- Accept a transfer of a site – Accept a transferable environment from another WP Engine account.
- Build a new site (Most common) – Build a new WordPress site from scratch. This allows several additional options:
- Site Owner – Select the account for the new site (if your user has access to multiple hosting accounts) and whether or not the site should be transferable.
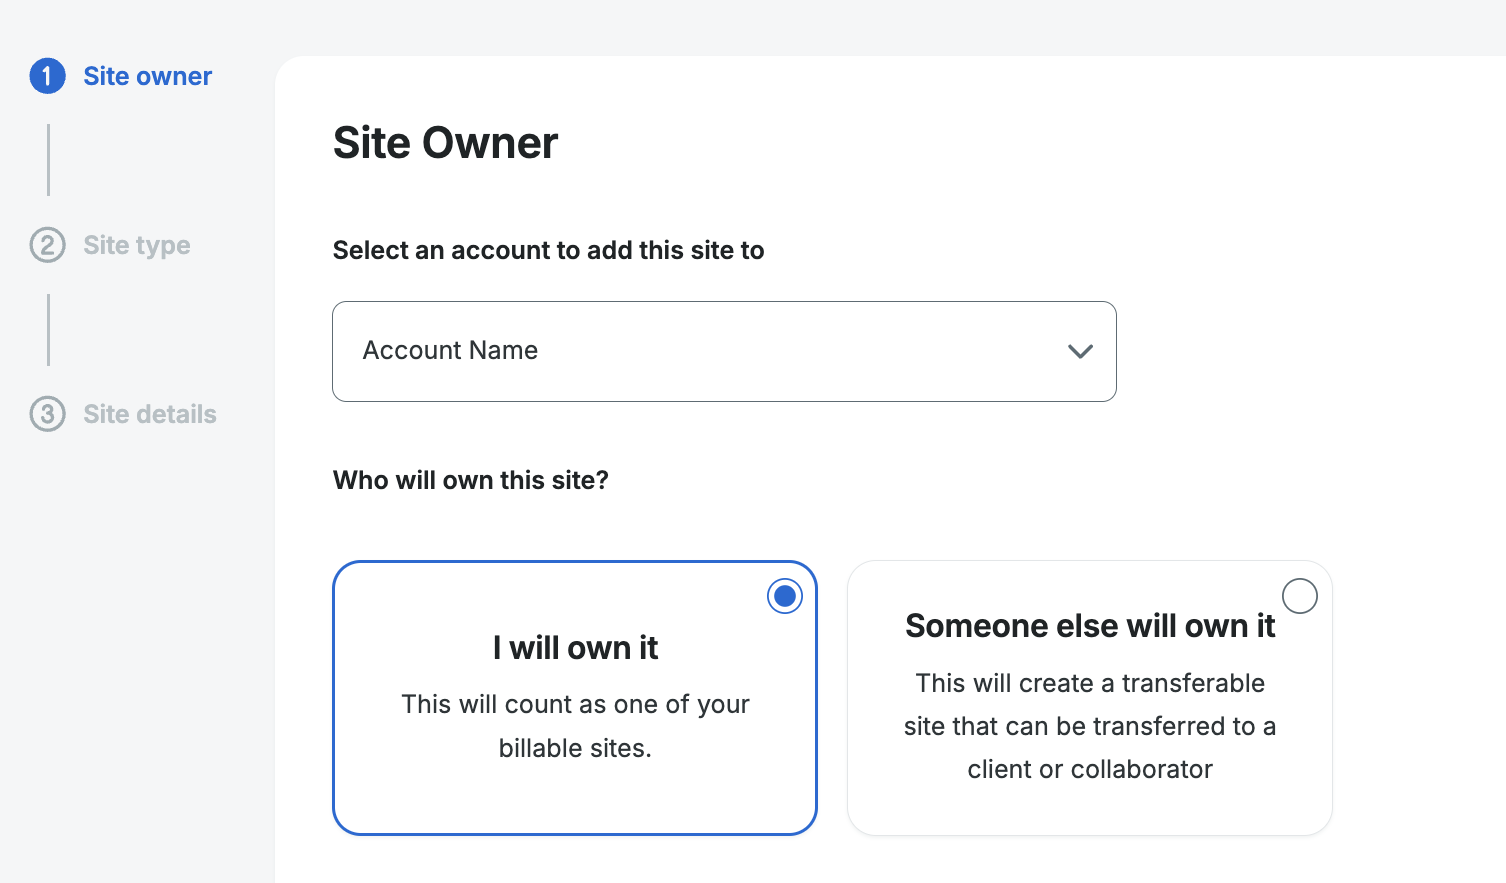
- I will own it (Most common) – The site will be created as billable on the current account.
- Someone else will own it – Create the site as transferable, to be added to the current plan as non-billable
- Click Next
- Site Details – Define details for this site as well as the first environment within the site.
- Site Name – The site’s name does not need to be unique and can be changed later
- Type – Select the type for the first environment to be assigned within this site. Each site can include up to three environments:
- PRD (Production) – Intended to be taken live. Allows a custom domain to be added.
- STG (Staging) – Optional testing environment. Cannot be taken live.
- DEV (Development) – Optional testing environment. Cannot be taken live.
- Environment Name – Name the first environment within the new site. The name must be unique and cannot have been used before.
- Click Add Site
That’s it! The site and new environment will begin setting up. An email will be sent once the setup has completed.
Edit Site Name
A site is simply a container for your three environments (PRD/STG/DEV), therefore the name can be changed any time and does not have to be unique. Additionally, site names can contain certain special characters (likes spaces or parenthesis).
Option 1
- Open the Sites page in the User Portal
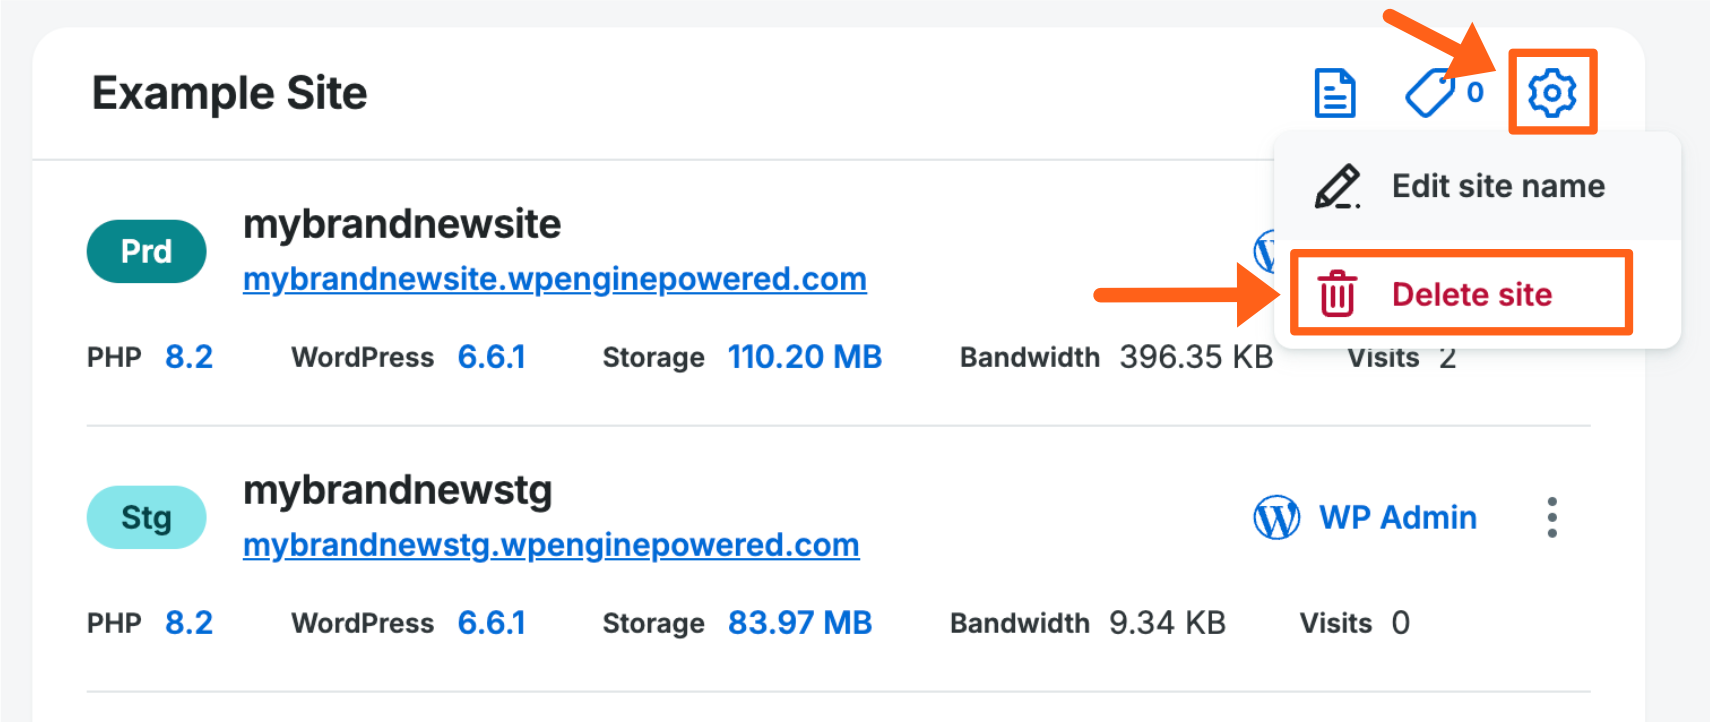
- Next to the site name, expand the Settings menu icon
- Select Edit site name
- Fill in a new site name
- Click Save changes

Option 2
- Open the Sites page in the User Portal
- Click the site name or any environment name within the site
- In the upper right corner of the page, expand the Settings menu icon
- Click Edit site name
- Fill in a new site name
- Click Save changes to save

Delete Site
Deleting a site also deletes every environment within it (PRD, DEV, STG). Be sure any backups are downloaded or copies are created before deleting a site. Only “Owner” level User Portal users can delete Sites.
If a Site is deleted by accident, it can be created again, as it is just a container for the environments. However, if an environment was deleted unintentionally please reach out to support. WP Engine keeps 30 days of backups. Should you need access beyond the backups found in the User Portal, contact support.
There are two ways in which a site can be deleted:
Option 1
- Open the Sites page in the User Portal
- Next to the site name, expand the Settings menu icon
- Select Delete site
- Confirm deletion by typing the site name
Option 2
- Open the Sites page in the User Portal
- Click the site name or any environment name within the site
- In the upper right corner of the page, expand the Settings menu icon
- Select Delete site and its environments
- Confirm deletion by typing the name of the site

Sandbox Sites
Sandbox Sites are a new type of Site designed to make developing your next WordPress website even easier.
Sandbox Sites are non-billable Sites, meaning they do not count towards your plan’s total Site limit. Sandboxes include a single Development environment, and exclude Production and Staging environments. These Sandbox Sites cannot have a domain added when utilized on Shared accounts, however Premium dedicated server accounts may add a domain as-needed. Sandbox Sites do not support multisite.
Below are the number of Sandbox Sites included per account type:
| Plan Type | Number of Sandbox Sites included |
|---|---|
| Lite | 1 |
| Startup | 2 |
| Professional | 3 |
| Growth | 5 |
| Scale | 8 |
| Agency | 50 |
| Premium (Core/Enterprise) | 150 |
To add a Sandbox Site, click the Create a sandbox button during the Add Site workflow.

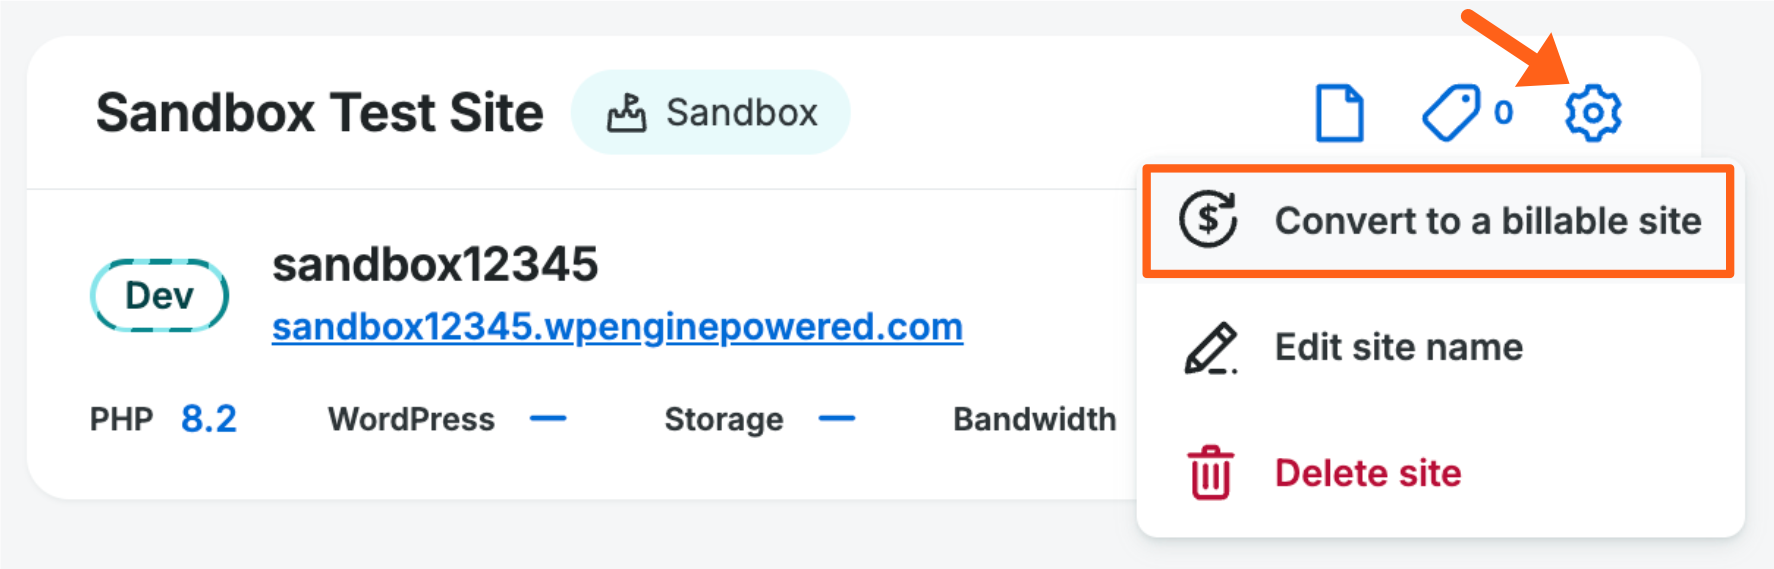
To take a Sandbox Site live, visit the Sites page, then click the gear icon next to the Site name and click Convert to a billable site.
About Environments
Environments are individual and completely separate instances of WordPress. Environments operate independently and without impacting other environments within the site. Each site can have up to one environment of each type, for a total of three environments per site.
The three types of environments are:
Production (PRD) – An environment type that’s intended to be taken live.
- Unique name and CNAME cannot be changed, e.g.
myprdenv.wpenginepowered.com - All plans can add custom domains to Production environments to allow the environment to receive live and organic traffic.
- Advanced Network or Global Edge Security can be applied when using a custom domain.
Staging (STG) – Recommend for use when testing minor changes, such as plugin updates.
- Unique name and CNAME cannot be changed, e.g.
mystgenv.wpenginepowered.com - Shared plans (Lite, Startup, Professional, Growth, Scale) – Custom domains cannot be added to Staging. Due to this Global Edge Security cannot be applied.
- Premium plans – Custom domains can be added to Staging. Therefore, Advanced Network or Global Edge Security can be applied when using a custom domain.
Development (DEV) – Recommended for use when developing larger changes, such as building out a new theme.
- Unique name and CNAME cannot be changed, e.g.
mydevenv.wpenginepowered.com - Shared Plans (Lite, Startup, Professional, Growth, Scale) – Custom domains cannot be added to Development. Due to this Global Edge Security cannot be applied.
- Premium Plans – Custom domains can be added to Development. Therefore, Advanced Network or Global Edge Security can be applied when using a custom domain.
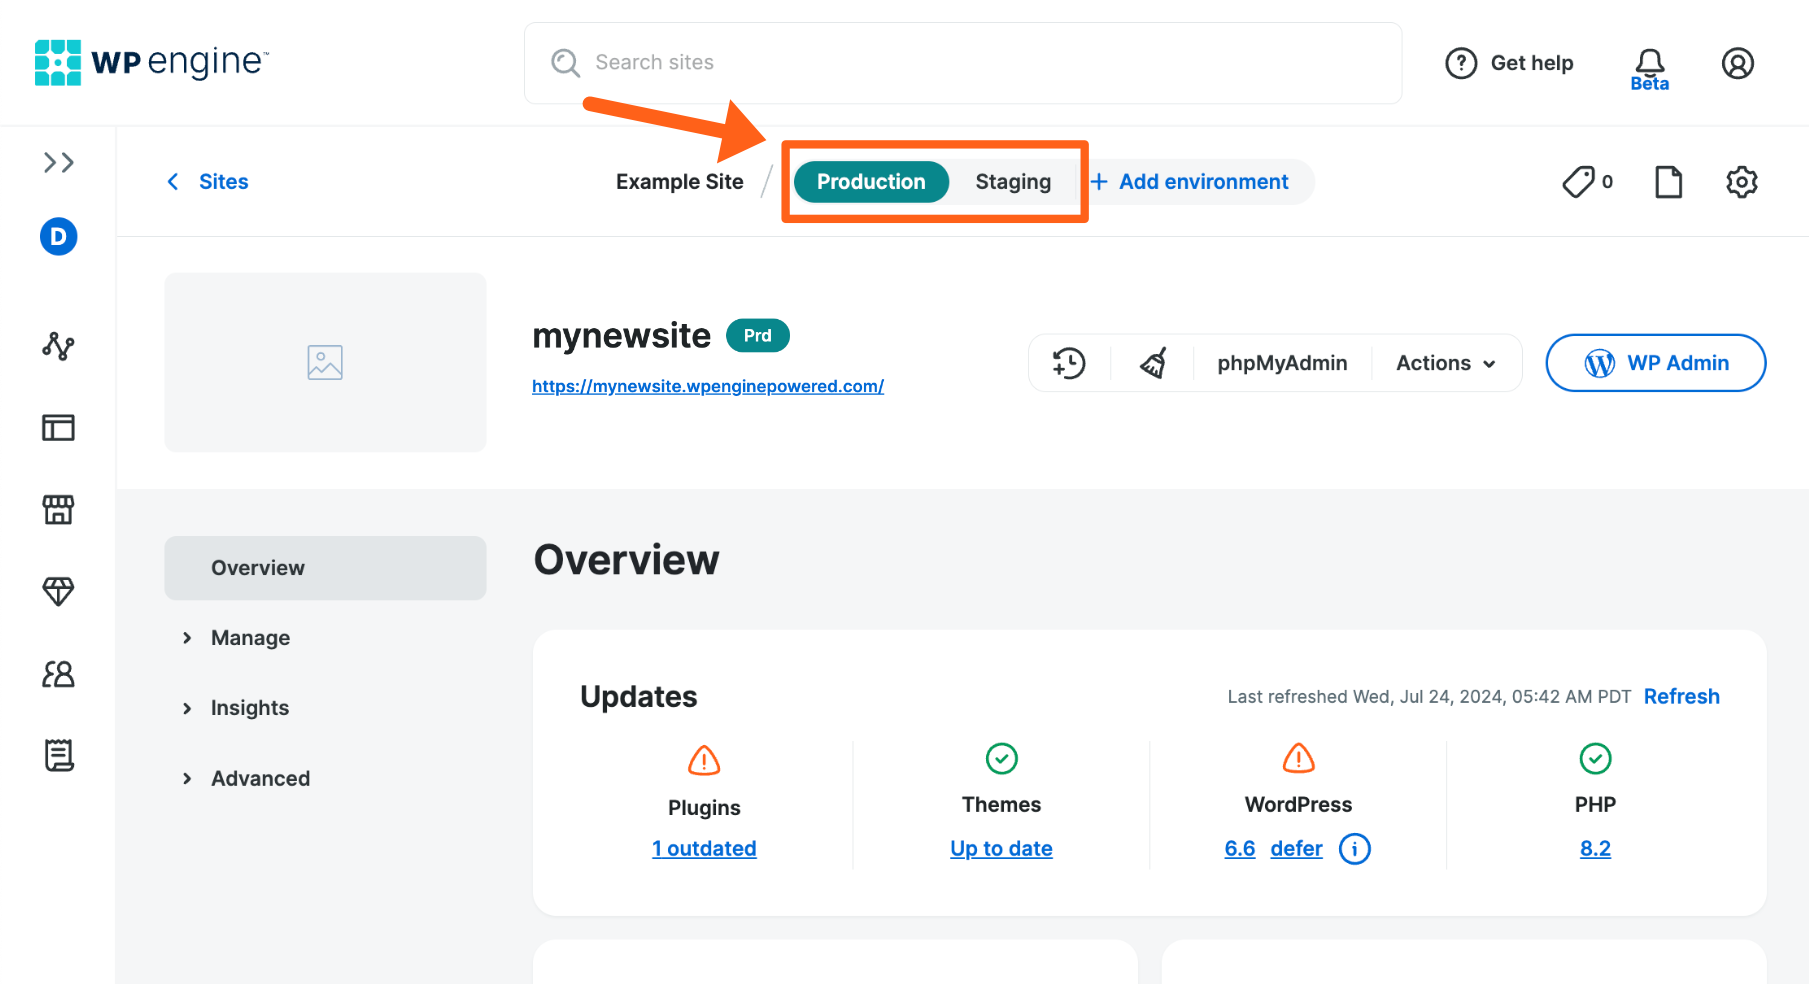
When viewing any environment within the User Portal, the site name will be displayed at the top of the page and any environments that exist will be displayed next to the site name.
Environments are also useful for keeping test sites grouped with their main site. You will see all your environments listed when copying an environment using push or pull in the User Portal. Learn more about using the Copy Environment tool here.

Domains
Each environment will use the same default CNAME URL structure: environmentname.wpenginepowered.com where environmentname is the unique name given to the environment.
For shared plans (Lite, Startup, Professional, Growth, Scale) only the Production environment can have a live custom domain added. On Premium plans, any of the three environments can have a custom domain added to it.
It is standard for Staging and Development environments to use different domains than the Production environment. If using a premium service that issues license based on domain, additional licenses may need to be purchased for each environment. Alternatively, inquire about staging services- Some premium services that authenticate based on domain will also offer a staging mode.
The environment name and it’s corresponding CNAME cannot be changed. To change the environment name or CNAME, a new environment with the desired name should be created then the contents of the old environment copied to it. If an environment is deleted, the name cannot be reused.
Server Configuration and Media
Each environment has the same default server configuration and caching, which make them useful for accurate testing and building.
Be aware that WP Engine configurations (those typically done in the User Portal) will not be copied when using the Copy Environment tool. This includes:
- Redirect Rules – Reach out to Support to have redirects copied.
- Cache Exclusions (custom) – Reach out to Support to have redirects copied.
- SSL Certificates – Reach out to Support to have SSL certificates copied.
- Web Rules – Can be duplicated from the User Portal. Learn more.
- Nginx Rules – Reach out to Support to have Nginx rules copied.
When using LargeFS, media is stored off-site which means these files cannot be copied by our server. A fall-back rule can be put in place by Support on any necessary Staging/Development environments, or media can be copied in Amazon S3.
Add Environment
When a site is first created, a new environment will be added to it as part of the setup process. An email is sent once the environment has been set up. If copying from an existing environment, this process can take some time to complete.
Only one environment of each type can be added to a site: Production (PRD), Staging (STG), Development (DEV). The options shown below may vary based on which environments already exist within the selected site.
An additional environment can be added to a site using two methods. (Don’t have a site? Learn how to add one here.)
Option 1
- Open the Sites page in the User Portal
- Click the site name or any environment name within the site
- Click Add environment next to the environment name at the top
Fill in a name, environment type, and other setup options. An email will be sent once the environment has completed the setup process. If copying from an existing environment, this initial creation process can take some time to complete.

Option 2
- Open the Sites page in the User Portal
- Next to the site name, click the Settings icon
- Select Add environment
Fill in a name, environment type, and other setup options. Then select the type of environment (Production, Staging, or Development).
An email will be sent once the environment has completed the setup process. If copying from an existing environment, this initial creation process can take some time to complete.

Delete Environment
Deleting an environment will not impact any other environments on the account or within the site. Before deleting an environment be sure to download a backup point. For security purposes, only Owner level users can delete environments.
Environment names cannot be reused, even when the original environment has been deleted.
There are two ways to remove an environment (PRD, STG, or DEV) from a Site:
Option 1
- Open the Sites page of the User Portal
- Next to the environment name, expand 3 dot quick actions menu
- Select Delete environment
- Confirm deletion by typing the name of the environment
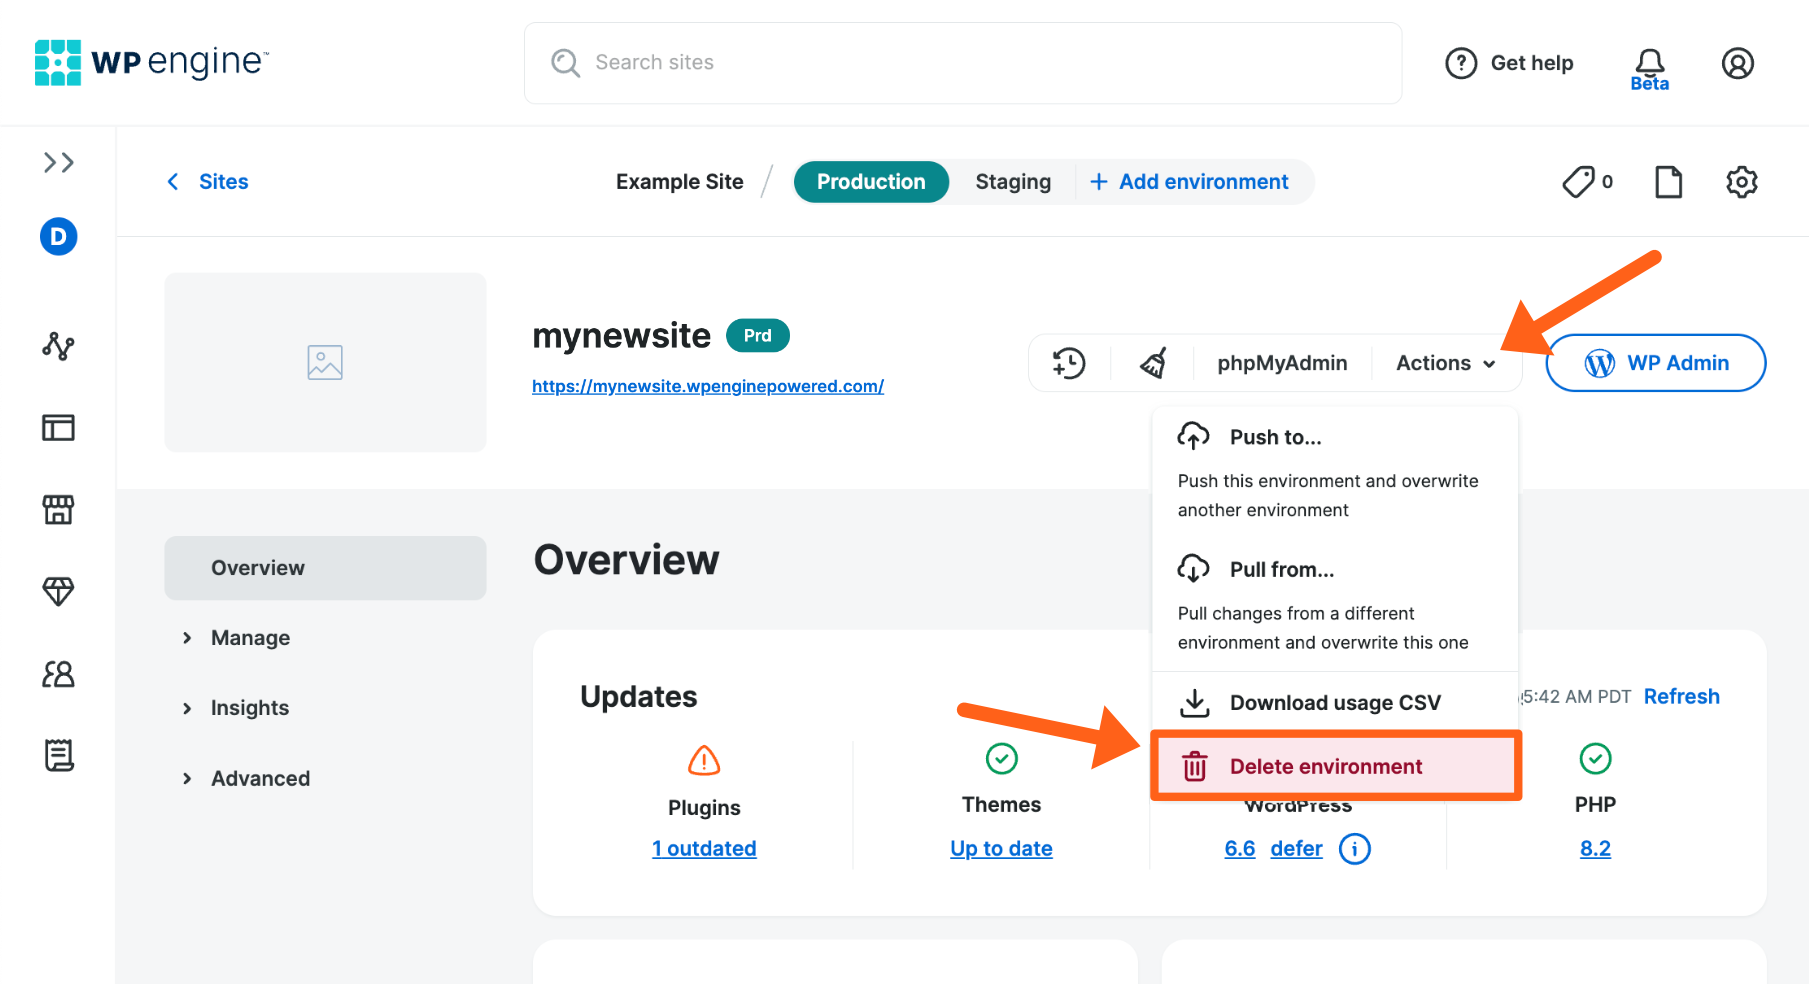
Option 2
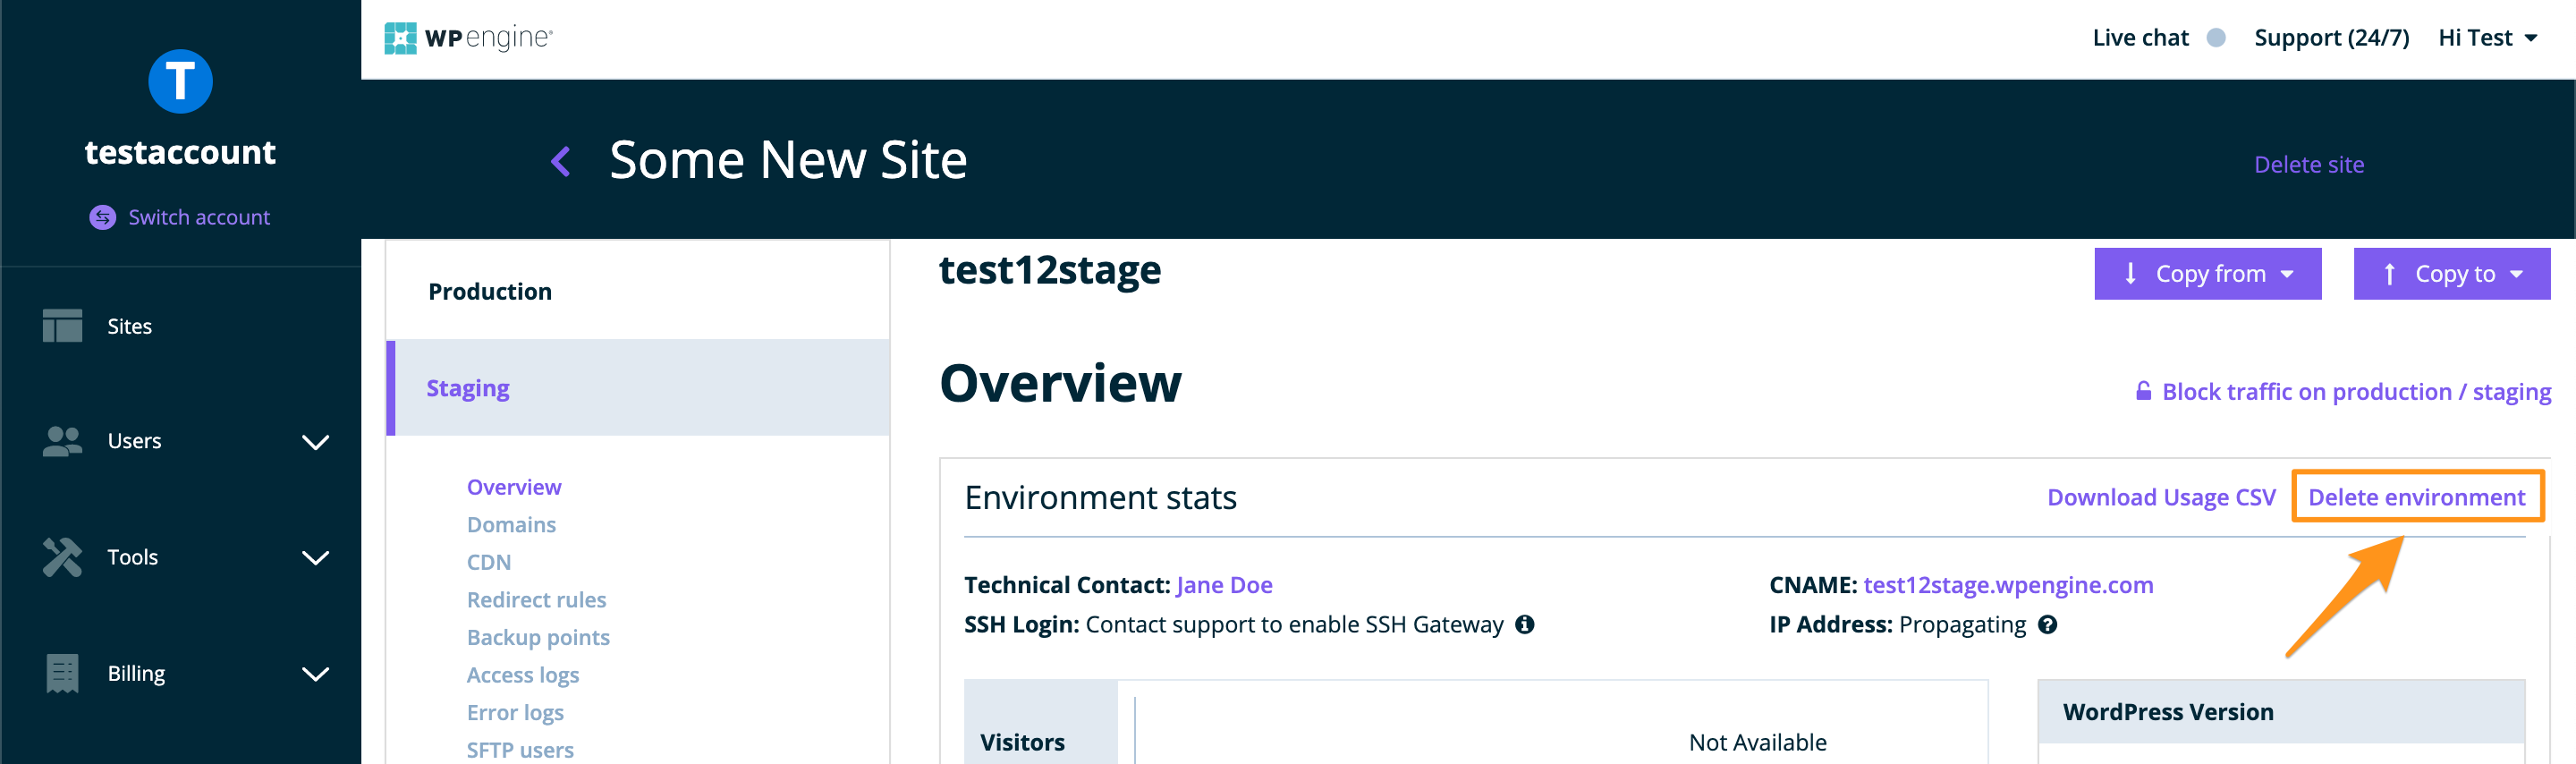
- Open the Sites page of the User Portal
- Click on the environment name
- Expand the Actions menu
- Select Delete environment
- Confirm deletion by typing the name of the environment
NEXT STEP: Learn how to copy an environment