Get Started
Leverage Browser Cache with Cache Headers
Tags:
Key Takeaways
Cache headers control page caching for faster loading times. Understanding and optimizing cache headers can significantly improve site speed and user experience.
Increasing cache expiration boosts site performance. Extending cache headers for pages and assets can enhance scalability and user satisfaction.
Reducing cache headers below 10 minutes is not recommended. Lower cache times may impact performance and scalability negatively.
Altering cache headers directly in PHP code is advised for performance improvements. Utilizing methods like WP Engine mu-plugin ensures effective cache control without compromising site speed.
Cache exclusions should be used sparingly to avoid performance issues. Uncached pages can impact scalability, so exclusions should be carefully implemented.
Explore advanced cache control methods for optimal site performance. Leveraging tools like WP Engine mu-plugin and Web Rules page can fine-tune cache headers for better user experiences.
When using WP Engine as your Digital Experience platform, we handle many server-level optimizations for you automatically. One of these optimizations is handling the caching instructions sent in headers on your site. In this article we will explain how these headers work, and how to tell if your page or file is hitting cache.
About Cache Headers
“Cache” refers to a saved snapshot of a page or file so it can be served more quickly. A page served from cache can be returned in a few milliseconds, compared to a second or more for page that has to be created as new. This means it’s definitely in your best interest to serve as much content from cache as possible. (Learn more about caching here.)
“Headers” refers to information that your web browser sends or requests. Some headers are sent with a page or file request, while others are associated with the response you receive back.
When a page or file is requested, the server and your browser both listen to the “Cache-Control” headers for instructions on who can access the cached copy, and how long the copy can be accessed. Cache-Control headers are important to your site’s scalability, so WP Engine already manages these headers for you.
To effectively leverage browser cache, these cache-control headers are used to tell the browser how long to store saved content.
By default, page cache is set to 600 seconds, or 10 minutes. Static assets (such as images) are set to 365 days.
Verify Cache Headers
There are multiple ways to see the Cache-Control headers set by your website, but the easiest way is within your web browser.
- Right+Click or CTRL+Click on your web page
- Click Inspect
- Select the Network tab
- Refresh the page
- You should see something like this:
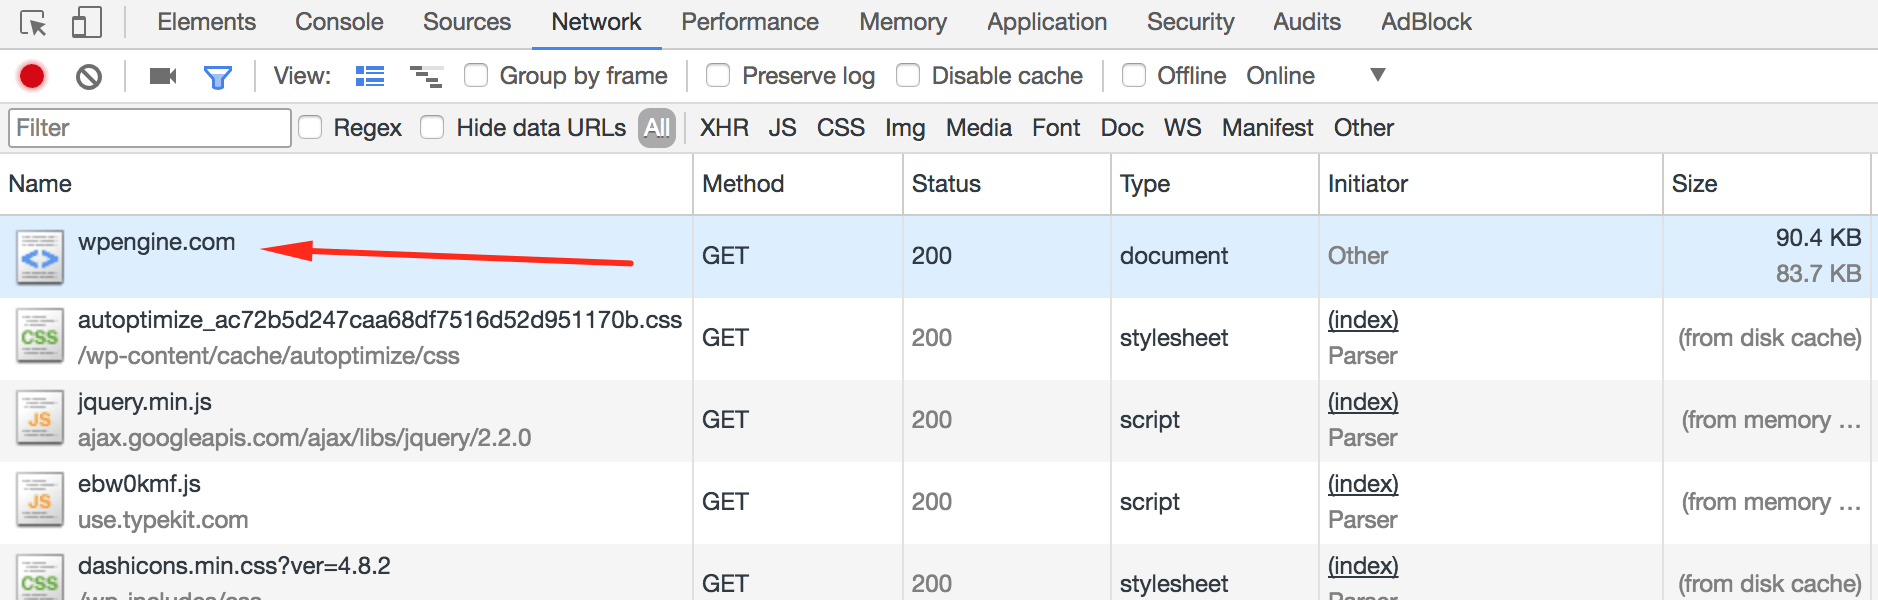
- Click your page URL in the list – usually the first item
- This will bring up a list of Response headers sent
- If you do not see the headers straight away, be sure the Headers tab is selected
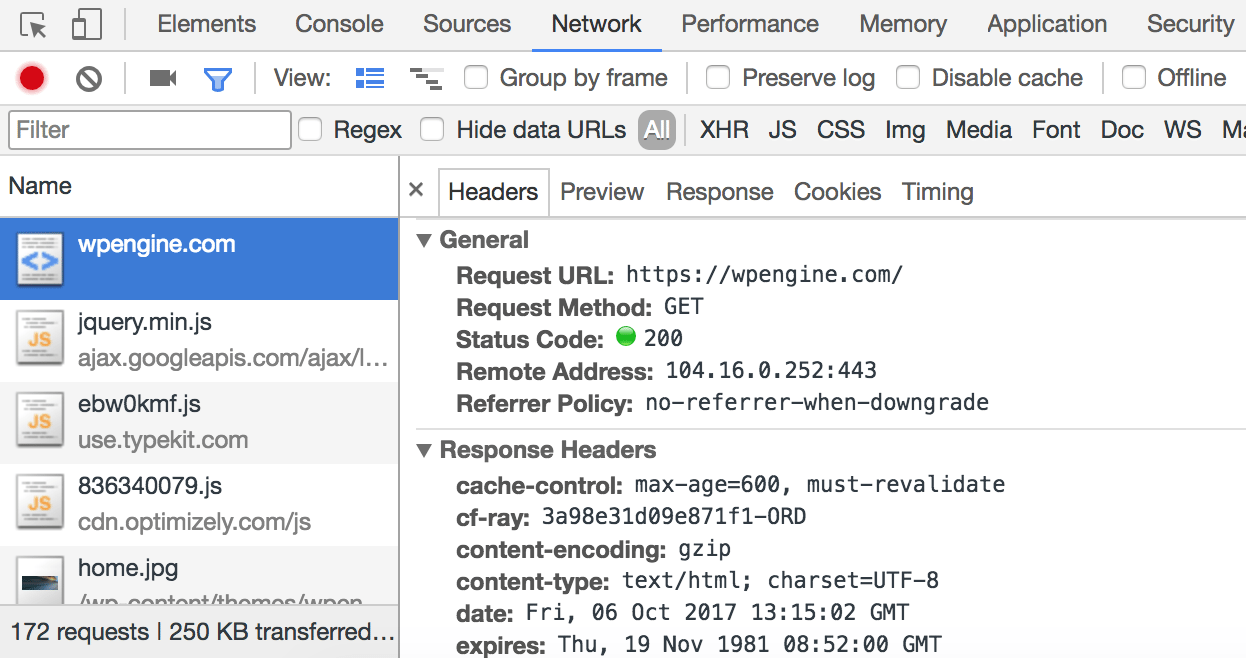
- You will see two important headers:
- cache-control – Tells the cache system (browser or server-level page cache) how long to cache the page in seconds.
- When max-age is set to 600, the page can be cached for 10 minutes.
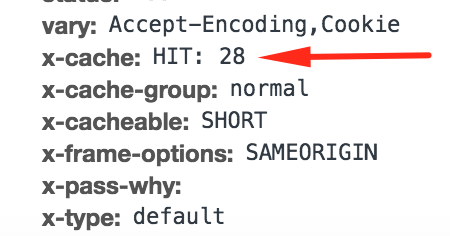
- x-cache – Tells you whether the page was served from cache or not.
- A HIT indicates the request was served from the caching layer. The number tells you how many times this version of a page has been served from cache.
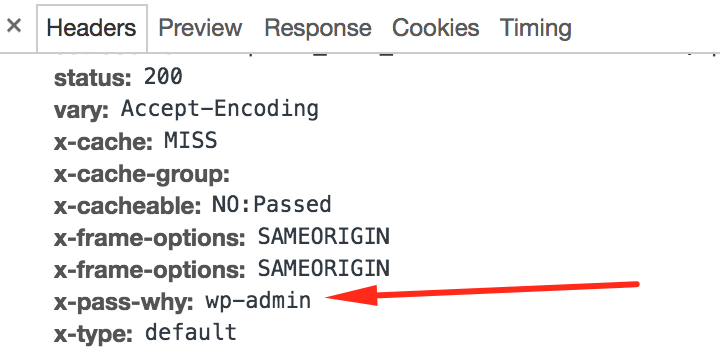
- A MISS indicates the page was not served from cache. The x-pass-why header will tell you the reason why the request did not hit cache. In the example below, the reason this page was not cached is because it’s a WordPress® Admin page, which cannot be cached as a WP Engine default.1
- cache-control – Tells the cache system (browser or server-level page cache) how long to cache the page in seconds.
Change Cache Headers
Making cache-related changes will typically affect site performance. The more cacheable a site is, the more it will gracefully scale with higher traffic volumes. Caching can also negatively impact site performance as well, so it is advise to alter cache length on items you are sure can be served from cache without issue.
There may be times when you want to cache a page for longer than the standard 10 minutes. In these cases, you can use a configuration plugin to set Cache-Control headers to your liking. Cache headers can be increased, but not decreased below 600 seconds (10 minutes).
Increase Cache Headers
Increasing the amount of time pages are stored in cache will help with site speed and the overall user experience on your site. Increasing cache headers varies by the type of asset. While there are other plugins and methods available, those will likely require placing header changes in your .htaccess file. WP Engine has deprecated the .htaccess file, so this is not a sustainable method and will not ensure your success. The options we recommend are listed below.
If you would like to increase the cache expiration on a website to improve performance and scalability, it is advised to use a method of altering cache headers that does so directly in PHP code, such as in the WP Engine mu-plugin. Alternatively, cache headers can be set on the Web Rules page of the User Portal, or by having a rule placed directly on Nginx by Support.
Post and Page Expiry
Cache expiry for WordPress post and pages can be increased by way of the WP Engine mu-plugin available in the WordPress admin dashboard of the website. To take effect, a change must be made from the default setting and then saved.
- Log in to the wp-admin dashboard of the website
- Click on WP Engine in the main menu
- Select Caching
- Alter the Post cache length and/or Page cache length
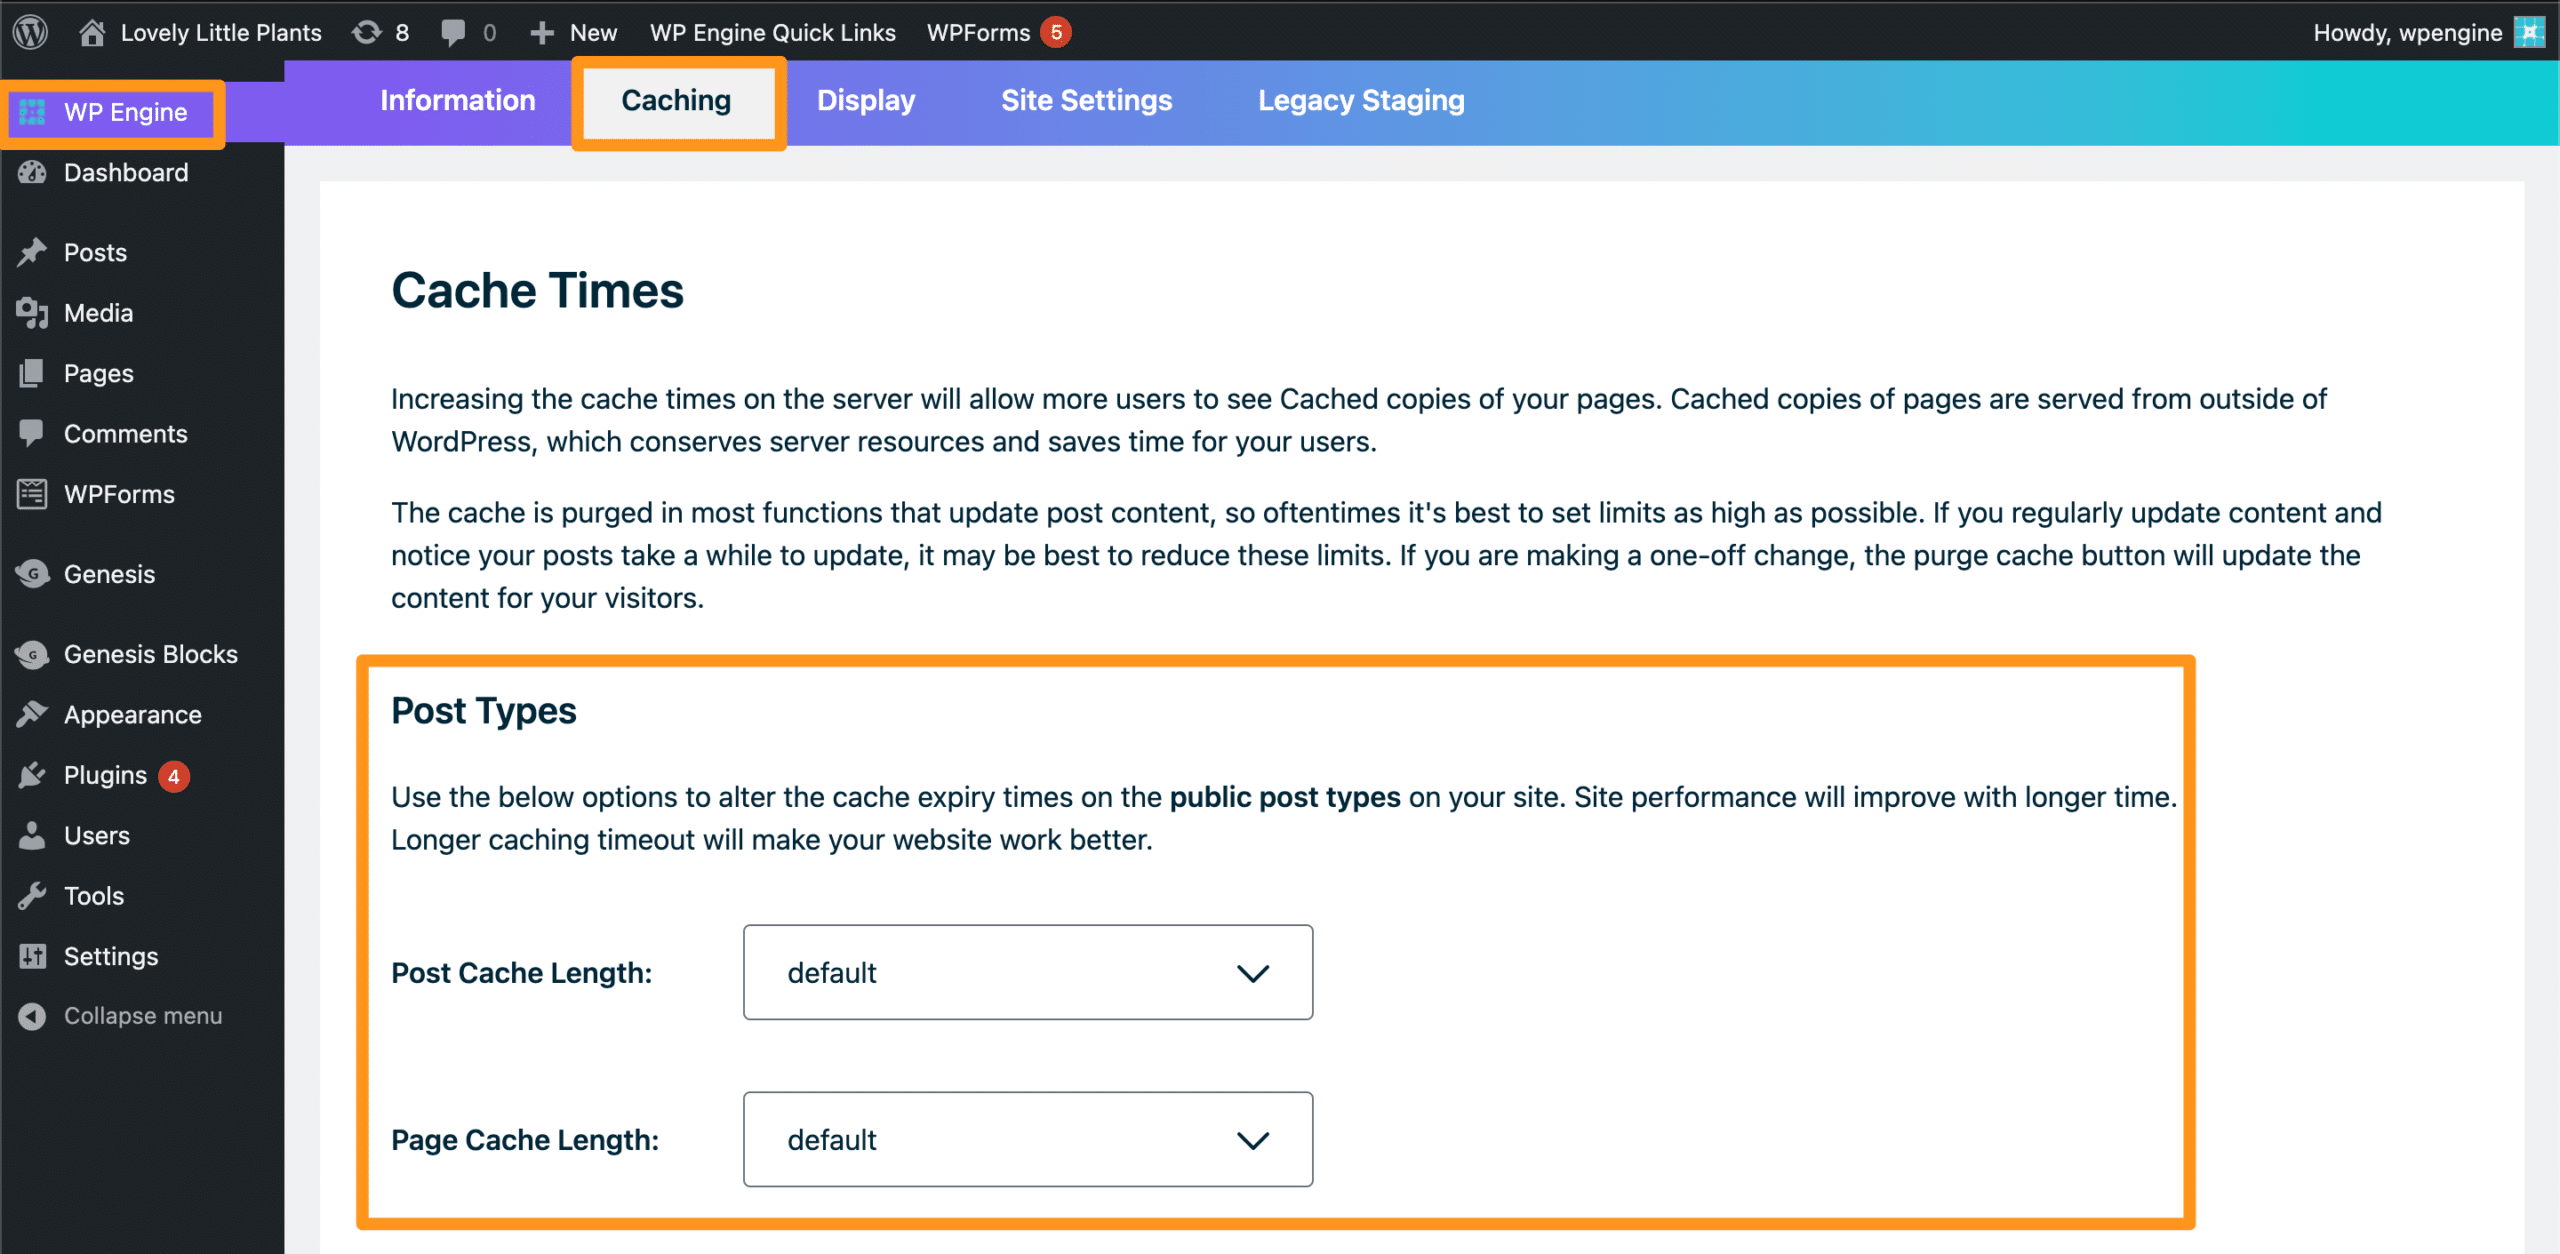
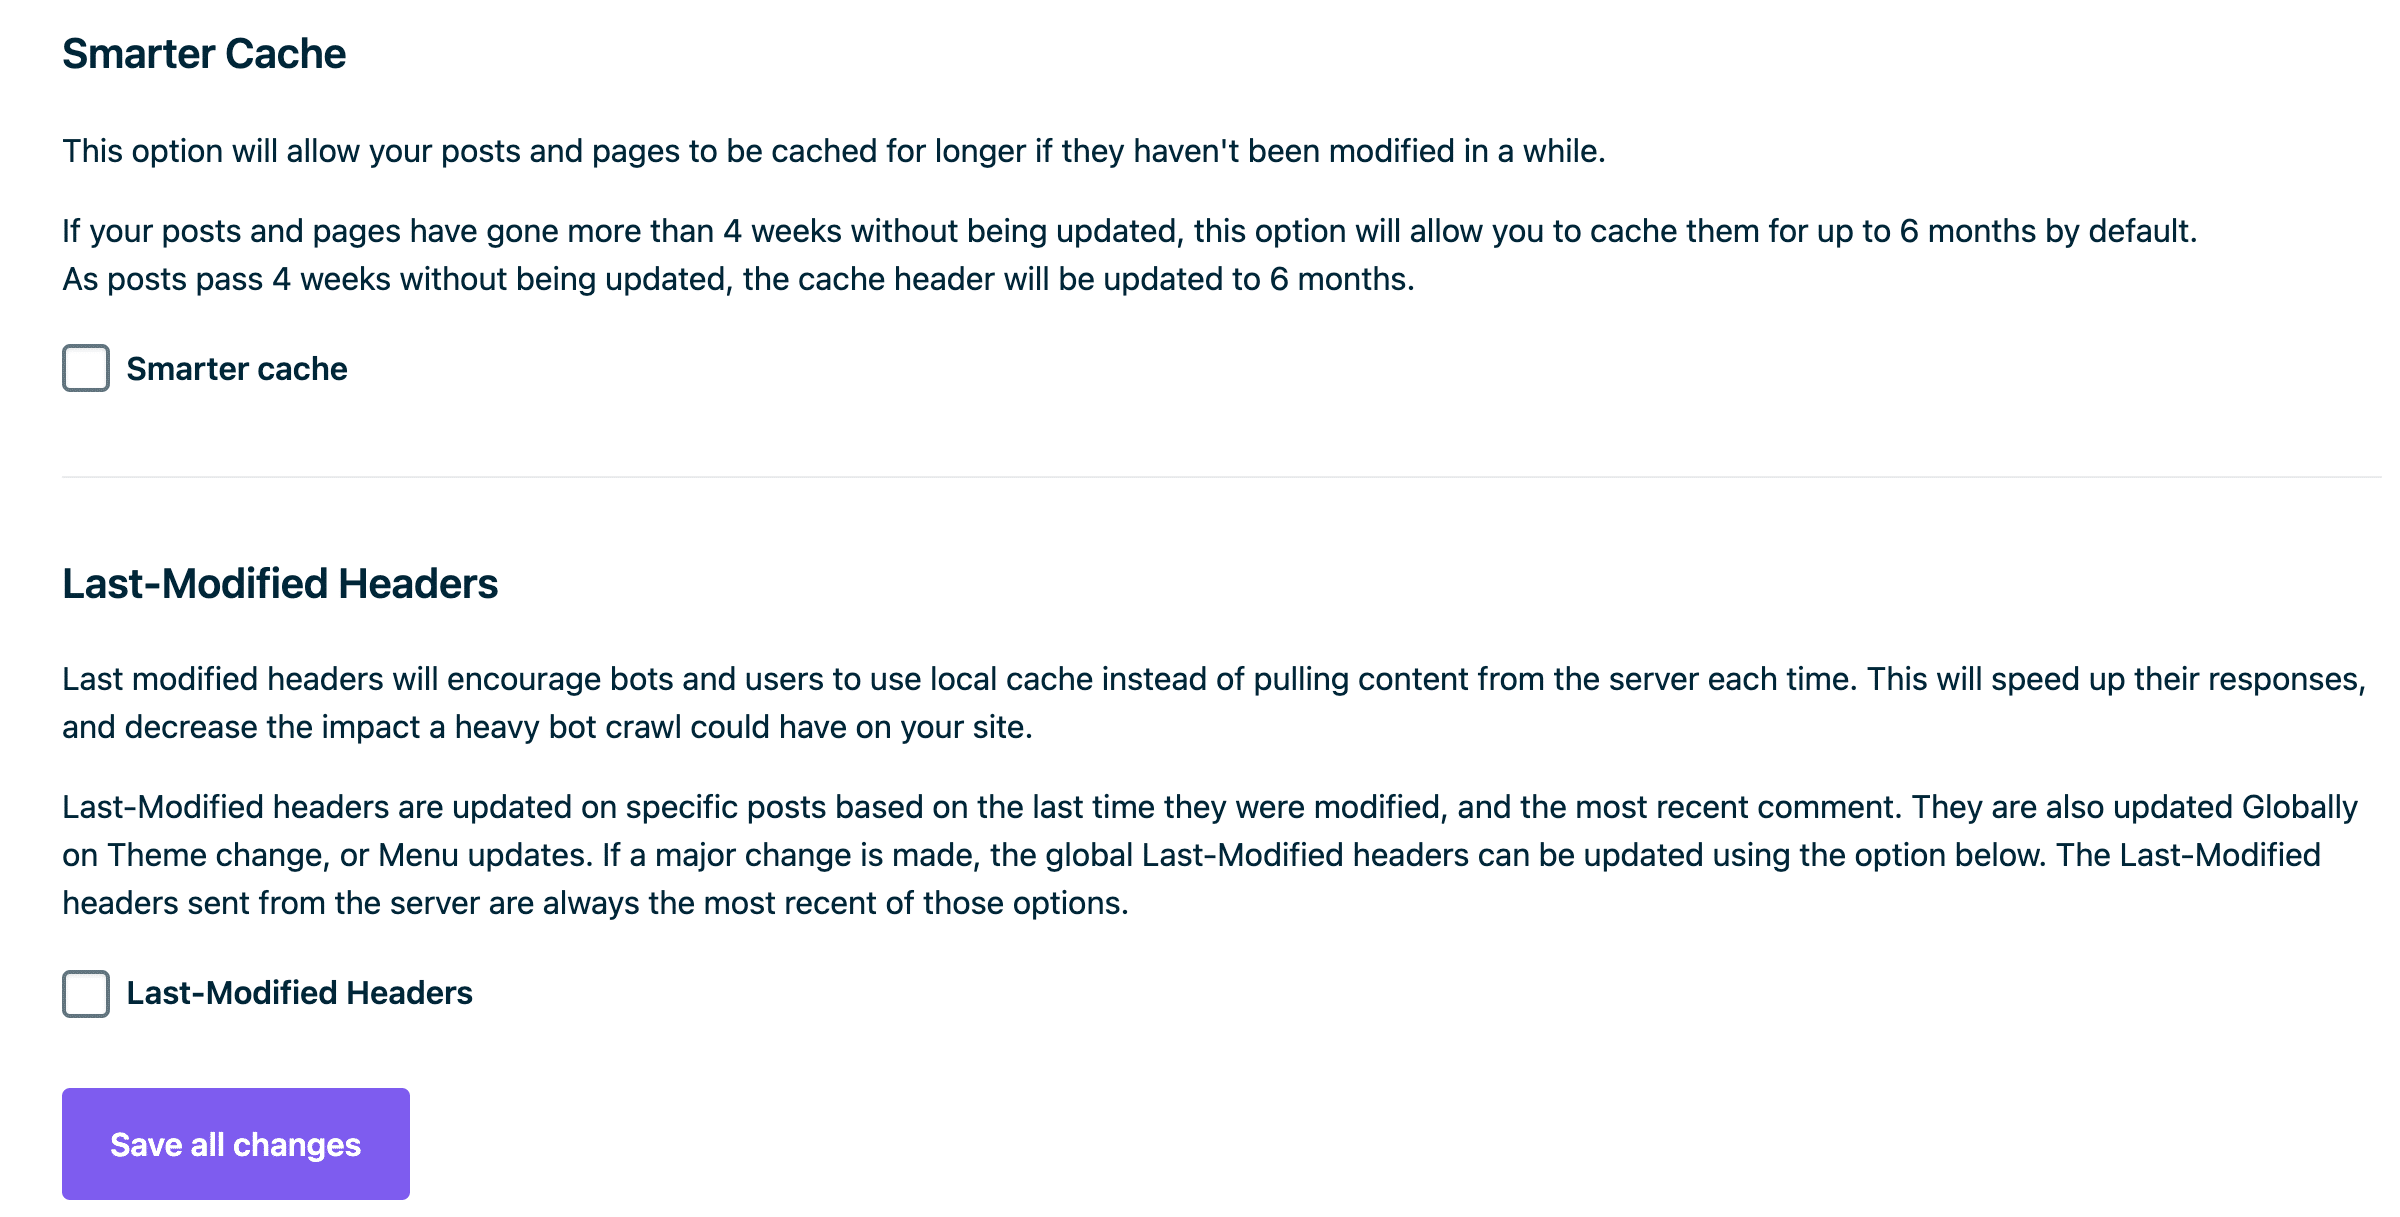
- (Optional) Enable Smarter Cache and Last-modified Headers to increase cache even more for post that are not edited often
- Save all changes
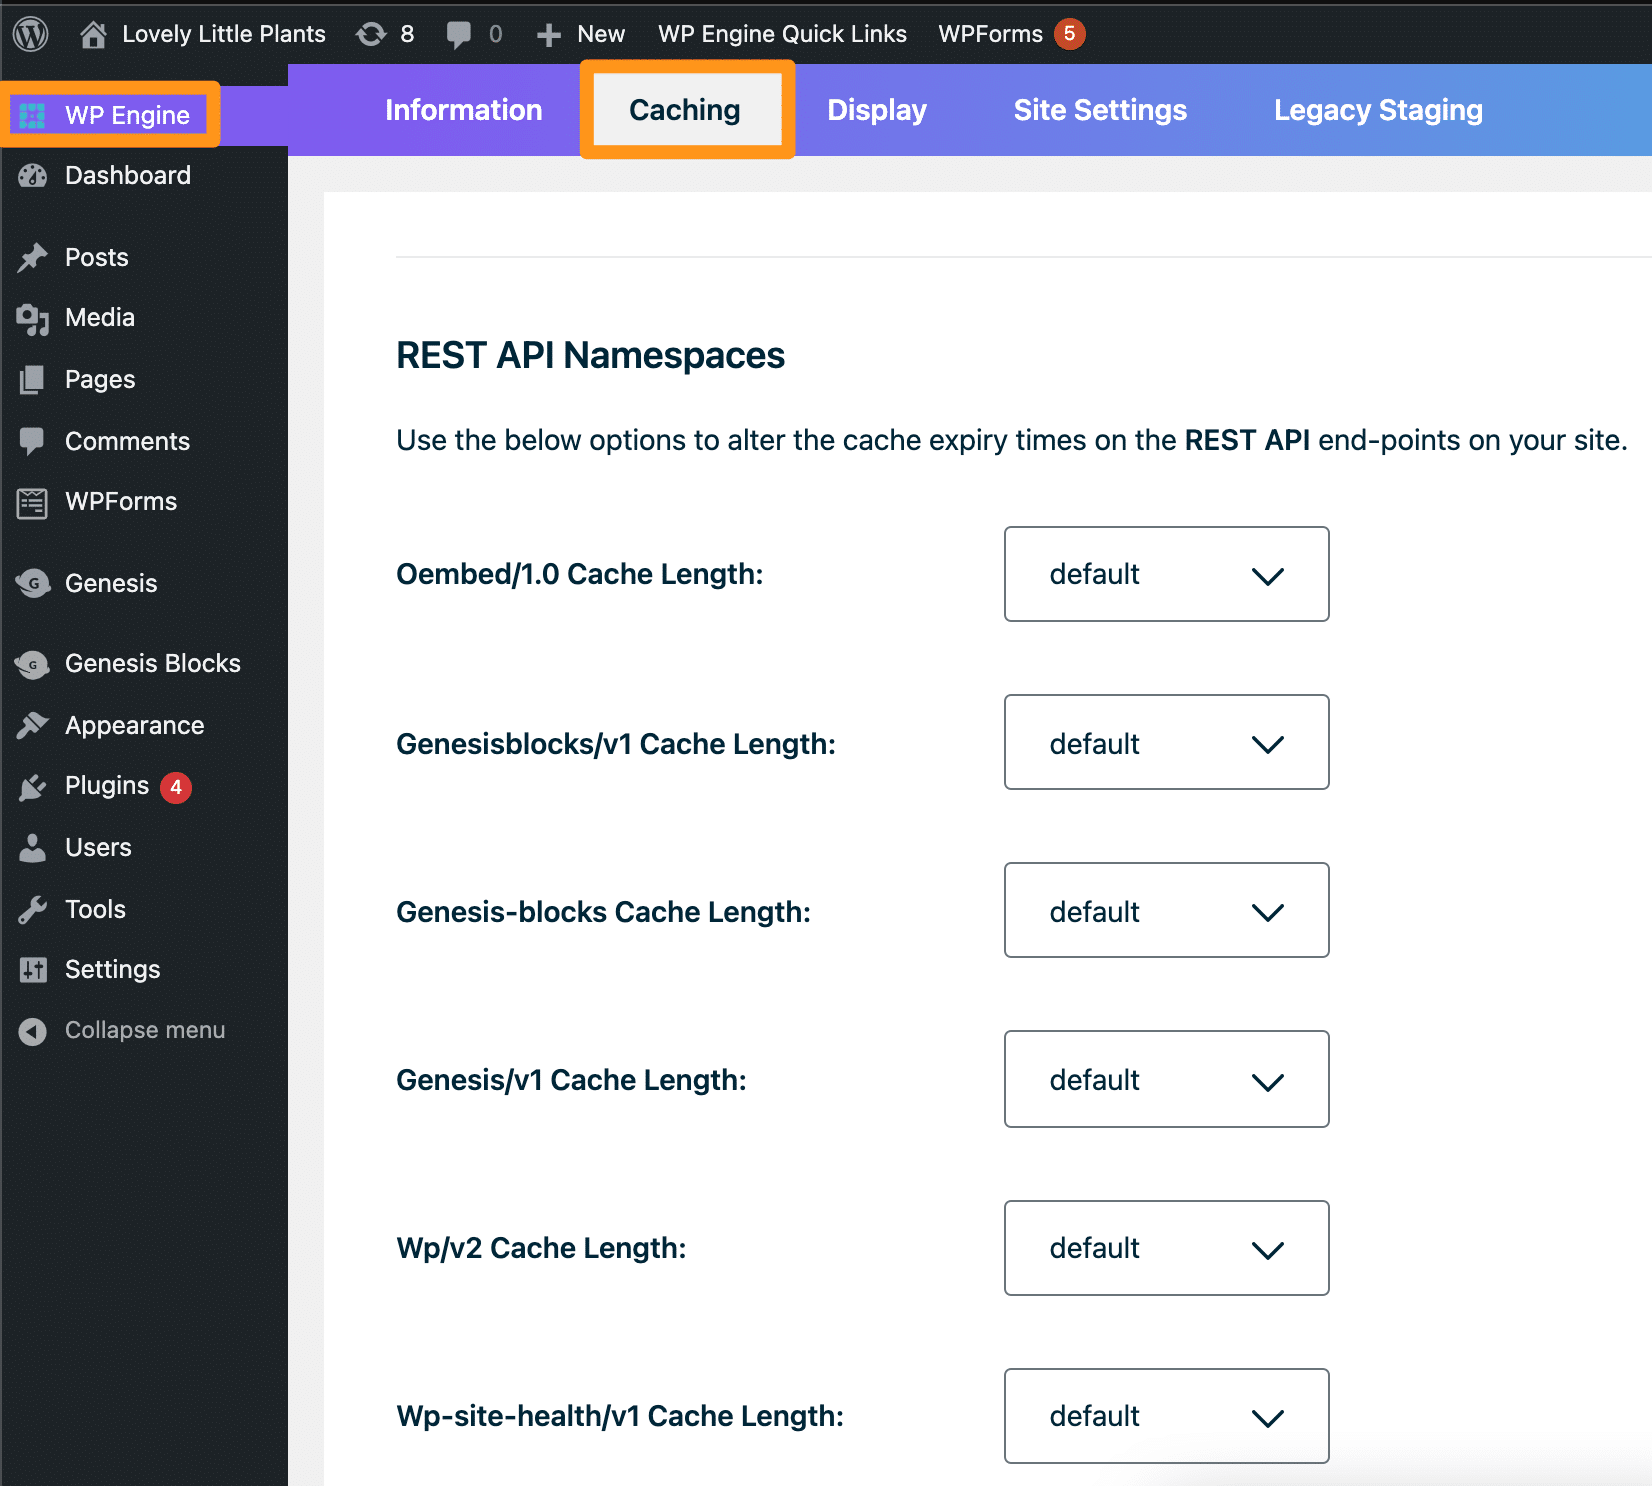
REST API Namespaces
Cache length for REST API end-points can be increased through the WP Engine mu-plugin in your WordPress admin dashboard. To take effect, a change must be made from the default setting and then saved.
- Log in to the wp-admin dashboard of the website
- Select WP Engine from the main menu
- Click Caching
- Alter the desired end-point(s)
- Save all changes
Cache-control Headers
Cache-control headers can be set for static assets (e.g. images, js, css, etc) by way of the User Portal, on the Web Rules page.
Learn more about adding headers in the Web Rules guide here.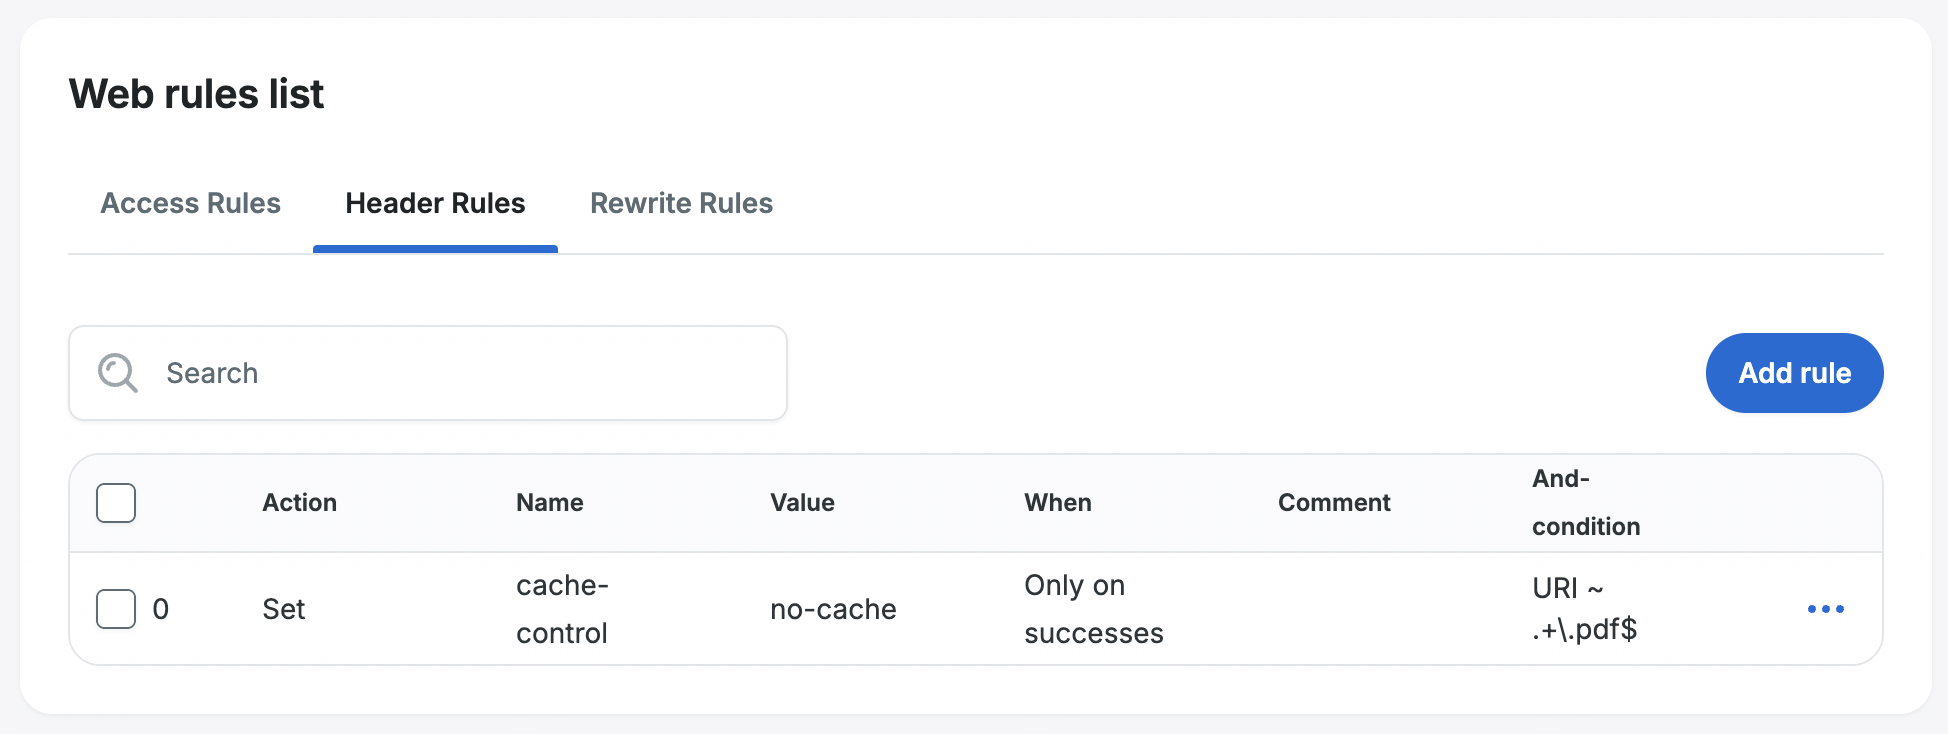
Reduce Cache Headers
Cache-control headers for pages set lower than 600 (10 minutes) will not be effective, as this is the length of time set on WP Engine’s caching server directly.
Anything lower than 600 requires a full page cache exclusion, which can be added by WP Engine Support. We advise using cache exclusions very sparingly, as uncached pages can negatively impact performance at scale. We will not honor requests to uncache an entire website, a site homepage or add cache exclusions that otherwise uncache a large portion of your website.
NEXT STEP: Learn what object caching is and how to enable it