Get Started
WP Engine Smart Search
Tags:
Key Takeaways
WP Engine Smart Search is a product extension for WP Engine customers that enhances website searches, guiding visitors to relevant content without coding.
Licensing for Smart Search is available for Premium and WP Engine Headless Platform plans, enabling easy purchase and installation.
Content Sync is crucial for Smart Search functionality, requiring a one-time sync for accurate indexing and real-time updates.
Configure Smart Search settings post-sync to optimize search data control and choose from Full Text, Semantic, or Hybrid search types.
Faceted Gutenberg Blocks enhance search experience with range, filter, and active filters facets, improving user interaction.
AI Toolkit Integration rebrands WP Engine Smart Search, offering advanced search solutions for WordPress sites.
WP Engine Smart Search is a Product Extension for WP Engine customers that improves website searches for traditional and WP Engine Headless Platform applications.
With WP Engine Smart Search, guide website visitors to the most important content with an intuitive, typo-tolerant search function that surfaces more relevant results — even custom post types. No coding necessary.
Smart Search licenses are currently available for purchase on Premium and WP Engine Headless Platform plans. To purchase a license for a Premium plan, contact our Sales team or the Account Manager. For WP Engine Headless Platform plans, Smart Search can be purchased from the Modify Plan page.
About
WP Engine Smart Search is an advanced search solution that’s designed to:
- Increase search result relevancy through content prioritizing and weighting
- Support advanced search query operators
- Add support for advanced WordPress® data types1
After purchasing and enabling on the environment of choice via the User Portal, the WP Engine Smart Search WordPress plugin will be installed automatically.
Licensing
Licenses are currently available for Premium and WP Engine Headless Platform plans.
To purchase a license for a Premium plan, contact our Sales team or the Account Manager for assistance.
To purchase a license for the WP Engine Headless Platform plan, either select WP Engine Smart Search as a Product Extension when signing up for a plan, or purchase it through the Products page of the existing plan.
After purchase, install WP Engine Smart Search on as many sites as the plan allows.
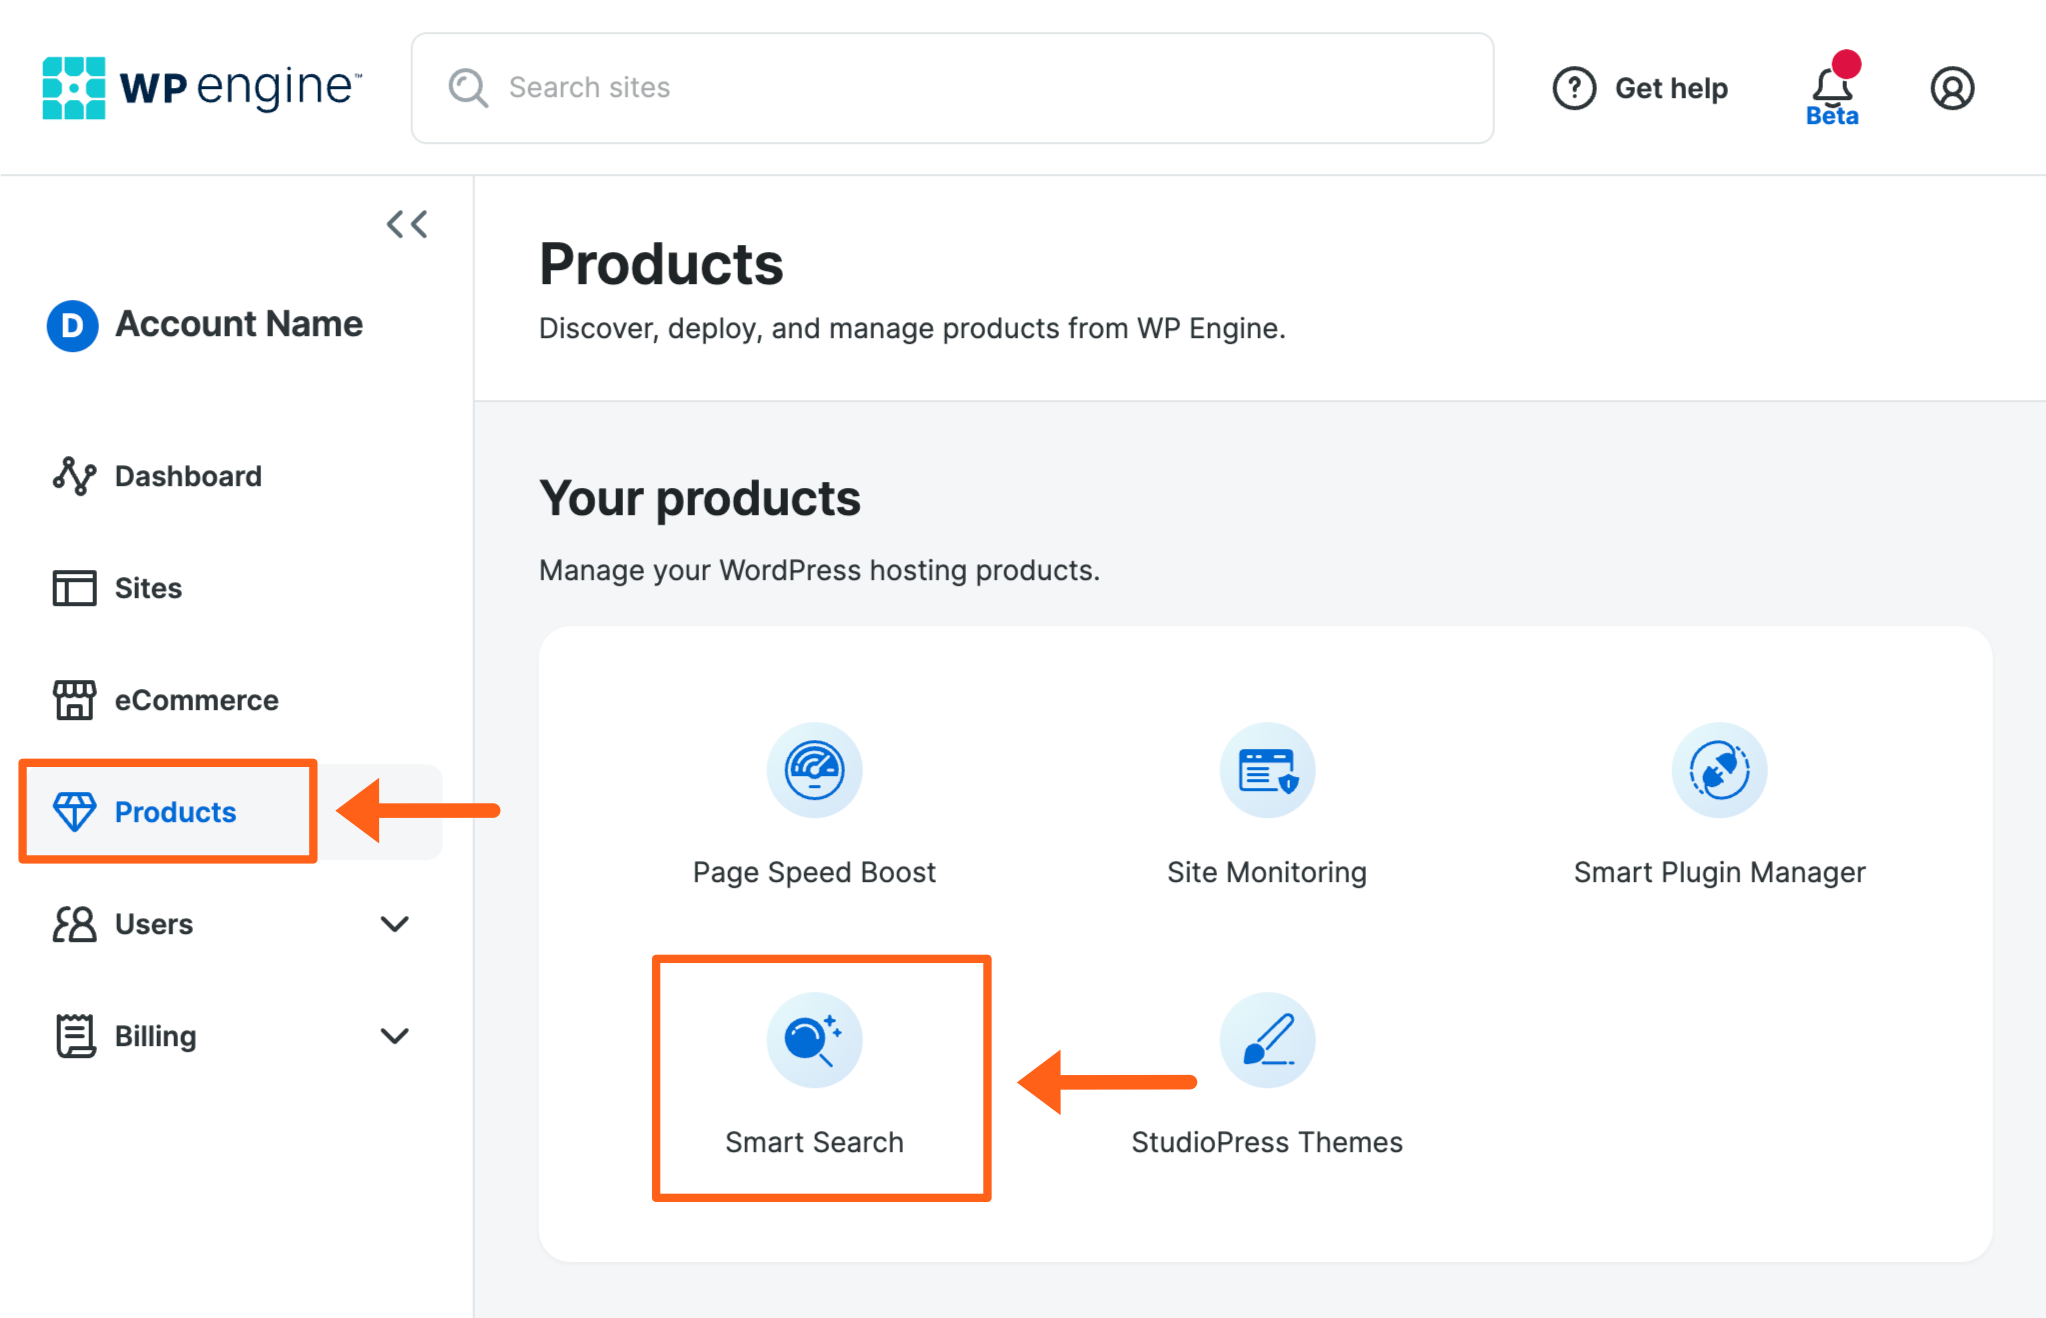
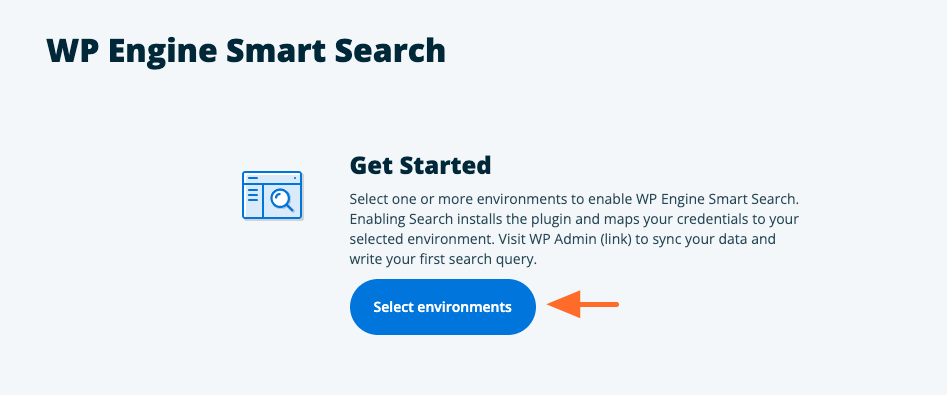
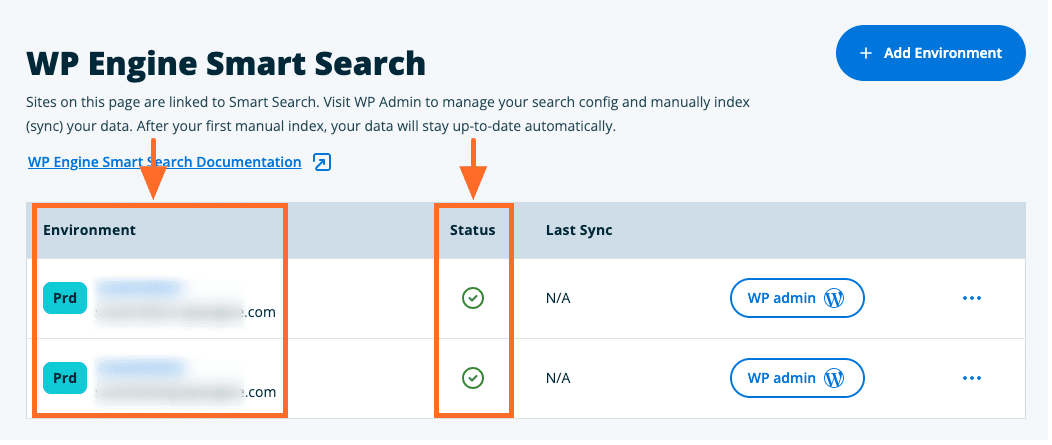
Enable
To enable WP Engine Smart Search on an environment:
- Open the Products page in the main sidebar in the User Portal
- Click Smart Search under Your products
- Or, access this page directly at: https://my.wpengine.com/products/smart_search
- Click Select environments
- Check the box(es) of the environment(s) and click Add environment
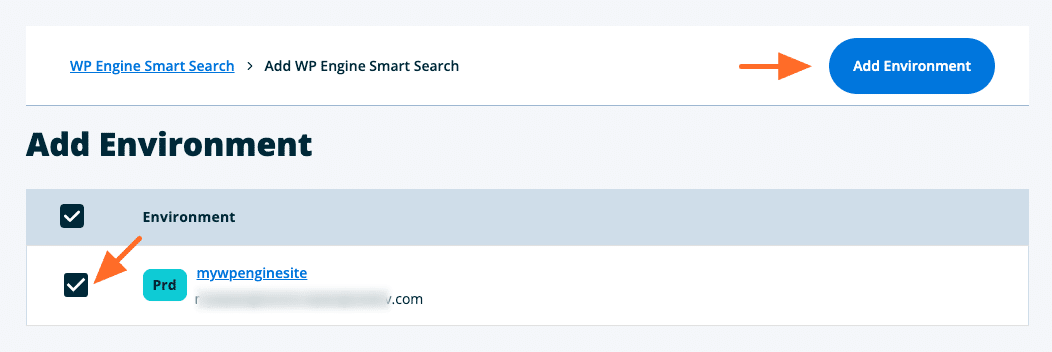
- Click Confirm to complete the licensing process

The plugin will be automatically installed on the selected environment(s).
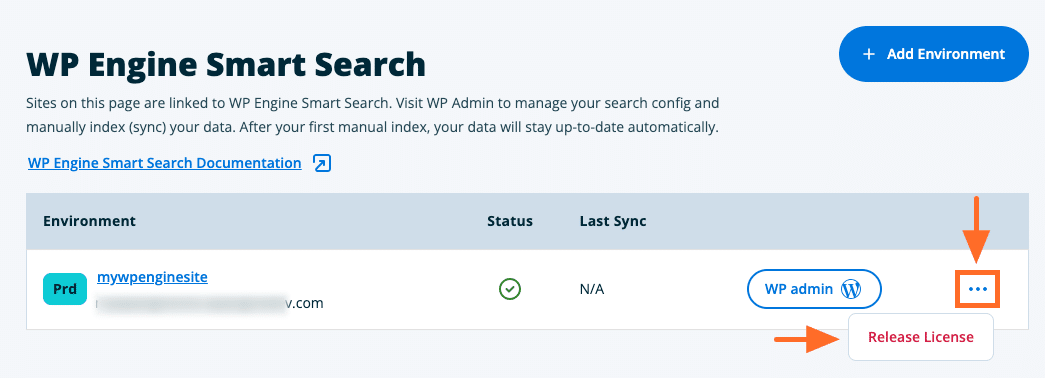
Remove a License
To remove a license from an environment:
- Open the Products page in the main sidebar of the User Portal
- Click Smart Search under Your products
- Or, access this page directly at: https://my.wpengine.com/products/smart_search
- Click the 3-dot Actions icon to reveal more options
- Click Release License
Content Sync
A content (or data) sync sends all pre-existing content on the WordPress site to WP Engine Smart Search for indexing. This ensures the plugin knows exactly what content exists so it can serve the best results to site users.
To run the content sync:
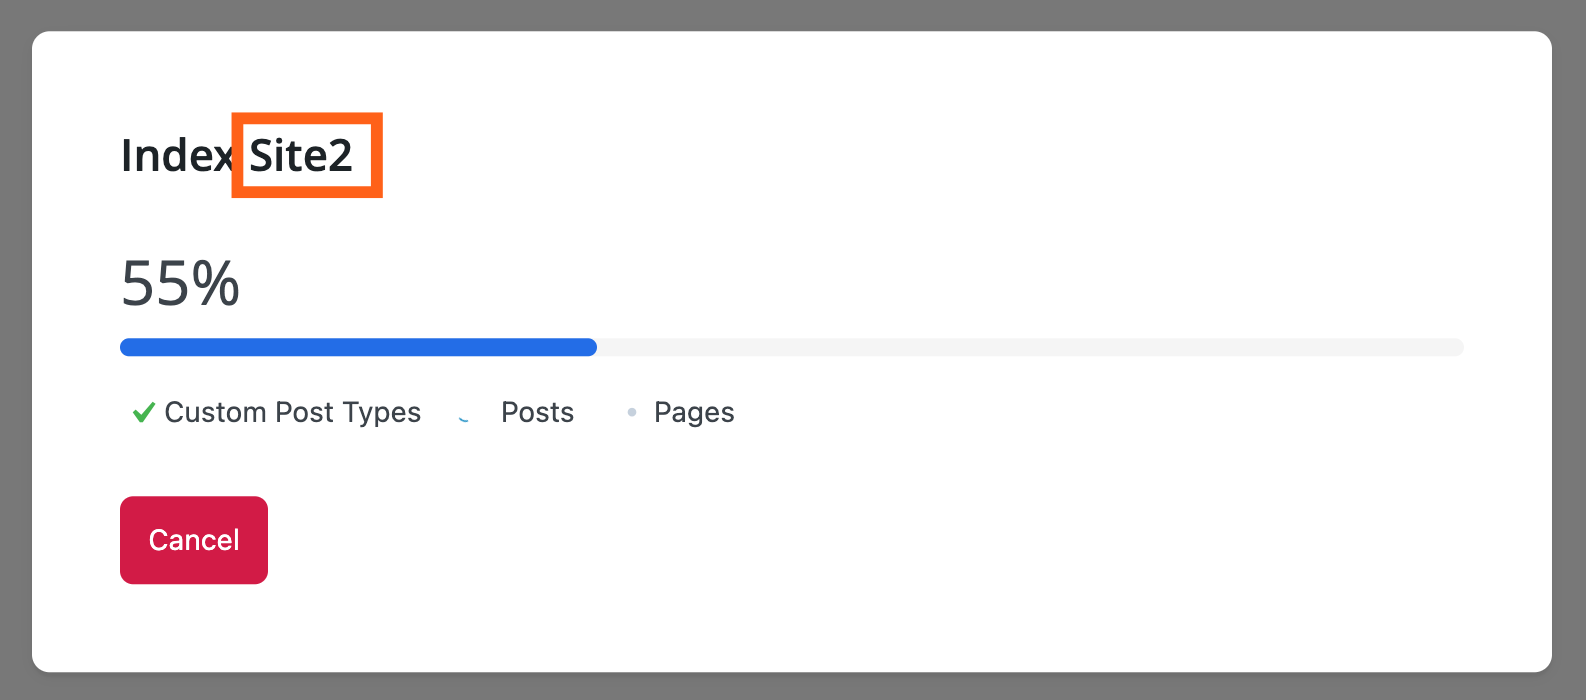
- Log in to the WP Admin dashboard.
- Go to WP Engine AI Toolkit > Smart Search in the left nav menu.
- From the default Index tab, click the Index Now button.
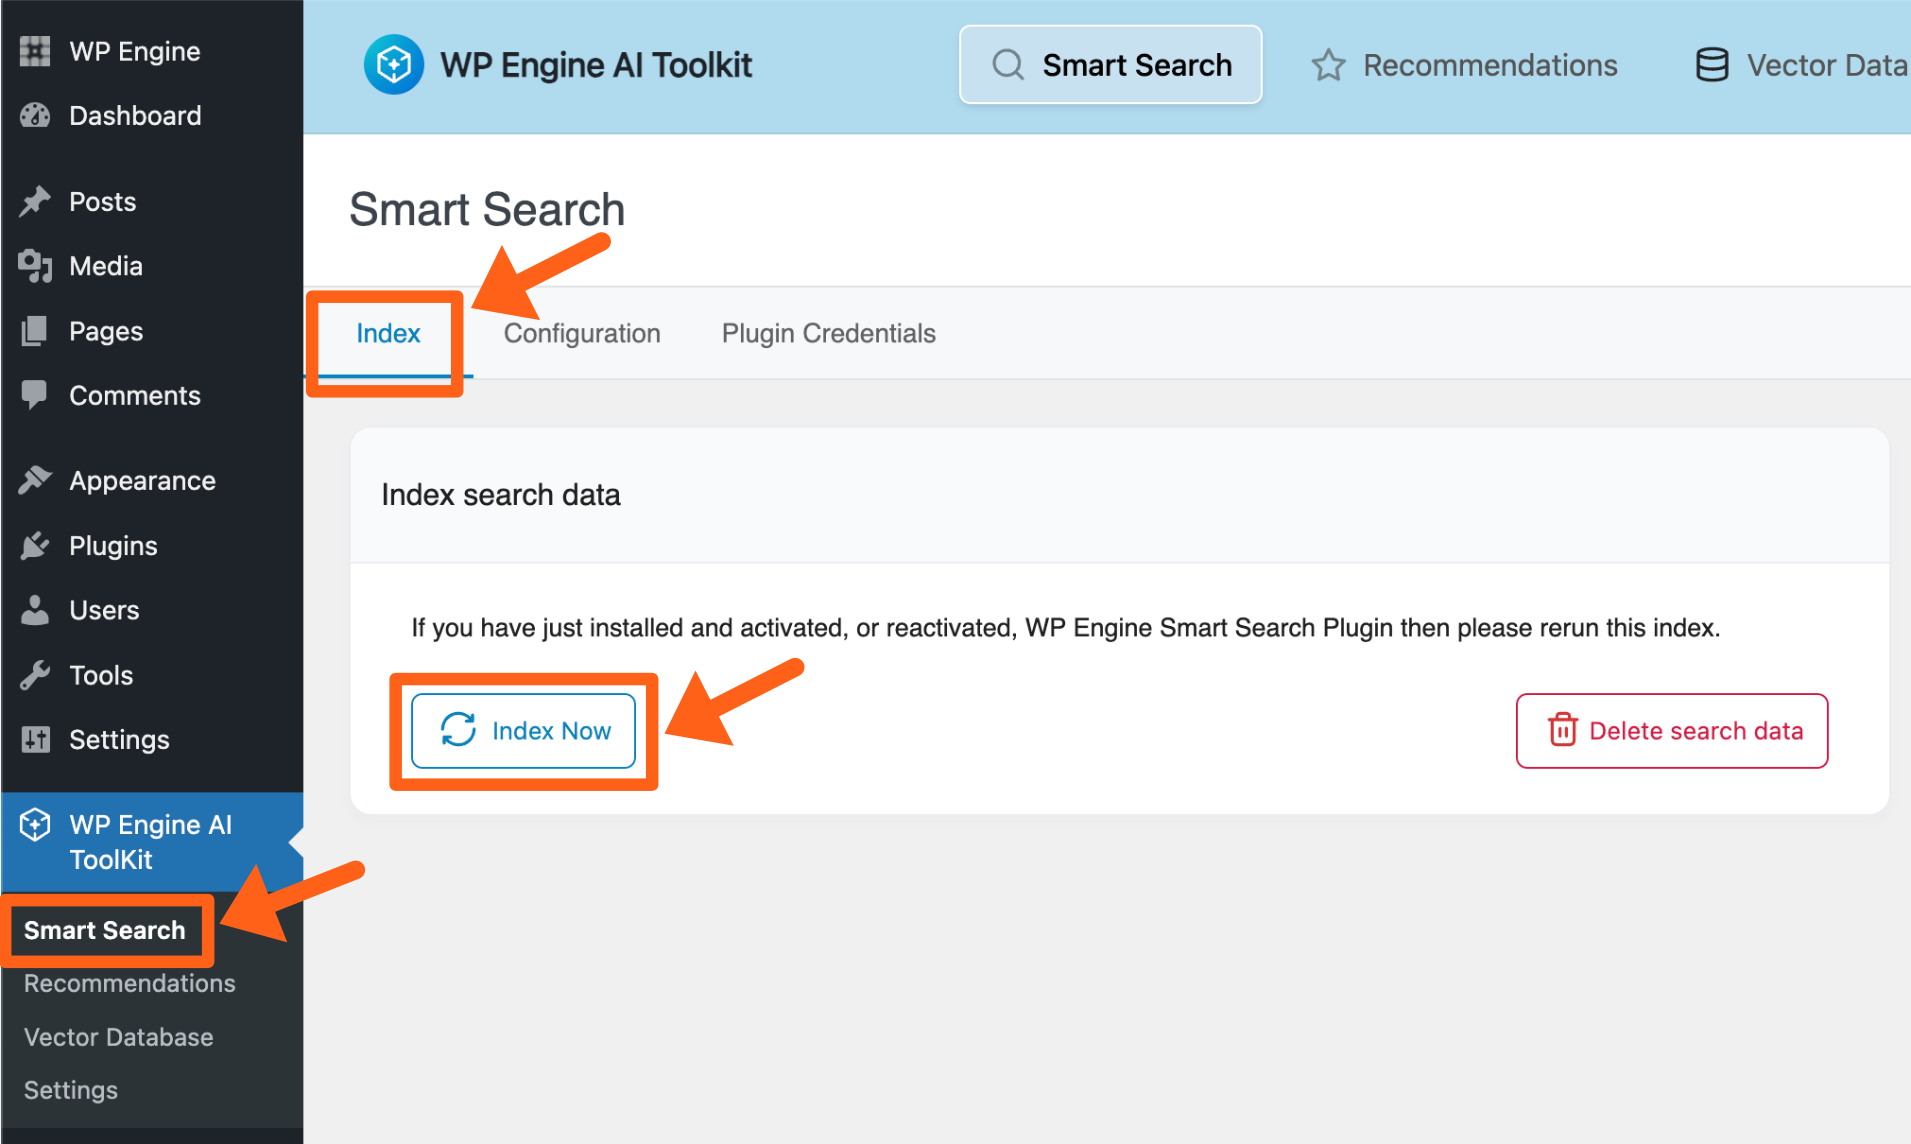
This sync can take some time to complete, especially on websites with large amounts of data (up to and beyond 30 minutes for the largest websites so please be patient. After the first sync, the content will stay up-to-date in the index automatically).
After the sync is complete:
- All searches on the WordPress site will be served by WP Engine Smart Search without any additional configuration.
- WP Engine Smart Search will continue to sync data in real-time any time new content is added or existing content is edited
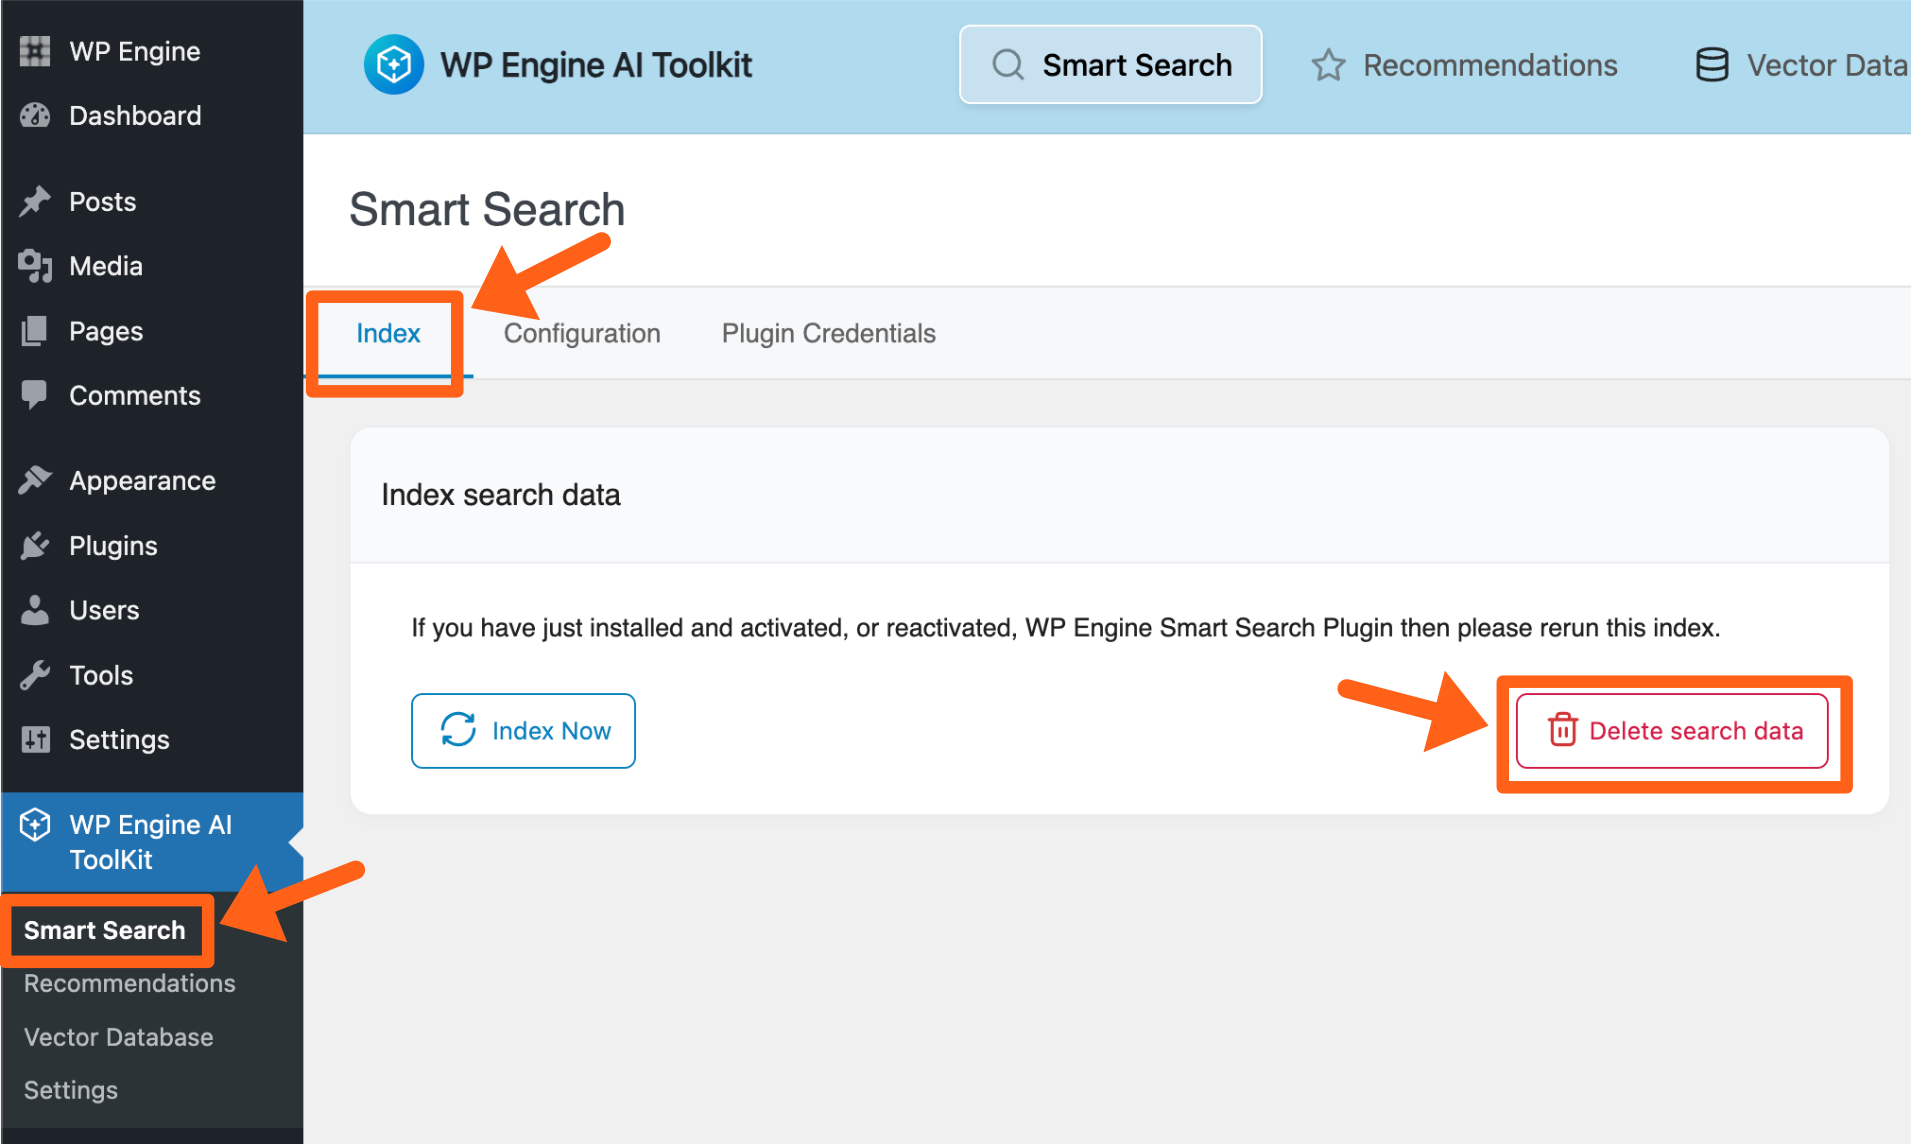
Delete Sync Data
If there are any issues with the content sync, delete the current search data and then sync again.
To delete sync data:
- Log in to the WP Admin dashboard
- Go to WP Engine AI Toolkit > Smart Search in the left nav menu.
- From the default Index tab, click the Delete search data button.
- When the deletion is complete, click Index Now to run the sync again.
If deleting the sync data doesn’t resolve the issue, you can remove the WP Engine Smart Search license from the environment and then enable it again.
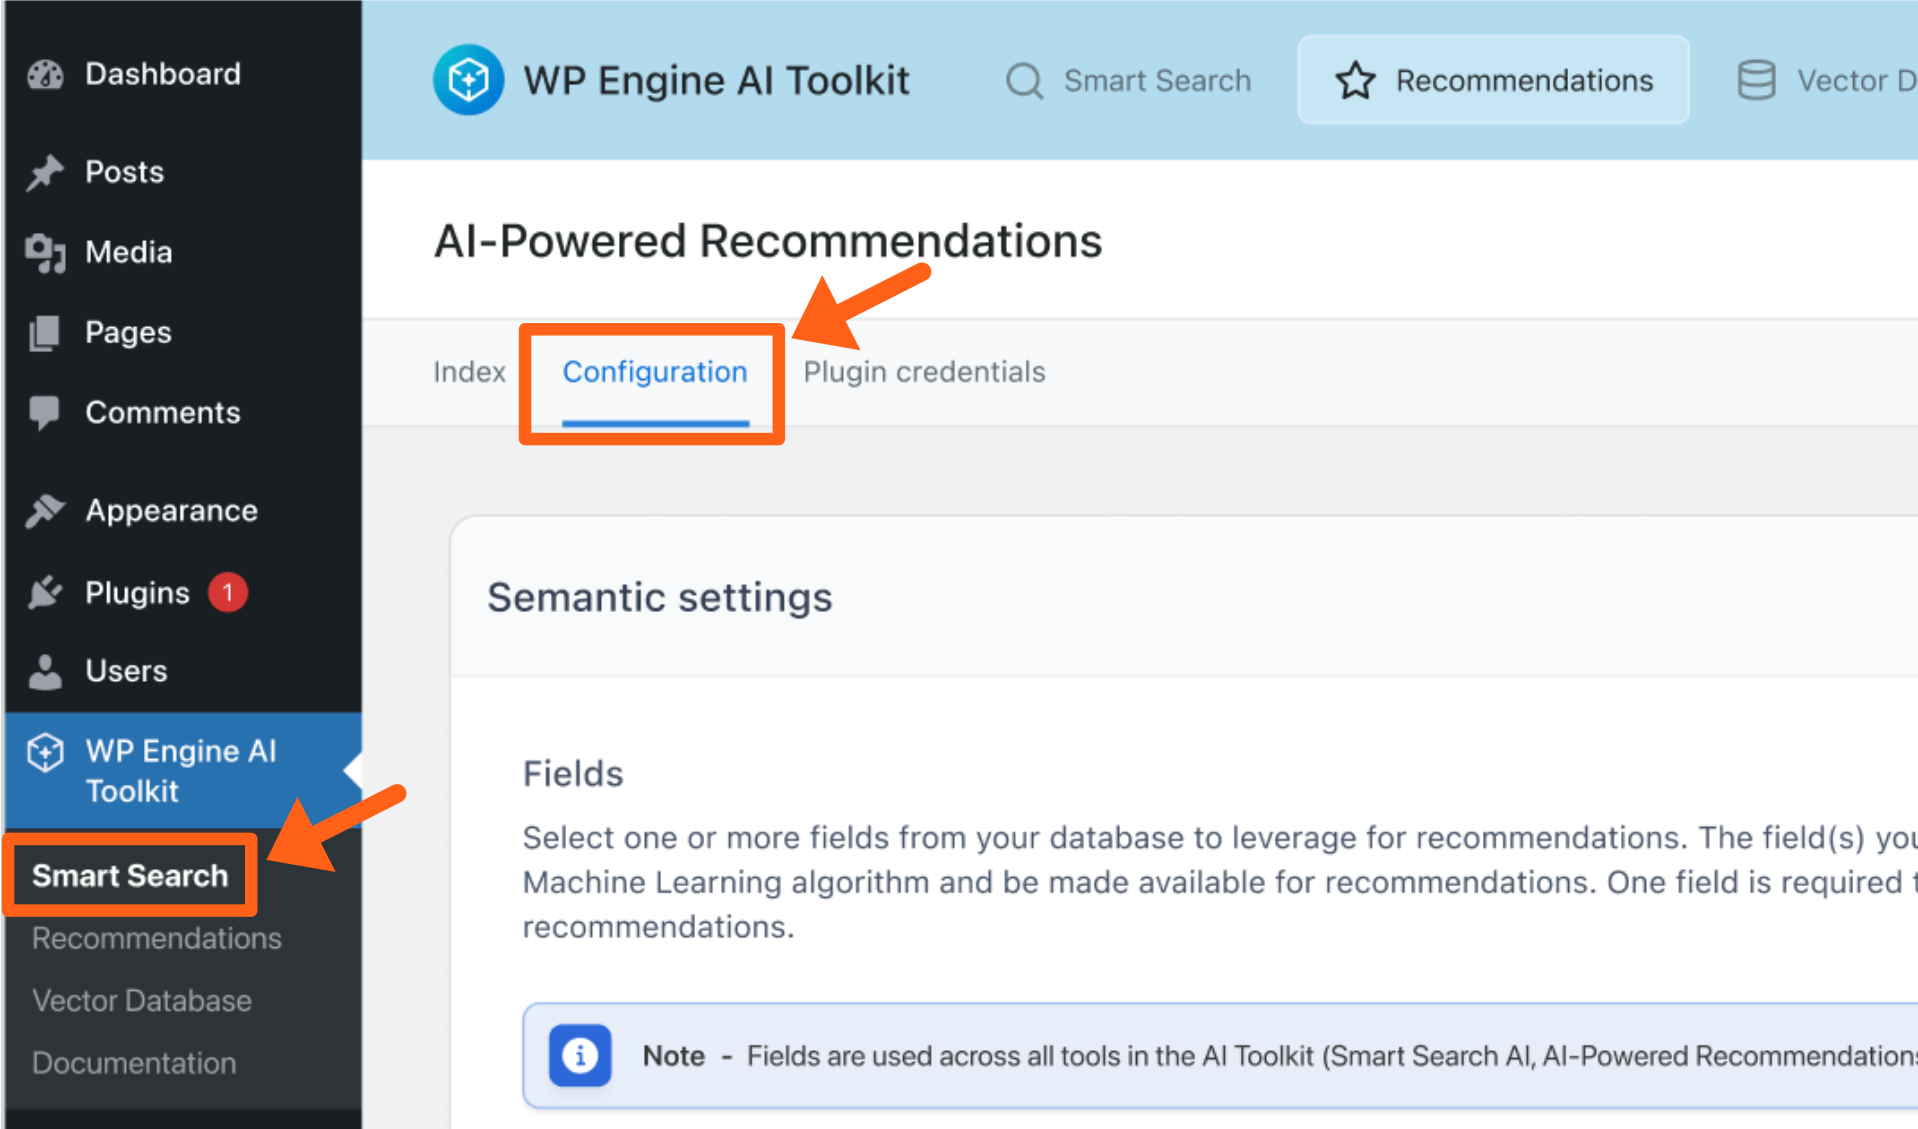
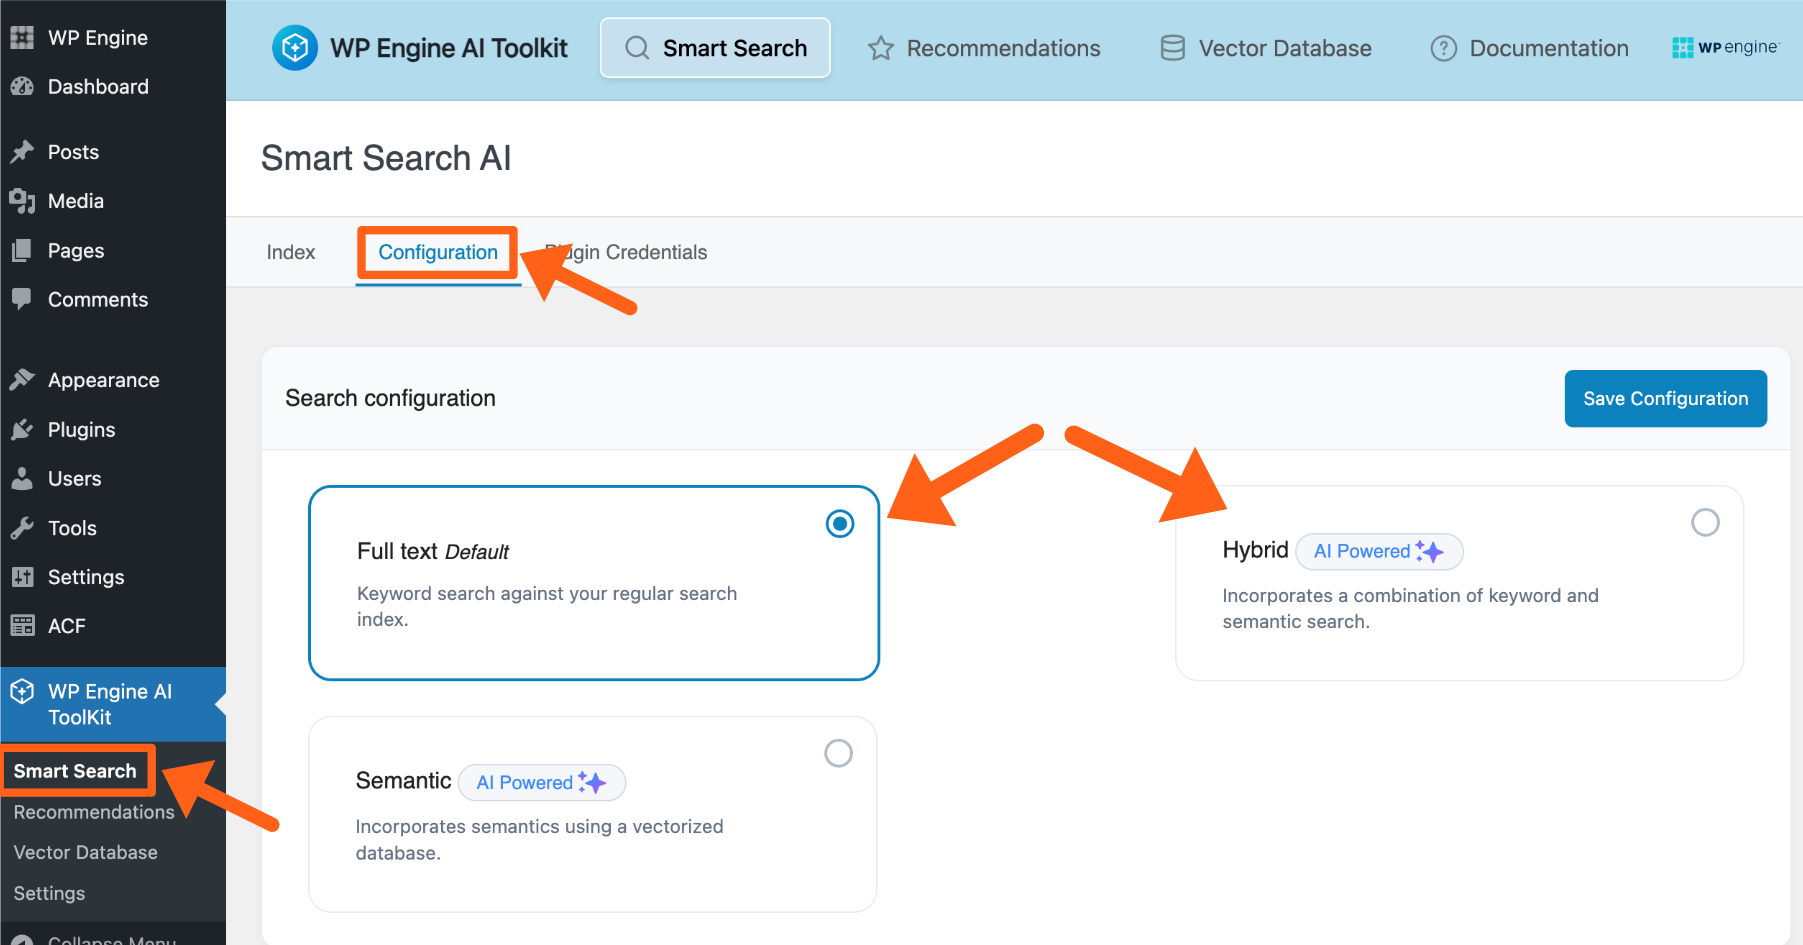
Configure WP Engine Smart Search
After performing the first content sync, configure the WP Engine Smart Search settings. These settings give more control over the search data. There are 3 types of search configurations you can choose from, Full Text, Semantic, and Hybrid. Below we’ll explain the 3 types and how to adjust the settings for each.
To start configuring your settings:
- Open the wp-admin dashboard
- Go to WP Engine AI Toolkit > Smart Search in the left nav menu.
- Click on the Configuration tab.
- After adjusting the settings, be sure to click the Save Configuration button at the top of the page.
Full Text Search
Full Text Search can handle misspellings and simplify words to their base forms like including “run” when “searching “running”. This returns more results than the default “exact-match” WordPress search, though it might include some unrelated matches.
Full Text Search lets you choose between Stemming and Fuzzy search methods.
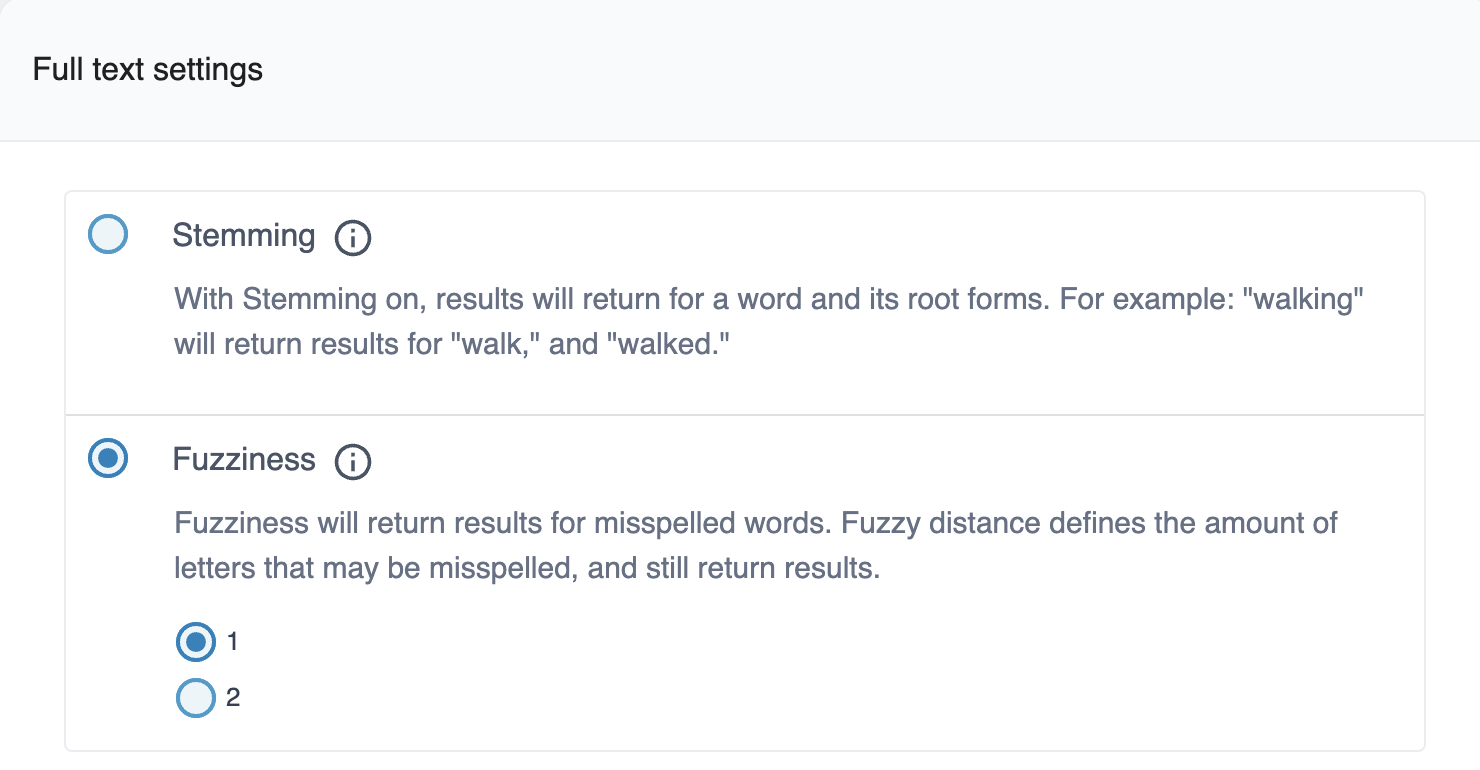
- Stemming is the process of reducing a word to its root form or base word. This is the default search method of WP Engine Smart Search.
- Fuzziness uses a letter-per-word tolerance (or “distance”) in the search terms to handle typos. Choose 1 or 2 for the distance, which determines how many letters can be wrong in each word that users type into the search form.
- For example, if the Fuzzy distance is 1, a search for “Hallo Warld” would return results for both “Hello” and “World.” (Each misspelled word in this example contains only one wrong letter.)
- If the Fuzzy distance is set to the maximum distance of 2, a search for “Haalo Waald” would return results for both “Hello” and “World.”
Semantic Search
Semantic Search enhances search by focusing on the meaning of words or phrases, not just their spelling. It finds more relevant results by analyzing words used in similar contexts, and inferring user intent. This is also called “Natural Language” search, and is accomplished by using recent advances in Machine Learning technology.
Fields
AI-Powered Search can be resource prohibitive. Therefore, Semantic Search lets you choose a Field from the database that will help define where more relevant context can be found when using Semantic Search functionality without overusing resources.
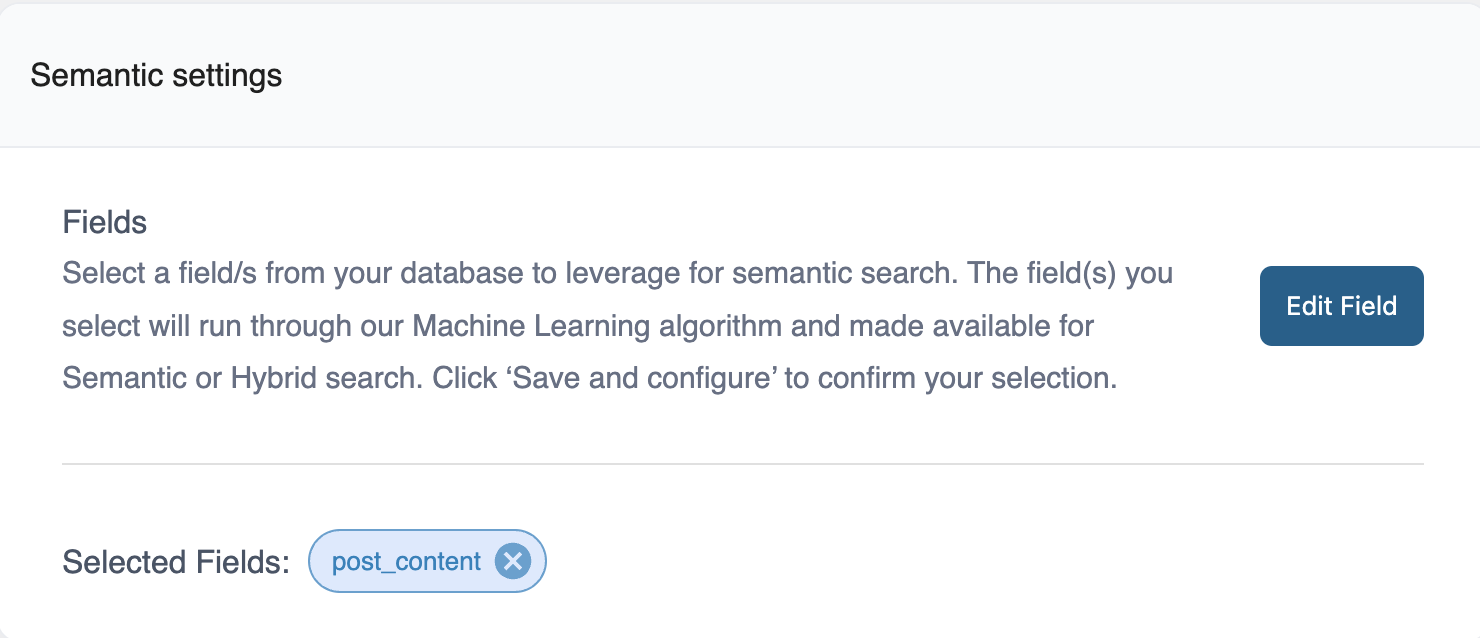
- For example, if the field post_content contains a store’s product descriptions, this field could be a good choice to provide more contextual information about the product for Semantic and Hybrid searches.
- Bear in mind that only the first ~500 words of the selected field will be referenced for each instance. If a store regularly has 2000+ words in the post_content field, another field may be preferable.
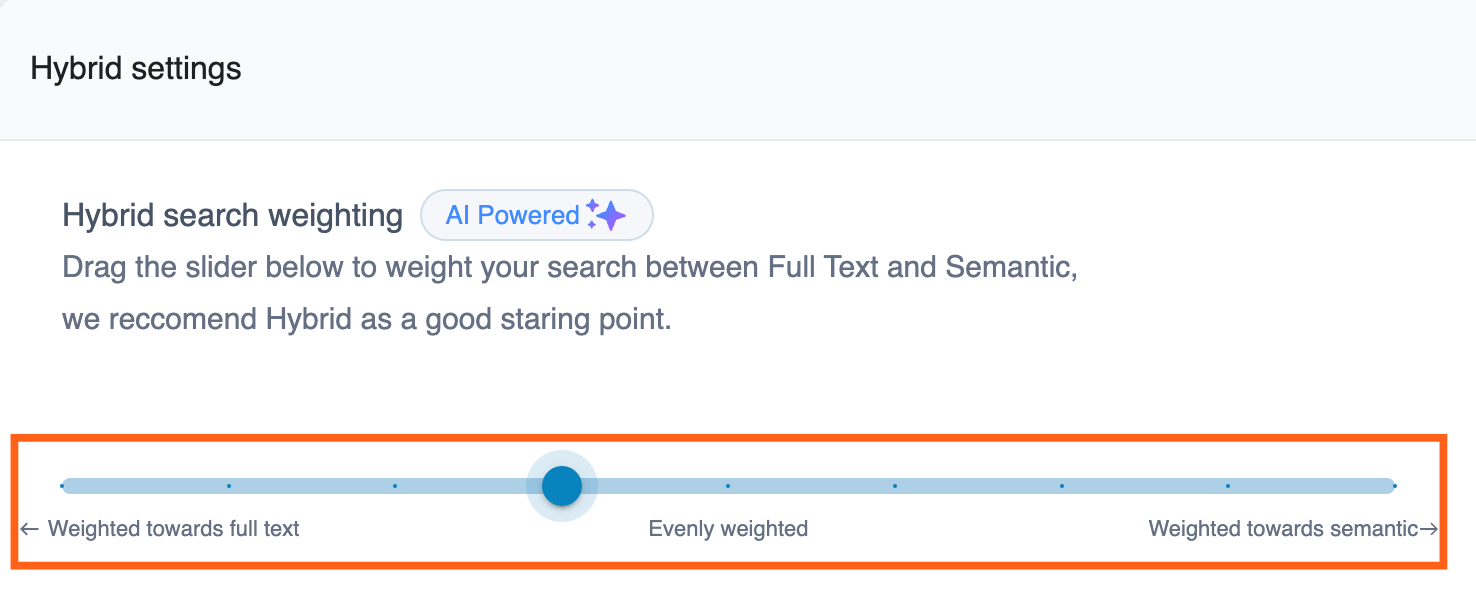
Hybrid Search (AI Powered)
AI-Powered Hybrid Search combines Full Text and Semantic Search. It’s a new search feature that unlocks a GPT-like search experience for users. This approach uses Machine Learning to produce more relevant search results.
Hybrid Search lets you select the same Stemming or Fuzzy settings as Full Text Search, and also lets you choose the same Fields as Semantic Search.
Hybrid search weighting
Hybrid Search also lets you choose a balance between Full Text and Semantic Search with a slider. Adjusting the search bias impacts the order that relevant results are returned.
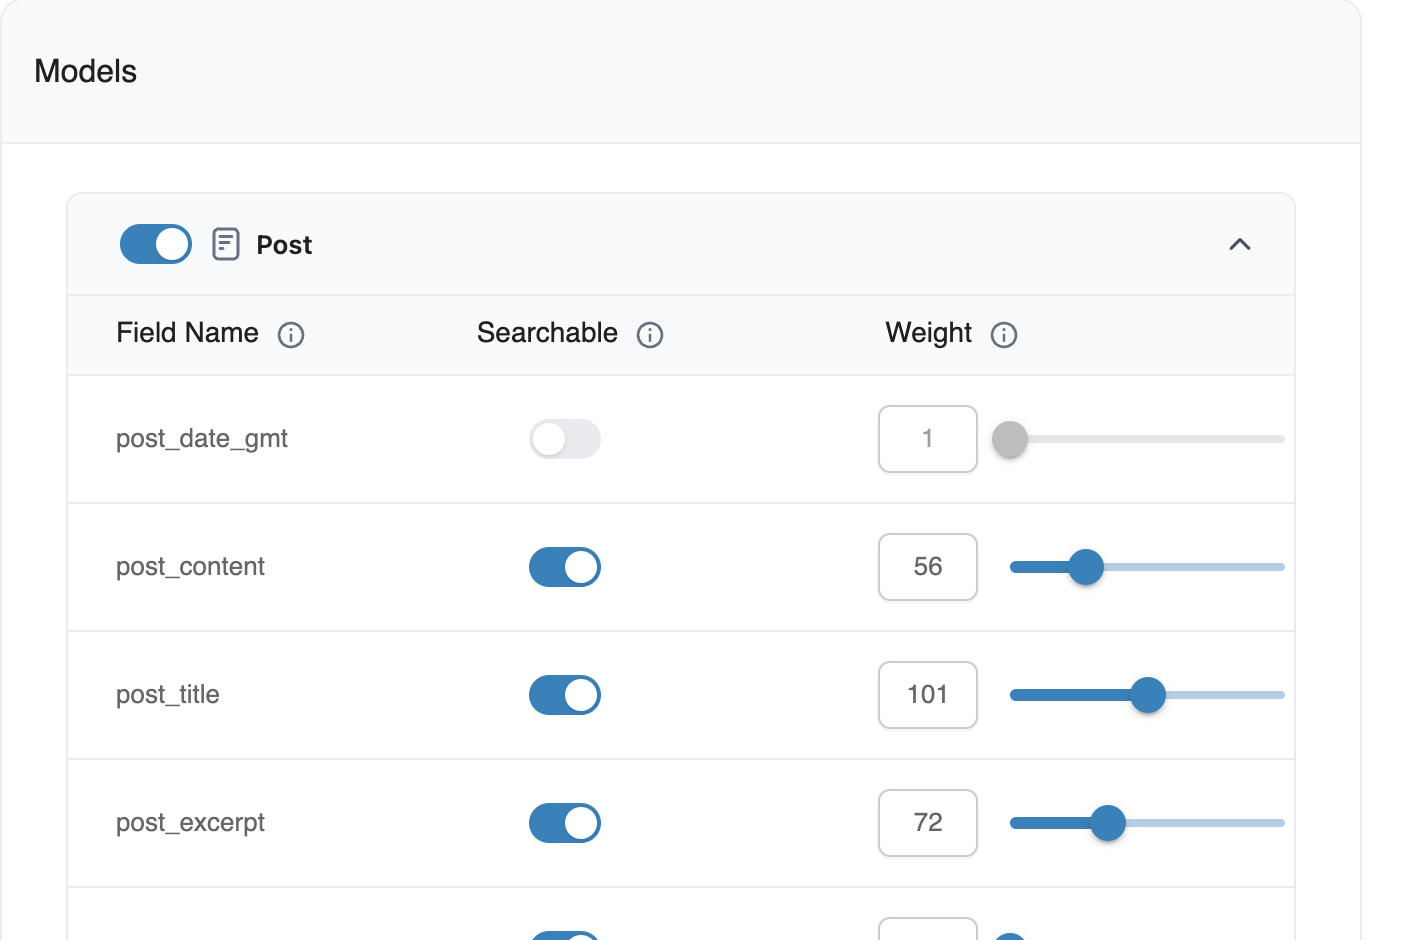
Models
All 3 types of search configurations, Full, Semantic, and Hybrid, let you choose settings for Models to limit what data can be searched or to give more importance to certain fields to ensure highly relevant results.
By default, WP Engine Smart Search searches all supported WordPress data type objects such as Posts, Pages, and Custom Post Types, and all of their supported fields.
To choose what post types and related fields can be searched, and to give more importance to certain fields, use the toggle buttons and the weight sliders.
- A field with a higher weight will be given a higher priority in the search results.
Additional Search Settings
The Additional search settings section will only show when you have selected either Full text or Hybrid for your search configuration. It will not show for the Semantic search configuration.
This section currently includes the following configuration options:
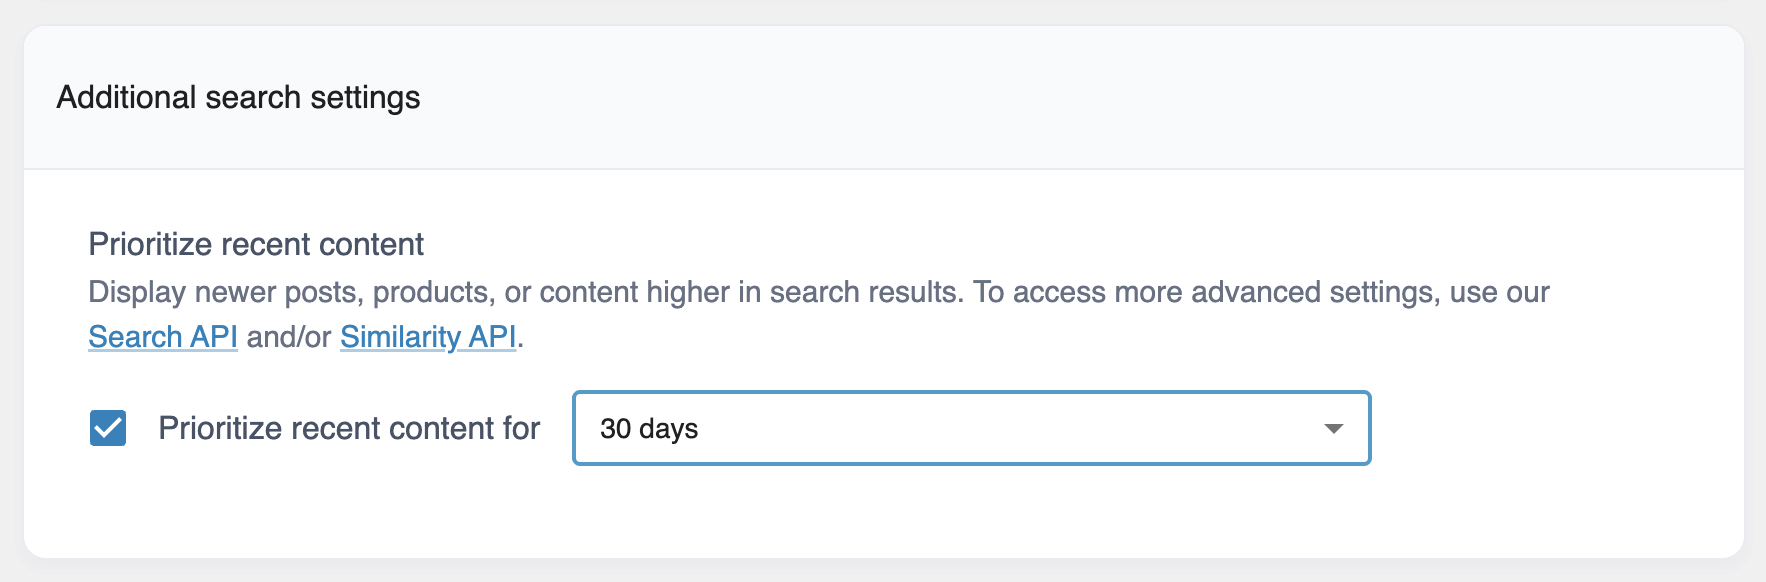
Prioritize Recent Content
This option allows you to surface recent posts or products higher in search results.
To prioritize recent content:
- Log in to the WordPress admin dashboard for the website.
- From the left sidebar go to: WP Engine AI Toolkit → Smart Search.
- Select the Configuration tab.
- Select either Full text or Hybrid for your search configuration.
- Scroll down to the Additional search settings section.
- Check the box next to “Prioritize recent content for” under the Prioritize recent content heading.
- Select one of the available limits from the dropdown box. The limits specify how many days posts or products will be prioritized after their publish date. The available prioritization limits range from 7 days to 365 days.
- Scroll to the top of the page and click the Save Configuration button in the top right.
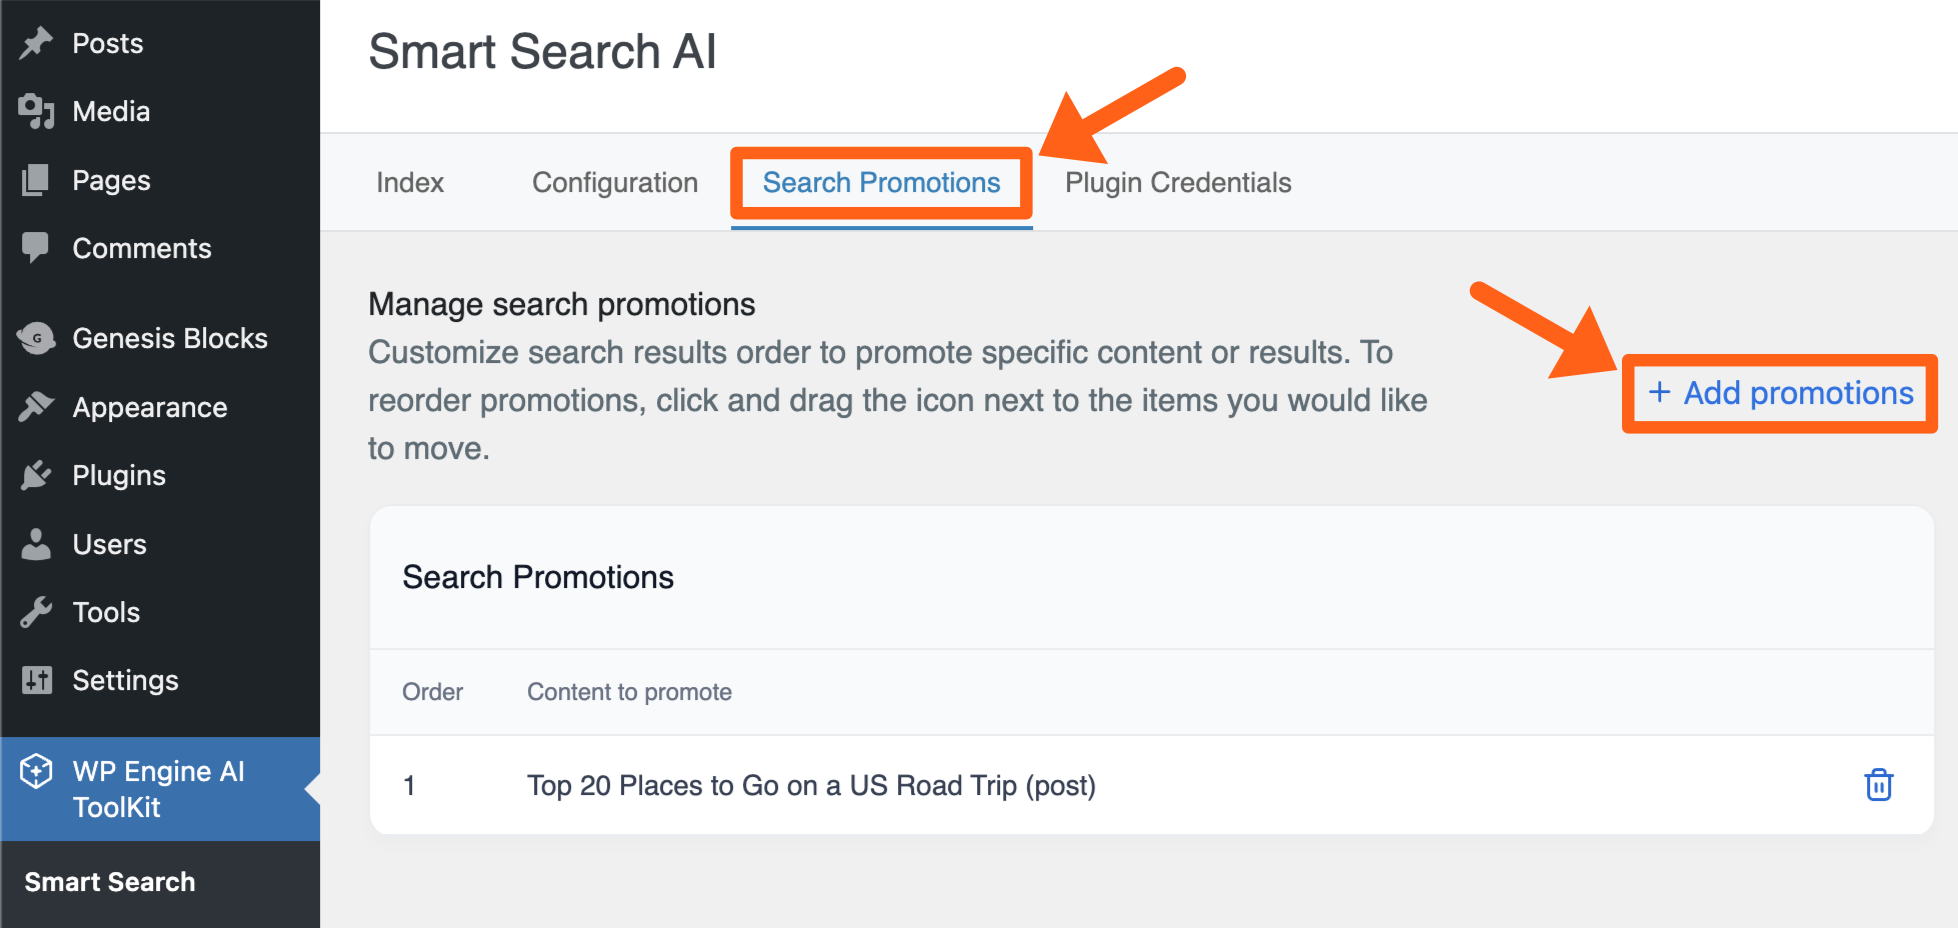
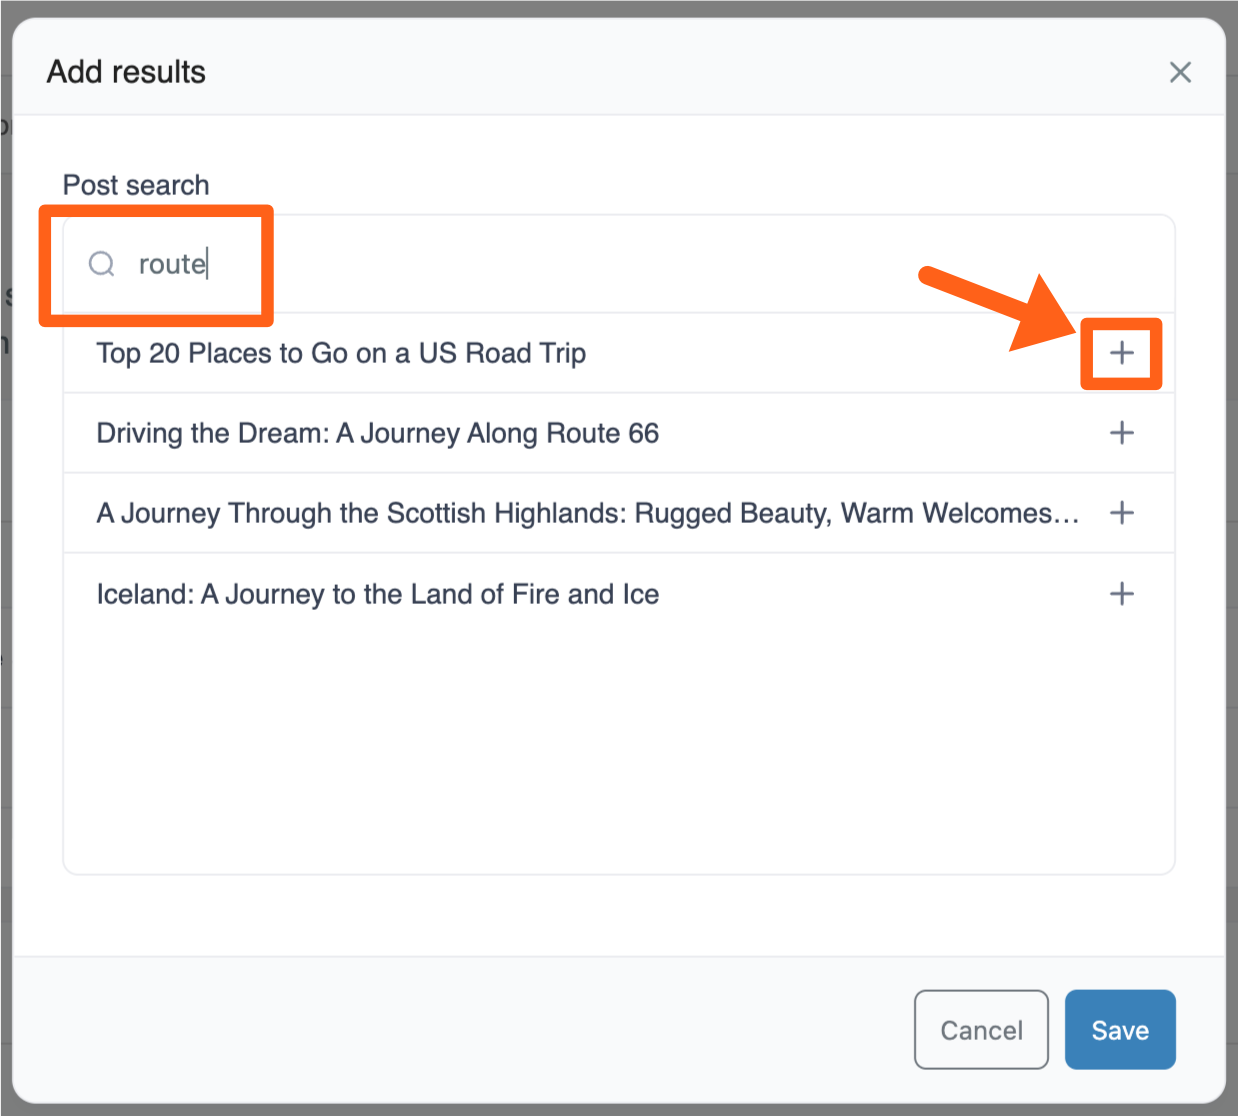
Promote Posts in Search Results
The search promotions feature lets you specify featured posts to show at the top of the search results for your site.
To set search promotions:
- Go to the WP Engine AI ToolKit menu in the WordPress sidebar.
- Click on the Search Promotions tab.
- Click the + Add promotions button.
- Search for pages or posts that you want to promote higher in search results.
- Click the plus sign button next to a post to select it.
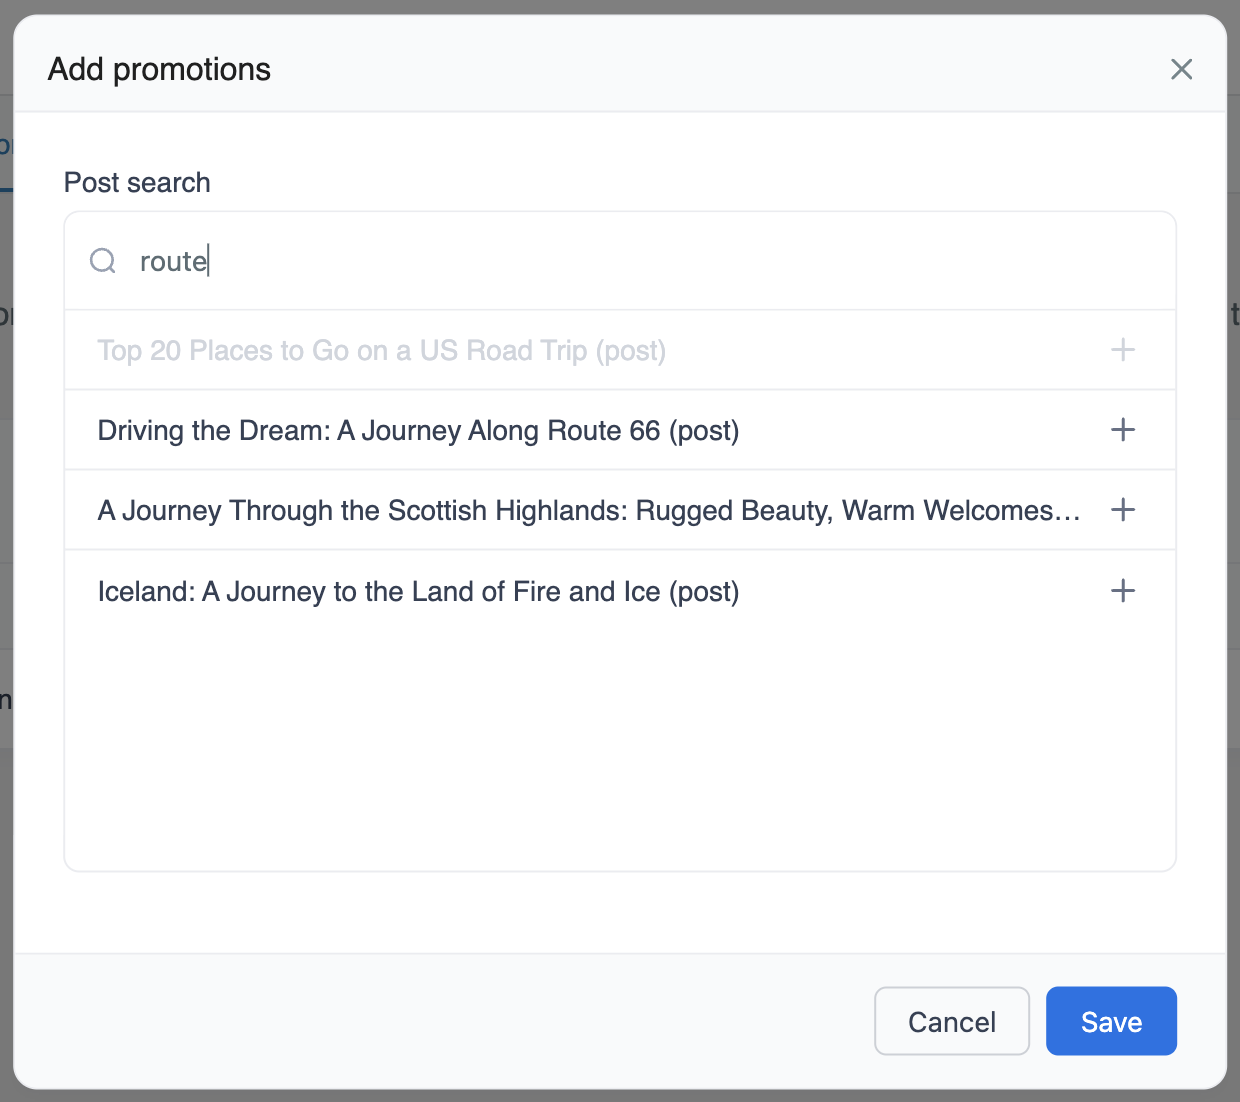
- Click the Save button.
- In the next window click the Add button.
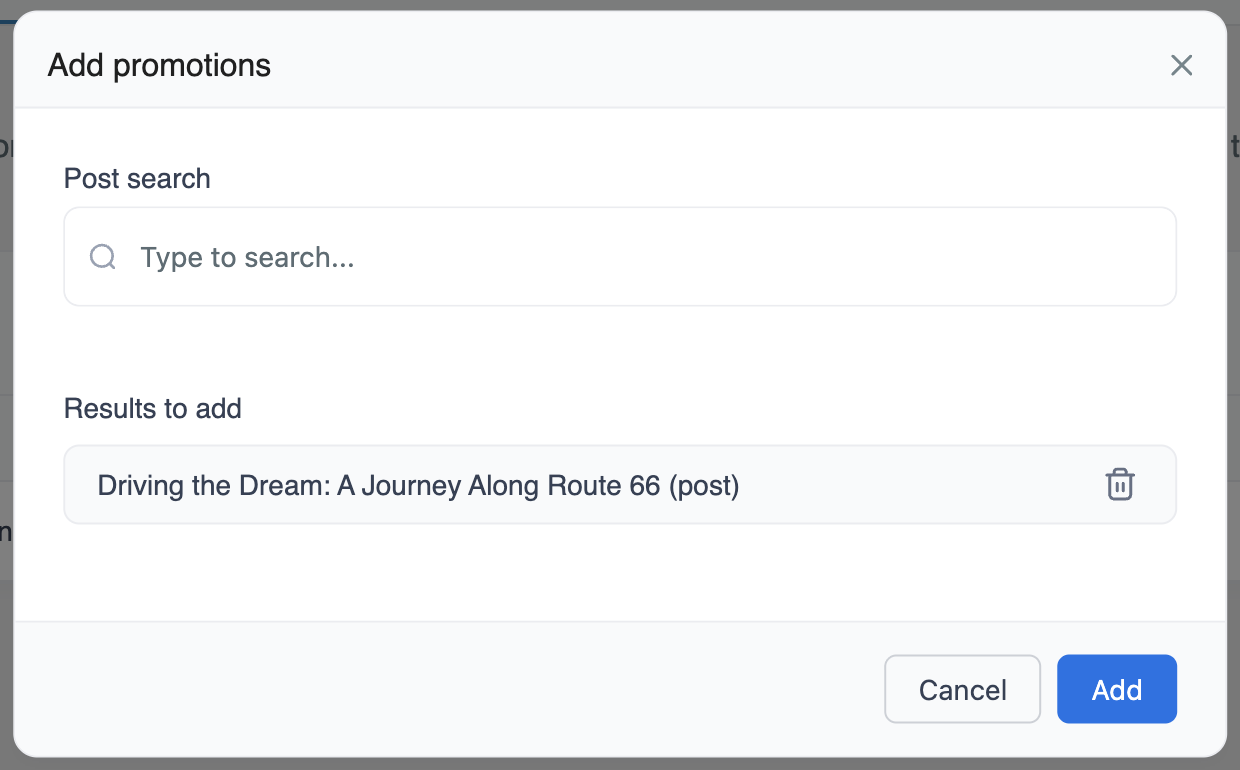
- Drag and drop posts in the search promotions list to adjust the order that they will show at the top of your search results.

- You can also click the trash can icon next to posts to remove them from the search promotions list.
- Review your search results. You should now see your promoted posts at the top of the search results in the specified order even if they don’t match the search query.
In the below example, the user searched the term “paris”. You can see that the 2 promoted selections show above the post about Paris in the search results.
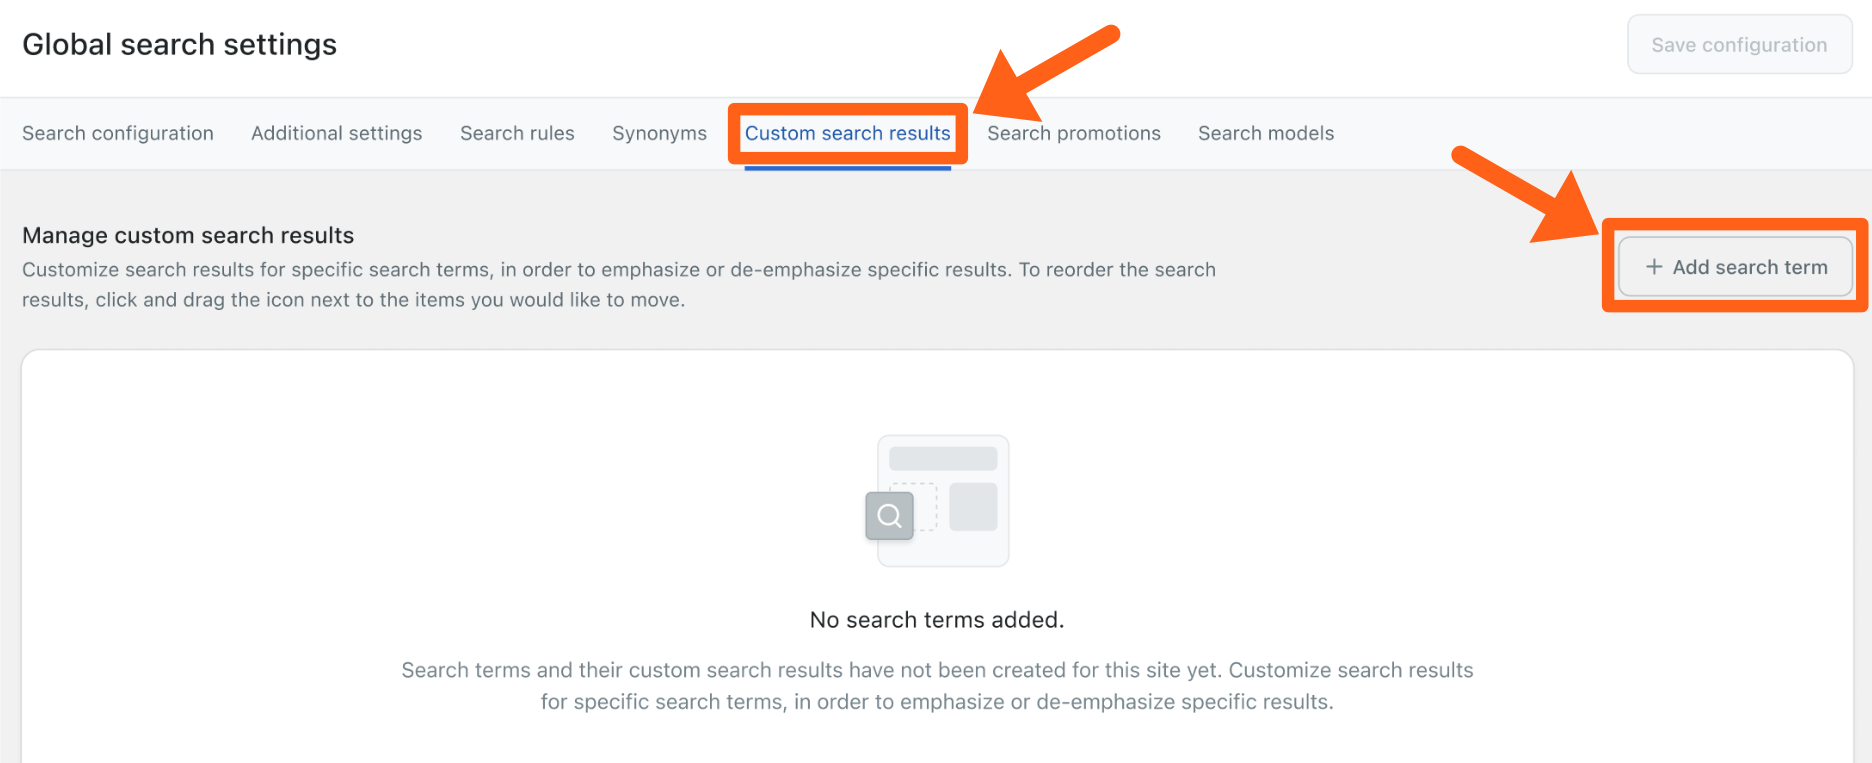
Custom Search Results by Search Term
The custom search results feature lets you set the exact search results that show for specified search phrases.
To set custom search results:
- Go to the WP Engine AI ToolKit menu in the WordPress sidebar.
- Click on the Custom search results tab.
- Click the Add search term button.
- Type in the search phrase that you want to customize and then click the Add search term button.
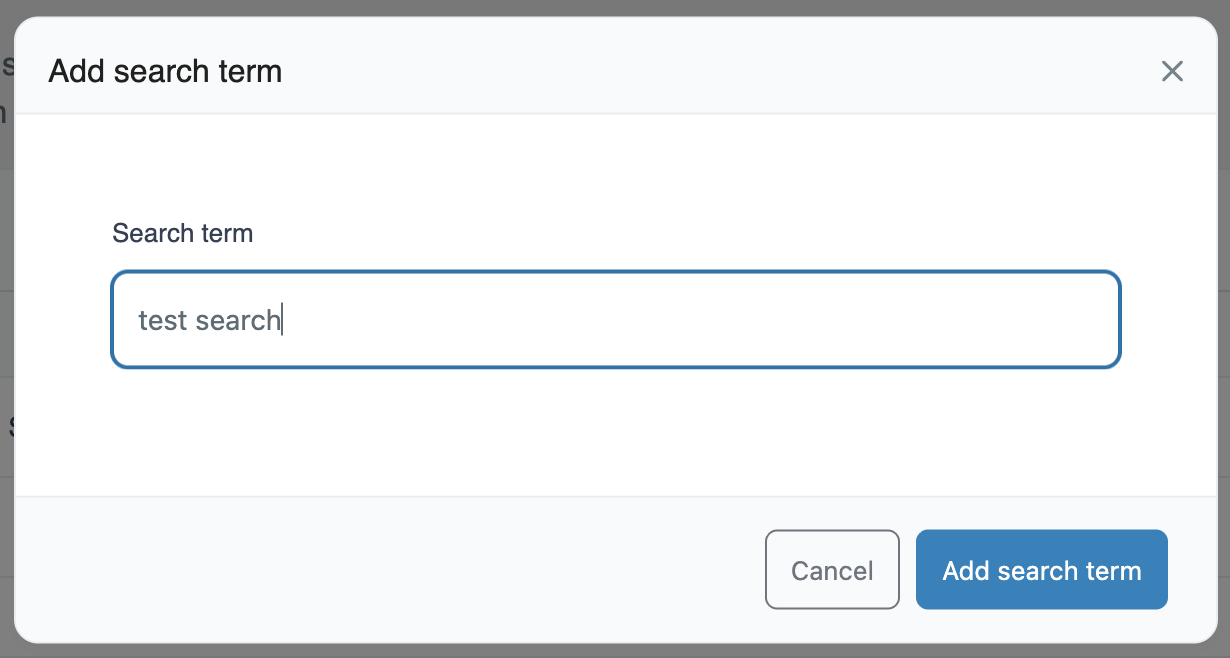
- You should now see a new meta box for your search term on the custom search results page. Click the Add to results button at the bottom of the meta box for your search term.

- Search for pages that you want to show when visitors type in this search phrase.
- Click the plus sign “+” button to the right of each article that you want to add.
- Continue searching for more pages and clicking the plus sign button next to each page to be added. Once you’ve searched and added all of your pages, click the Save button.
- You’ll then see a list of all the pages you selected with the option to remove any if needed. Once you confirm the list to be added, click the Add button.

- Hover over posts within the meta box for your search phrase, and use the drag handles to drag and drop the articles into the order that you want them to show in search results.
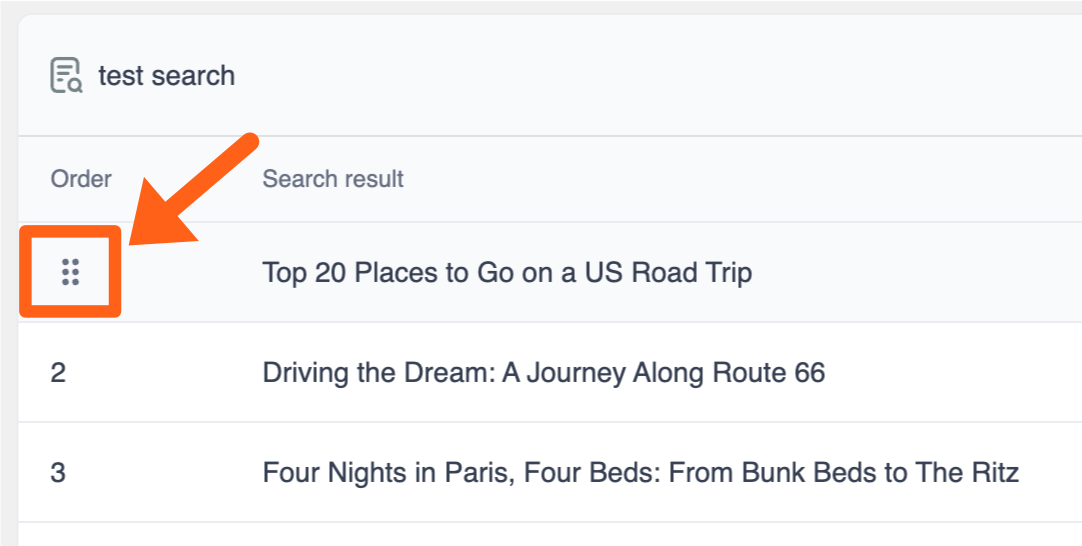
- After the posts are in your desired order, try a test search on your website to confirm that the results show in the specified order.
Remember, as mentioned above, any Search Promotions that you have set will show above your custom search results.
Set Synonyms for Search Terms
Create rules that tell the Smart Search which words should be treated as identical or related. Instead of a rigid search that only looks for character-for-character matches, Smart Search becomes intuitive, understanding the intent behind queries.
To add synonyms:
- Go to WP Engine AI ToolKit in the WordPress admin sidebar.
- Select the Synonyms tab.
- Click the + Add synonyms button.
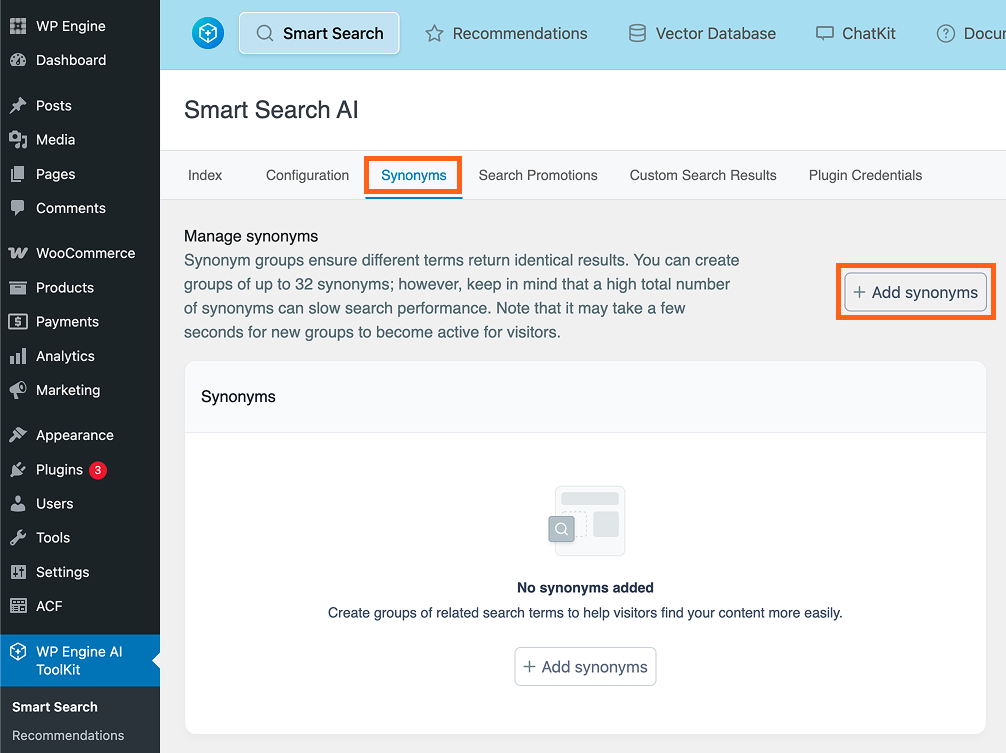
- Add your list of synonym words. You can type a comma or hit the enter key after typing each synonym to add more. Groups can contain 2-32 synonyms.

- Click Save or click Save and add another to add another synonym group.
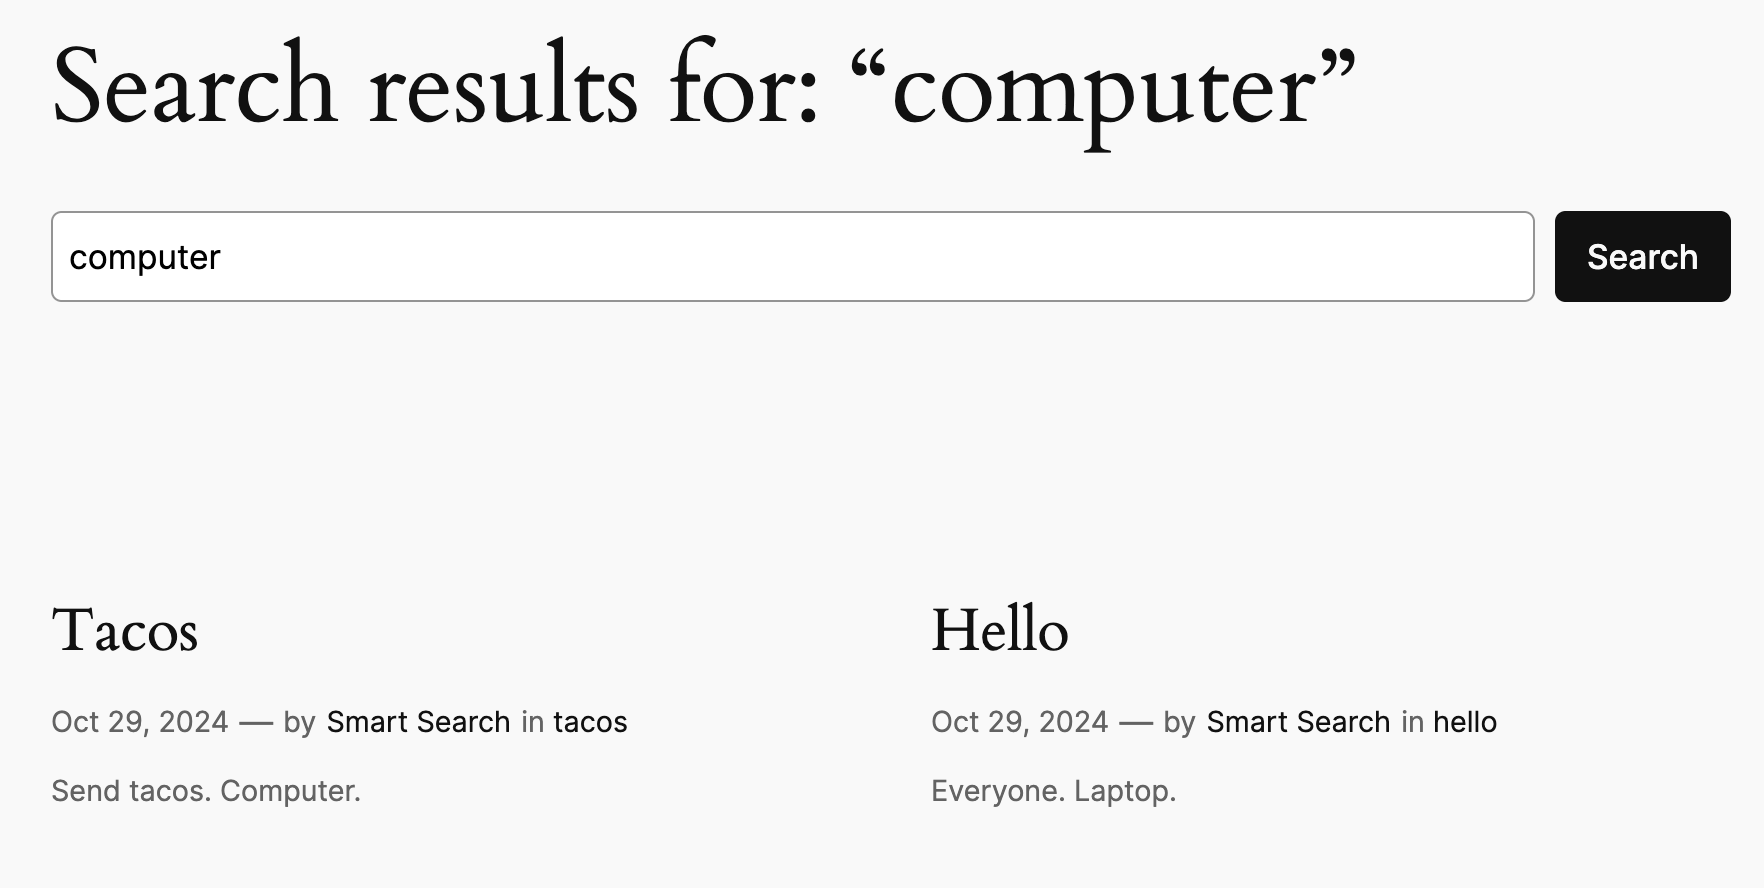
- Test your new synonyms by searching on your site. In our example shown below, you can see that a search for “computer” also returned an article that contained the word “Laptop” but did not contain the word “computer”.
Smart Search for eCommerce Products
WooCommerce® product details can now be indexed by WP Engine Smart Search.1 All new Core and Enterprise eCommerce plans will come with Smart Search and be able to access the new features for advanced product search.
Why Smart Search Matters for Products
With product support for Smart Search you get all of the amazing Smart Search features like Full Text search, Semantic search, Hybrid AI search, and Weighting for Models, and product specific data like pricing and attributes will also be indexed which will work with default WooCommerce blocks.
Examples of Smart Search in product searches:
Stemming
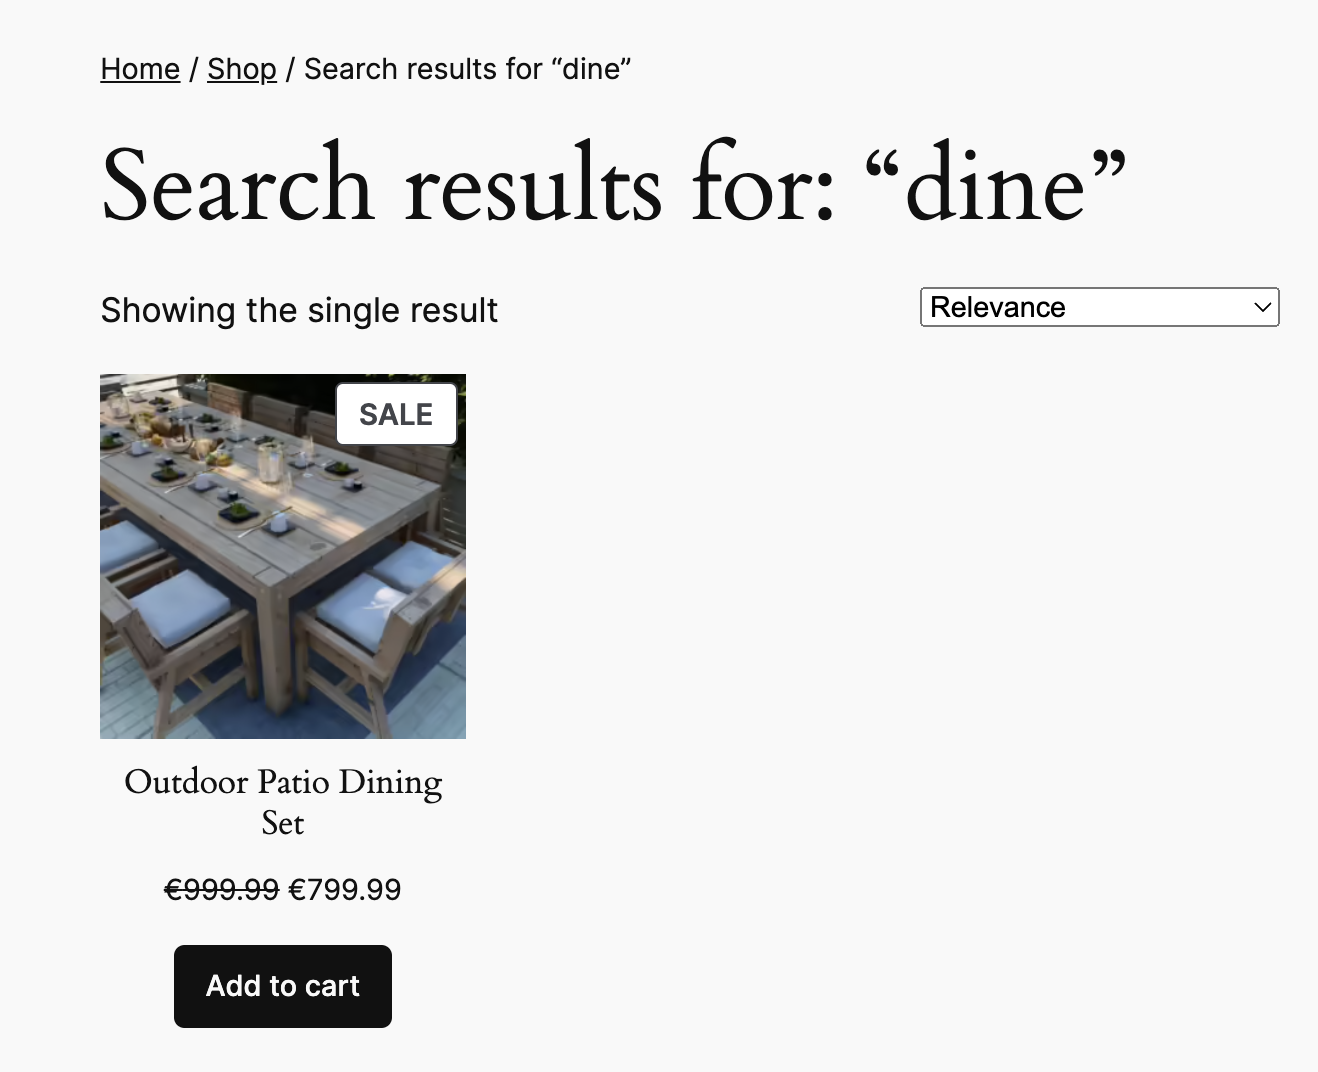
With Stemming on, results will return for a word and its root forms. For example: “walking” will return results for “walk,” and “walked.“
For example, if a product name has the word “dining” in it, a non Smart Search query would return 0 results if someone searches the word “dine”. With Stemming enabled for Smart Search it will return the expected product with the related root word in the name.
Fuzziness
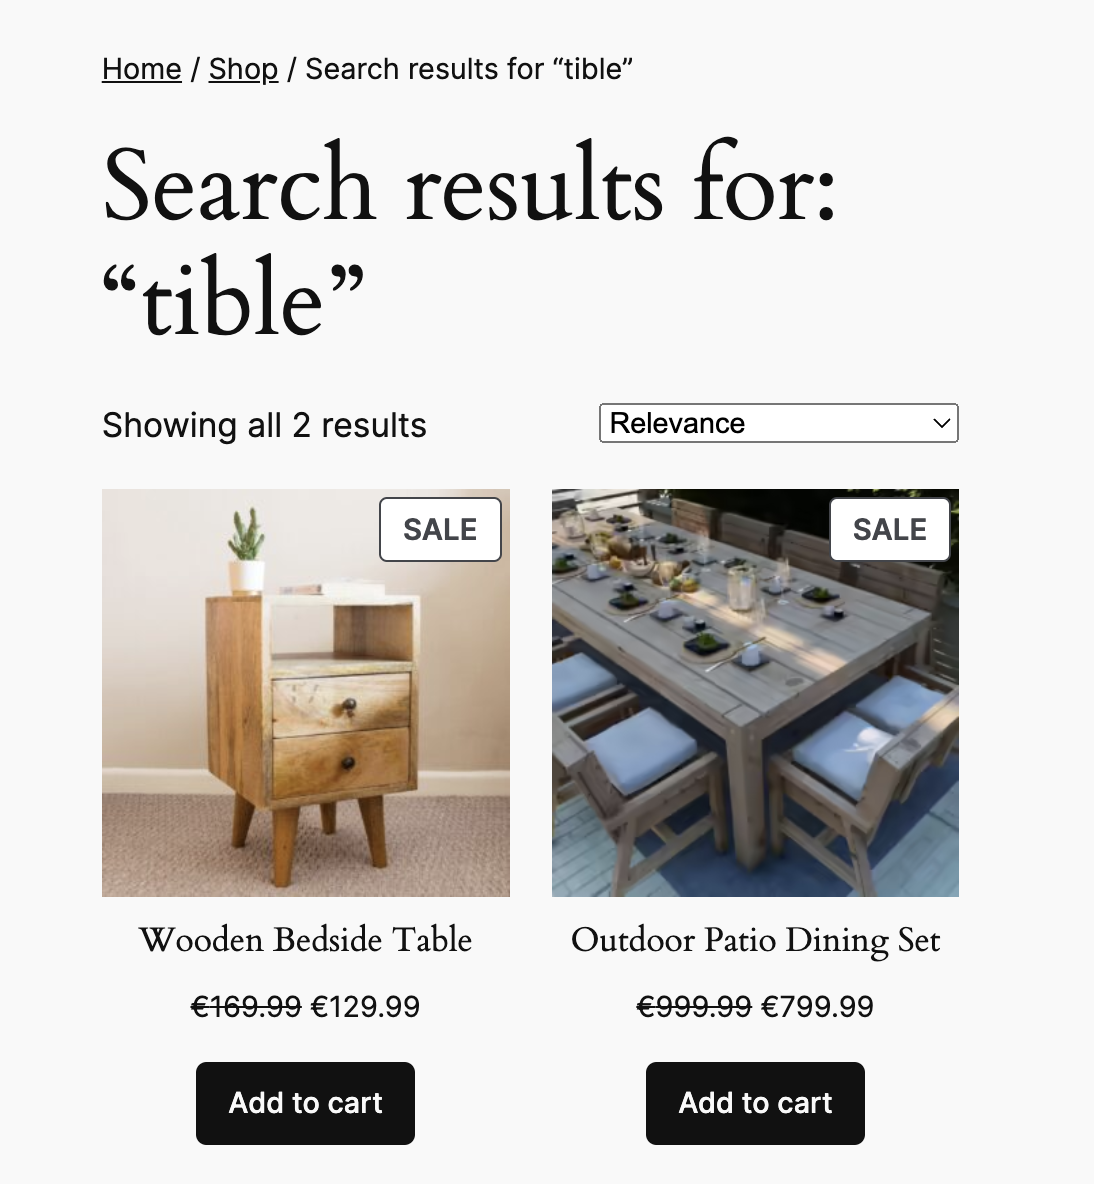
With the Fuzziness option selected results will be returned for misspelled words. Fuzzy distance defines the amount of letters that can be misspelled, and still return results.
For example, if a word like “table” is misspelled, a default search would return 0 results for an incorrect spelling like “tible”. The same search with Smart Search Fuzziness enabled, would return 2 results in our example, where 1 has “table” in the name and the other has “table” in the product description.
Semantic and Hybrid (AI Powered Search)
Hybrid search combines Full Text and AI powered Semantic search, and lets you choose the weighting for which of the 2 options it should favor more.
An example of the benefits of Semantic search would be a search for the word “kitchen” when you have 3 kitchen related products. In this example only 1 of the 3 has the word “kitchen” in its product details, under the short description. A regular search would only return 1 result. A Semantic Smart Search would use AI to recognize that the other 2 products are kitchen related items even though they don’t use the word kitchen anywhere in their product details.

Multisite Support
WP Engine Smart Search supports Multisite for WordPress. This allows your website visitors to perform searches on individual sites within the multisite network, and only see results for the site they are currently searching on.
Please note that after the plugin is network activated:
- The Sync and Settings pages are only available on the Network Admin screen.
- The Search Config must be configured for each individual site in the network.
Follow these steps to use WP Engine Smart Search on your multisite network:
- Enable WP Engine Smart Search on the environment that contains the multisite network.
- Log in to your WordPress admin and go to My Sites > Network Admin > Dashboard.
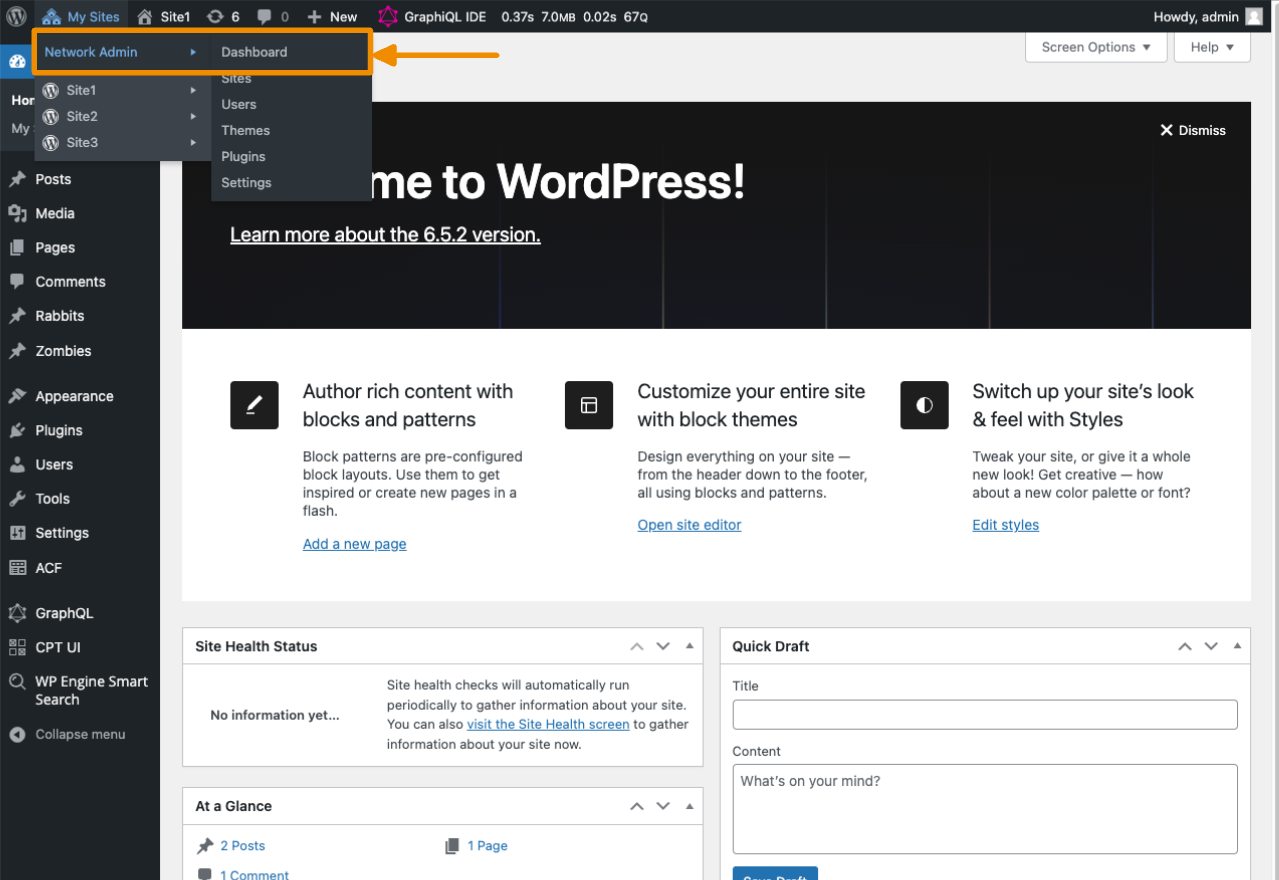
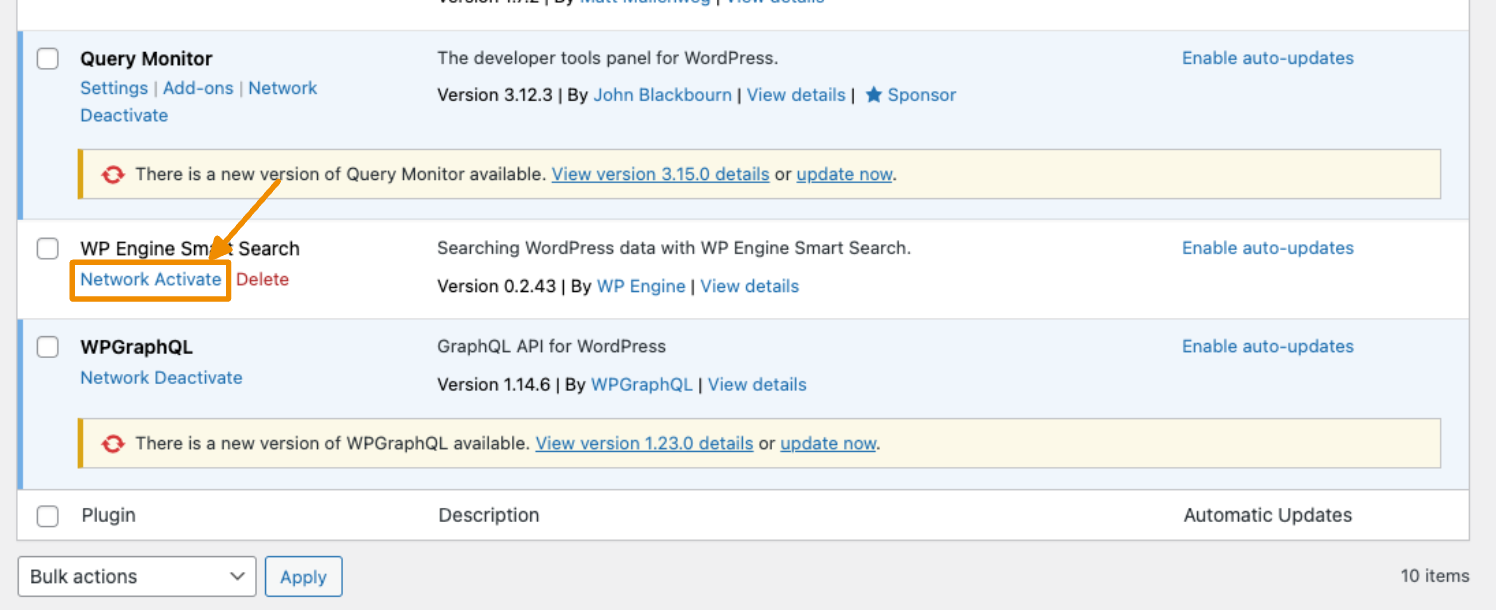
- Go to Plugins > Installed Plugins and click Network Activate for WP Engine AI Toolkit.
- Go to WP Engine AI Toolkit > Smart Search to sync the data for all sites currently in the multisite network.
- On the default Index tab, click the Index Now button to begin the process.
While data syncing is in progress, you will notice that it shows which site’s data is currently being indexed.
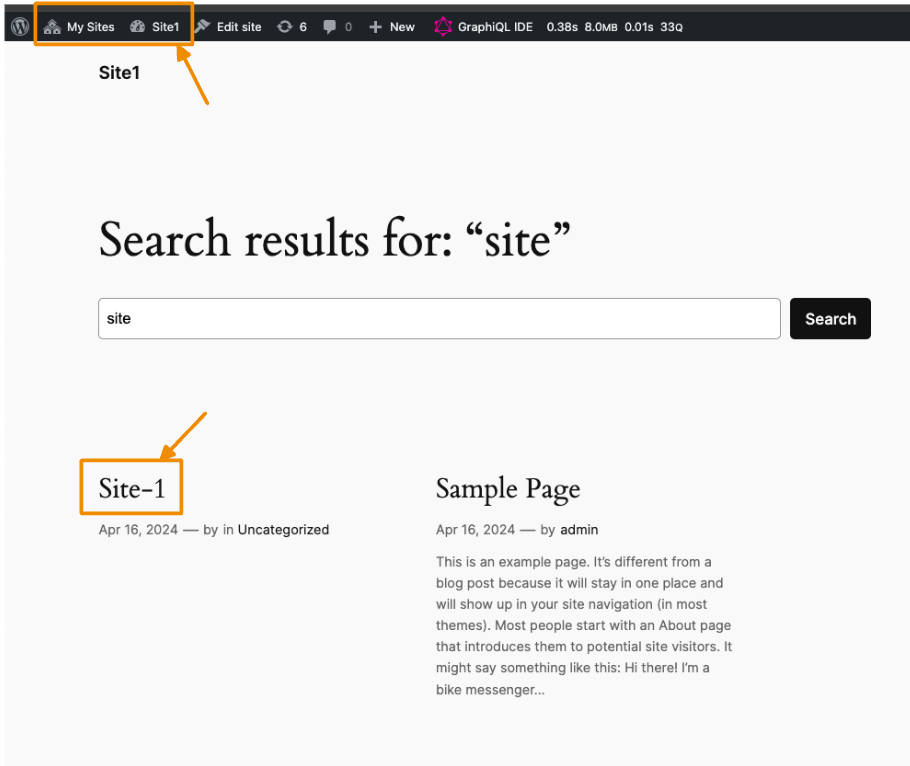
Once the sync process is complete, visitors can perform a search on each site in the multisite network individually. When they do, they will only see results for the site they are currently searching on.
For example, the image below shows that a search for “site” was performed on Site 1, and the results shown are only from Site 1.
WP Engine Smart Search Insights
Once you’ve installed and configured WP Engine Smart Search, you can see what your site visitors are searching for on your website.
To view these insights:
- Log into the User Portal and open the environment where you’ve installed WP Engine Smart Search.
- Click WPE Smart Search in the secondary lefthand menu. (You may have to expand the Insights dropdown section)
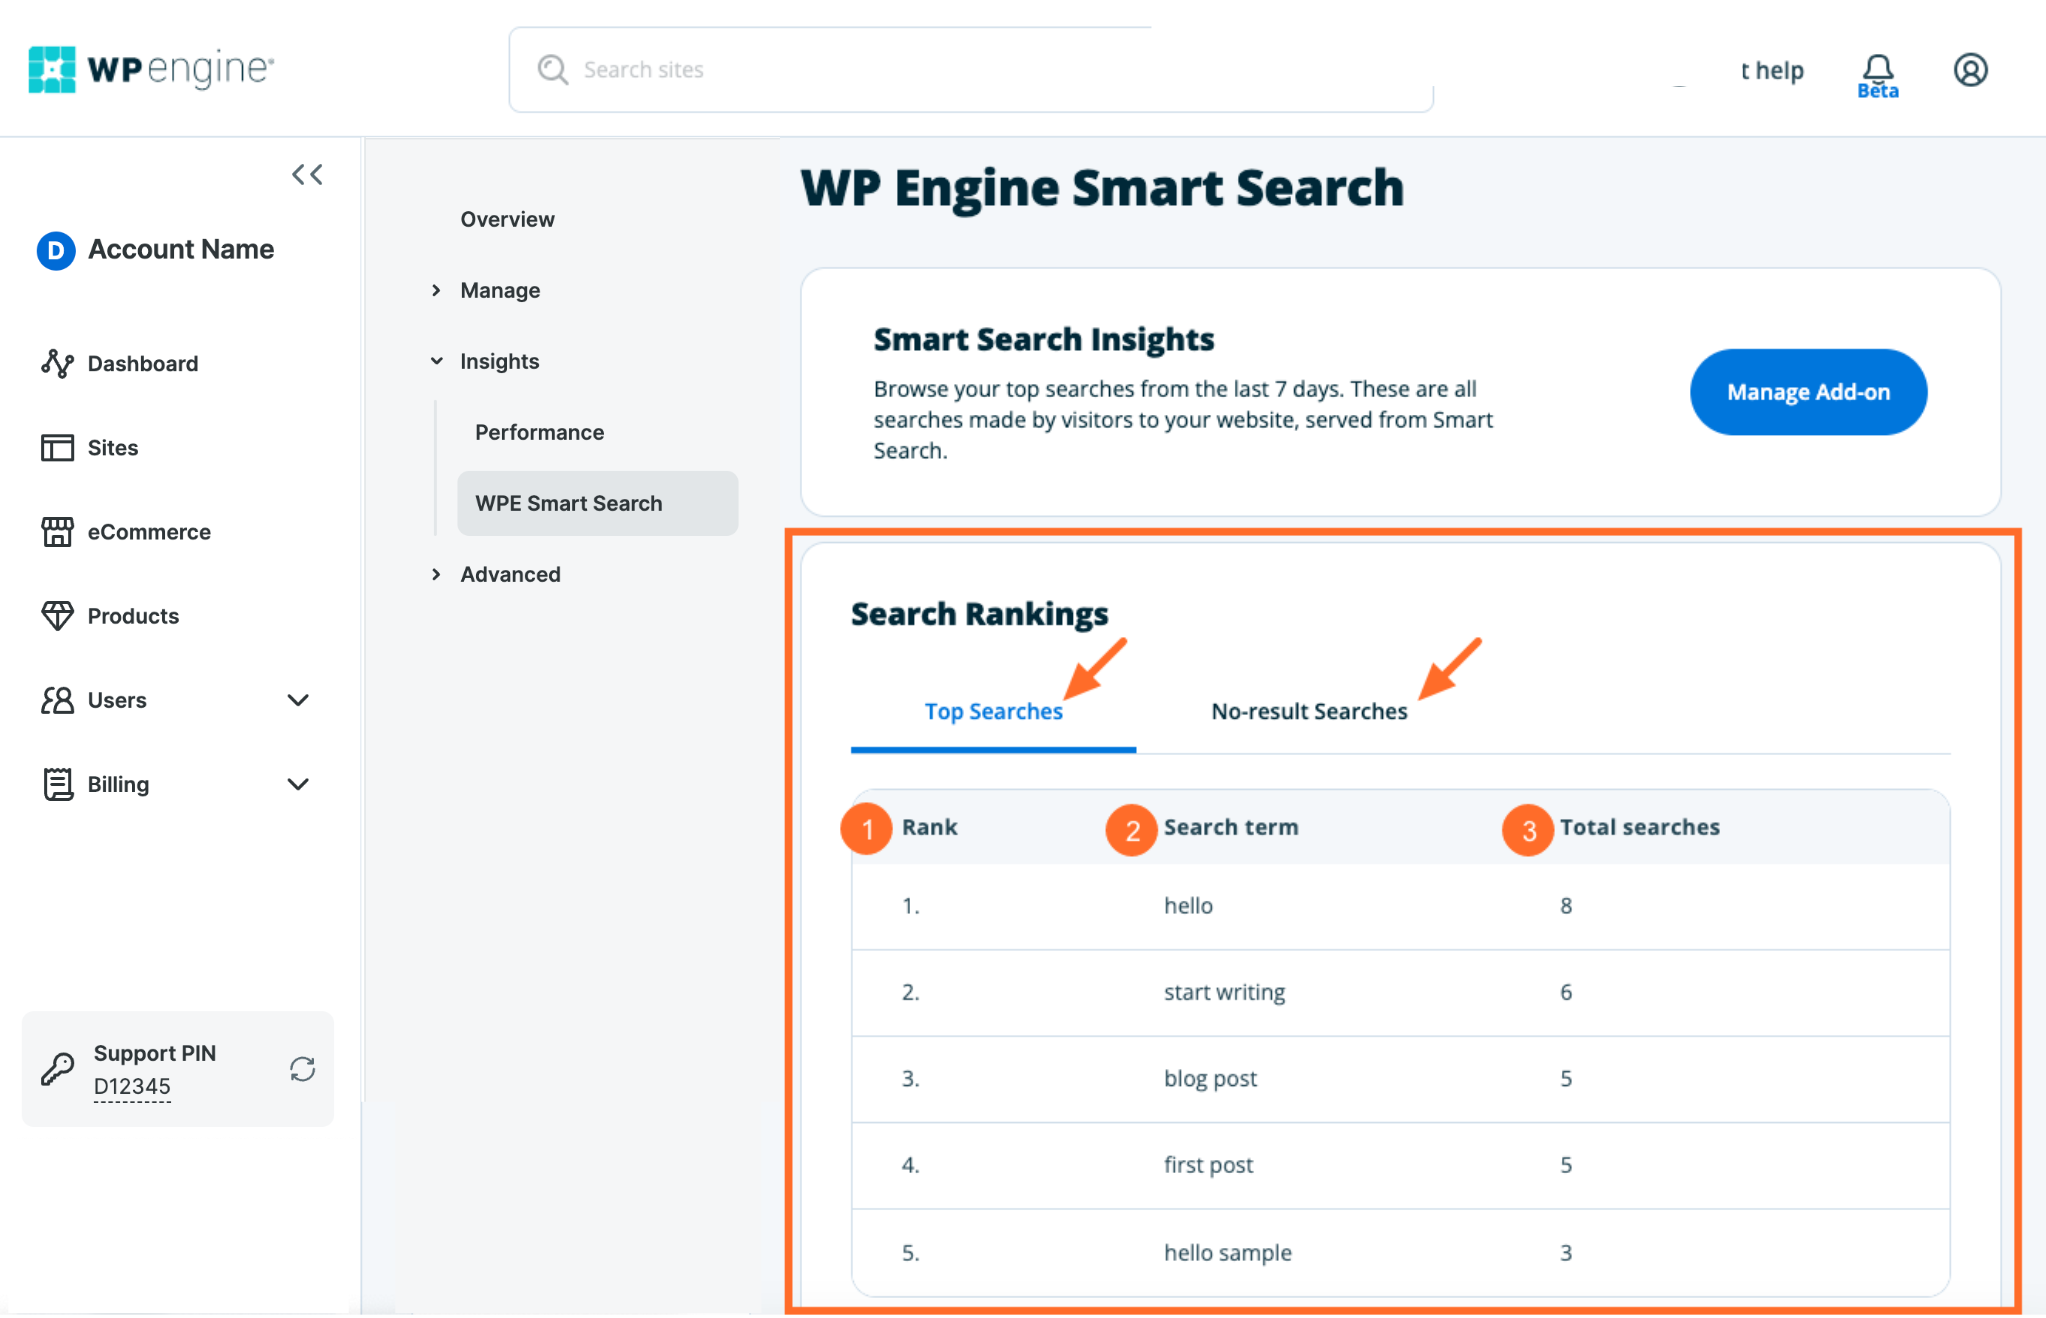
This is where you’ll find the top searches that were served from WP Engine Smart over the last seven days.
When site visitors enter search terms on your site, they are immediately recorded here on the Smart Search Insights page.
You can toggle between the Top Searches and the top No-result Searches to discover what users are looking for on your site.
- Rank: The order in which a term ranks on your site (from most to least searched).
- Search term: The terms visitors typed into the search box.
- Total Searches: How many total searches there were for the terms in the last seven days.
Faceted Gutenberg Blocks for Smart Search
We’ve created some helpful Gutenberg blocks that you can use with WP Engine Smart Search to allow users to filter search results on your website.
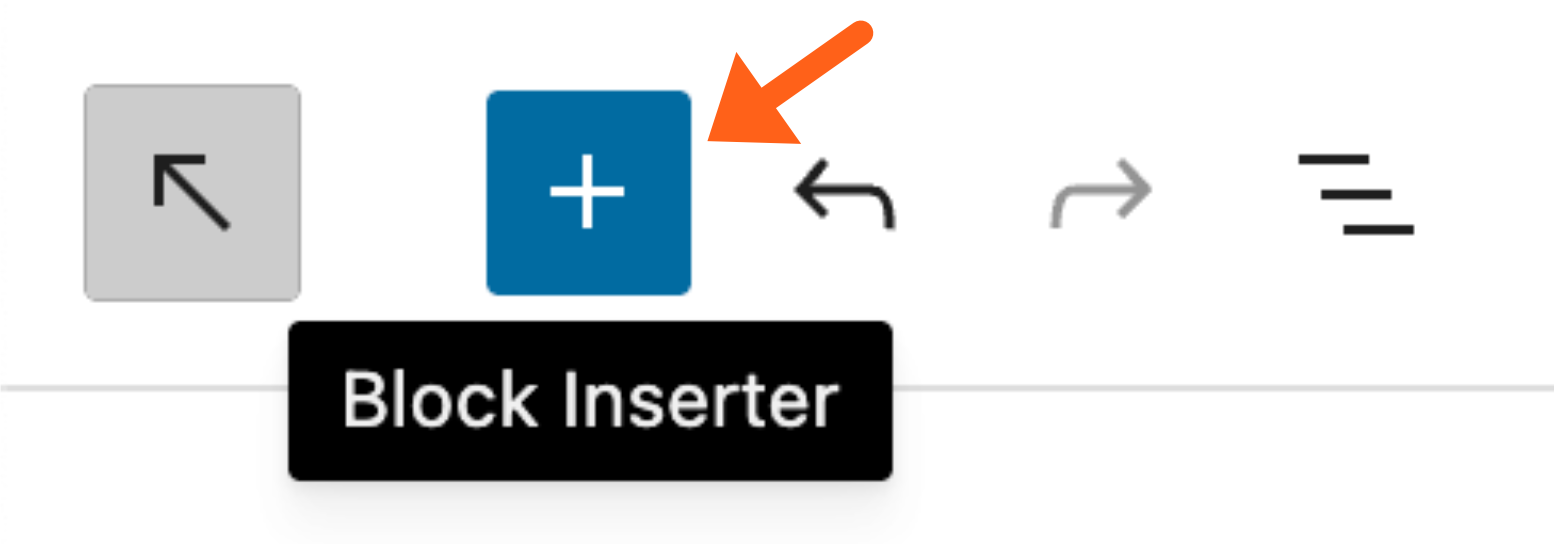
To easily identify blocks that belong with WP Engine Smart Search, click the Block Inserter (+ sign button), in the top left of your page editor and then scroll down through the list of available blocks until you see the heading for WP Engine Smart Search as shown below.
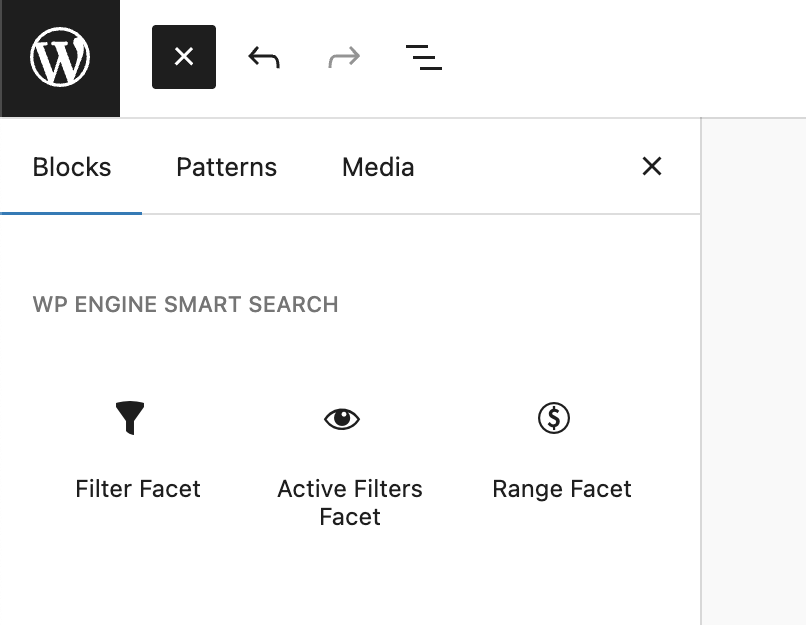
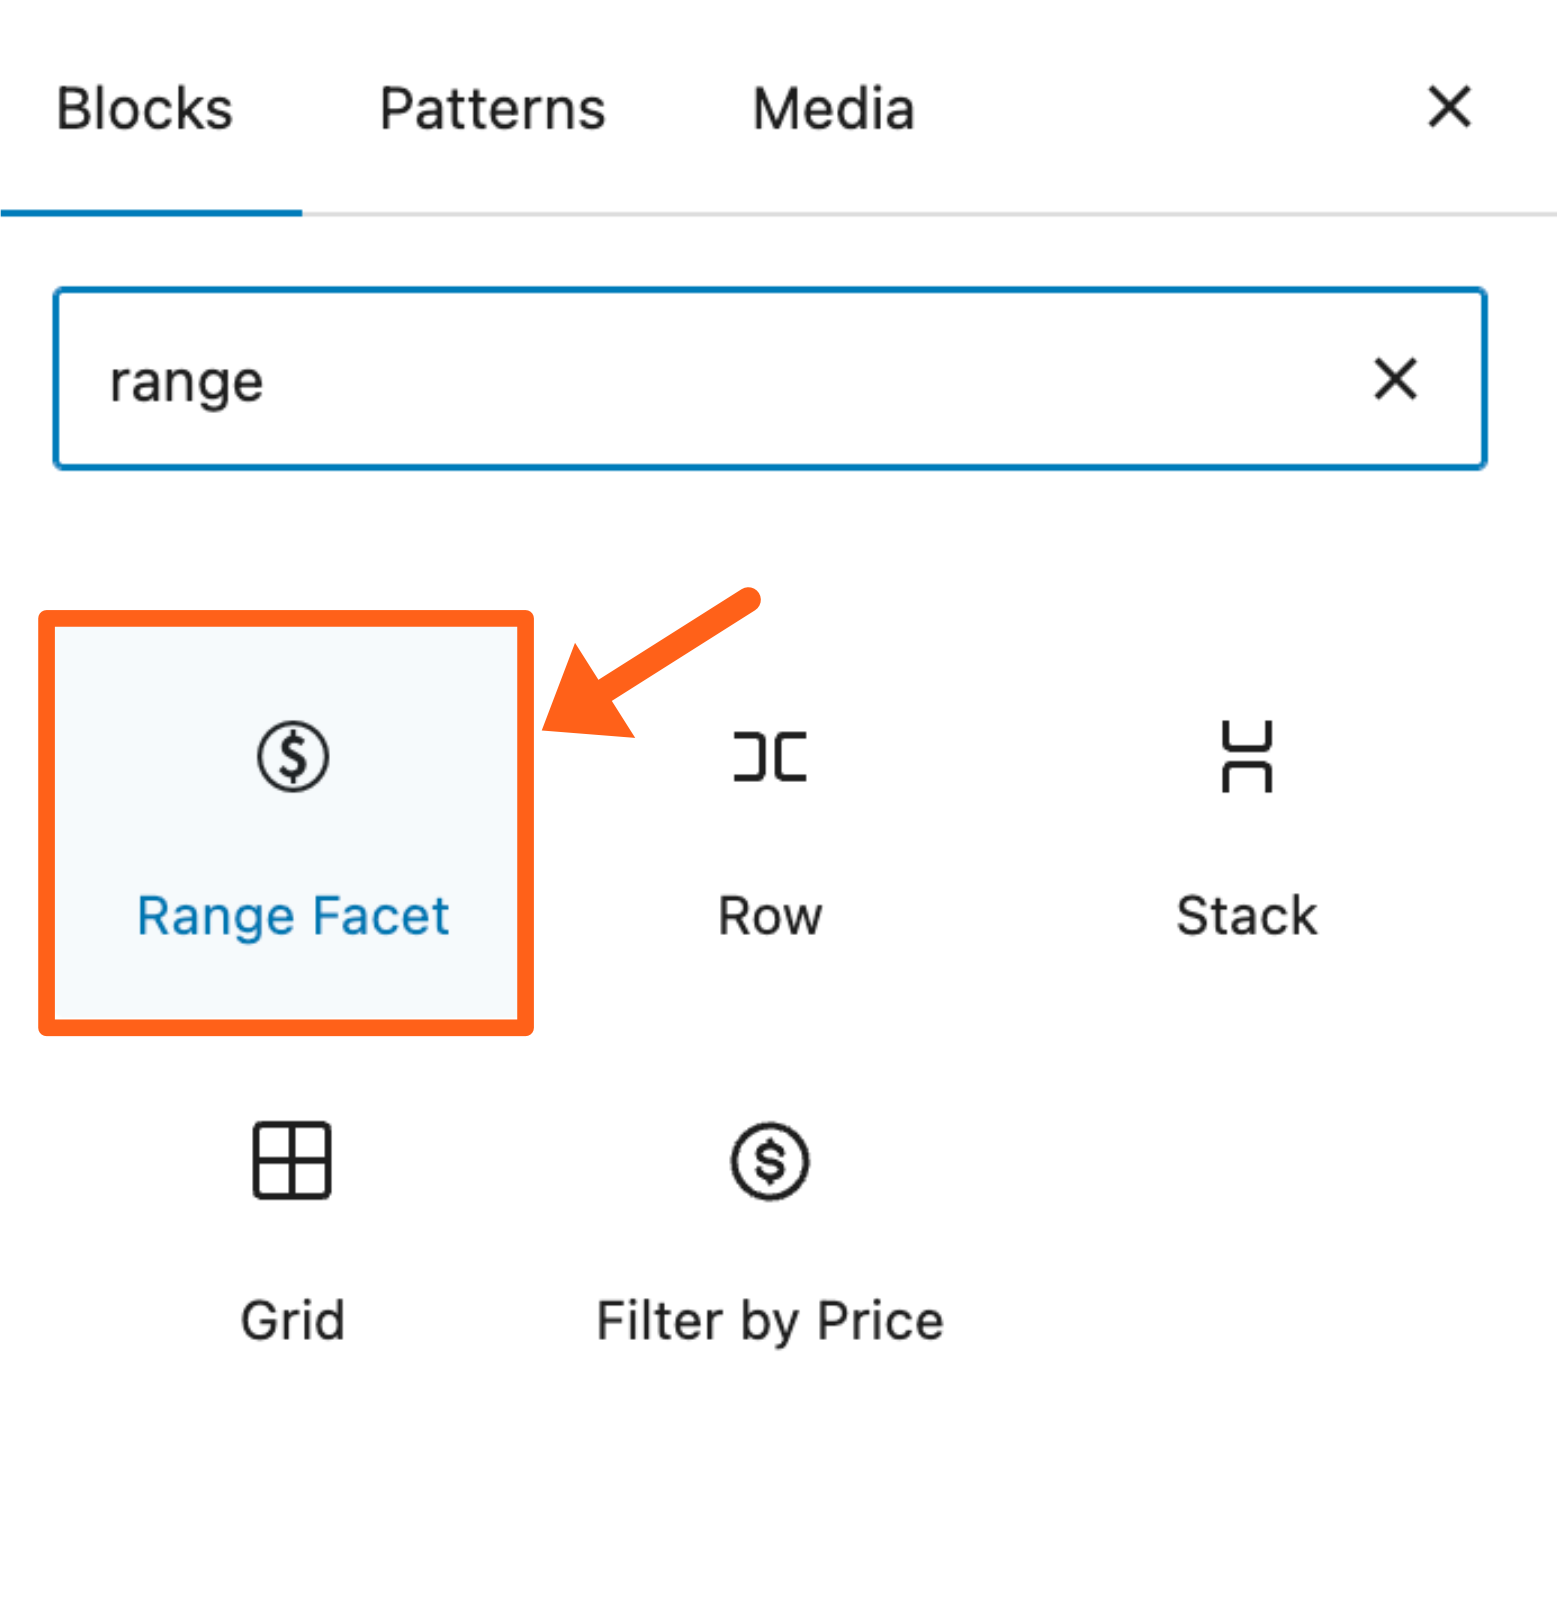
Range Facet
The Range Facet block allows you to select a data source like product price or a custom ACF numeric field that has been added to products. After you have a data source selected, you can choose a beginning and end range of numbers that your users can use to filter products in search results.
To add the Range block:
- Click the Block Inserter (+ sign button), in the top left of the page editor.
- Search for and click on the Range Facet block to insert it into the page.
- Type a Range Label in the textbox above the slider.
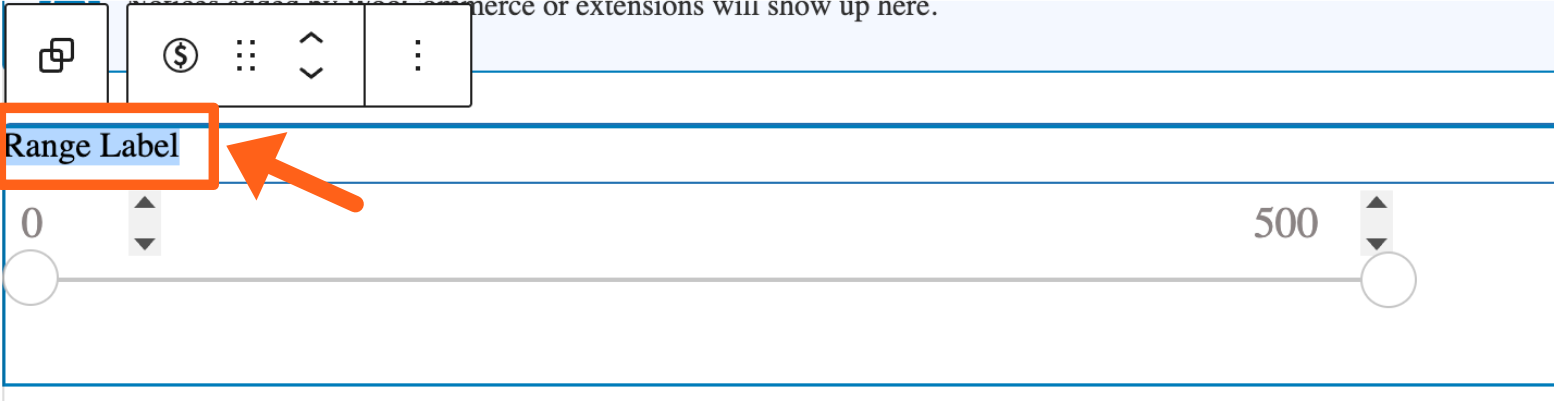
- Select your options:
Source: Available data sources for the range filter.
Min value: Minimum number that can be filtered.
Max value: Maximum number that can be filtered.
Auto reload: When enabled, this option will automatically reload your search results when a user updates the numbers in the slider.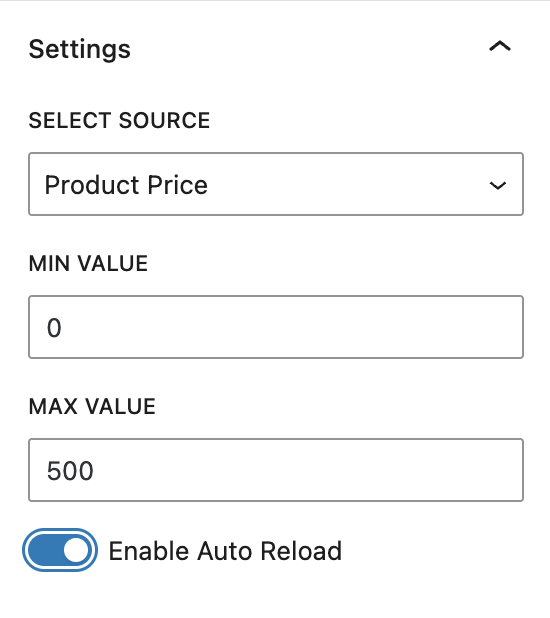
- Save your changes to the page, to update the block.
Filter Facet
The Filter Facet block allows you to provide taxonomies for your users to filter by, like tags, categories, colors, etc.
To add the Filter Facet block:
- Click the Block Inserter (+ sign button), in the top left of the page editor.
- Search for and click on the Filter Facet block to insert it into the page.

- Type a Filter Label in the textbox above the selections.

- Select your options:
Source: The taxonomy you want to filter by.
Type: Choose to show the selections with checkboxes or with a dropdown box.
Auto reload: When enabled, this option will automatically reload your search results when a user updates their selection.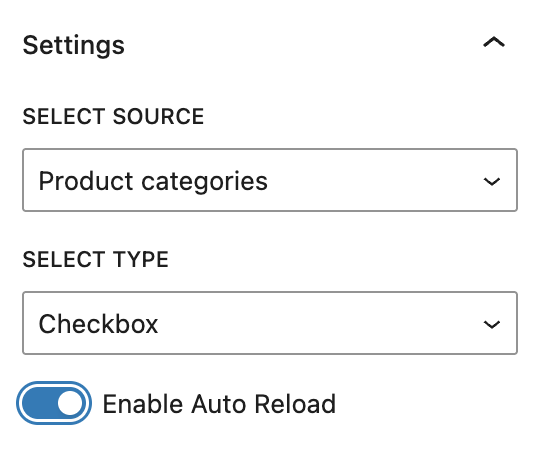
- Save your changes to the page, to update the block.
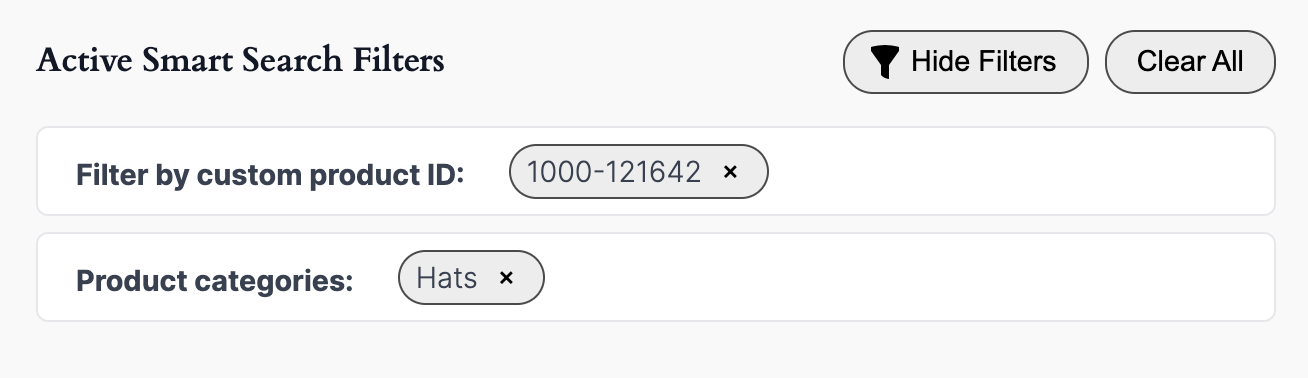
Active Filters Facet
The Active Filters Facet allows you to display your Smart Search filters that are actively filtering product search results, like the Range Facet and Filter Facet outlined above. It also lets your users toggle the visibility of the smart search filters, clear each filter individually, or clear them all at once.
Here’s a sample of what it might look like on your product search page.
Add Facet Blocks to a Template
To add these blocks to a template like the Product Search Results template, you must be using a Block Theme for your website. Classic themes do not have the option to edit these templates and there are currently no shortcodes available to allow the blocks to be used with classic themes.
As an example of editing a template, follow the directions below to add one of the blocks to the Product Search Results template.
- Go to Appearance > Editor in your WordPress admin dashboard.
- Select Templates in the left sidebar.
- Search for and select the template named Product Search Results.
- Now that you are in the page editor for the template, follow the steps above for any of the Smart Search blocks (e.g. Filter Facet, Range Facet) to add them to the page.
- Save your changes to the page to update the template.
Now that you’ve updated the template you should be able to do a search (using the Product Search gutenberg block) on your website and see the new filter block added to the product search results page.
Recommendations Gutenberg Block for Smart Search
We’ve created a new Gutenberg block that can be used with WP Engine Smart Search to return related or trending posts.

For trending posts it could make sense to display the block on any page. However, for related posts it makes sense to add the block to a single post, since the related posts will be relative to the single post.
To add the block to a page or post:
- Click the plus symbol (+) to add a new block in the Gutenberg editor
- Search for and select the Smart Search Recommendations block
- Adjust the settings listed below to display related or trending posts
Count: This is the number of posts that will be returned from the Smart Search query. This excludes the number of sticky posts if you include sticky posts in the setting below. Sticky posts will be shown in addition to the number of posts returned from the count setting.
Recommendations Type: Select between trending or related posts. Trending posts will show the posts that are being searched for the most on your site within the last 30 days. Related posts will use AI to determine posts that are closely related to the current post.
Layout: Toggle between full width or a specified width for the block content.
Post Type: Select what type of posts to display. Posts, pages, or a custom post type. If you have custom post types they will show here as a dropdown.
Order By: Choose the order in which you want the related or trending posts to be displayed.
Sticky Posts: Choose whether to include or exclude sticky posts, or to show only sticky posts. Sticky posts will show first if included. A post can be set as sticky from within the status options of a post.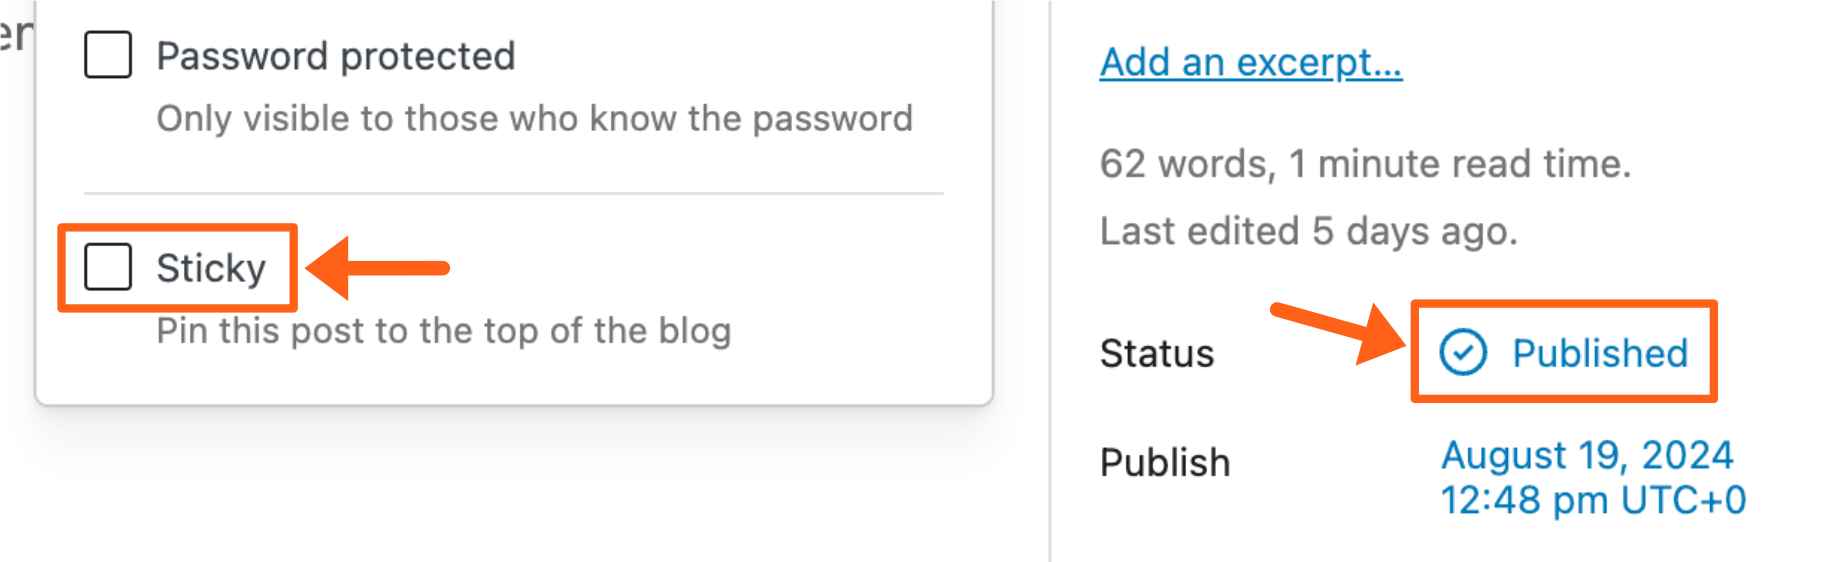
Posts Per Page: This is the max number of related or trending posts that should show on the page. Set this to the same as the Count setting above.
Max Pages: The pagination feature is not available for this block. Leave this setting set to 0.
Filters: Choose an optional filter to restrict the posts returned to posts that have the selected authors, keywords, or taxonomies (categories and tags).
Connecting to the Smart Search AI MCP Server
This guide will walk you through how to connect your preferred tools and platforms to the WP Engine Smart Search AI Model Context Protocol (MCP) server.
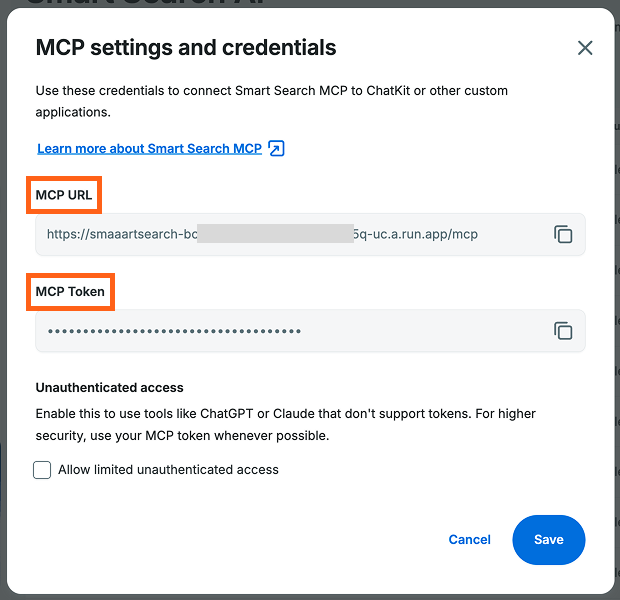
Locate Your MCP Credentials
Before connecting to any platform, you will need to gather your unique MCP connection details.
- Find your MCP URL and MCP Token: You can locate your endpoint and token in the WP Engine User Portal under Products > Smart Search AI. Click the 3 dot button next to the relevant environment and click MCP Settings.
- Copy the MCP URL and MCP Token.
Connecting to ChatKit & Agent Builder
When using ChatKit or Agent Builder interfaces, you can connect directly via the UI settings.
- Open the “Connect to MCP Server” menu within the application.
- Fill in a label and description of your choice.
- Enter your MCP URL into the URL field.
- Under Authentication, select Access token / API key from the dropdown menu.
- Paste your MCP Token into the credential field and click Connect.
View an example in our ChatKit article.
Connecting to ChatGPT and Claude Desktop
To connect your desktop applications to the Smart Search MCP, you will need to configure remote servers within their respective environments. Use your MCP URL and your MCP Token for authorization.
- Claude Desktop: Please follow Anthropic’s official instructions for adding remote servers to your configuration file: Connecting to a remote MCP server.
- ChatGPT: You can set up the remote server by following OpenAI’s platform guide: OpenAI MCP Documentation.
Connecting to Claude Code
If you are working in the terminal using Claude Code, you can add the MCP server directly via the command line.
- Open your terminal.
- Add the server by using the claude mcp add command with the http transport flag.
claude mcp add --transport http <NAME> <MCP_URL>
- Replace <NAME> with your preferred label such as
aitk-mcp, and <MCP_URL> with your Smart Search MCP URL.
example:claude mcp add --transport http aitk-mcp https://your-site-url.us-central1.run.app/mcp
- Replace <NAME> with your preferred label such as
- Verify the connection by launching Claude Code with the
claudecommand. - Type
/mcpto view your connected servers and confirm the connection is healthy.
WP Engine Headless Platform Users
WP Engine Smart Search is headless-ready – without 3rd party vendors or complex integrations.
Setup on WP Engine Headless Platform is just as easy as on a traditional WordPress site, and it comes with built-in headless search support, including WP GraphQL and ACF.
Installation for WP Engine Headless Platform
As mentioned previously, WP Engine Smart Search can be installed automatically when applying a license to an environment (See Enable above).
To install the plugin through WP Engine Headless Platform Blueprints.
The WP Engine Headless Platform Blueprints pipeline will have:
- Installed & activated the WPGraphQL plugin.
- Installed & activated the WP Engine Smart Search plugin.
Prerequisites for WP Engine Headless Platform
The WPGraphQL plugin is required when using WP Engine Smart Search on the WP Engine Headless Platform.
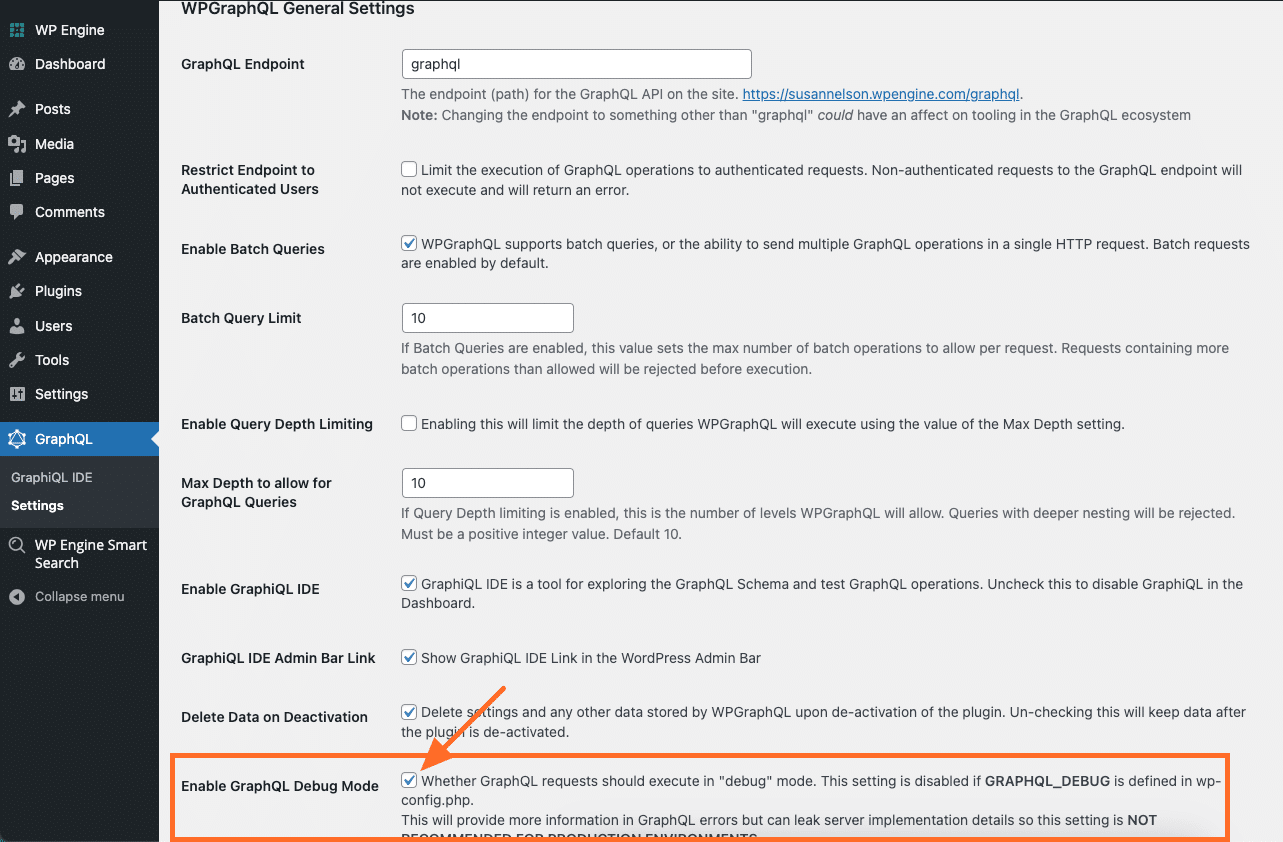
- Debug Information
WP Engine Smart Search adds debug information to WPGraphQL queries. To enable this, go to the WPGraphQL settings page and check the Enable GraphQL Debug Mode setting.
- Query Monitoring for non-WPGraphQL users
WP Engine Smart Search works seamlessly with the Query Monitor plugin for non-WPGraphQL users (see Debug Information above for how to access logs when using WPGraphQL).
The query monitoring plugin will allow users to view detailed information about the WP Engine Smart Search queries being made on their site, including the query string, the time it took to execute the query, and more. This information can be used to optimize search performance and ensure that searches are working as expected.
To use Query Monitor with WP Engine Smart Search, follow these steps:- Install the Query Monitor plugin on the WordPress site.
- Activate the plugin.
- Click the Query Monitor that has appeared in the WordPress Admin top menu.
- In the dashboard that appears, click on Logs.
- Run WP Engine Smart Search and see the data appear.
Querying with WP Engine Smart Search
After applying a license to a site and running the initial content sync, WP Engine Smart Search takes over the default WordPress search functionality and serves all the site’s search content.
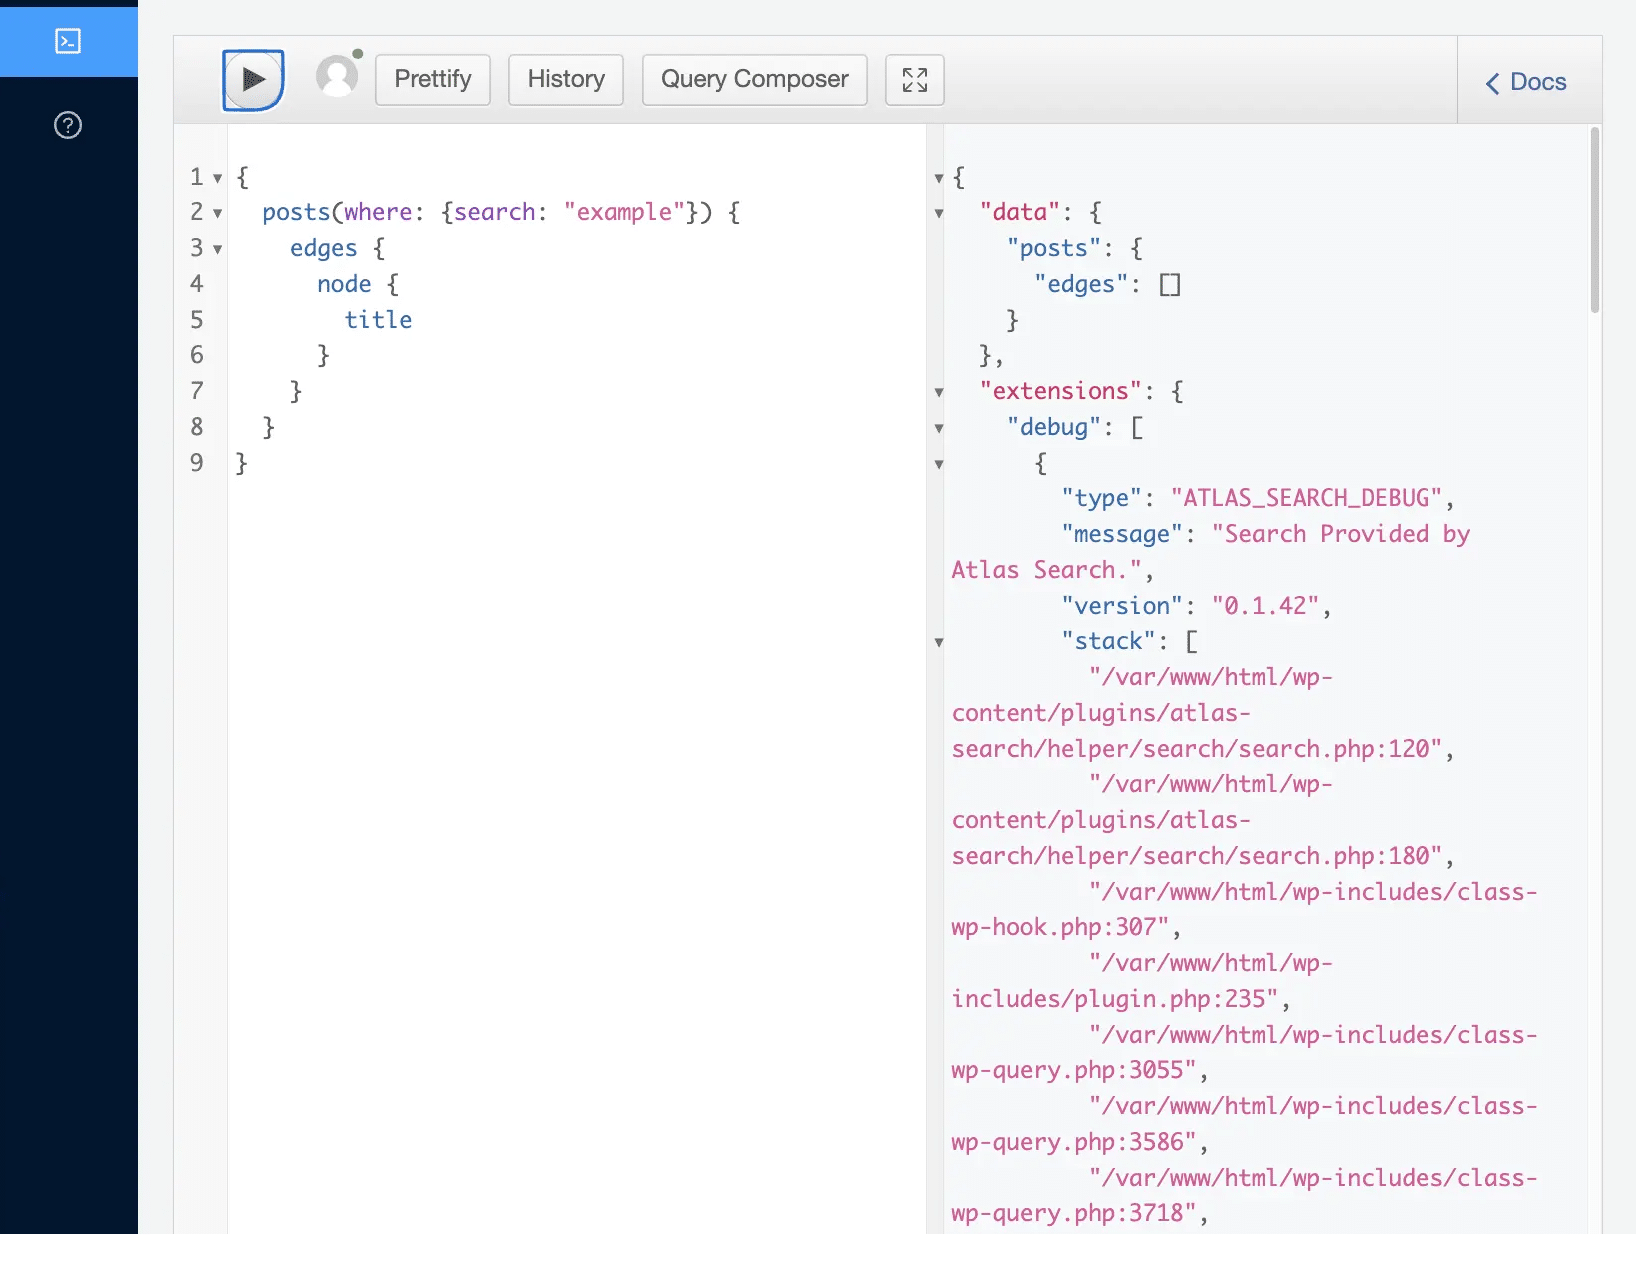
The WPGraphQL plugin is a good place to test search queries. WPGraphQL provides a ‘GraphiQL IDE’ in the WordPress dashboard to interact with the WPGraphQL Schema in the browser. WP Engine Smart Search overrides the default search functionality for WPGraphQL queries on all WP Engine Smart Search supported WordPress data types.
Below is a screenshot of the WPGraphQL plugin & GraphiQL IDE view, where WP Engine Smart Search has overridden the default WP search behavior, followed by some sample queries:
Querying Standard WordPress Data Types
Here are examples of querying standard WordPress data types (Posts, Pages, and Custom Post Types (CPT)):
- Querying Posts/Pages:
{
  {either "posts" or "pages"}(where: {search: "CSS"}) {
    nodes {
      id
      status
      title
    }
  }
}
- Querying Custom Post Types:
{
  branches(where: { search: "Austin" }) {
    nodes {
      address
    }
  }
}
Querying for various post types and ACF fields
WP Engine Smart Search also integrates with the Advanced Custom Fields (ACF) plugin.
Here is an example of querying for a custom data type:
- Querying ACF type of
project, with fields ofstreetAddress,contactName&workOrderNumber:
{
  projects(where: { search: "Austin" }) {
    nodes {
      streetAddress
      contactName
      workOrderNumber
    }
  }
}
Advanced Query Example
Fields can be queried that appear on the plugin’s Search Config page, including ACF fields, tags and categories, etc. Consider the following query:
seats.count:>4 tags.name:Cars hello AND world OR 123 4.56This search string uses a combination of search terms and filters.
It searches for records that match the following criteria:
- The
seats.countfield has a value greater than 4. - The
tags.namefield contains the value Cars. - The text “hello” appears in the record.
- The text “world” appears in the record.
- The record contains either the number 123 or the number 4.56.
The search string uses the following syntax:
- Search terms: Any word that does not contain a special character is considered a search term. In this example, “hello” and “world” are search terms.
- Filters: A filter is used to search for records that meet specific criteria. Filters are specified using the format <field name>: <value>. In this example,
seats.count:>4andtags.name: Carsare filters. Theseats.countfilter searches for records where the value of theseats.countfield is greater than 4, while thetags.namefilter searches for records where thetags.namefield contains the value Cars. - Logical operators: The search string uses the logical operators AND and OR to combine search terms and filters. The AND operator is used to require that both search terms or filters appear in a record, while the OR operator is used to search for records that contain either one or the other.
Order By
Currently, we support ordering by the following fields: DATE, MODIFIED. Also, these should be provided in the order direction: ASC, DESC. If orderby is not provided, the default weighting policy is applied – which is shaped by Search Config weights.
- Querying posts, order by
DATE DESC:
graphql
{
  posts(where: {search: "CSS", orderby: [ { field: DATE, order: DESC} ] }) {
    nodes {
      id
      status
      title
    }
  }
}- Querying ACF type of project, with fields of
streetAddress,contactName&workOrderNumber, ordered byMODIFIED ASC. In the event of the same modified date, further sort them in descending order ofDATE:
graphql
{
    projects(where: { search: "Austin" , orderby: [ { field: MODIFIED, order: ASC}, { field: DATE, order: DESC}] }) {
        nodes {
            streetAddress
            contactName
            workOrderNumber
        }
    }
}
Query Operators
WP Engine Smart Search treats spaces as an OR operator by default, whereas the default WordPress search treats spaces as an AND operator. With WP Engine Smart Search, explicitly specify the AND, OR and NOT keywords within the search query (these can combined too). This provides enhanced specificity for querying needs.
Here is an example of querying using different search operators:
- Using
NOTsearch operator:
{
  projects(where: { search: "Austin NOT Minnesota" }) {
    nodes {
      streetAddress
      contactName
      workOrderNumber
    }
  }
}
- Using
ANDsearch operator:
{
  projects(where: { search: "New York AND Texas" }) {
    nodes {
      streetAddress
      contactName
      workOrderNumber
    }
  }
}
- Using
ORsearch operator:
{
  projects(where: { search: "New York OR Texas" }) {
    nodes {
      streetAddress
      contactName
      workOrderNumber
    }
  }
}
WP Meta Query Support
WPE Smart Search also supports custom fields registered using WP_Meta_Query. The WP_Meta_Query structure is now respected when a search is made. Compare Operators currectly supported are '=', '!=', '>', '>=', '<', '<=', 'LIKE', 'NOT LIKE', 'IN', 'NOT IN', 'BETWEEN', 'NOT BETWEEN', 'EXISTS' (only in WP >= 3.5), and 'NOT EXISTS' (also only in WP >= 3.5). Custom field types currently supported are 'NUMERIC', 'CHAR', 'DATE' and 'DATETIME'.
You can read more about WP_Meta_Query here.
This an example of how to register a meta query custom field, using the pre_get_posts action.
add_action( 'pre_get_posts', function( $query ) {
    //check if this is the correct context to add meta queries
    if (  $query->is_search() ) {
        // Set up your meta query arguments
        $meta_query_args = array(
            'relation' => 'OR',
            array(
                'key'     => '_my_custom_key',
                'value'   => array( 4, 20 ),
                'type'    => 'NUMERIC',
                'compare' => 'BETWEEN',
            ),
            array(
                'relation' => 'AND',
                array(
                    'key'     => '_my_custom_key_2',
                    'value'   => 'Value I am looking for 2',
                    'compare' => '=',
                ),
                array(
                    'key'     => '_my_custom_key_3',
                    'value'   => 'Value I am looking for 3',
                    'compare' => '=',
                ),
            ),
        );
        // Add the meta query to the existing query
        $query->set( 'meta_query', $meta_query_args );
    }
});
Public APIs
The Public APIs grant the ability to interact with WP Engine Smart Search programmatically.
- The GraphQL Search API (also known as Find API) allows searching for documents in an index based on specific parameters.
- The GraphQL Index and Delete API includes mutations for creating, updating, or deleting documents.
Access the API documentation here:
Next steps: Learn about our AI Toolkit