Backup and Restore
WP Engine has both automated and manual backups to help protect your data, removing the need for any bulky third-party application. Backups exist for all environments on WP Engine by default (Production, Staging, and Development). These backups are stored offsite on Amazon S3 in the same region that the website is hosted in, and are encrypted in transit and at rest.
In this article we’ll discuss how to locate, restore, and download a backup checkpoint, as well as how to restore a backup to another environment entirely.
ATTENTION
WP Engine keeps all website backup data off site in AWS data centers. The current backup location for the Tel Aviv data center is Frankfurt, Germany. Because of this, we can confirm that customer site data is readily available in the event of any regional outages around Tel Aviv.
Access Backups
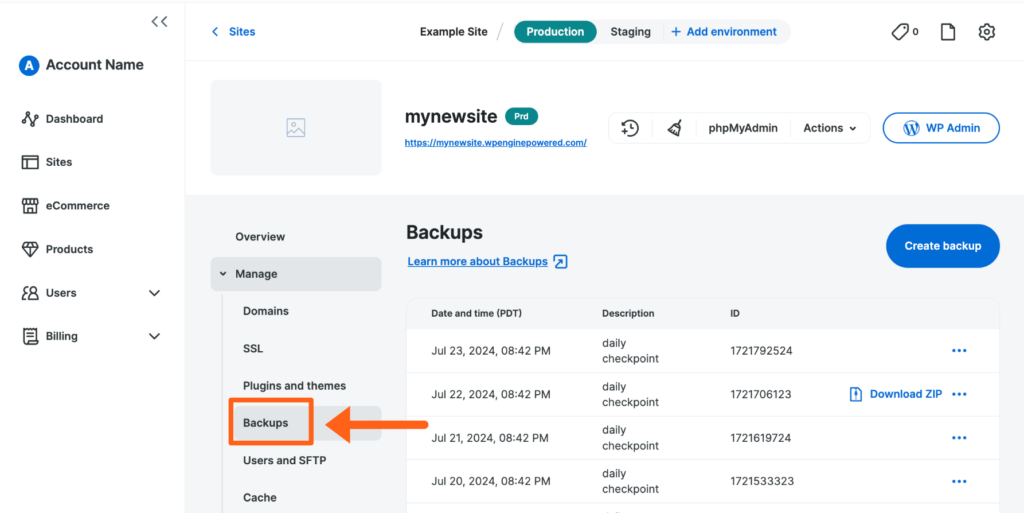
All backup and restore functionality takes place from the same page in your User Portal, called “Backups”. To access the Backups page:
- From the Sites page, select the environment name
- Click Backups (You may have to expand the Manage dropdown section)
NOTE
The Backups page shows the 40 most recent backup checkpoints. However, WP Engine stores up to 60 days worth of checkpoints. If you need a checkpoint that is not displayed, please contact Support.
Make a Backup Checkpoint
Daily backup checkpoints are made automatically, but if you’re planning to make updates to your site you will typically want to make a fresh backup checkpoint before proceeding- just in case you need to quickly revert the change.
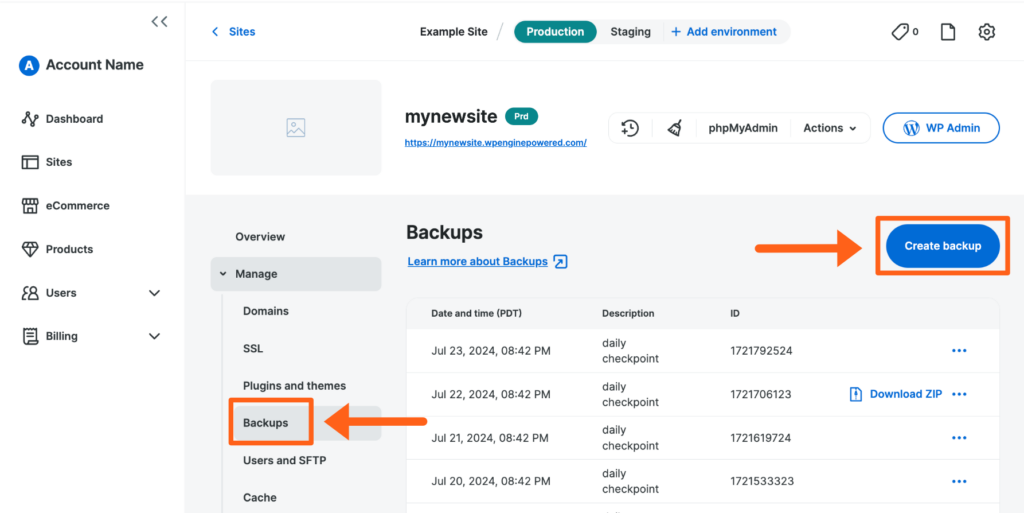
- From the Sites page, select the environment name
- Click Backups
- Click Create backup
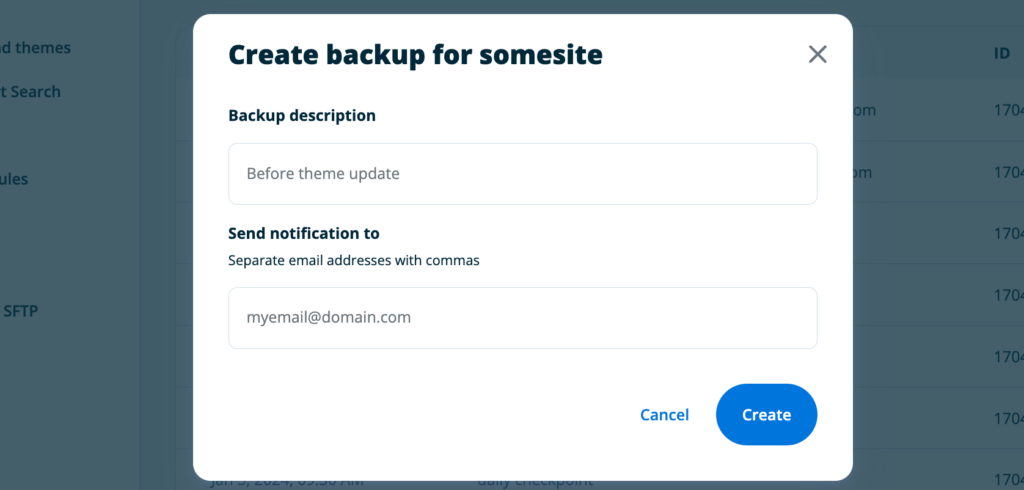
- A second window will pop up with required fields:
- Backup description — For example “Before theme update”
- Send notification to — List emails, separated by commas, to receive a notification when the backup completes
- Click Create
NOTE
The email notification may be filtered into Junk or Spam. Be sure to check these folders in your email inbox!
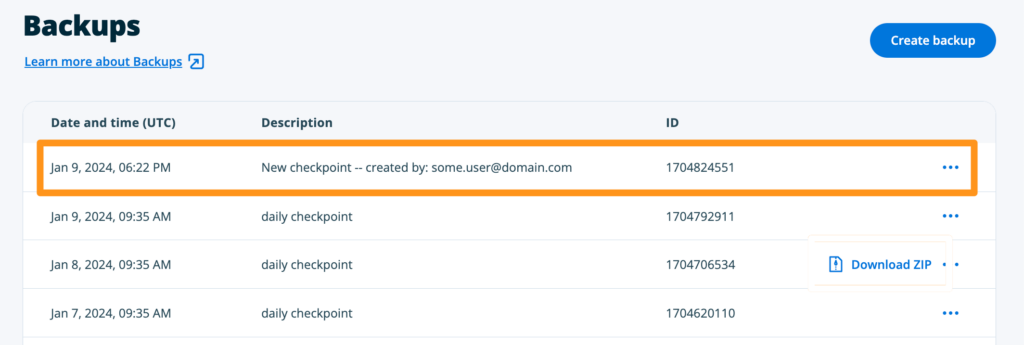
Once completed, the new checkpoint will be added to the backup checkpoint list. At this point the new backup checkpoint can be prepared for download or restored.
Status Visibility for Backups
We now have a status banner for showing the status of a backup currently in progress. In the banner you’ll also see a link to a side drawer with more details.
Status Banner
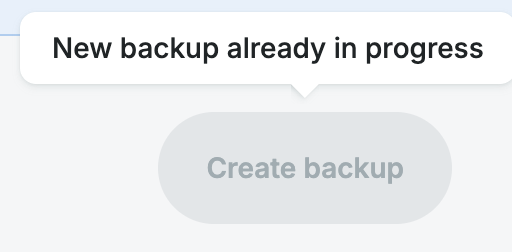
You’ll now see a status banner whenever a user on an environment starts a backup. This will let you quickly see when you’re not able to start a new backup because another backup is currently in progress. You’ll also be able to confirm that your backup has not yet completed, without having to rely on a confirmation email.

The banner will also persist after the backup is completed for 10 minutes or until you click Dismiss. If there is an error message for a backup failure, the banner will persist for 1 hour or until you click Dismiss. After clicking Dismiss the View Details link will no longer be accessible for that backup. You’ll still be able to see details about backups started from the User Portal under Account Activity.

The Create backup button will also be disabled while a backup is in progress.
Status Drawer
To see more details click the View Details link in the status banner on any page within the environment.
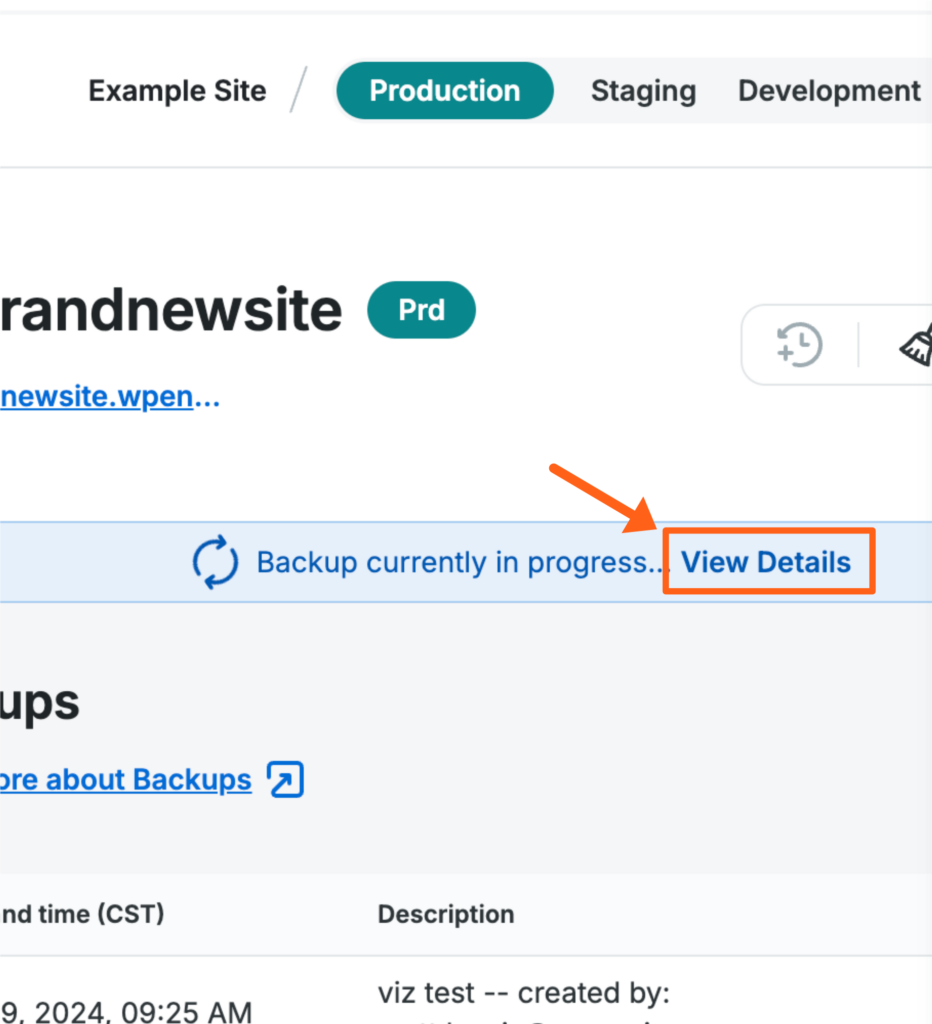
You’ll see a drawer with more details about the backup.
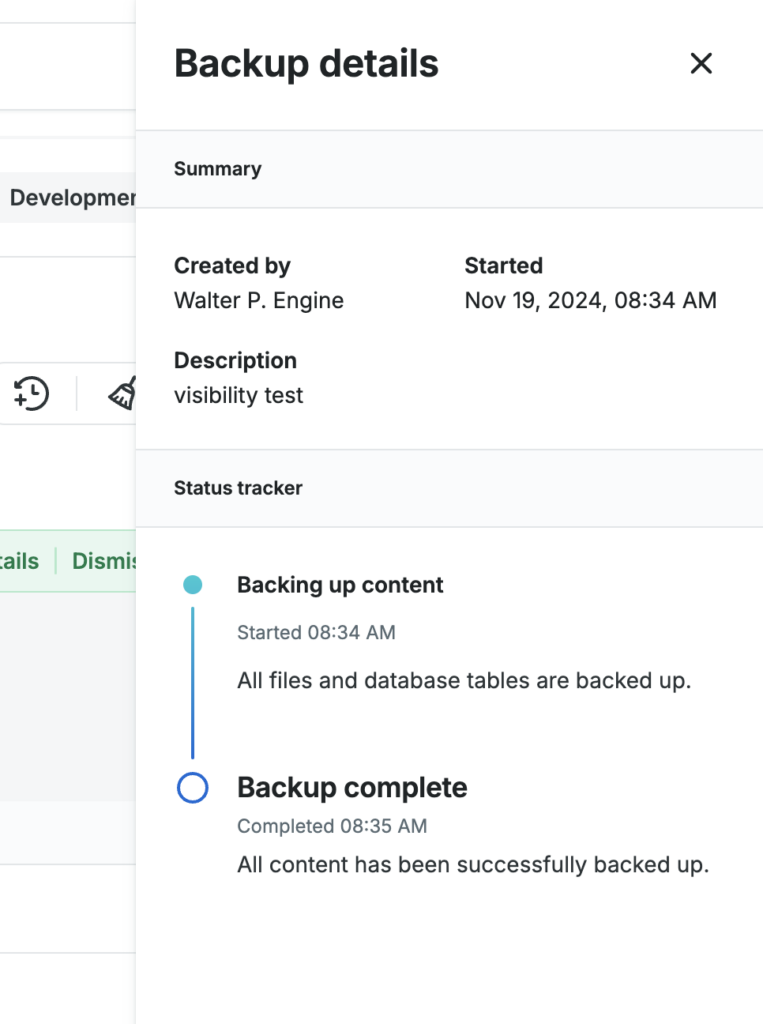
Some details that you’ll see in the detailed view will be:
- Created by – the name of the user that started the backup
- Started – the timestamp when the backup was started
- Description – the user defined label for this backup
- Status tracker – the current status of the backup with 2 states:
- Backing up content

- Backup complete

- Backing up content
Restore a Backup
To restore (or “rollback”) your website to a previous version:
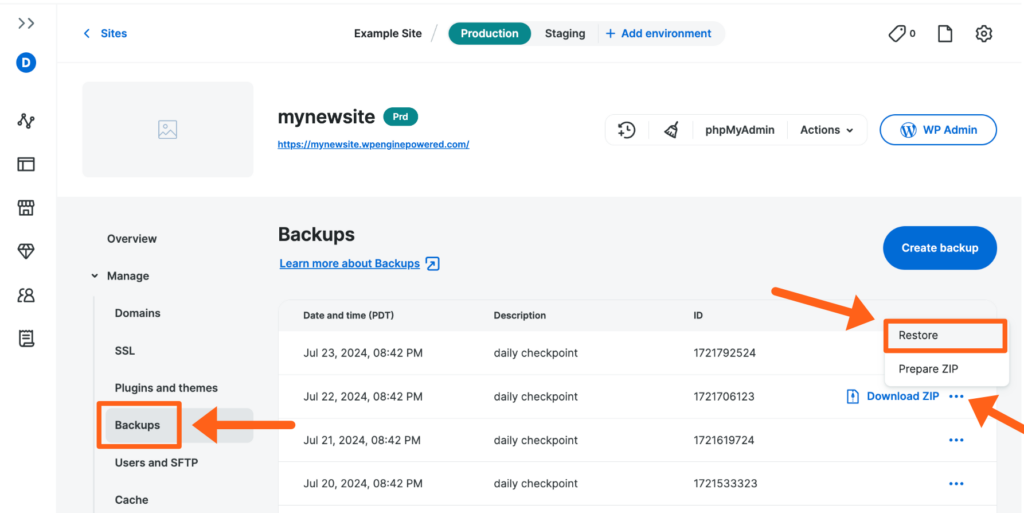
- From the Sites page, select the environment name
- Click Backups (You may have to expand the Manage dropdown section)
- Locate a backup in the list and expand the 3 dot “more actions” menu
- Select Restore
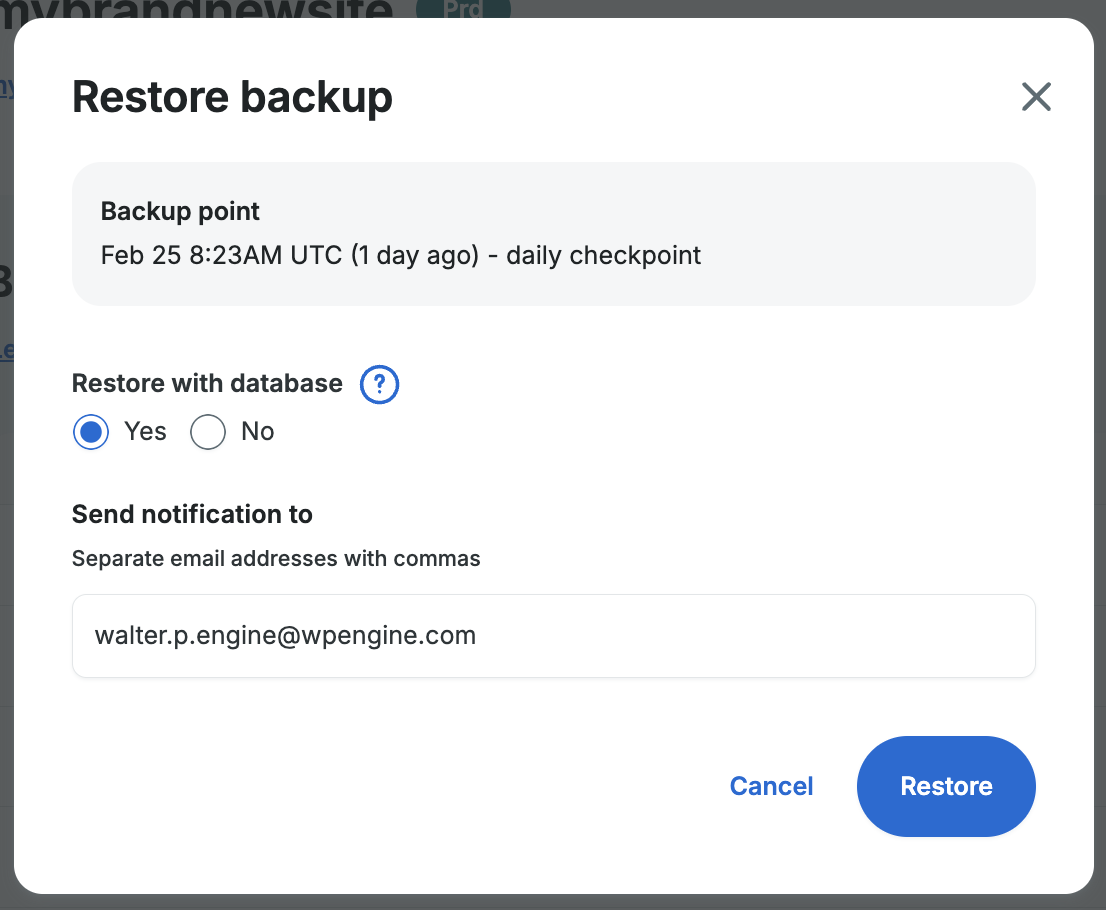
- A window will pop up with required fields:
- Restore with database — The database includes: all posts, pages, users, custom post types (EX: Store orders), and certain settings. It’s possible for the database to also contain theme and plugin settings. This will vary based on the asset so if there are questions, reaching out to the author directly would be best if you aren’t sure. Partial database selection (specific tables) is not an option.
- Send notification to — List email addresses, separated by commas, to receive a notification when the restore completes
- Click Restore
The automated restore process can take anywhere from a few minutes to several hours. This largely depends on the size of your site and the number of files. An email will be sent to the email addresses listed when the restore has completed.
NOTE
It’s possible for the email notification to be filtered into Junk or Spam. Be sure to check these email folders.
The restore process is destructive, meaning all content will be overwritten to match the content of the backup point selected. This means files not present in that backup point, will be removed upon restore.
Restore a Backup to Another Environment
Sometimes you will need to push a specific backup point for an environment to a completely different environment that you have access to. This option was previously available in the Restore feature of the backups menu, but now this action is handled in our copy site feature using the Push to option.
- Follow the instructions for copying an environment in our copy site article.
- In step 2 you will select Push to.
- In step 3 you will select the destination environment.
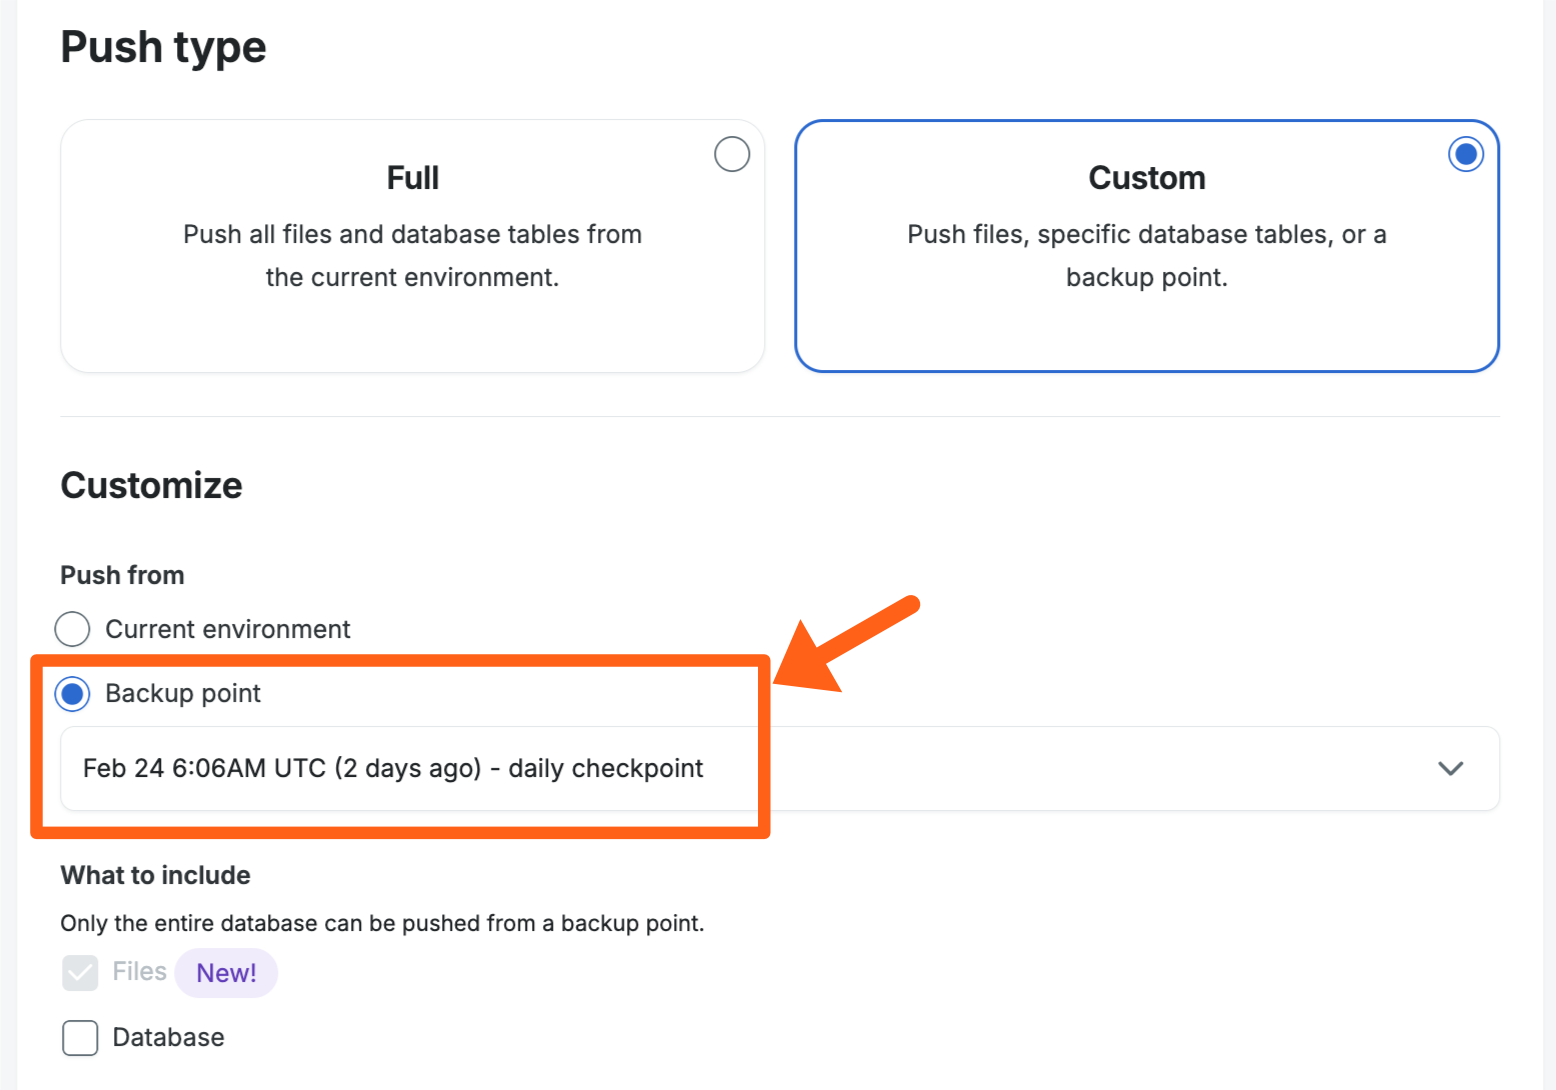
- In step 4 you will select Custom for the push type and then select Backup point for the Push from option.
- You will then see a dropdown box where you can select the backup point that you want to push to the new environment.
- After selecting the backup point, finish the steps outlined in the article to complete the copy process.
Download a Backup
Backups can be downloaded as a ZIP archive and can be requested as full or partial. If you have a large site, or need to manually restore a single directory, partial backups can be useful. The last 40 backups taken on an environment can be accessed on the Backups page. Our support team can also access backups for the last 60 days if you need a backup outside of the 40 most recent backups.
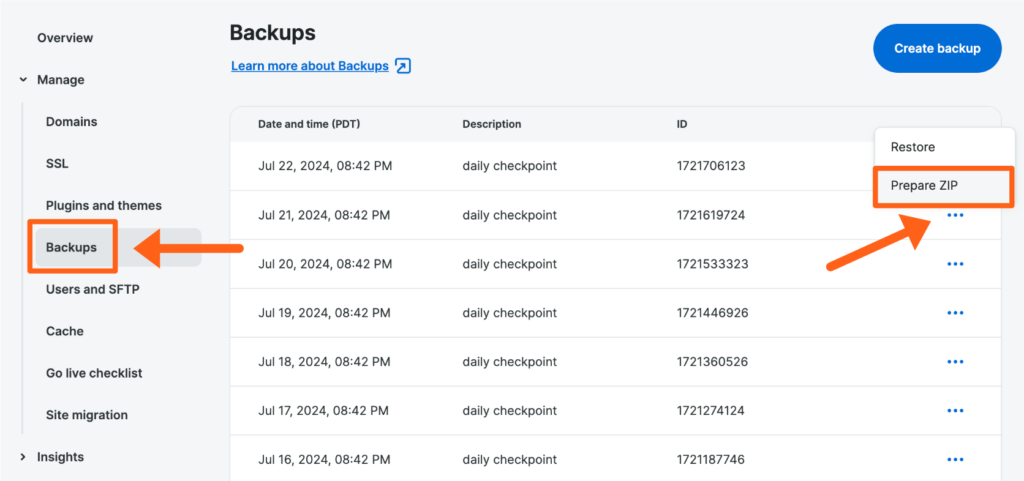
- From the Sites page, select the environment name
- Click Backups (You may have to expand the Manage dropdown section)
- Locate a backup point and expand the 3 dot “more actions” menu
- Select Prepare ZIP
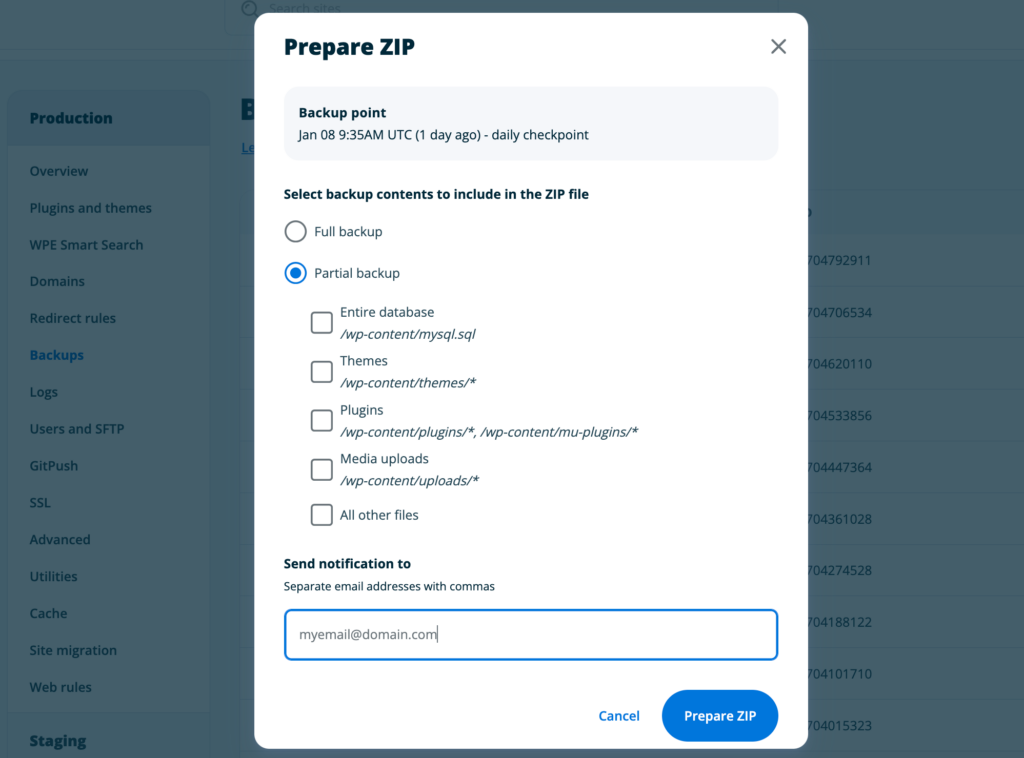
- A window will pop up with required fields:
- Backup Contents:
- Full Backup — All files and the database.
- Partial Backup:
- Entire database — Database file,
/wp-content/mysql.sql- *Partial database (i.e. selecting specific tables) is not an option with this tool.
- Themes — Themes directory,
/wp-content/themes/* - Plugins — Plugins and must-use plugins directories /wp-content/plugins/*, /wp-content/mu-plugins/*
- Media uploads — Uploads directory
/wp-content/uploads/* - All other files — All other site files not listed above
- Entire database — Database file,
- Send notification to — List email addresses, separated by commas, to receive a notification when the backup has completed.
- Backup Contents:
- Click Prepare ZIP
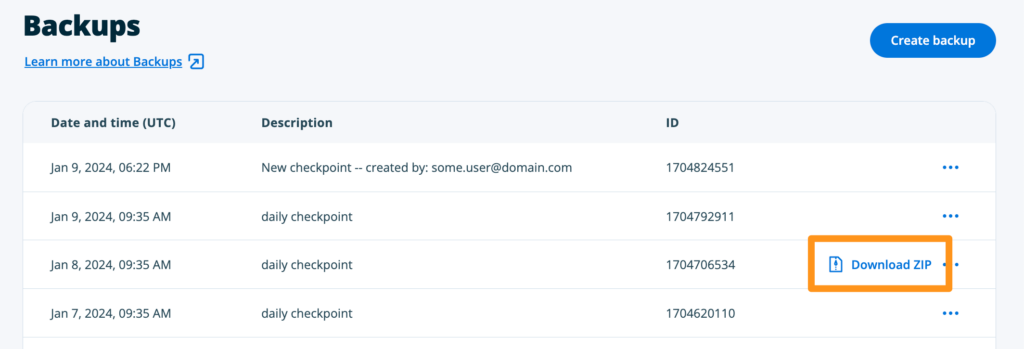
When a backup is requested, it is first compiled. Once the backup has been prepared it can be downloaded from the Backups page by clicking Download ZIP next to the checkpoint. The Download ZIP links for backups cannot be manually deleted and any backup that’s already been prepared can be downloaded from this page for up to 7 days.
At this time there is no way to automatically export WP Engine generated backups to another service, such as Amazon S3. However, you can still use your own backup integration to offload backups to a separate location. Bear in mind that your WP Engine local storage is limited, and excess storage can impact performance, so these third-party backups should never be stored on the same server as your website.
Partial Restore
At times you may want to restore a single directory, or just the database. WP Engine’s automated restore feature will not work in these cases so the restore must be done manually. Partially restoring specific tables in the database is not an option.
Restore a Directory
Restoring a single, or several directories requires first downloading and opening a backup, then uploading the specified content back to your site.
- Download a full or partial backup point
- Unzip the backup archive locally
- Locate the directory you wish to restore within the local copy of the backup
- Connect to your environment using SFTP or SSH Gateway
- Overwrite the remote directory on WP Engine with the local backup directory
- Reset default file permissions
- Purge cache
Restore Database Only
Restoring just the database of a WordPress website requires first downloading and unpacking a backup point to locate the database file. Next you will clear out the existing database and import the database file from your backup to the website.
- Download a full or partial backup point
- Unzip the backup archive locally
- Locate the database within the local backup directory at wp-content/mysql.sql
- Open phpMyAdmin from the User Portal
- Select the database name
- Check all database tables
- From the dropdown, select Drop
- Confirm by clicking Yes
- If there are several pages of tables, this may need to be done a few times until no tables show
- Click Import
- Browse your computer to locate the mysql.sql file and select it
- Click Go
- Purge cache
NOTE
A database file can also be imported using SSH Gateway.
Backup Inclusions and Exclusions
Every backup (manual or automated) includes the following:
WordPress core files
Themes
Plugins
Database
Backup Exclusions
The things we choose not to backup on our platform typically fall into the following 5 buckets:
Temporary Files (Cache, temporary files, versioning files, etc): These files are meant to be kept around temporarily and therefore can be regenerated easily. In most cases it’s actually bad if we restored these files as they contain time specific content and may affect the functionality of your website.
Stock files (samples, templates): These files are provided by the maintainer of the software to illustrate sample content in various config files. EX: sample-wp-config.php in WordPress core. The files are not used in rendering a site, and can be gathered again if needed.
Backups (backups, snapshots, .bak files): These files are redundant to the backups we offer as part of our platform, and for that reason we choose not to include them as part of the backups we create. We recommend never creating backups locally (we disallow some plugins that perform this), but we do permit additional offsite backups to be created.
Log files (logs, error logs, debug logs): Log files as they would appear in the WordPress root are relevant only at the time of creation, or shortly after. We believe that backing up these files is typically unnecessary and instead recommend downloading relevant log files when the necessary information is captured. Long running log files can also create a large amount of local storage, and we recommend disabling wp debug and other logs once you are done using them.
Obsolete software (unmaintained or prohibited): This category contains things like timthumb and other softwares that aren’t something we recommend using. If you are using unmaintained software, we strongly recommend working to eliminate that software from your site as a security precaution.
Full List of Backup Exclusions
WP Engine backups contain the majority of your uploads, though some are excluded.
Here is our list of files and directories that are not backed up:
".*~"
.*/_wpeprivate
".*\.(svn|cvs|git|log|tmp|listing|bak|swp)"
.*/log\.txt
.*/wp-content/upgrade
.*/wp-content/.logs
.*/pclzip-.*
.*/wp-content/uploads/sucuri
.*/.sucuriquarantine
.*/wp-content/cache
.*/cache/.*\..*
.*/imagecache.*
.*/ics-importer-cache
.*/gt-cache
.*/et-cache
.*/wp-content/w3tc.*
.*/wp-content/w3-.*
.*/wp-content/uploads/igcache
.*/wp-content/nitropack/.*/pagecache
.*/wp-content/.*-nitropack
.*/wp-content/podscache
.*/wp-content/backups
.*/wp-content/snapshots
.*/wp-content/plugins/wpengine-snapshot/snapshots
.*/wp-content/uploads/snapshots
".*/wp-content/updraft/.*\.(zip|gz)"
".*/wp-content/uploads/backupbuddy_backups/.*\.(zip|gz)"
.*/wp-content/ai1wm-backups/.*\.wpress
.*/wp-content/aiowps_backups/.*\.wpress
".*/wp-content/backups-dup-pro/.*\.(zip|gz)"
".*/wp-content/envato-backups/.*\.(zip|gz)"
".*/wp-content/uploads/backup/.*\.(zip|gz)"
".*/wp-content/uploads/backup-guard/.*\.(zip|gz)"
".*/wp-content/uploads/db-backup/.*\.(zip|gz)"
".*/wp-content/uploads/pb_backupbuddy/.*\.(zip|gz)"
".*/wp-content/uploads/tCapsule/backups/.*\.(zip|gz)"
".*/wp-content/uploads/wp-file-manager-pro/fm_backup/.*\.(zip|gz)"
".*/wp-content/wpvividbackups/.*\.(zip|gz)"
.*/wp-content/managewp
.*/wp-content/infinitewp
.*/wp-content/wfcache
.*/wp-content/wflogs
.*/wp-content/plugins/adobe-xmp-for-wp/cache
.*/wp-content/plugins/wordfence/tmp
.*/wp-content/plugins/wp-clean-up-optimizer/views/error-logs
.*/wp-content/uploads/gravity_forms/logs
.*/wp-content/uploads/sessions/sess_.*
wp-cli.yml
wp-cli.yaml
wp-cli.local.yml
Backup Errors
Start your troubleshooting process here if you receive an email that your WP Engine backup, restore, or copy has failed.
Database
The following database items are currently not fully supported on WP Engine specifically because they interfere with the checkpoint process. Unlike files, however, these items are not ignored automatically by our system. The entire database is backed up at once without any modifications, taking any problem-causing items with it.
When the database is restored or imported with these items, Superadmin permissions are required. For security purposes, our system does not allow Superadmin actions and the process will fail, leaving your site potentially broken.
The following database items should be removed to prevent issues:
Definers
Custom Views
Custom Procedures
Custom Functions
NOTE
While these items may work on your live site itself, they will directly interfere with WP Engine backup, restore and copy environment processes and should be removed if you intend to use these services.
Too Many Processes
Only one backup, Copy Environment or restore can run for an environment at any given time. Starting any additional operations will cause the new process to immediately fail if the old process has not yet completed.
If you receive a failure email after starting an additional backup/restore/copy, this typically means there is no error at all with the original process. Simply need to wait a bit longer for the original process to finish.
If you’re still having issues or simply have questions, our Support team is always happy to help!
Restore Checkpoint Prompt in WordPress
As part of our standard environment, WP Engine includes an awesome restore checkpoint feature that allows you to easily create a backup of your site at a single point in time. This feature may not be something that you remember to use often, so we include a popup to prompt you to create a restore point before making updates to plugins or themes on your website.
This warning appears as follows: Before taking this action, we at WP Engine recommend that you create a Restore Point of your site. This will allow you to undo this action within minutes.
While our goal is to ensure that you can always get back to a working version of your site if something goes wrong, we certainly understand how this feature can be intrusive at times.
With that in mind, there’s an easy way to disable this popup window. To do so, add the following line to the wp-config.php file found in the root directory of your site:
define( 'WPE_POPUP_DISABLED', true );
NEXT STEP: Copy an Environment