Get Started
SSH Gateway
Tags:
Key Takeaways
SSH Gateway provides secure remote access to website files and databases. Users can leverage tools like WP-CLI and MySQL command line for efficient website management.
SSH Gateway enhances security with key-based authentication and isolated sandbox environments. This ensures secure access without additional IP restrictions.
SSH Gateway supports automation through scripts and bash loops, streamlining manual tasks. Developers and site administrators can work faster and more efficiently.
Connecting to SSH Gateway involves creating and adding SSH keys for secure authentication. Following the setup process ensures seamless access to website resources.
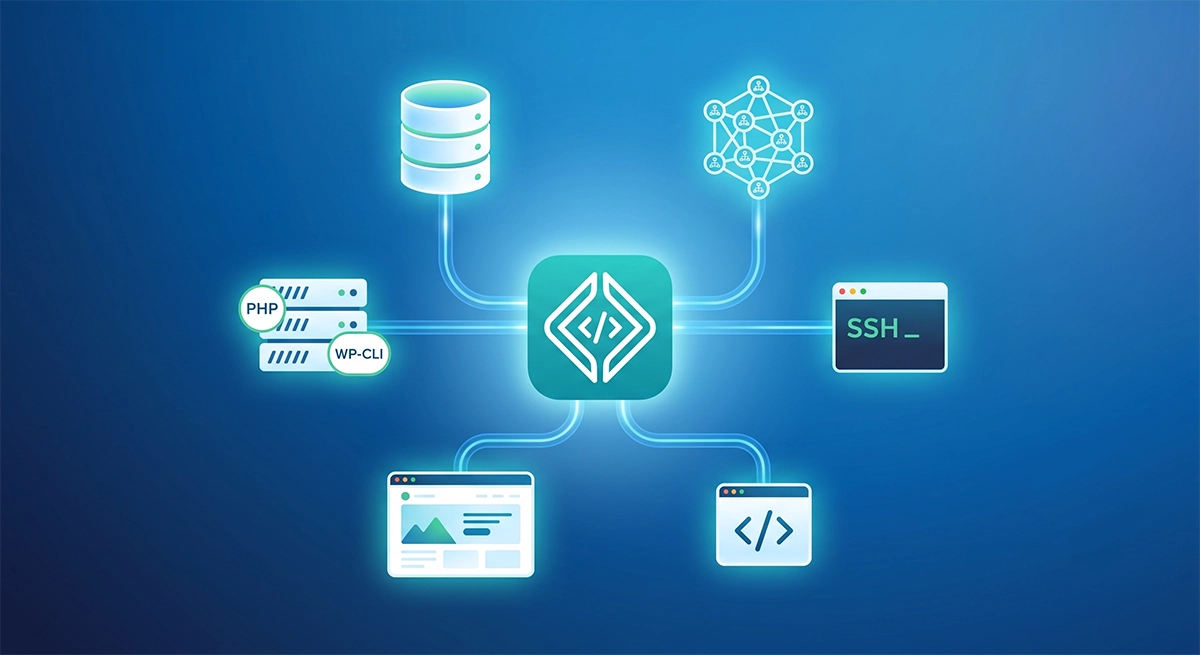
SSH, also known as Secure Shell, is the method of connecting from your computer to the web server where your site is hosted. With SSH access you can use a variety of command-line tools such as: WP CLI, MySQL command line, bash, and Composer to manage your website. WP Engine’s SSH Gateway will connect to a container, like a sidecar, that sits alongside the website. This allows authorized users to access the website’s filesystem and database.
SSH Gateway uses key-based authentication for even greater security than a simple username and password combination, and is only accessible to users who have been granted permission to access the specific environment.
About SSH Gateway
SSH stands for “Secure Shell” and is the authentication method two devices (computers, servers, or other internet devices) use to communicate with each other. On the WP Engine platform, SSH Gateway access means the ability for you to connect remotely from your local machine to a container where your site’s content is hosted. Developers who are testing, building, or managing multiple websites can and should use SSH Gateway. SSH Gateway should be used by people who are familiar with the use of command line, bash, and WP CLI.
SSH Gateway is ideal because it allows users an easy, secure interface to interact with their site’s files and content. This includes using WP-CLI to manage WordPress® settings and administration, navigating files and directories, using rsync and SCP to move and transfer files, and using MySQL command line to manage databases.1 Users can even create scripts and bash loops to automate tasks that previously would take a lot of manual work. WP CLI allows developers and site administrators to manage their site outside of the confines of the WordPress back-end, which allows for faster work and chained commands to automate site workflows.
WP Engine uses an SSH “sidecar” that sits alongside your server with a timeout of 10 minutes. Each site will have its own unique connection details and a separate sandbox to ensure there is no cross-contamination of sites or resources. This ensures the highest security level while allowing access to your site, without requiring additional steps such as IP allowing. When connected through SSH Gateway, you will be able to access the WordPress files and database as though you were connected directly to the server, but you won’t see all of the standard processes that are running on a server, such as PHP or MySQL.
The SSH session does not use the Memory dedicated to the server itself and as such will also not cause load to increase. SSH Gateway processes are not affected by the PHP timeout. The PHP kill script exists on the server itself, while the commands are running in the sidecar container.
SSH multiplexing is supported, which provides a way to reuse a connection for multiple SSH sessions to reduce the connection overhead for subsequent sessions. Since SSH Gateway spins up a new sidecar environment for each connection, multiplexed sessions reuse the same environment resulting in much faster connection times.
If desired, add the content below config to ~/.ssh/config to enable multiplexing for a given WP Engine environment.
Host *
ControlPath ~/.ssh/socket-%C
ControlMaster auto
ControlPersist 10m
Connect to SSH Gateway
SSH Gateway allows for file and database access through a secure interface, as well as access to tools like WP-CLI and MySQL command line. Connecting to SSH Gateway requires three steps: Create and add your SSH key to the WP Engine User Portal, then run a connection command.
Create SSH Key
- If you already have a SSH key locally labelled
wpengine_ed25519.pub, then simply copy the contents when adding the key in the next step. - If not, please follow SSH Key Management to generate a key first.
We highly advise configuring a SSH config file before proceeding, as this will mitigate many potential issues down the road.
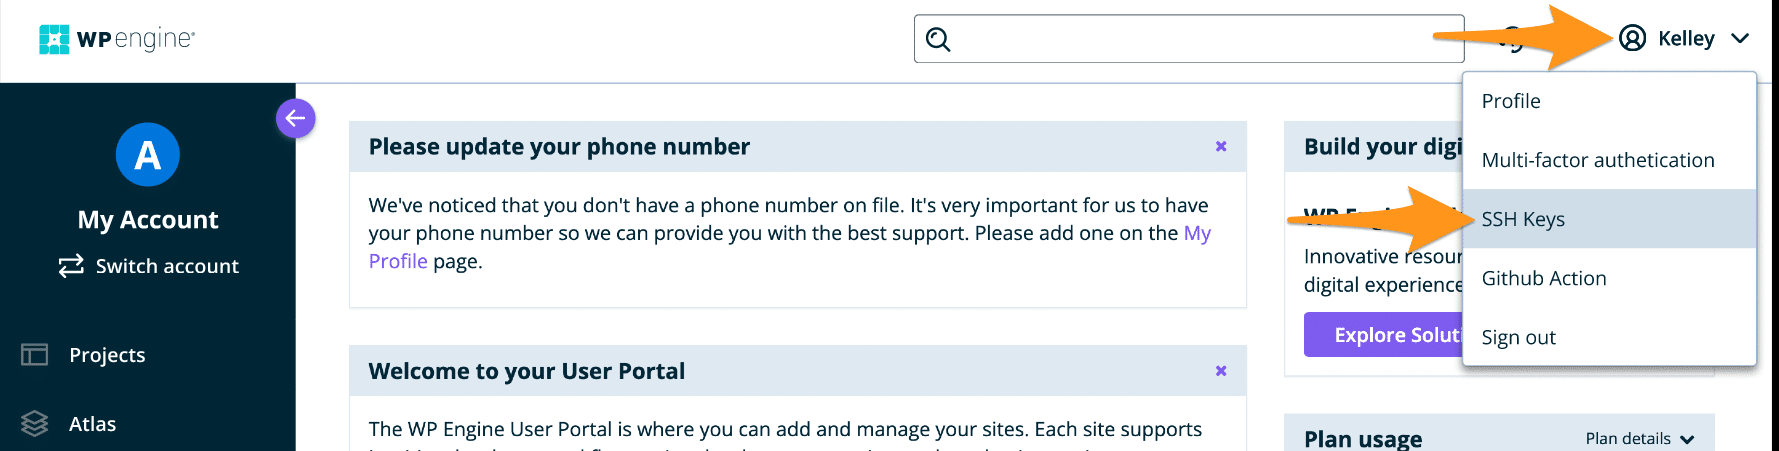
Add SSH Key
Adding your SSH key to the User Portal allows the key to be used on all environments your email has access to in the User Portal. This makes it simple and easy to ensure you have SSH access ready to go when it’s needed for past and future environments.
After your key has been added to the User Portal, the command you must use to connect using SSH will require that you specify the environment name to ensure you enter the appropriate website.
A direct link to the page to add your SSH key to your account can be found at: https://my.wpengine.com/profile/ssh_keys
Or, to access this page manually, use the following steps:
- Log in to the User Portal
- Click the profile icon at the top right
- Select SSH Keys
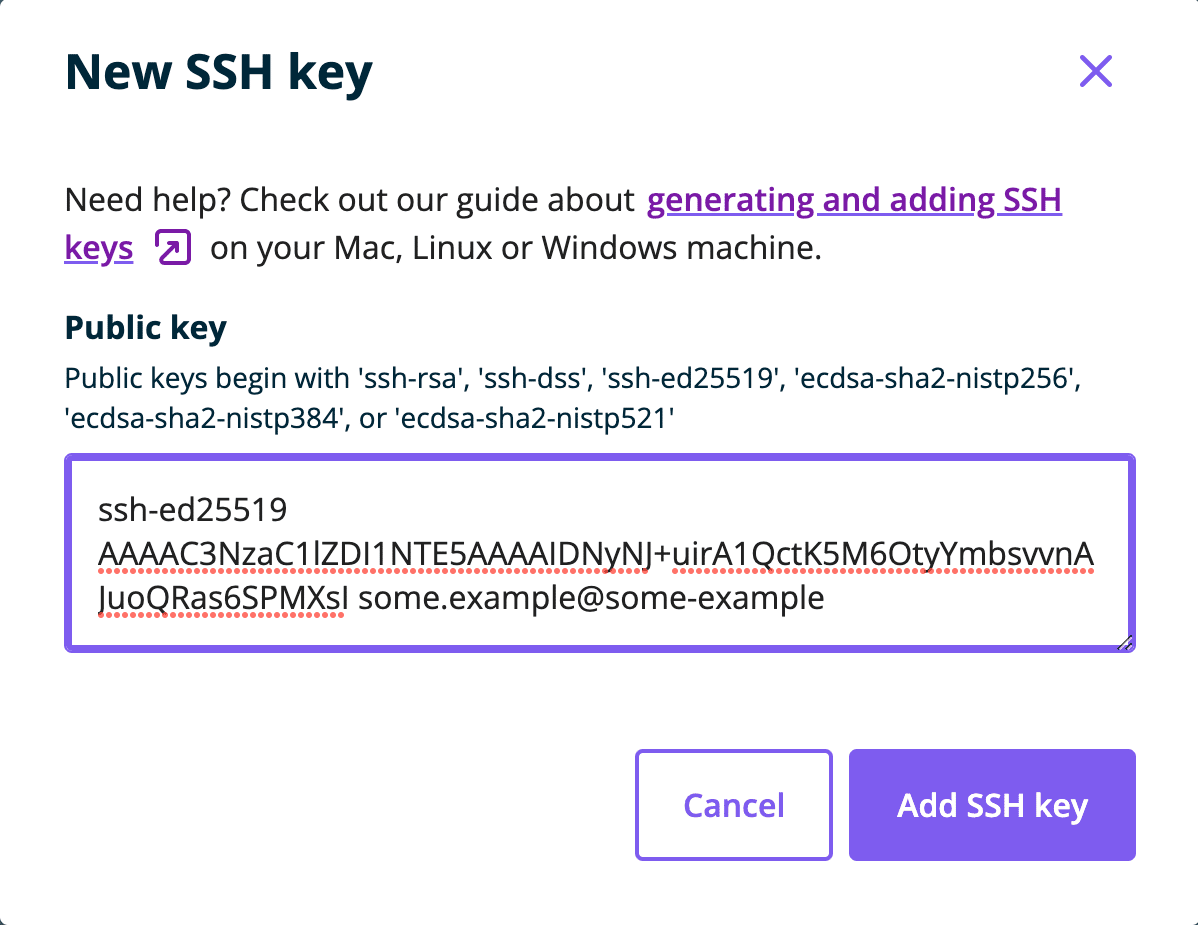
- Click New SSH Key
- Paste your Public Key * into the field
- To view the key contents, run
cat ~/.ssh/wpengine_ed25519.pub
- To view the key contents, run
- Click Add SSH Key
Once your SSH key is added it can be used for all environments to which your WP Engine User Portal user also has access. If you cannot see the environment in the User Portal, you cannot access it using SSH.
Connect to SSH Gateway
When connecting to SSH Gateway, you can use the following syntax from your terminal window. Be sure to replace the word environment with the unique WP Engine environment name (EX: environment.wpengine.com).
ssh environment@environment.ssh.wpengine.net
If you do not use a SSH config file, then you must specify which key your machine should use to authenticate the connection. In this example, the private key file is located at: ~/.ssh/wpengine_ed25519
ssh -i ~/.ssh/wpengine_ed25519 -o IdentitiesOnly=yes environment@environment.ssh.wpengine.net
If you encounter any connection errors, please reference our Troubleshooting SSH Connection Issues guide.
Using SSH and WP-CLI
Now that you have successfully set up your keys and connected, it’s time to get started using SSH Gateway. You can use WP-CLI, bash loops, edit files using your favorite editor, and many other CLI tools. Be sure take a backup prior to making any changes.
After connecting to SSH, you will need to enter the root directory for your website to see and interact with your files. To do this, type:
cd sites/environment
Or, you can enter the root directory of your website and list the files/directories there in a single command:
cd sites/environment && ls
Be sure to replace environment with your WP Engine environment name or update the file name and path to the appropriate location.
Example Commands
Below are some examples of commands you can use once within the root directory of your install:
Import a SQL file to your WordPress site’s database with WP-CLI:
wp db import mynewsqlfile.sql
Run database queries with WP-CLI by encasing the query in quotes:
wp db query "SELECT * FROM wp_users WHERE user_email='[email protected]';"
Update a plugin:
wp plugin update plugin-name
See if WordPress core files have been modified:
wp core verify-checksums
Add “administrator” capabilities to a user named “wpengine” with WP-CLI:
wp user add-cap wpengine administrator
Search-replace for olddomain.com to newdomain.com using precise (PHP-based search) on all tables with WP-CLI:
wp search-replace “olddomain.com” “newdomain.com” --all-tables --precise
Sync all the files from folder1 to folder2 using rsync (non-destructive):
rsync -rvP folder1/ folder2/
Sync example.png on your local machine to folder4 on your website (non-destructive):
rsync example.png environment@environment.ssh.wpengine.net:/sites/environment/folder4
Edit a file named myfile.txt using vim:
vim myfile.txt
Enter MySQL command line and query your table storage engine for all tables:
First run: mysql
Then run: SELECT table_name, Engine FROM information_schema.tables WHERE table_schema='wp_environment'
Update WordPress to version 5.6 for multiple sites using a bash loop*:
for environment in environment1 environment2 environment3; do ssh $environment@$environment.ssh.wpengine.net "cd /sites/$environment && wp core update --version=5.6"; done
*You must run loops which iterate through multiple environments from your local machine instead of from the remote server.
WP-CLI Syntax
The following are WP-CLI command syntax examples.
| Command | Syntax |
|---|---|
wp media regenerate [<attachment-id>...] [--yes] | --yes parameter is required |
wp site create --slug=<slug> [--title=<title>] [--email=<email>] [--network_id=<network-id>] [--private] [--porcelain] | Example: wp site create --slug=test-2 |
wp site delete [<site-id>] [--slug=<slug>] [--yes] [--keep-tables] | Example: wp site delete 17 |
wp term create <taxonomy> <term> [--slug=<slug>] [--description=<description>] [--parent=<term-id>] [--porcelain] | Example: wp term create category Apple |
wp theme disable <theme> [--network] | Multisite only: Example: wp theme disable twentyfifteen |
wp theme enable <theme> [--network] [--activate] | Multisite only: Example: wp theme enable twentythirteen --activate |
wp theme get <theme> [--field=<field>] [--format=<format>] | Multisite only: Example: wp theme get twentytwelve --format=json |
wp user add-cap <user> <cap> | Example: wp user add-cap joeuser create_premium_item |
wp user add-role <user> <role> | Example: wp user add-role joeuser author |
wp user create <user-login> <user-email> [--role=<role>] [--user_pass=<password>] [--user_registered=<yyyy-mm-dd>] [--display_name=<name>] [--first_name=<first_name>] [--last_name=<last_name>] [--send-email] [--porcelain] | Example: wp user create joeuser [email protected] --role=author |
wp user delete <user>... [--network] [--reassign=<user-id>] [--yes] | Example: wp user delete ID --yes |
wp user get <user> [--field=<field>] [--fields=<fields>] [--format=<format>] | Example: wp user get joeuser |
wp user list [--role=<role>] [--<field>=<value>] [--field=<field>] [--fields=<fields>] [--format=<format>] | Example: user list --role=author |
wp user list-caps <user> | Example: wp user list-caps joeuser |
wp user meta <command> | Example: wp user meta update admin first_name "Joe" |
wp user remove-cap <user> <cap> | Example: wp user remove-cap joeuser edit_themes |
wp user remove-role <user> [<role>] | Example: wp user remove-role joeuser author |
wp user set-role <user> [<role>] | Example: wp user set-role joeuser author |
wp user update <user>... --<field>=<value> | Example: wp user update joeuser --display_name=Joe --user_pass=examplepassword |
widget add <name> <sidebar-id> [<position>] [--<field>=<value>] | Example: wp widget add rss sidebar-1 |
wp widget deactivate <widget-id>... | Example: wp widget deactivate search-2 |
wp widget delete <widget-id>... | Example: wp widget delete calendar-3 |
wp widget list <sidebar-id> [--fields=<fields>] [--format=<format>] | Example: wp widget list sidebar-1 |
wp widget move <widget-id> [--position=<position>] [--sidebar-id=<sidebar-id>] | Example: wp widget move calendar-1 --sidebar-id=sidebar-1 |
--url=<url> | Multisite only |
--skip-plugins --skip-themes | Skip loading plugins or themes if they are causing errors during execution of a wp-cli command |
SSH Gateway Limitations
- In general, you cannot use SSH to manage the aspects of your site that are in the User Portal (purge cache, create users, add a new environment).
- You cannot use SSH Gateway access to perform any actions that require root or sudo access, and cannot use it to access server logs.
- New or permanent files/directories can only be created in the
/sites/environmentname/directory. Newly created files outside of this path will disappear when your SSH session ends. Any scripts you create should be stored in your site’s_wpeprivatefolder to ensure they’re secure, hidden and persistent. - You can only remove files with the user “wpe-user” or “www-data”. You cannot remove files which are owned by “root” or “nobody”. Reset file permissions or reach out to Support if you have issues with these file permissions being set properly.
- The SSH Gateway connection limit is 5 per user. To serve customers at our scale we have several instances of our SSH Gateway service running and it is possible that occasionally customers will be able to initialize more than 5 connections.
SSH Gateway Issues
When using SSH Gateway on WP Engine there are several potential issues outlined below.
Character Encoding and Locales
A locale defines the user’s language, region, and character encoding settings. It dictates how special characters are displayed, how dates and times are formatted, and how files are sorted.If you only work with standard English text and filenames, you may never need to adjust these settings. However, if you see strange symbols (like ä or ?) instead of accented characters (like ä or ø), or if you are working with filenames containing international characters, you will need to configure your locale settings as described below to ensure proper display and compatibility.
Step 1: Configure your Terminal Emulator
First, ensure the terminal emulator you use to connect to SSH (such as Terminal on macOS, PuTTY on Windows, etc.) is configured to display text using UTF-8.
To test if your terminal is already configured correctly, run the following command:
printf "xC3xA4pfelnlxC3xB8rdagn"Check the output. You should see:
äpfel
lørdag
If you see scrambled characters or question marks, you must check the preferences/settings of your terminal software and set the encoding to Unicode (UTF-8) before proceeding. This setting is usually found in your terminal’s Preferences or Settings menu, often under a Profiles, Terminal, or Encoding tab.
Step 2: Check the Current Server Locale
Once you verify that your terminal is configured to handle UTF-8 characters, the next step is to confirm that your server manages text in UTF-8 correctly.
By default, the SSH Gateway uses the C.UTF-8 locale. However, your SSH client can sometimes attempt to pass its own language settings to the server during the connection.After connecting to the SSH Gateway, run the command locale to see the active configuration.
Example output:
LANG=C.UTF-8
LANGUAGE=
LC_CTYPE="C.UTF-8"
LC_NUMERIC="C.UTF-8"
LC_TIME="C.UTF-8"
LC_ALL=
Look for UTF-8 or utf8 in the output. If the LANG variable is empty or set to POSIX, you may encounter issues with special characters.
Step 3: Setting a Different Locale
The SSH Gateway supports the most common UTF-8 locales. You can view a list of all available locales on the system by running:
locale -aTo switch to a specific locale for your session (for example, US English with UTF-8 support), set the environment variable LANG through the following command:
export LANG=en_US.utf8Step 4: Verify the Fix
To confirm everything is working, create a temporary file using a special character in the name and verify that the system lists it correctly.
- Set the language:
export LANG=en_US.utf8 - Create the file:
touch äpfel.txt - List the file:
ls - The output should display
äpfel.txtclearly.
Files Not Changing Immediately
- File changes may take 5+ seconds to appear between the WordPress Admin Dashboard and the SSH session, and vice versa.
- In this case, simply wait a few seconds and then the changes should appear. Additionally, use an incognito window or clear the browser cache to see changes faster.
- Review our guide for purging caches.
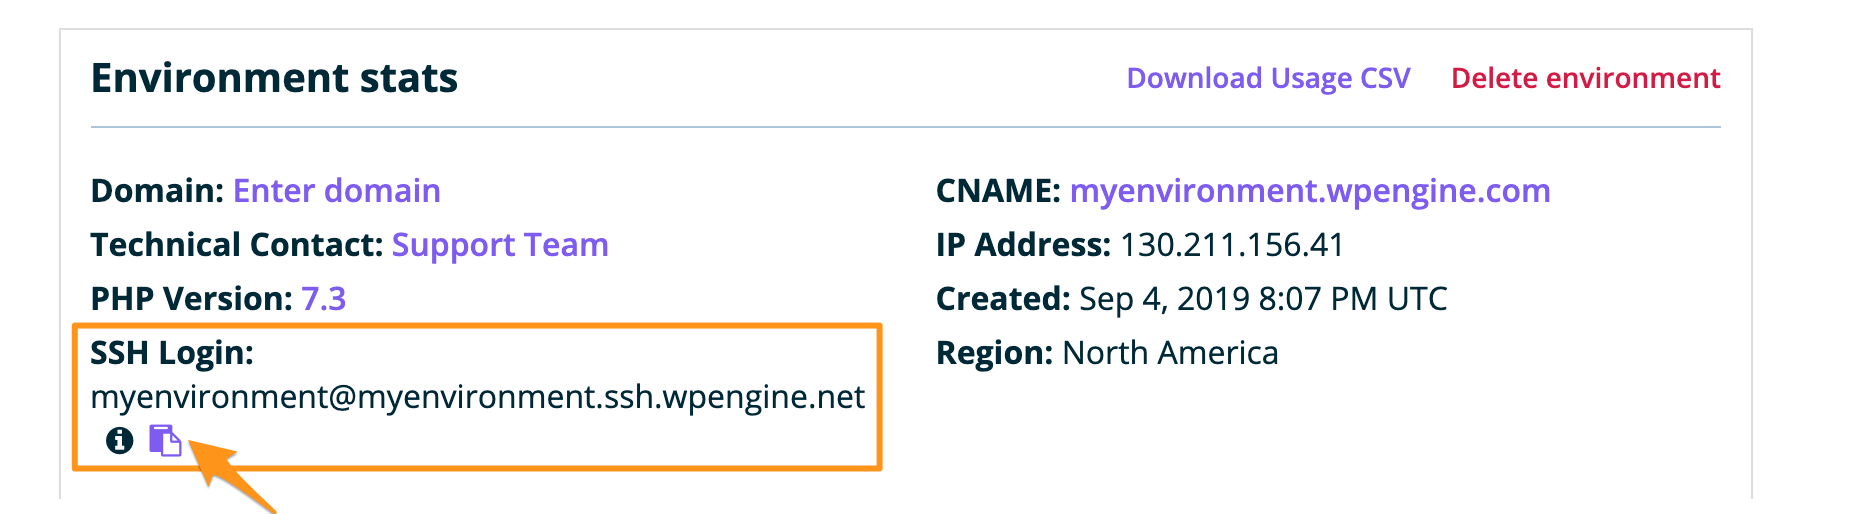
Username Not Accepted
- If receiving authentication errors when connecting, double-check the format of the username. The username must be formatted like so, where environment is replaced by the unique WP Engine environment name.
environment@environment.ssh.wpengine.net
- Log in to the User Portal
- Click on the environment name to connect to
- In the Overview section, locate SSH Login
- Click the clipboard icon to copy the SSH login for easy pasting into the terminal
New Files Not Saved
- Only files updated and saved within the
/sites/environment/directory will remain after the SSH session ends. A new SSH sandbox is created with each SSH session. - To avoid this issue please ensure any new files or directories are created within the
/sites/environment/directory, as this is the root directory of the WordPress site. - If creating scripts for use in SSH, please be sure these are placed in the
_wpeprivatefolder of the site, so these files will persist past the SSH session for future use.
Memory Limitations
- If opening a new file or performing an action with WP-CLI requires too many server resources, it is possible the action or the session itself may be killed. Actions should be batched into smaller sets to ensure minimal resource consumption.
Lockouts
- By default, the local machine will attempt to use all SSH keys present when connecting to the SSH Gateway. If 6 or more keys are presented unsuccessfully, the SSH Gateway will disconnect.
- To avoid this issue, use an SSH config file to designate which key file should be used with which hostname.
Broken Connection
- In some rare cases, it may be possible for software deploys to break existing connections. If this happens, simply reconnect after a few minutes to continue work in SSH.
No Mutual Signature Algorithm – SHA1 Deprecation
- If either of the following errors display when attempting to connect to SSH Gateway, the key does not match the type the client is looking for. This is because SSH-RSA SHA-1 has been deprecated.
debug1: send_pubkey_test: no mutual signature algorithmPermission denied (publickey). fatal: Could not read from remote repository. Please make sure you have the correct access rights and the repository exists.
A possible resolution for this issue is to create the key using ED25519 instead:- To generate a new key in the supported format, use
ssh-keygen -t ed25519 -f ~/.ssh/wpengine_ed25519 - Use the new key files
wpengine_ed25519andwpengine_ed25519.pub
- To generate a new key in the supported format, use
Permission denied (publickey)
- When users are connecting to their SSH Gateway, there are two levels of authentication they pass through. The first determines whether the private and public keys match up and that the user has SSH access. If they do not, the user does not continue any further and receives the Permission denied (publickey) message.
- Confirm the SSH key was added to the intended User Portal account
- Confirm environment has SSH Gateway enabled
- Confirm the SSH login is entered correctly, and that there are no typos or missing letters
- Is there an SSH config file? Run
cat ~/.ssh/configto check.- If yes, open it and ensure there is an entry in the SSH config file for
*.wpengine.netmapped to the correctwpengine_key file name and that everything is spelled correctly.ed25519 - If there is no SSH config, set one up using this guide. This will ensure the machine uses the correct key when connecting.
- If yes, open it and ensure there is an entry in the SSH config file for
Connection Error Messages
A number of other error messages may display, depending on the error condition:
| Error Message | Meaning |
|---|---|
| Cannot access environment [environment_name] | Either the environment you are trying to connect to does not exist (potentially mistyped), or the User Portal user your SSH key is assigned to does not have access to this particular environment |
| Install [environment_name] does not support ssh | The environment you are trying to connect to exists and you have access to it, but the environment is not on a server environment that supports SSH Gateway access |
| Install [environment_name] is disabled | The environment you are trying to connect to is disabled or inaccessible |
NEXT STEP: Learn how to connect to SSH Gateway