Using a Reverse Proxy with WP Engine
WP Engine’s support of reverse proxies is complex and specific, and typically not recommended. In the situations where reverse proxy is supported, there are often extra configuration steps needed. In this article we explain which reverse proxy situations will work, and which will not.
NOTE
A reverse proxy is primarily configured with a third-party service. Due to the intentional layer of abstraction, WP Engine Support is unable to assist with configuring or troubleshooting a reverse proxy beyond the information detailed in this guide. Learn more about our Scope of Support here.
About Reverse Proxy
A reverse proxy is a web server that sits in front of the server hosting your website content and is often configured to offload static resources, pass only specific requests to your server, or to serve as a firewall for security purposes.
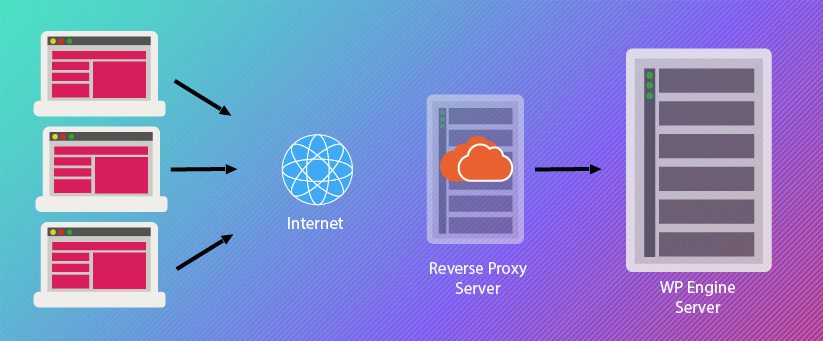
There are many reasons why you might use a reverse proxy setup. One of the most common reasons you may need to use a reverse proxy is if you want to host a website in a subdirectory, like domain.com/blog. Using a reverse proxy for this purpose must be configured with a third-party service. Before we continue though, we should explain that WP Engine already uses reverse proxy on your server itself.
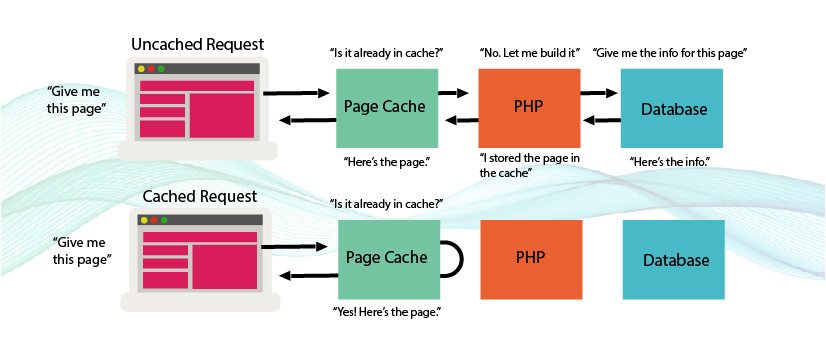
WP Engine uses a dual-web-server setup: Nginx works as a traffic director to receive all requests to your web server. It quickly and easily serves all static files: images, CSS, JavaScript, and so on. It also determines whether a page exists in our page caching layer. If a cached version of the page exists, it is served up to the end user of your website quickly. If a cached version does not exist, Nginx reverse-proxies the request to be processed by our backend PHP processing system. In this way, Nginx and page cache both behave as reverse proxies on your WP Engine environment.
Additionally, WP Engine offers CDN services. CDN takes the reverse proxy a step further, and distributes your static files (images, CSS, JavaScript) across a network of global servers for faster access around the world. In this way, only full page requests make it back to the WP Engine server system in the first place.
With that in mind, users who wish to use CDN (Akamai, Fastly) as a reverse proxy may already find this at WP Engine without needing third-party services.
NOTE
WP Engine Support unable to assist with configuring or troubleshooting these reverse proxies beyond the information listed here. This is because reverse proxies are configured largely at your external proxy service and intentionally add a layer of abstraction,
Forward Real IP Addresses
To WP Engine servers it appears as though all traffic is coming from a single IP address (or a single range of IP addresses) when you configure a reverse proxy. This means if there are any bad actors sending abusive traffic, it appears that the IP address(es) of the proxy service is the abuser, which could cause it to be denied. This will typically result in a 403 error or any number of other errors, depending on the service.
With that in mind, we strongly suggest you enable settings to forward the actual IP addresses of your users to WP Engine in a header. Most often an X-Forwarded-For or True-Client-IP headers are used.
Once this setting is configured, please contact WP Engine Support to request we enable the interpretation of X-Forwarded-For/True-Client-IP headers for your website, and provide us a supported IP address (or range of IP addresses) to allow for these headers. This will be the IP address your reverse proxy service is using to send traffic to WP Engine.
Enabling this setting allows us to deny the true bad actors on your website where applicable, rather than denying the entire proxy service.
NOTE
If your reverse proxy service uses randomized IP addresses, we will have to accept these headers from all IP addresses, which is much less secure and not recommended.
Proxy Configuration
The configuration method you will need to use varies based on the specific situation. Refer to the situations below before proceeding on to the setup processes.
NOTE
WP Engine Support unable to assist with configuring or troubleshooting these reverse proxies beyond the information listed here. This is because reverse proxies are configured largely at your external proxy service and intentionally add a layer of abstraction,
Host Subdirectory Only
Use these steps if you plan to host only the subdirectory on WP Engine, but not the top-level domain. For example, if domain.com/blog is hosted on WP Engine, but domain.com is hosted elsewhere.
In this scenario your DNS is not going to point to WP Engine, but will proxy traffic for domain.com/blog to us instead.
- Configure your external proxy from
domain.com/blogtoinstall.wpengine.com/blog - Follow the steps in Proxy A to complete the configuration
Host Subdirectory and Top-Level Domain
Use the steps Proxy B if you are hosting both domain.com AND domain.com/blog on separate WP Engine installs. For example, if domain.com directs to install1.wpengine.com and domain.com/blog directs to install2.wpengine.com.
In this scenario you will point DNS to a service outside of WP Engine, such as Akamai, but will proxy all traffic to us.
Proxy A
The domain’s DNS is not going to point to WP Engine, and instead will proxy traffic for domain.com/blog to your WP Engine default domain instead (EX: install.wpengine.com/blog.
You must have a way to create the proxy on the system where your DNS is pointed (i.e. Akamai, Netlify, Nginx, Apache).
In most cases you will NOT add domain.com into the WP Engine User Portal. However, if there are issues with the proxy it can occasionally help.
This configuration will not work until the domain is proxying to WP Engine.
- Add the following code into the site’s
wp-config.phpfile, making sure to update thedomain.comanddomain.com/blogdetails to your domain and subdirectory.
if ( ! empty( $_SERVER['HTTP_X_FORWARDED_HOST'] ) ) {
       $_SERVER['HTTP_HOST'] = 'domain.com';
}


define( 'WP_HOME', 'https://domain.com/blog' );
define('WP_SITEURL', 'https://domain.com/blog') ;- Reach out to WP Engine support to add the following Nginx rule on the environment.
real_ip_header X-Forwarded-For;
set_real_ip_from 0.0.0.0/0;- Finally, run a search and replace on the website to find the WP Engine CNAME (EX:
install.wpengine.com) and replace it with your subdirectory (EX:domain.com/blog).
Proxy B
- Configure an external proxy from
domain.comtoinstall1.wpengine.com.- Make sure you send the Cache-Control
$http_cache_controlheader in your requests to WP Engine. If this isn’t configured you will be permanently logged into /wp-admin and it will not auto logout. That can be a serious security concern. - Make sure you pass the
X-Forwarded-Forheaders to WP Engine so that we see the actual IPs and not the proxy IP. If this isn’t in place, you will get blocked by WP Engine’s firewall. - Gutenberg requires the Rest API so if you are using it, you will also need to proxy a header with a browser request to keep Gutenberg functioning.
- Make sure you send the Cache-Control
- Add the following code into the
wp-config.phpfile only on the first environment. Make sure to updateyourdomain.comwith the new live domain.
if ( ! empty( $_SERVER['HTTP_X_FORWARDED_HOST'] ) ) {
       $_SERVER['HTTP_HOST'] = 'yourdomain.com';
}


define('WP_SITEURL', 'https://' . $_SERVER['HTTP_HOST']);
define('WP_HOME', 'https://' . $_SERVER['HTTP_HOST']);
- Reach out to WP Engine Support to add the following NGINX rule into the Nginx configuration for this particular website. Replace 0.0.0.0/0 with the actual IP range of the proxy provider.
real_ip_header X-Forwarded-For;
set_real_ip_from 0.0.0.0/0;- Configure your external proxy from
domain.com/blogtoinstall2.wpengine.com/blog - Add the following code into the site’s
wp-config.phpfile for the second environment, making sure to update thedomain.comanddomain.com/blogdetails to your domain and subdirectory.
if ( ! empty( $_SERVER['HTTP_X_FORWARDED_HOST'] ) ) {
       $_SERVER['HTTP_HOST'] = 'domain.com';
}


define( 'WP_HOME', 'https://domain.com/blog' );
define('WP_SITEURL', 'https://domain.com/blog') ;- Install the following mu-plugin on your website:
https://gist.github.com/ryanshoover/470579cea6a2a2ca94e8f548e9af7 - Reach out to WP Engine support to add the following Nginx rule on the environment. Replace 0.0.0.0/0 with the actual IP range of the proxy provider.
real_ip_header X-Forwarded-For;
set_real_ip_from 0.0.0.0/0;- Finally, run a search and replace on the website to find the WP Engine CNAME (EX:
install.wpengine.com) and replace it with your subdirectory (EX:domain.com/blog).
NEXT STEP: WP Engine platform settings