Point DNS for Your Domain Name to WP Engine
The most important step to “go live” with your WP Engine-hosted website is to connect your domain name to your website by pointing DNS. This is what allows traffic to be directed to your website when someone types your domain name into their web browser.
To do this, you will need to log in to your DNS provider account which, most often, is where you purchased your domain (a domain registrar). As your web host, WP Engine does not sell domain names, so this will be a separate provider. If you are not sure who your DNS provider is, you can use the Whois Lookup tool or the Entri Connect tool (as explained later in this article) to identify your provider.
Not sure what DNS or a domain registrar is? Check out the glossary below.
At WP Engine, there are two options for pointing your domain to your website:
- Automatic DNS configuration
- If you are using a supported DNS provider, your DNS can be automatically configured through Entri Connect.
- Prefer to watch a video tutorial on how to use Entri Connect?
- Manual DNS configuration
- If you are using a DNS provider that is not supported by Entri Connect, or if you prefer to update your DNS records yourself, you can point your domain manually.
- Prefer to watch a video tutorial on how to manually point your DNS?
Before Pointing Your Domain
Before pointing your domain to WP Engine, review the following steps to make sure the whole process goes as smoothly as possible.
Required Steps
These steps must be completed before you can point your domain to WP Engine:
- Add your domain to the User Portal. Learn how to add a domain here.
- During this step (and depending on who your DNS provider is) WP Engine may be able to automatically configure your DNS through Entri Connect. Learn more about Entri Connect here.
- Update the Site URL in WordPress®.1 Learn how to update your domain in WordPress here.
- If you have purchased Global Edge Security (GES), you should enable the GES network before pointing DNS. Learn how to update a domain’s network to GES.
Optional Steps
All DNS changes will cause some amount of downtime while those changes propagate. However, if your domain is already pointed to a live website, you can complete the following optional steps to reduce the effects of this downtime.
- Pre-verify domain ownership. Learn more about pre-verification here.
- Make DNS changes during a time when your website usually experiences low traffic.
- Consider activating a maintenance mode or coming soon page on the live website. You can use a plugin for this.
Automatic DNS Configuration
The easiest way to point your domain to WP Engine is using the automatic DNS configuration option.
For this, WP Engine partners with Entri Connect, an easy-to-use tool that will update your DNS records on your behalf if you are using a supported DNS provider.
So, if you add a domain to the User Portal that was registered with one of the supported providers listed below, you will be given the option to use Entri to automatically point your domain to WP Engine.
Supported DNS providers
Entri supports an extensive list of providers, shown in the list below.
Please note this list is subject to change. Refer to Entri Connect’s Supported Provider page for the most up to date list.
- 123-Reg
- Amazon Route 53 (AWS)
- Arsys
- Bluehost US
- Cloudflare
- Crazy Domains
- Domain.com
- Digital Ocean
- DNSimple
- DreamHost
- Dynadot
- Enom
- Gandi
- GoDaddy
- Hetzner
- Hover
- Hostgator
- Hostinger
- Inmotion Hosting
- IONOS
- IWantMyName
- Linode
- LocaWeb
- Name.com
- Namebright
- Namecheap
- NameSilo
- Network Solutions
- Netlify
- One.com
- OpenSRS
- OVH
- Porkbun
- Register.com
- Register.it
- Registro.br
- Shopify
- SiteGround
- Strato
- Squarespace
- Web.com
- Wix
- WordPress.com
- Xneelo
How to use Entri Connect
The following video guide shows how to use Entri Connect to automatically point your domain to WP Engine.
Was this video helpful?
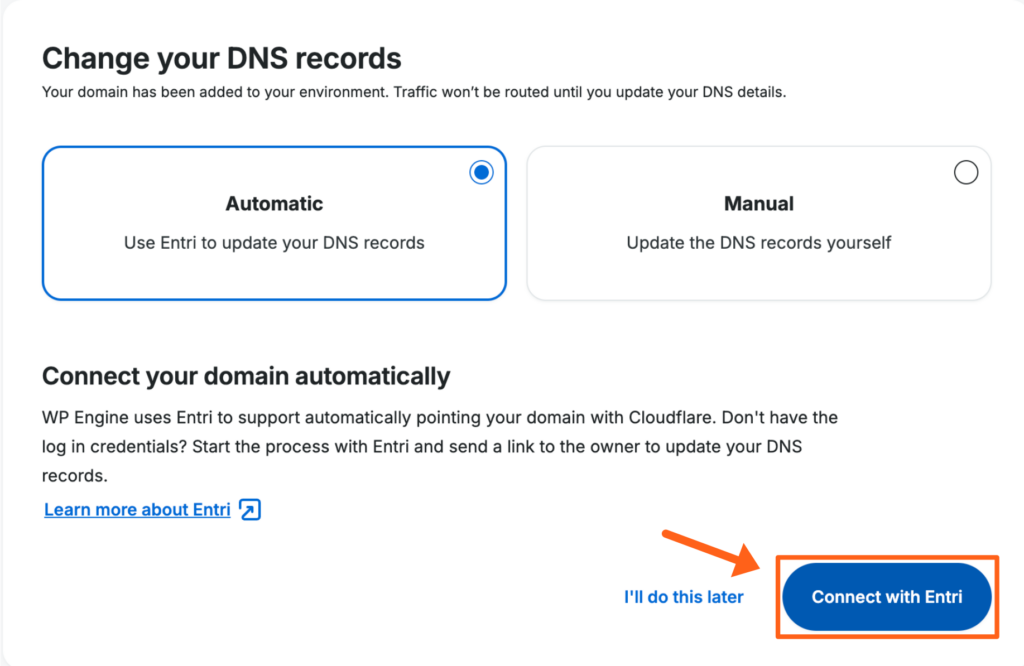
If you are using one of the supported DNS providers listed above, all you need to do is use Entri Connect when adding your domain to WP Engine’s User Portal. After entering your domain name information, you will see a prompt (shown in the image below) to connect your domain using Entri, and have your DNS pointed to WP Engine on your behalf.
- Make sure the Automatic option is selected
- Click Connect with Entri
After clicking the Continue button you’ll see a Detected DNS Provider message if your DNS provider is found and supported.
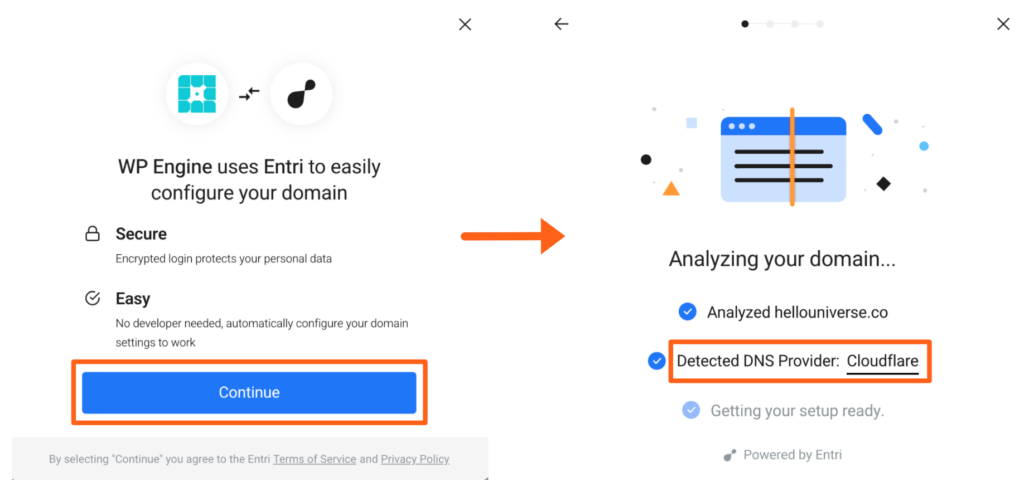
However, if Entri is unable to detect your DNS provider you’ll be provided with a list to “Select your domain provider“. If you cannot find your provider in the list you can scroll to the bottom of the list and click the button labeled “Can’t find your provider? Go to our manual setup“. Your DNS records will be displayed on the next screen so you can point your DNS manually.

If Entri did automatically find your provider you should then see a button to Authorize with your specific domain provider and complete the automatic connection like the example below.
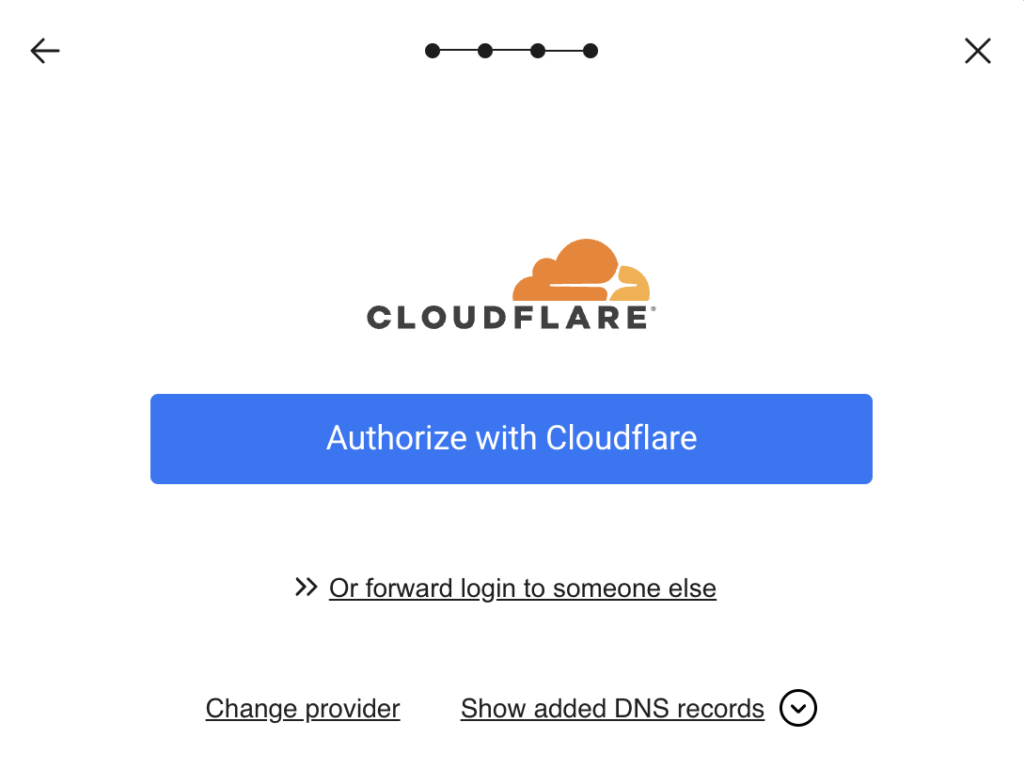
After logging into your domain provider you’ll see the new DNS records that will be added automatically.
NOTE
If Entri finds conflicting DNS records in your account, they may be deleted. Be sure to review everything carefully before authorizing WP Engine to make DNS changes.
We recommend asking your DNS provider if you are not sure if other records (such as MX records that control domain-based email) could be impacted by the changes Entri will make.
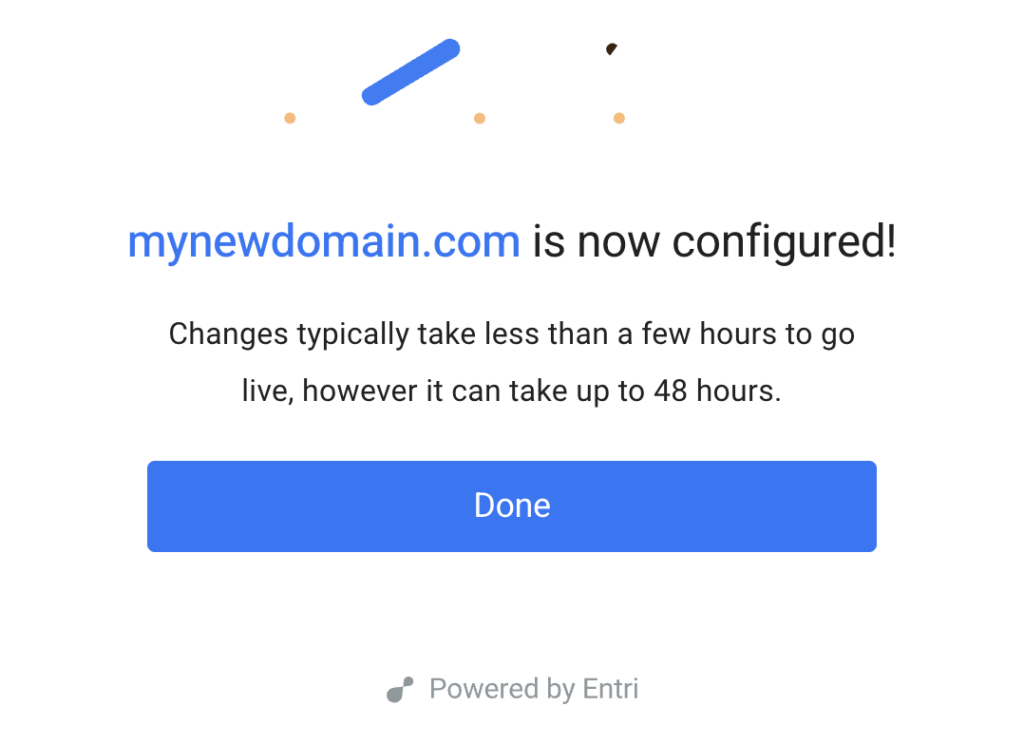
Once you click the Authorize button, the DNS records will automatically be added at your DNS provider.

After your DNS is updated, you will be returned to the WP Engine Domains page and your DNS changes will begin to propagate throughout the internet.
NOTE
If you are not sure who your DNS provider is and we can detect who it is, their name will be displayed on the Add domain screen (as shown in the image below). This is helpful for finding the correct login credentials, or directly logging in to your DNS provider for more complex DNS configurations.
Locate Entri Connect again
If you have already added your domain to the User Portal, but have not pointed your domain name yet, you can access the Entri Connect workflow again by following these steps:
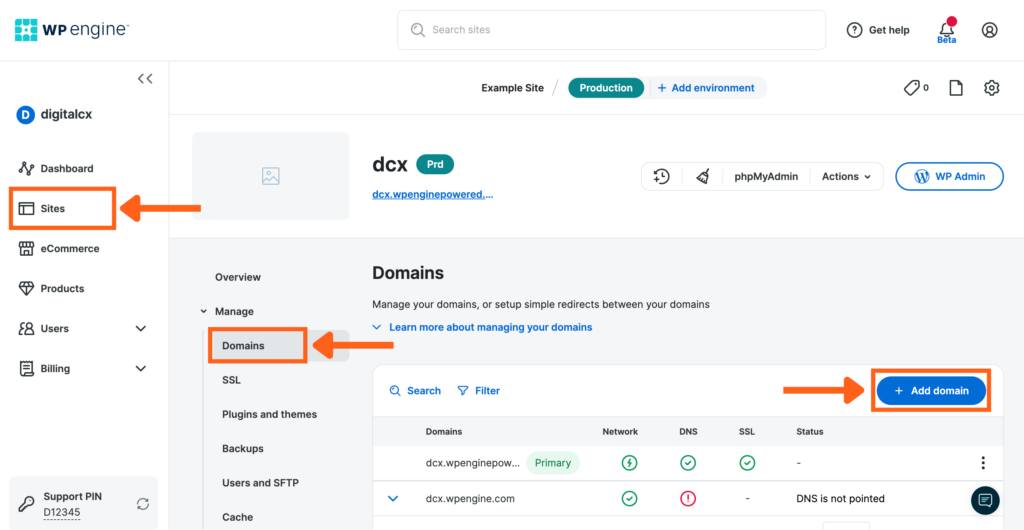
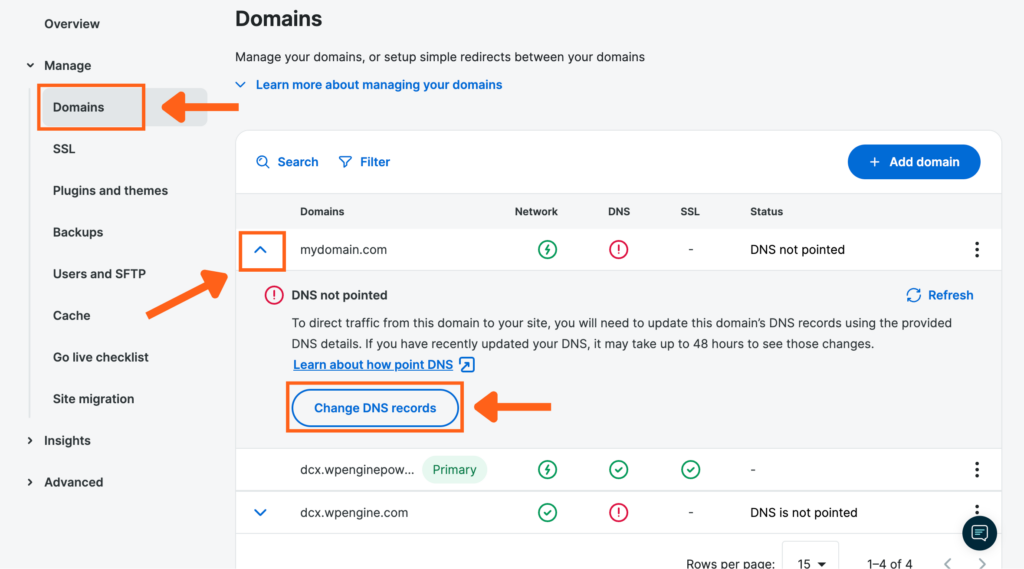
- From the Sites page, select the Environment that contains the domain you want to work with.
- Click Domains in the secondary menu on the left.
- Expand the domain name’s Status drop down.
- Click the Change DNS records button.

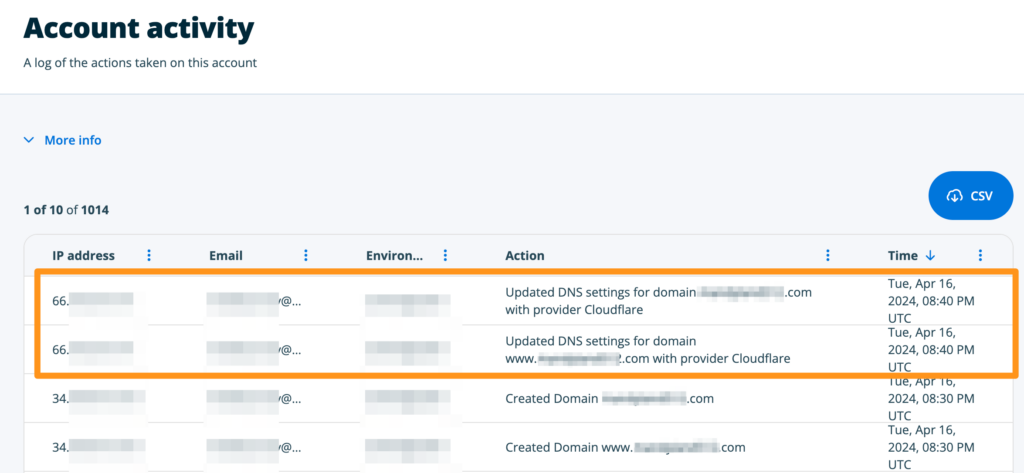
Entri Connect logs
You can view your Account Activity in the User Portal to see if Entri Connect has successfully or unsuccessfully configured your DNS settings.
Entri Connect actions in the log look similar to the following example:
Common issues
If you are having trouble with using the automated Entri Connect system, check the following:
- Did you complete the entire process?
You should have seen a login page for your domain provider. The login page would have asked for your username and password. After submitting those details, you should have been automatically directed back to WP Engine. If this doesn’t sound familiar, try again and be sure to complete the entire process. - Did you use the correct credentials?
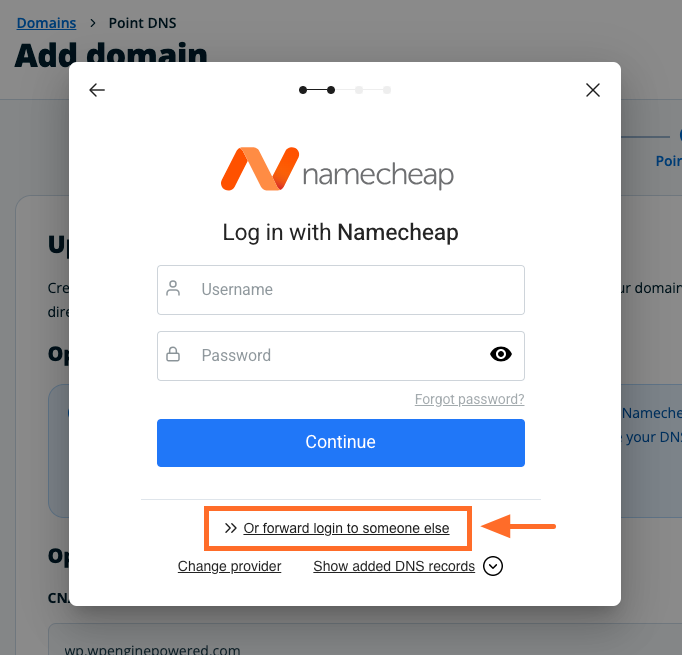
While using Entri Connect, you will need to use your login credentials for your DNS provider (not your WP Engine login credentials). Verify that you have the correct username and password. You can do this by going to your DNS provider directly and logging in there. If your credentials are incorrect, you will need to use your DNS provider’s “Reset Password” functionality. Once completed, try using Entri Connect again using your username and new password.
If you do not have the login credentials, you can also forward the login request to someone else who has the required credentials (shown in the image below).
Note: The share link expires after 30 days or once the domain is successfully configured, whichever comes first.
- Did you log in to the correct DNS account?
The username you use for Entri Connect to log in to your DNS provider must be the owner of the domain name you are adding to WP Engine. You can verify this by logging into your DNS provider and checking to see if the domain exists for your user. If not, you will have to determine which user owns the domain and use those credentials instead.
If you do not have the login credentials, you can also forward the login request to someone else who has the required credentials (shown in the image above).
Note: The share link expires after 30 days or once the domain is successfully configured, whichever comes first.
Additional information
- If your website is migrated to a new server environment and was not pointed using CNAME flattening, the DNS records will not be updated automatically. To resolve this, you can:
- Either remove and re-add the domain to your Domains page in the User Portal to trigger the automatic DNS connection process.
- Or, manually update the entries directly through your DNS host.
- Cloudflare, Akamai, Incapsula, or other services involving a reverse proxy, are not fully compatible with the automatic DNS configuration process. The automated configuration process will still work to update the DNS records at your DNS host, but it will not update records at your reverse proxy service provider which must be done manually. View our full article for more details about setting up a reverse proxy.
Entri Connect
- Entri will automatically configure the DNS records using CNAME flattening or the A record(s) depending on which method your DNS provider supports..
- If either Advanced Network or Global Edge Security network are enabled on the domain, Entri will automatically detect the network and correctly configure the domain.
- Entri will set a fixed TTL (time to live) of 1 hour which cannot be changed. This means propagation can take around one hour to complete. However, in many cases, it may be faster.
- Conflicting DNS records will be removed when using Entri. The records affected will vary based on the update being made, and may include MX records and TXT records. Review the changes carefully when authorizing WP Engine to make the DNS changes. Consult with your DNS provider if unsure of the impact of deleting other records.
Manual DNS Configuration
If your DNS provider is not supported by Entri Connect, or if you prefer to update your DNS records yourself, you can point your domain manually.
To point your domain to WP Engine, you’ll need to add specific DNS records at your domain registrar. This includes A records and CNAME records. Instructions for making these changes are typically available through your registrar’s support or documentation.
At WP Engine, we support the following methods for pointing your domain name:
- CNAME flattening (recommended)
- A records
- ANAME record
- ALIAS record
(Domain masking is not directly supported on WP Engine, however, this configuration may still be set up from your DNS provider.)
We will explain how to point your domain using the two most commonly used methods, CNAME flattening and A records, below.
To protect the stability and security of your website, WP Engine may (rarely) need to change your server’s IP address. A dynamic DNS configuration with CNAME flattening, ANAME, or ALIAS is recommended, as it prevents the need for you to make DNS updates down the road. Static IPs were standard in the past, and we understand that in certain situations dynamic IPs may be undesirable or unusable. Therefore, A record configurations are still supported, however note in the steps below we do recommend two A records to achieve the same dynamic and flexible nature.
NOTE
If you need assistance manually configuring DNS records, we recommend contacting your DNS provider directly and giving them your WP Engine DNS record values.
Because WP Engine does not sell domain names and all DNS configuration is managed through a third-party provider, our Support representatives cannot log in to your DNS provider’s dashboard on your behalf.
Locate your DNS record values
Before you begin, you will need to locate your DNS record values in the User Portal.
Please note that DNS records values may vary by environment, so make sure you are checking from inside the correct environment.
There are three ways to find your DNS record values:
- Add your domain to the User Portal. When you add your domain to the User Portal, your WP Engine DNS record values will be displayed during that process. Follow these steps to start the process:
- From the Sites page, select the Environment that contains the domain you want to work with.
- Click Domains in the secondary menu on the left. (You may have to expand the Manage dropdown section)
- Click the Add domain button to begin.
- Go back to the point DNS page. If you have already added your domain, but have not pointed it to WP Engine yet, follow these steps to get back to the point DNS page:
- From the Sites page, select the Environment that contains the domain you want to work with.
- Click Domains in the secondary menu on the left. (You may have to expand the Manage dropdown section)
- Expand the domain name’s Status drop down.
- Click the Change DNS records button.
- Use the View DNS Details option. If you need to access your A and CNAME record values again after you have already added and pointed your domain, follow these steps:
- From the Sites page, select the Environment that contains the domain you want to work with.
- Click Domains in the secondary menu on the left. (You may have to expand the Manage dropdown section)
- Click the three-dot menu next to the correct domain.
- Click View DNS Details.
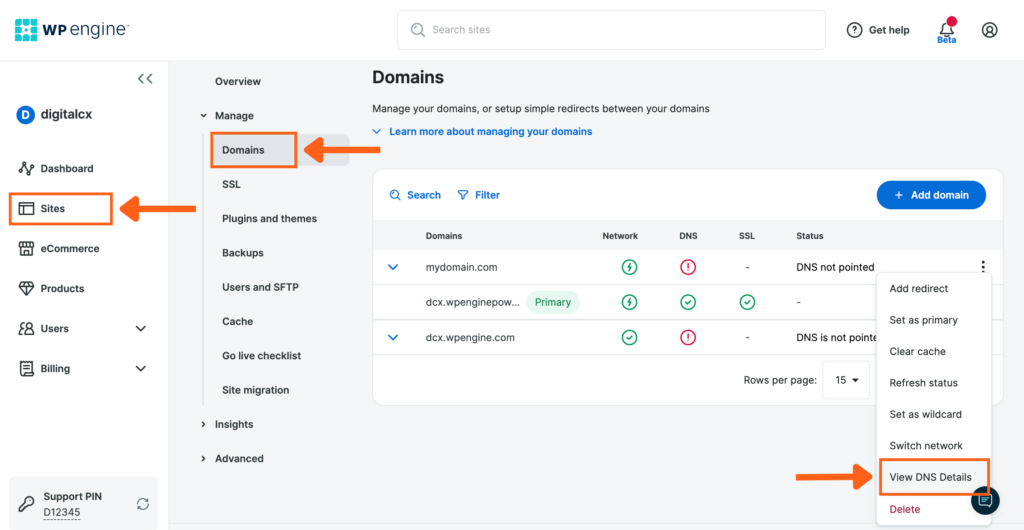
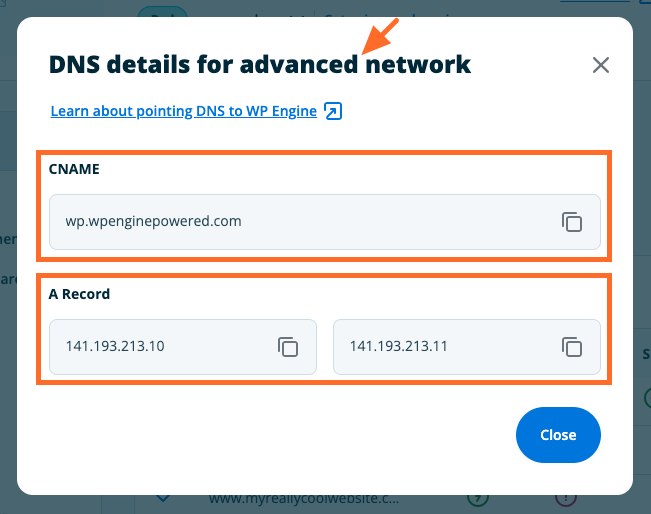
No matter which method you use to access your DNS record values, you will see the server IP address(es) and CNAME record values for the currently selected environment.
NOTE
Take note of which network name is displayed at the top of the DNS Details window (shown in the image below): Advanced Network or Global Edge Security.
If needed, learn how to switch the domain to Global Edge Security here or how to update to the Advanced Network here.
Determine which DNS records to use
We provide both a CNAME record and A records that you can use to point your domain name to WP Engine. However, you only need to use one of these types of records. The type you should use depends on who your DNS provider is and the method they support.
The following video guide briefly explains what each of these types of records are and how to determine which one to use on WP Engine.
Was this video helpful?
If your DNS provider allows you to use the CNAME record to point your root (or apex) domain, or more specifically if they support CNAME flattening, this is what we recommend.
Not sure what a root (or apex) domain is? Check out the glossary below.
However, not all domain providers support this method. If yours does not, or if you are not absolutely certain that they do, you can use A records instead because all DNS providers support using them.
The reason we recommend the CNAME flattening method is because it provides the best DNS experience and a seamless network connection.
For example, IP addresses are subject to change here at WP Engine (although it is a rare occurrence). This means if you use A records to point your domain to an IP address, you may need to update your DNS later if the IP addresses change in the future. But if you are able to use CNAME flattening, you won’t need to update your DNS settings if the IP addresses change.
Also, CNAME flattening allows DNS to update fluidly if your site needs to be migrated to a different WP Engine server later.
How to use CNAME flattening
CNAME flattening refers to the technique of pointing a root (or apex) domain using a CNAME record.
Not all DNS providers support CNAME flattening. Therefore, we often recommend pointing nameservers from your domain registrar to a service like Cloudflare where CNAME flattening is easy to configure. (Cloudflare’s free account type works great for this!)
Not sure what nameservers are? Check out the glossary below.
NOTE
Using the CNAME flattening method with a provider that does not support it can delay your website’s Go Live process, and disrupt other DNS records and the services that depend on them (like domain-based email).
It is important to confirm that your DNS provider supports CNAME flattening before proceeding with this method.
The following video guide shows how to point a root (or apex) domain to WP Engine using the CNAME record, or CNAME flattening, method.
Was this video helpful?
If you have confirmed that your DNS provider supports CNAME flattening, follow these steps to manually point your root (or apex) domain to WP Engine:
- Log in to your DNS provider’s dashboard and locate the area to manage DNS records.
- This is usually the registrar where you purchased your domain. If you are not sure who your domain provider is, you can use the Whois Lookup tool to find the registrar name.
- This is usually the registrar where you purchased your domain. If you are not sure who your domain provider is, you can use the Whois Lookup tool to find the registrar name.
- If you see an existing A record for the root (or apex) domain, delete it.
- If it exists, this record will be named something like mywebsite.com, or will be using the @ symbol, and it will be pointed to an IP address.
Be careful about modifying or deleting any other records that already exist – especially MX records which are responsible for email.
Here’s an example of an existing A record pointing to an IP address (shown in Cloudflare):
- If it exists, this record will be named something like mywebsite.com, or will be using the @ symbol, and it will be pointed to an IP address.

- Add the CNAME record for the root (or apex) domain.
- Create a new record and enter the following information:
- Type: CNAME
- Name/Host:
yourdomain.com@can be used instead if your DNS provider requires it. However, doing so may impact existing DNS records (such as MX records that control email). We recommend consulting with your DNS host for more information.
- Value/Target/Content/Points to: Enter your WP Engine CNAME
- Then click Save
- A correctly pointed CNAME record for the root (or apex) domain will look like the following (the exact record content may vary from this image):
- Create a new record and enter the following information:

- Point the “www” version of your domain. Skip to that section below for step-by-step instructions.
NOTE
If your site is currently live, you can add your WP Engine DNS records in Cloudflare before updating the nameservers to point to Cloudflare. This will help minimize downtime.
Be sure to copy any additional records that may be necessary for functions such as email.
How to use A records
If your DNS provider does not support CNAME flattening, you can point your root (or apex) domain using the A records instead.
Not sure what a root (or apex) domain is? Check out the glossary below.
Please note that for security purposes, static IP addresses are subject to change here at WP Engine (although it is a rare occurrence). This means if you use A records to point your domain to an IP address, you may need to update your DNS later if the IP addresses change in the future.
If the IP addresses change, WP Engine will notify you via email. We will also provide a brief period of traffic forwarding from the old IP addresses to help minimize downtime. If the IP addresses do change, it is important that you update them in your DNS provider account as soon as possible to ensure proper website performance.
The A record method we will explain below involves using two different A records to point your root (or apex) domain to two different IP addresses.
Pointing the root domain to two separate IP addresses allows the domain to take full advantage of the cloud load balancing that our high-performance networks provide.
NOTE
Some DNS providers will give warnings or try to prevent you from using a second A record on your root (or apex) domain. However, the WP Engine Advanced Network and Global Edge Security (GES) network use two A records. You can disregard those warnings.
However, if a single IP is required, you can use either of the two IP addresses we provide. Keep in mind that this is not recommended because the domain will not receive the stability that cloud load balancing provides.
The following video guide shows how to point a root (or apex) domain to WP Engine using the A records.
Was this video helpful?
Follow these steps to point your root (or apex) domain using the A records:
- Log in to your DNS provider’s dashboard and locate the area to manage DNS records.
- This is usually the registrar where you purchased your domain. If you are not sure who your domain provider is, you can use the Whois Lookup tool to find the registrar name.
- Configure the first A record:
- If there is an existing A record for the apex domain (indicated by yourdomain.com or @):
- Edit the record and change the record value to the first WP Engine IP address.
- Then click Save
- If there is no A record for the apex domain (indicated by yourdomain.com or @):
- Create a new record and enter the following information:
- Type: A
- Name:
yourdomain.com@can be used instead if your DNS provider requires it. However, doing so may impact existing DNS records (such as MX records that control email). We recommend consulting with your DNS host for more information.
- Value/Target/Content/Points to: Enter the first WP Engine IP address
- Then click Save
- A correctly pointed A record for the root (or apex) domain will look like the following (the exact record content may vary from this image):
- Create a new record and enter the following information:
- If there is an existing A record for the apex domain (indicated by yourdomain.com or @):

- Add the second A record:
- Create a new record and enter the following information:
- Type: A
- Name:
yourdomain.com@can be used instead if your DNS provider requires it. However, doing so may impact existing DNS records (such as MX records that control email). We recommend consulting with your DNS host for more information.
- Value/Target/Content/Points to: Enter the second WP Engine IP address
- Then click Save
- Two correctly configured A records for the root (or apex) domain will look like the following (the exact record content may vary from this image):
- Create a new record and enter the following information:

How to point the “www” record
The “www” record is considered a subdomain, so it should be pointed to WP Engine using a CNAME record.
Follow these steps to point your “www” record:
- Log in to your DNS provider’s dashboard and locate the area to manage DNS records.
- This is usually the registrar where you purchased your domain. If you are not sure who your domain provider is, you can use the Whois Lookup tool to find out.
- This is usually the registrar where you purchased your domain. If you are not sure who your domain provider is, you can use the Whois Lookup tool to find out.
- Point the “www” record.
- If a “www” record exists and it points to yourdomain.com or @ (as shown in the image below), then no further changes are needed.

- If the “www” record exists and it points to anything other than yourdomain.com or @ (as shown in the image below), delete it and add a new “www” record as described below.

- If the “www” record does not exist, or if you just deleted an incorrectly pointed www record as described above, add a new record and enter the following information:
- Type: CNAME
- Name: www
- Value/Target/Content/Points to:
yourdomain.com@can be used instead if your DNS provider requires it. However, doing so may impact existing DNS records (such as MX records that control email). We recommend consulting with your DNS host for more information.
- Then click Save.
- A correctly pointed “www” record will look like the following (the exact record content/value may vary from this image):

How to point subdomains
Subdomains, such as blog.domain.com or shop.domain.com, should be pointed to WP Engine using a CNAME record.
In the example below, we’re showing how to point the blog.domain.com subdomain. When you point your subdomain, be sure to change blog to whichever subdomain you’re pointing.
- Log in to your DNS provider’s dashboard and locate the area to manage DNS records.
- This is usually the registrar where you purchased your domain. If you are not sure who your domain provider is, you can use the Whois Lookup tool to find the registrar name.
- This is usually the registrar where you purchased your domain. If you are not sure who your domain provider is, you can use the Whois Lookup tool to find the registrar name.
- Point the subdomain record.
- If a record already exists named “blog” (or your whatever your subdomain is):
- Edit the record
- Update the value to the WP Engine CNAME
- Then click Save
- To add a new subdomain record, create a new record and enter the following information:
- Type: CNAME
- Name: Enter your subdomain (EX: “store”, “shop”, etc.)
- Value/Target/Content/Points to: Enter your WP Engine CNAME
- Then click Save
- If a record already exists named “blog” (or your whatever your subdomain is):
A correctly pointed subdomain will look like the following (the exact value/name may vary):

Additional Information
- AAAA (IPv6) records: Unless you are using Cloudflare as your DNS provider, AAAA (IPv6) records should not be used to point your root (apex) domain to WP Engine. This is because WP Engine does not currently support IPv6. Removing AAAA records ensures that:
- Your domain will be routed to your WP Engine-powered website properly.
- WP Engine can issue and apply the SSL correctly for your domain.
- Nameservers: If your domain registrar only allows for updating nameservers to point your domain, WP Engine does not have nameservers to point to. Instead, we recommend pointing the nameservers to Cloudflare and using Cloudflare as your DNS host. Cloudflare’s free account type works great for this!
To do this, follow these steps:- Step 1: Point your domain’s nameservers to Cloudflare (check with your domain registrar for instructions on how to update nameservers).
- Step 2: Set up CNAME flattening in Cloudflare
DNS Propagation
After updating your DNS, the change will begin to propagate throughout the internet. DNS propagation can take time and impact access to your site during the process. If you notice issues with accessing your website, confirm if it’s due to propagation delays. If problems persist, contact your domain registrar for further insights.
Propagation is the automatic process of updating servers across the world to the new DNS information, and can take anywhere from a few minutes up to 48 hours.
It’s normal to notice SSL errors while DNS propagation is occurring. A red SSL error icon may appear until propagation is complete, after which SSL should activate seamlessly. This is a typical behavior and should resolve itself once DNS fully propagates.
We can’t predict exactly how long propagation will take because it depends on how long it takes various servers around the world to update their caches with the new DNS information. This is not something WP Engine has control of.
However, you can track your DNS propagation status on a site such as WhatsMyDNS.net.
You can also check the status of your DNS propagation in the User Portal.
Follow these steps:
- From the Sites page, select the Environment that contains the domain you want to work with.
- Click Domains in the secondary menu on the left.
- To Refresh Status you can choose the Refresh option from one of two places:
- Expand the domain section by clicking the dropdown arrow to the left of the correct domain and click the Refresh option to the right.
- Click the three-dot menu next to the correct domain and click Refresh status.

Once propagation is complete, your website is officially “live” on WP Engine and any visitor to your domain will be directed to your WP Engine-powered website.
Also, once DNS has been verified as pointing to the Advanced Network or Global Edge Security, Cloudflare’s network, SSL and CDN will be enabled automatically. Also, HTTPS will be enabled for all pages automatically.
If you notice that a domain is not secured, or need to use a third-party SSL certificate, you can add it on the SSL page in the User Portal. Learn more about SSL here.
NOTE
At this point, we recommend testing the site to confirm that all pages are working as intended! If you experience issues at any point during this process, please reach out to our Support team, 24x7x365.
DNS Glossary
We understand DNS can be confusing and filled with terminology that may not be familiar, so we have provided some definitions of commonly used words and phrases on WP Engine to help.
Please note that these terms are defined in the context of WP Engine and may be slightly different on other web hosts. Additionally, the examples we use here may not be exact, but we hope they will provide more context and understanding.
A record
An A record is a type of record that points to a static IP address. Here at WP Engine, IP addresses are subject to change for security reasons (though it is a rare occurrence and you will be notified via email if it occurs). If they do change, you will need to manually update your DNS records to point to the new IP addresses.
An easy way to think of this is if a brick and mortar business moves to a new location, they will need to manually update their street address with their suppliers so they can still receive mail and packages.
CNAME record
A CNAME is a type of record that points one domain name or subdomain name to another domain name. It is used for subdomains and in some cases, root (or apex) domains.
WP Engine manages and provides the CNAME value you can use to point your domain.
By pointing your domain with a CNAME, traffic can be directed “flexibly” as the true destination is managed by WP Engine.
An easy way to think of this is like a P.O. box for a business. If the business moves to a new location, mail can still reach the business at the original address.
DNS
DNS is a set of rules to connect a domain and “point” traffic to a website. A and CNAME are the most common types of DNS records that direct traffic to a specific location.
DNS stands for Domain Name System. It is the system that converts domain names (like wpengine.com) into IP addresses (like 142.193.213.11) so websites can be found and loaded into your web browser.
This is necessary because computers do not understand website names like we do. A domain name like wpengine.com makes it easy for us to remember website names, but the servers that websites are stored on refer to them as numbers.
When you type a website address into your browser, such as wpengine.com, your computer searches for that website’s corresponding IP address to find and show you the correct page.
So, pointing your DNS connects your domain name to the WP Engine server where your website is located so people can find it easily.
DNS provider (or DNS host)
A DNS provider (or DNS host) is the place where DNS records are configured. This may be the domain registrar, or some other DNS host (EX: Cloudflare or Sucuri). The DNS provider will always be where the nameservers are pointed to in the domain name registrar’s settings.
Domain registrar
A domain registrar is where a domain name is purchased and “registered” (EX: GoDaddy, Google Domains, Namecheap).
IP address
An IP address is a static set of numbers that identify a specific server. EX: 12.34.56.78
This is similar to the street address of a business. WP Engine provides the IP address for your website.
Nameservers
Nameservers are special DNS servers that help direct traffic to the correct set of DNS records. In other words, they store DNS records like phone books store and organize street addresses.
Nameservers also make it possible to use a DNS host (the service that controls your DNS records) that is separate from your domain registrar (the company you purchased your domain from).
For example, if you purchased your domain from GoDaddy, but want to take advantage of Cloudflare’s CNAME flattening, you can update your nameservers to make Cloudflare your DNS host, even though you didn’t buy your domain from them.
Please note that because we are not a DNS host, WP Engine does not provide or manage nameservers. If you are not sure where your nameservers are pointed, you can use a website such as WhatsMyDNS.net to find out. Simply enter your domain name, select “NS” for nameservers, and click Search.
If your DNS host only allows for updating nameservers, we recommend pointing the nameservers to Cloudflare and managing DNS there instead.
Propagation
Propagation refers to the process of supplying DNS record updates to servers around the world. Propagation is controlled by the DNS provider, but you can request a delay by adjusting the TTL (time to live) when editing a DNS record.
Root (or Apex) domain
A root (or apex) domain is the topmost and bare level of a domain name. It does not include any prefixes (like “www”).
For example, wpengine.com is a root domain. However, www.wpengine.com is not a root domain because it contains the “www” prefix. Also, shop.yourdomain.com is not a root domain because it contains the “shop” prefix.
Depending on who your DNS provider is, you may notice that your root domain can be represented using either the @ symbol or the bare domain name (ex: yourdomain.com).
Subdomain
A subdomain is any prefix of the root (or apex) domain. For example, the “www” prefix will create the subdomain www.domain.com and the “blog” prefix will create the subdomain blog.domain.com. We recommend pointing subdomains using a CNAME record.
NEXT STEP: Learn how to protect your website with SSL and secure all pages over HTTPS