Get Started
Copy an Environment Using Push or Pull
Tags:
Key Takeaways
Push to action allows pushing changes from staging to production for immediate website updates. Pull from action enables testing changes in a safe environment before going live.
Choose between Full or Custom copy to control what content is included in the copy process, preventing accidental data loss.
Status Visibility feature provides real-time updates on the copy process, ensuring transparency and monitoring capabilities.
Automated search and replace during the copy process ensures seamless transition of content between environments, reducing manual errors and saving time.
If you have made changes to an environment and now you want to copy those changes to another environment, you can use the “Push to” or “Pull from” action in the User Portal.
In this article, we will show you how to push or pull changes in any environment in any site in your WP Engine account.
Please note that if you are copying a multisite network, we recommend reading the Multisite Deployment Best Practices article first.
If you need to copy an older checkpoint, you can use the Copy Environment tool as described in this article or use the backup and restore functionality.
Prefer to watch a video?

Was this video helpful?
What are “Push to” and “Pull from” actions?
When you are ready to copy changes from one environment to another, you can use the “Push to” or “Pull from” action. Both of these actions work in the same way, so the only real difference is where you’re starting the copy process from.
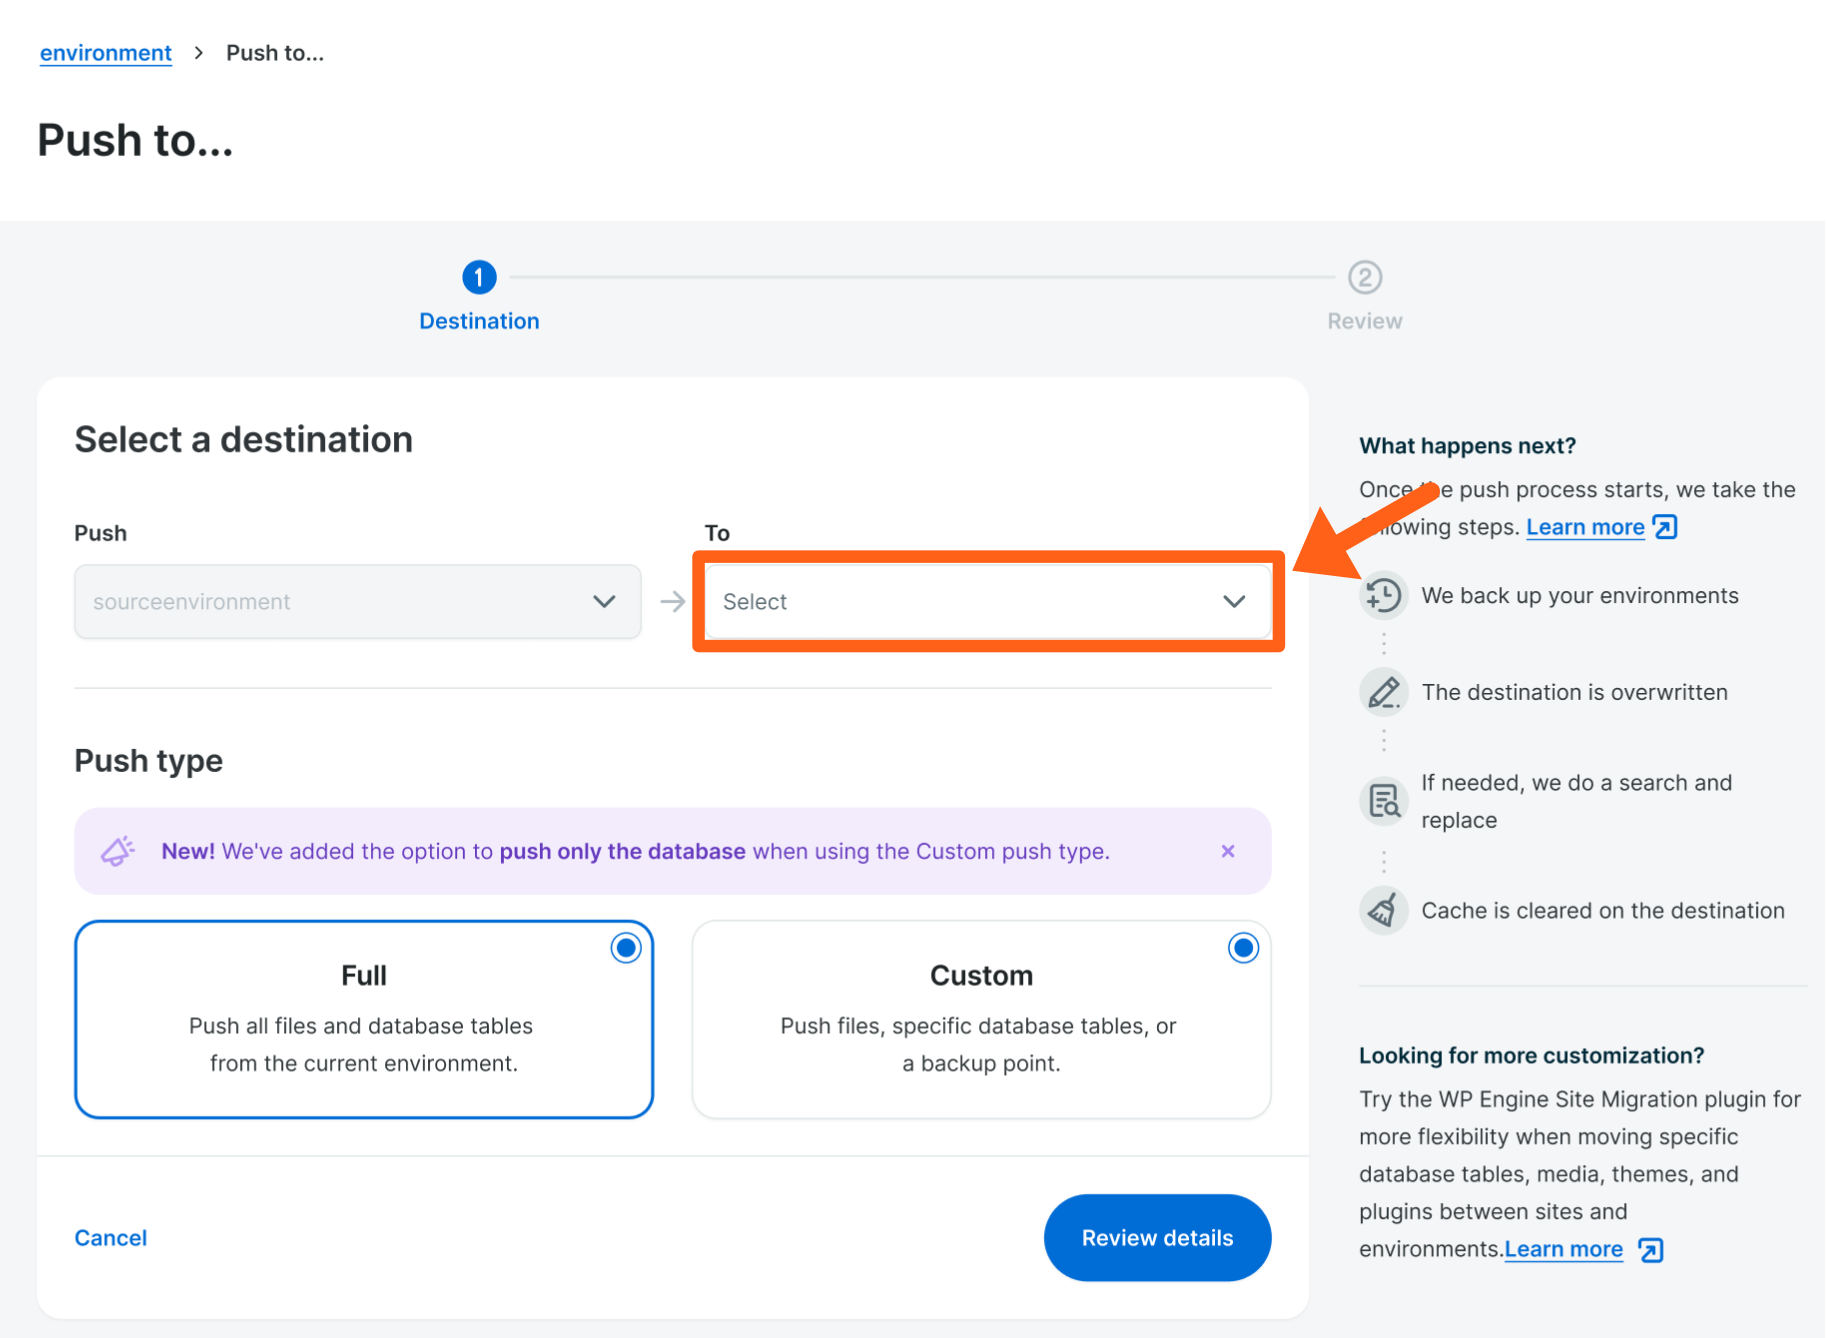
“Push to” action
The “Push to” action allows you to push the contents of the currently selected environment to another environment.
For example, if you have been working on your website in the staging environment and now you are ready to publish everything to your live website, you can push staging to production.
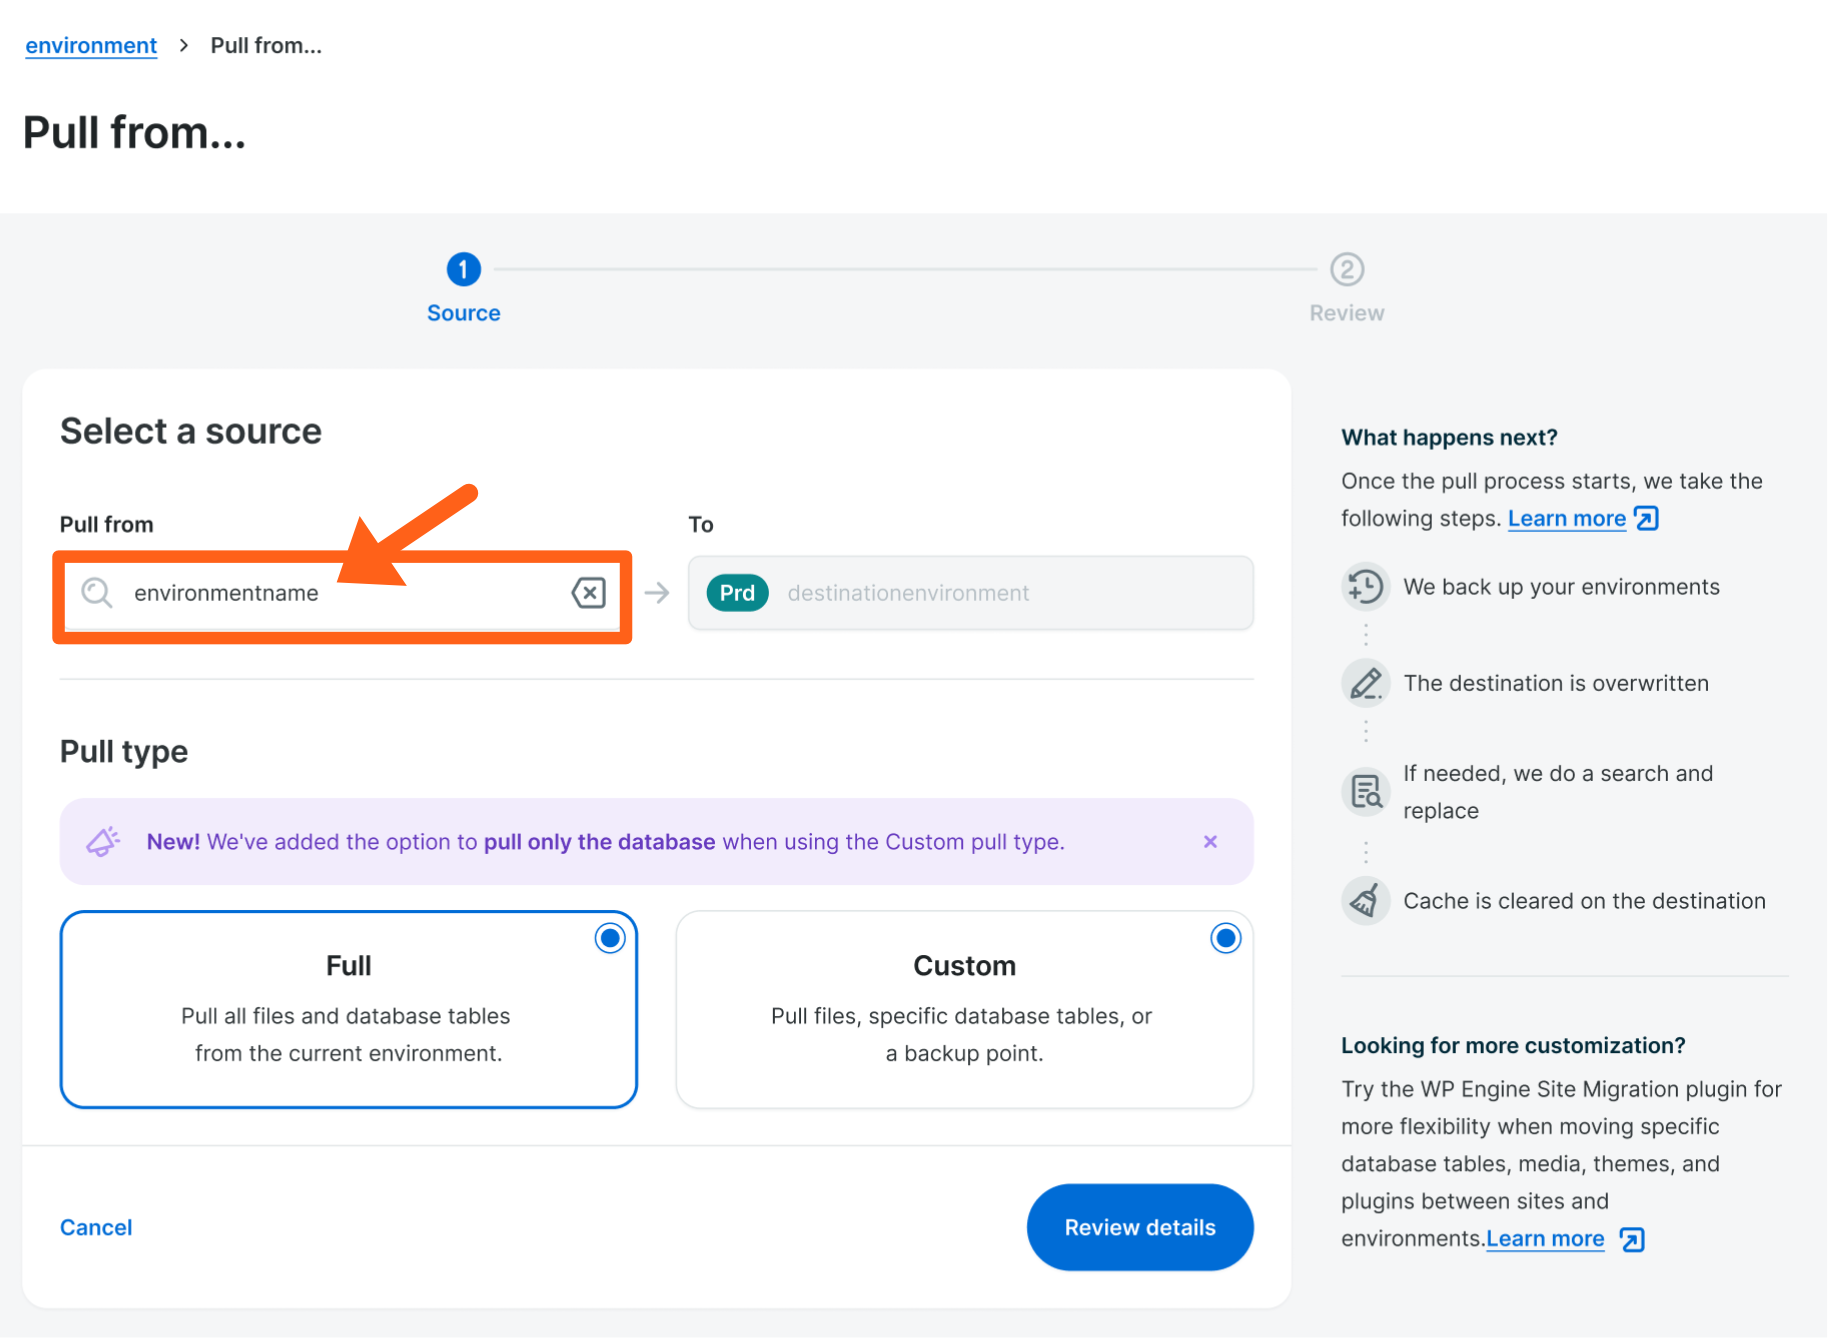
“Pull from” action
The “Pull from” action allows you to pull the contents from another environment into the currently selected environment.
For example, if you want to add a new plugin, but you want to test it for compatibility before activating it on your live website, you can pull production to staging and then do all your testing there.
How to push or pull content between environments
- Select the environment you want to start the copy process from.
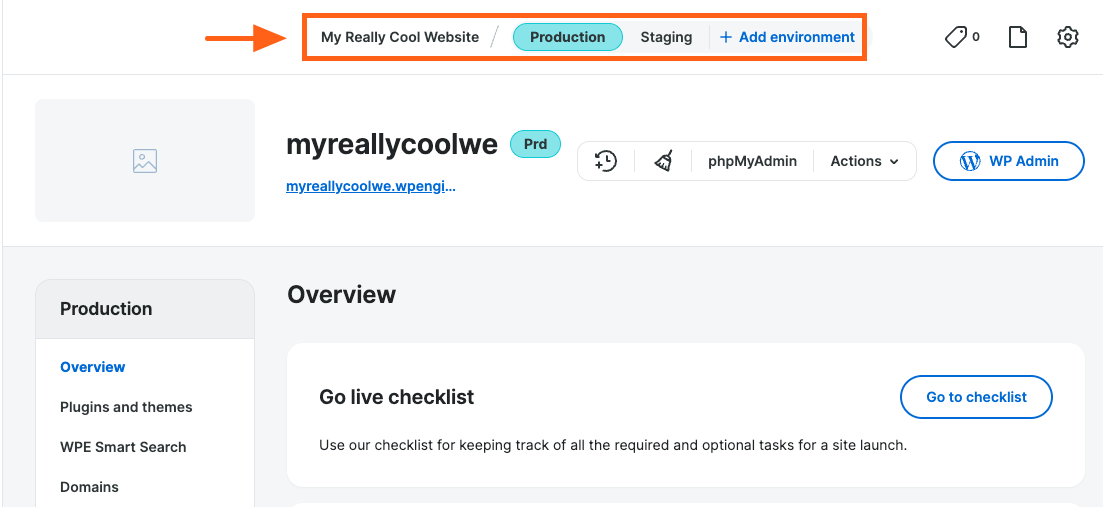
- On the Sites page, select the site you are working on.
- Select the correct environment at the top of the page.
- If you want to push content from this environment to another one, select the source environment.
- If you want to pull content from another environment into this one, select the destination environment.
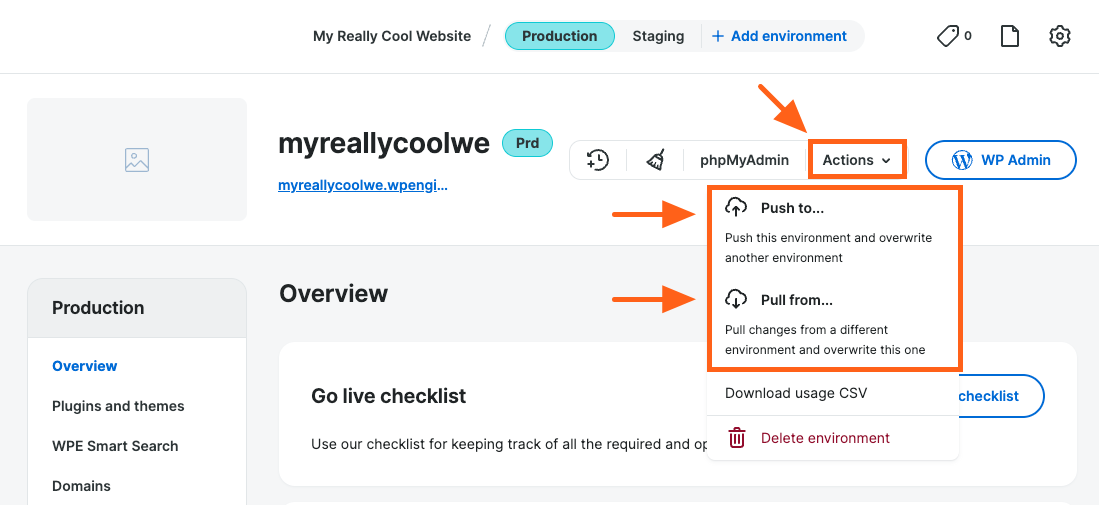
- Click the Actions menu to reveal the options and then select either Push to or Pull from.
- Select the destination or source environment.
- If you are using “Push to…”
- Select the destination environment that you want to push content to “To” as shown below.
- The source environment is grayed out because you cannot change it on this page. However, if you selected the incorrect environment, you can click the site name in the breadcrumb menu at the top of the page to start over.
- The source environment is grayed out because you cannot change it on this page. However, if you selected the incorrect environment, you can click the site name in the breadcrumb menu at the top of the page to start over.
- Select the destination environment that you want to push content to “To” as shown below.
- If you are using “Pull from…”
- Select the source environment that you want to “Pull from” as shown below.
- The destination environment is grayed out because you cannot change it on this page. However, if you selected the incorrect environment, you can click the site name in the breadcrumb menu at the top of the page to start over.
- The destination environment is grayed out because you cannot change it on this page. However, if you selected the incorrect environment, you can click the site name in the breadcrumb menu at the top of the page to start over.
- Select the source environment that you want to “Pull from” as shown below.
- If you are using “Push to…”
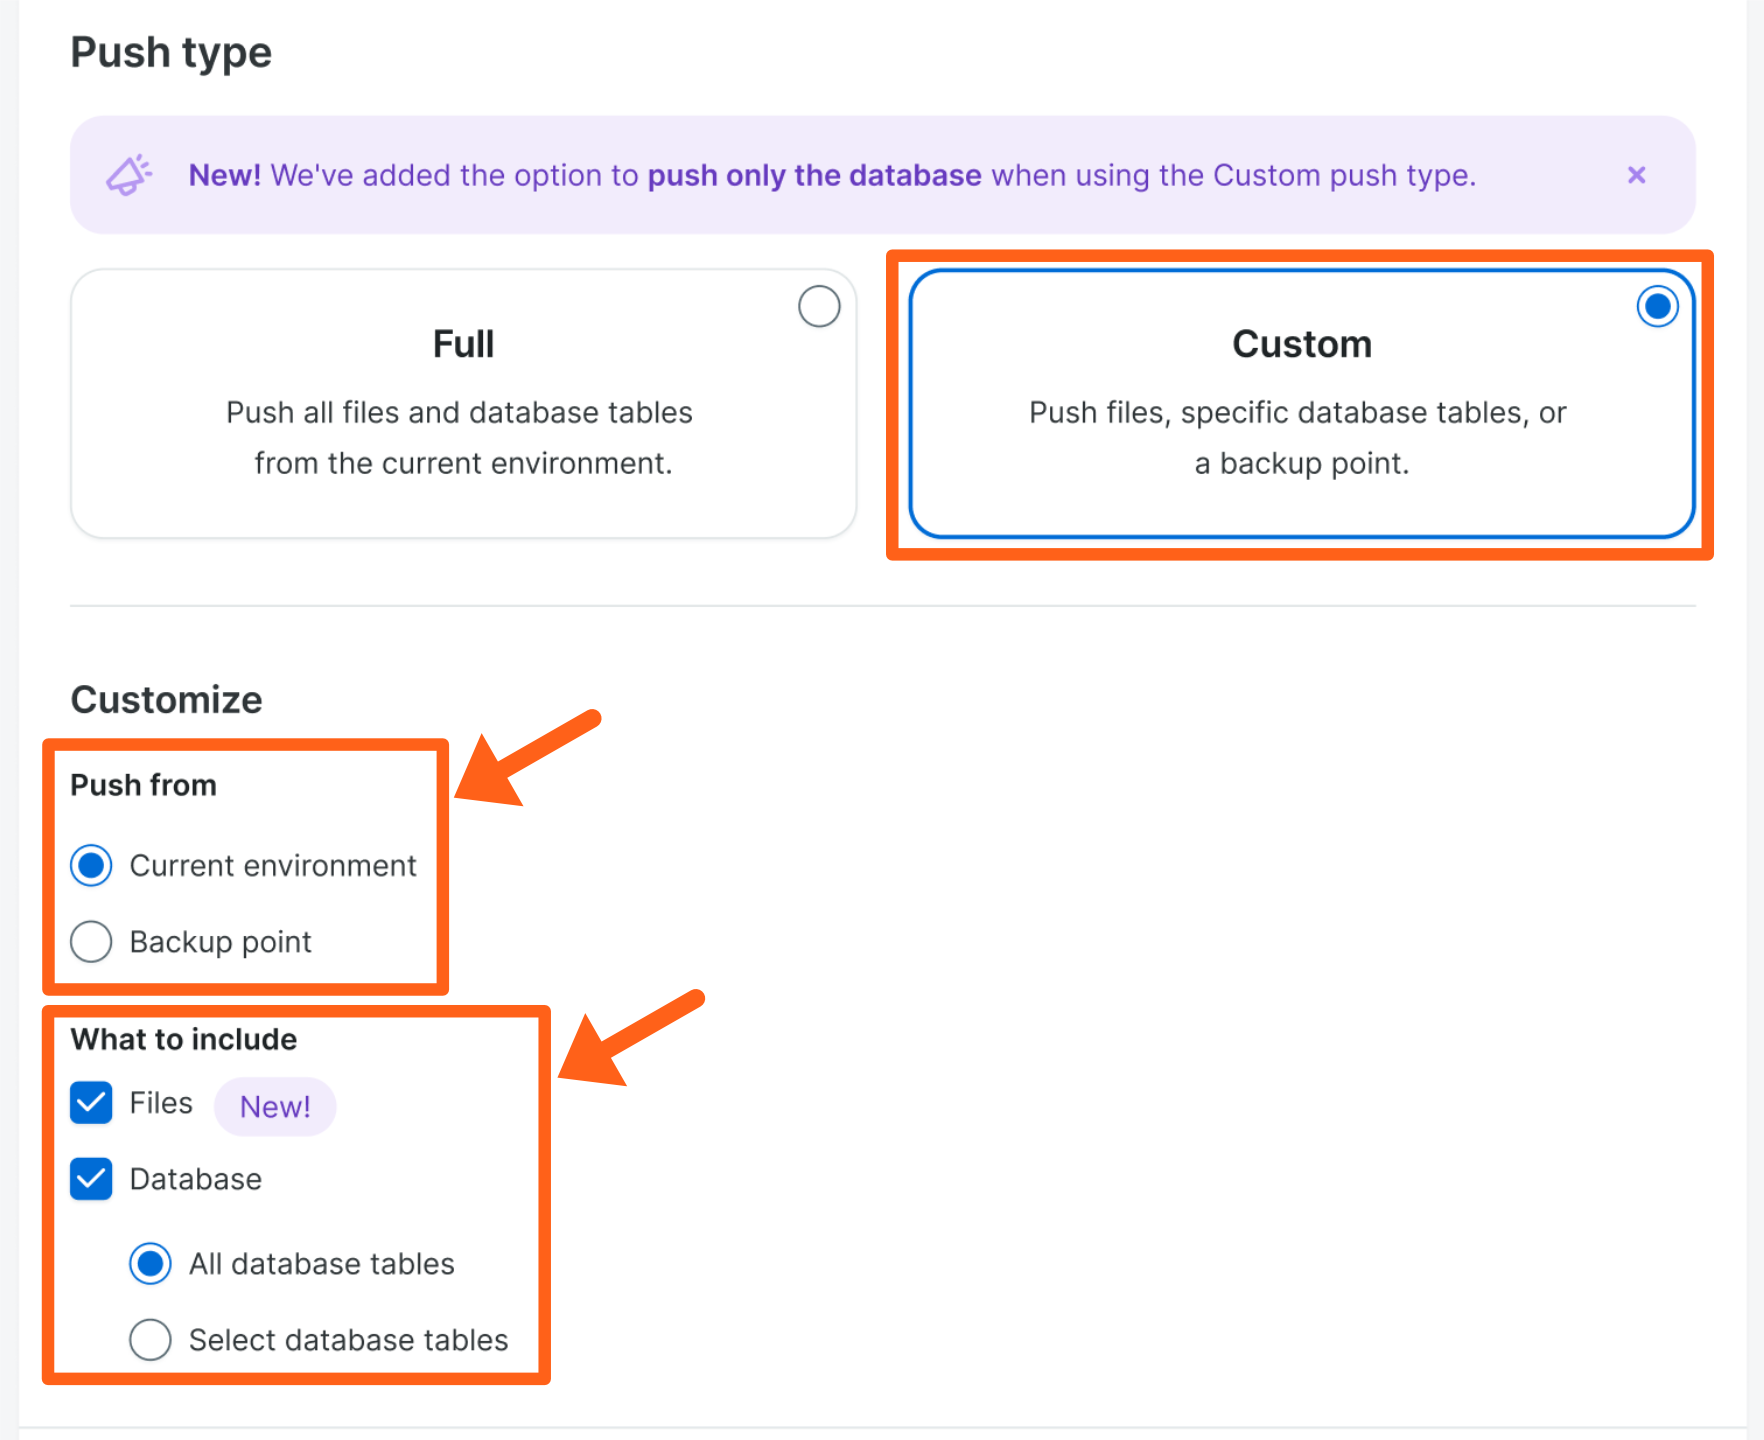
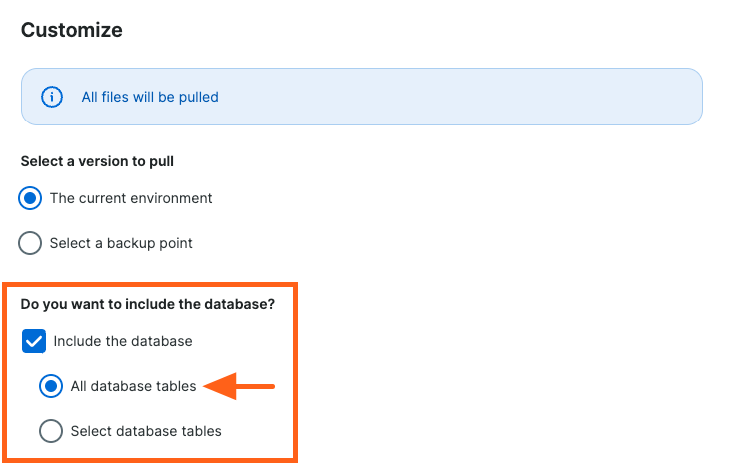
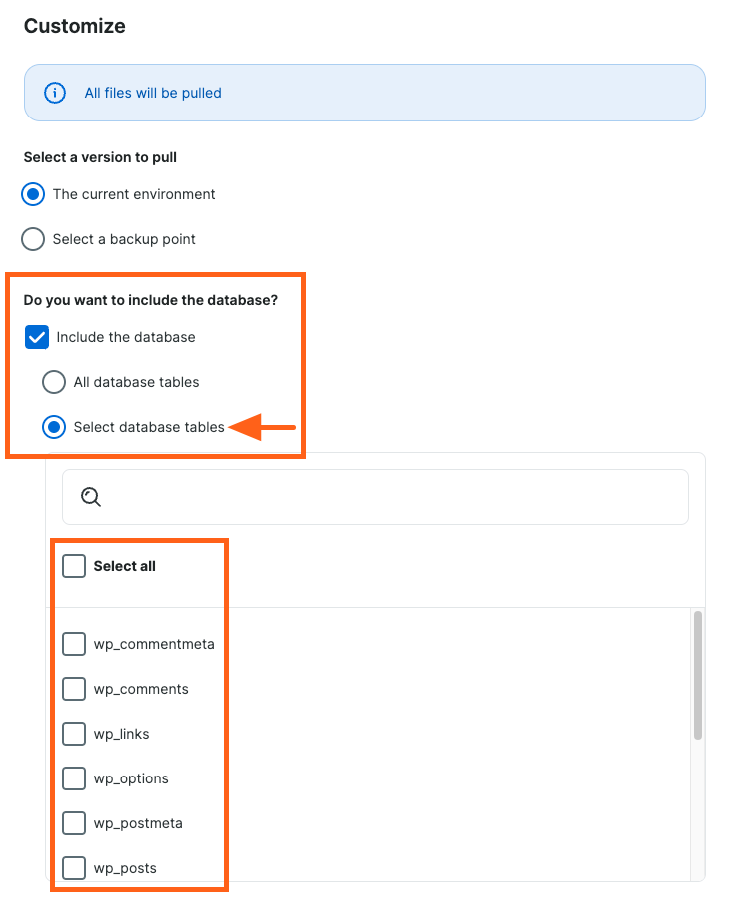
- Choose the content you want to include in the copy (Full or Custom).
- Full: A full copy includes all the files and all database tables in the environment.
- See what the file system includes.
- See what the database includes.
- We do not recommend pushing the entire database to the production environment. If you do, the production database will be completely overwritten. This can cause the live website to lose important data like new orders or new users, so be very careful when choosing this option.

- We do not recommend pushing the entire database to the production environment. If you do, the production database will be completely overwritten. This can cause the live website to lose important data like new orders or new users, so be very careful when choosing this option.
- Custom: A custom copy lets you choose whether to copy the current state of the environment or a specific backup, and whether or not to include the file system or the database.
- Select a version to push or pull.
- The current environment: The current, most recent version of the content will be included in the copy.
- Select a backup point: A previous version from your selected backup point will be included in the copy.
- Choose the content that you want to copy.
- Files: Check this box if you want to copy all of the files for the environment.
- Database: Check this box if you want to copy some or all of the database tables for the environment.
- All database tables: Select this radio button if you want to copy all database tables for the environment.
- Select database tables: Select this radio button if you want to choose which database tables to copy.
Note: If you selected to copy from a backup point then you can only select “All database tables”.
- Select a version to push or pull.
- Full: A full copy includes all the files and all database tables in the environment.
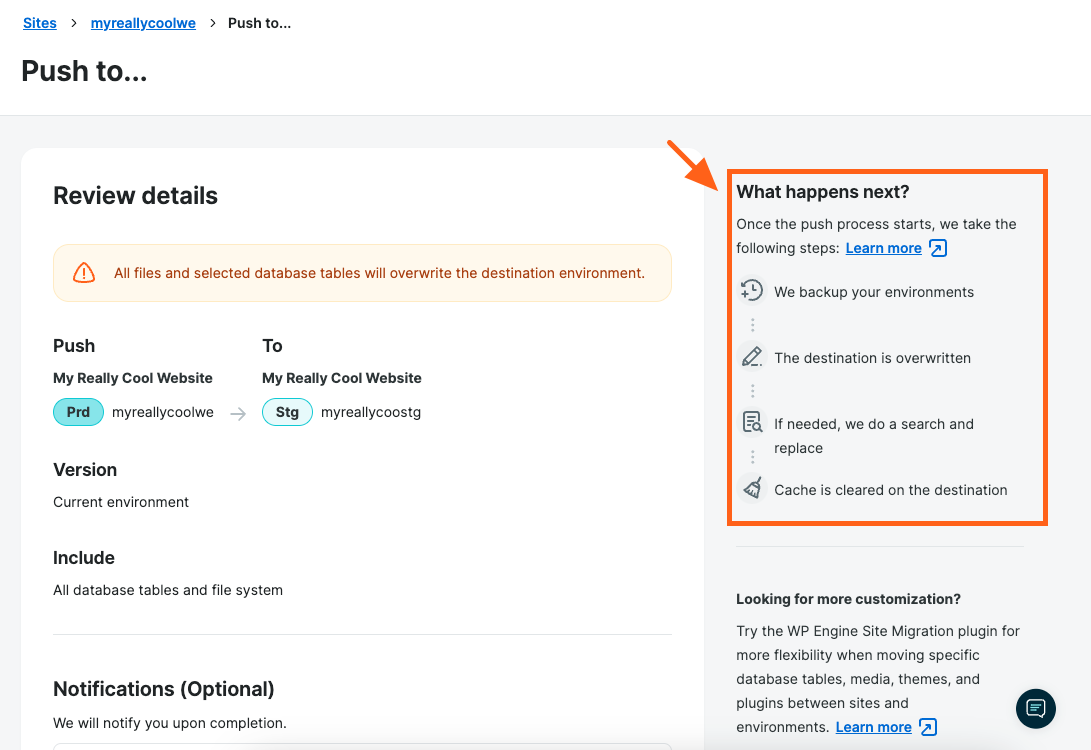
- Click Review details at the bottom of the page to confirm your selections.

- Review your selections on the next page.
- If something does not look correct, you can click the site name in the breadcrumb menu at the top of the page to start over.
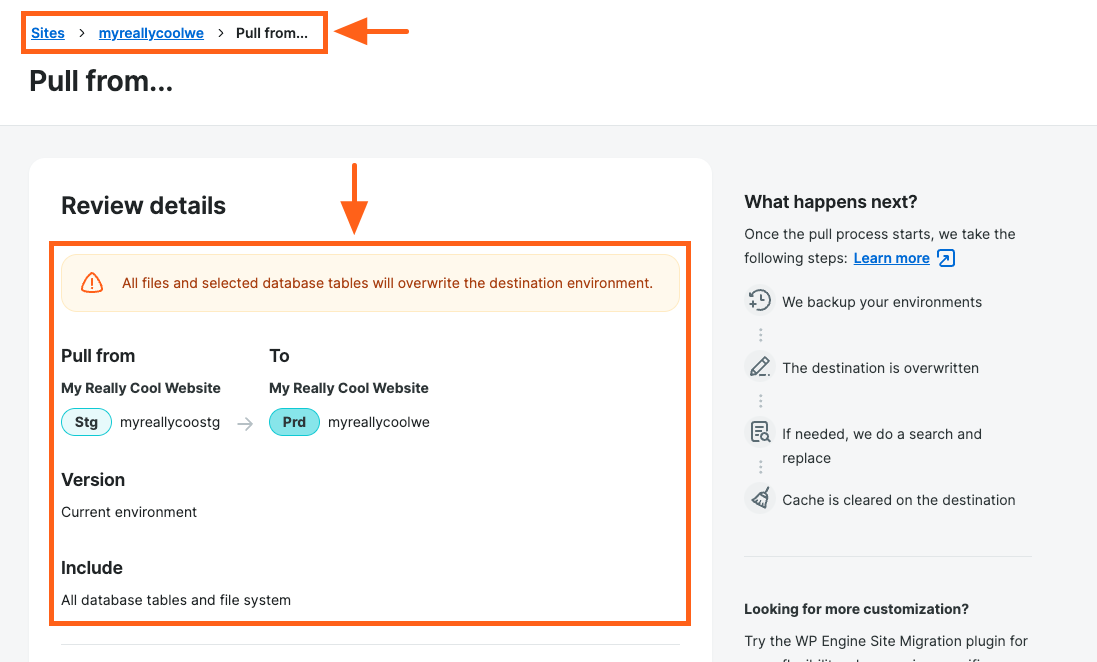
- If something does not look correct, you can click the site name in the breadcrumb menu at the top of the page to start over.
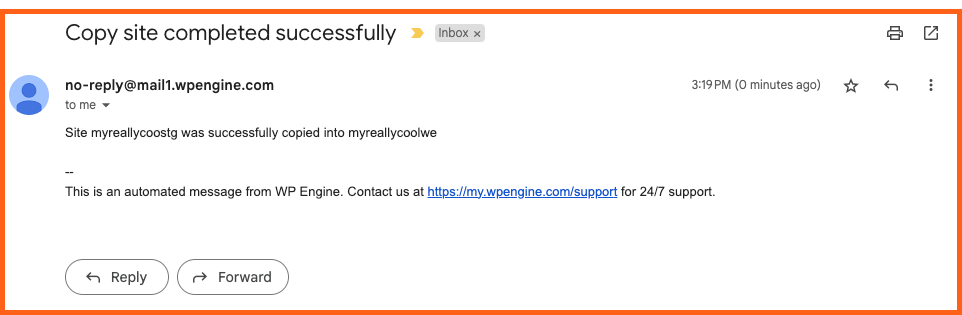
- Enable notifications.
- If you would like to receive an email notification when the copy is complete, enter your email address.
- We do recommend enabling this notification because it’s the only way you will know when the process is complete.
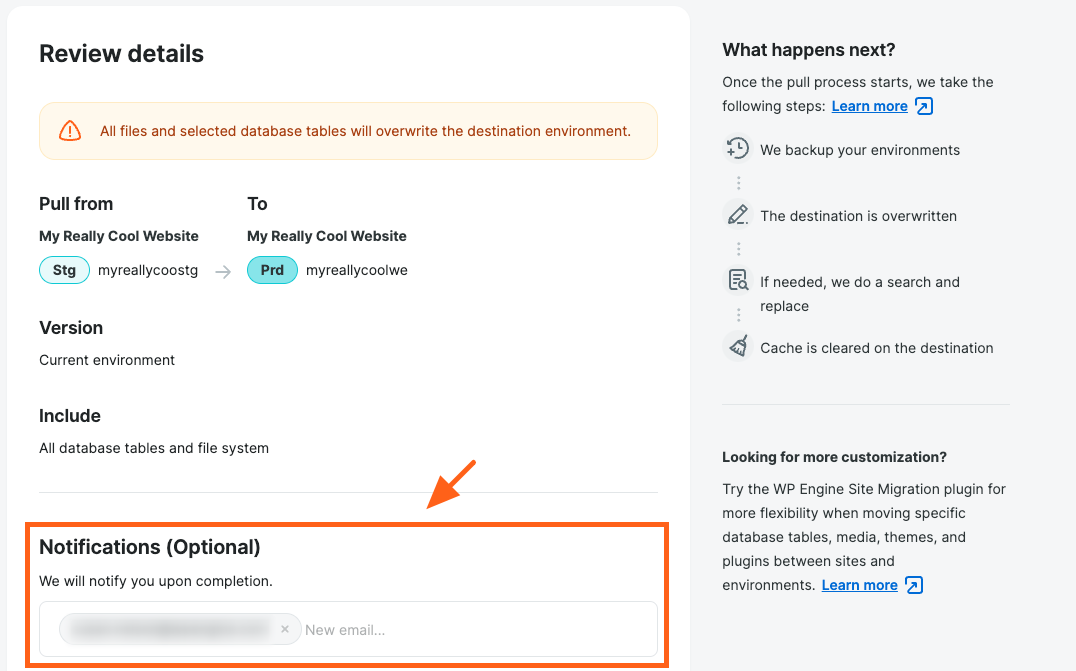
- We do recommend enabling this notification because it’s the only way you will know when the process is complete.
- If you would like to receive an email notification when the copy is complete, enter your email address.
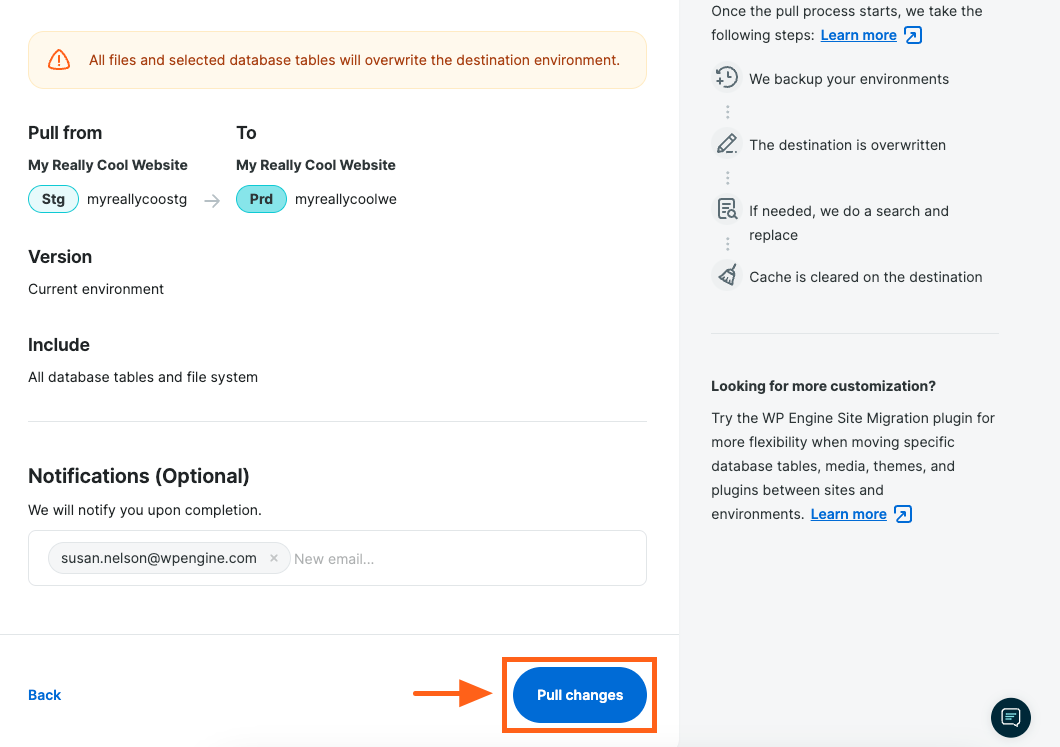
- Finally, click the Push changes or Pull changes button to start the copy process.
Status Visibility for Copying Environments
After an environment copy has started you’ll see a status banner showing the status of the copy in progress. In the banner you’ll also see a link to a side drawer with more details.
Status Banner
The Status banner will show on the destination environment below the header and above the side menu. This will let you know when a copy is still in progress. During this time you cannot start another copy. Click the View Details link to see more details in the status drawer that will pop out on the right side of the page.

The banner will also persist after the copy is completed for 10 minutes or until you click Dismiss. If there is an error message for a copy failure, the banner will persist for 1 hour or until you click Dismiss. After clicking Dismiss, the View Details link will no longer be accessible for that environment copy instance. You will still be able to see details about what copies have been started previously from the User Portal under Account Activity.
Status Drawer
After clicking the View Details link in the status banner as shown in the screenshot above, you’ll see the side drawer slide out from the right side of the page with more information about your environment copy in progress.
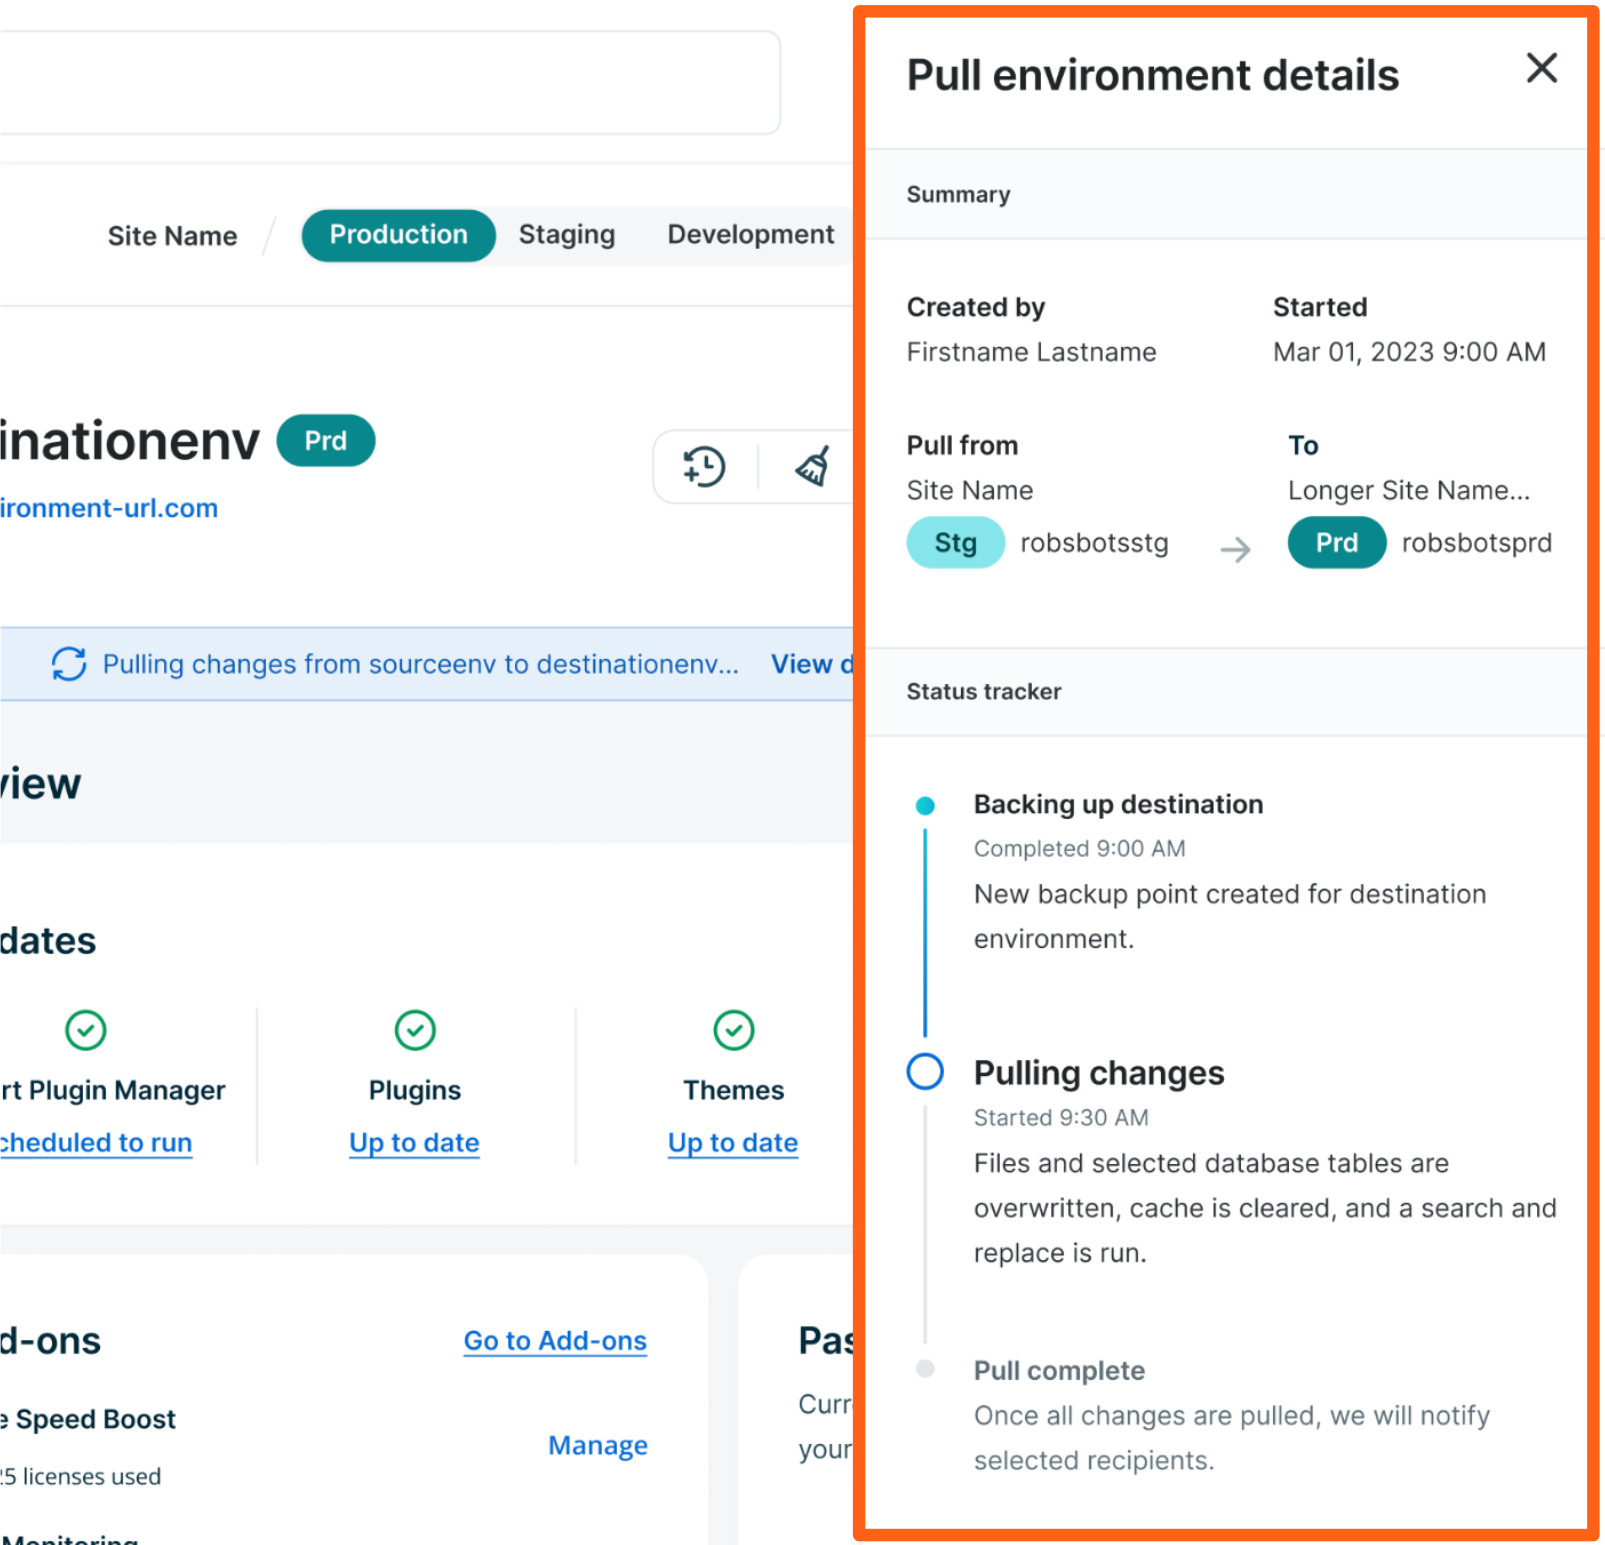
Details included in the status drawer are:
- Created by: This is the name of the user who initiated the copy.
- Started: Timestamp when the copy was started.
- Pull from: This is the source environment where the data is copied from.
- To: This is the destination environment that the data is copied to.
- Status tracker: The current status of the copy with 3 states. The 3 states are Backing up destination, Pulling changes, and Pull complete.
What happens during the copy process?
After the copy request is submitted:
- If you are copying the current environment, the source is backed up before the copy to ensure the copied content is fresh.
- The destination is backed up before and after the copy.
- The destination is overwritten.
- An automated search and replace from the source domain to the destination domain is performed on all included database tables. This ensures all website URLs are correct when the process is finished.
- On a multisite network, this search and replace may look different than expected, so we recommend reviewing the WordPress Multisite article before starting the copy process.
- The cache is automatically cleared on the destination environment to make sure everyone sees the new and updated content.
What happens after the copy is complete?
When the process is complete, and if you enabled the email notification, you will receive an email at the address(es) you provided confirming it was successful. Additionally, we will create a backup checkpoint of the destination environment.
Please note that copies of large environments may take a while. Also, once a copy has been started, do not make additional changes to either environment until the process is complete.
What specific content is included in a copy?
For each copy process you can choose to include or exclude the entire file system, and you can choose to include or exclude the database. For the database you can also choose to only include specified tables.
File system
The file system includes all media, theme files, plugin files, scripts, wp-config.php, core files, etc.
Please note that a file system copy is fully destructive, meaning everything in the destination environment will be overwritten. If a file exists in the destination environment, but not in the source environment, it will be removed from the destination environment during the copy. There are no file system exclusions.
If you select to copy the file system only, no database information will be copied to the target environment. The database will remain as-is.
Database tables
The database includes all posts, pages, users, custom post types (for example: WooCommerce® orders), and some settings.1 It is also possible for the database to contain theme and plugin settings. This varies, though, so if you are unsure, you can reach out to the theme or plugin author to ask.
When the database is included in a copy, a search and replace will automatically be run to update the source domain to the destination domain. Learn more about this process here.
If the environment is a multisite network, this search and replace will work similarly, but the results may look different than expected. We recommend reviewing this article before copying.
All database tables
This option overwrites the entire database of one environment with the entire database of another environment.
If you choose to include all database tables in the copy:
- Tables that exist in both the source and destination will be overwritten in the destination.
- Tables that exist in the source but do not exist in the destination will be added to the destination.
- Tables that do not exist in the source, but exist in the destination will be left as-is in the destination.
Specific database tables only
This option allows you to include specified database tables, excluding others. Only tables that exist in the source environment can be selected.
If you choose to include specific database tables only in the copy:
- Selected tables that exist in the destination will be overwritten in the destination.
- Selected tables that do not exist in the destination will be added to the destination.
When selecting the specific database tables option, you can either select specific database tables, or you can use “select all” tables, and then search or scroll through the list of tables and exclude specific ones.
Here are some example scenarios where you might want to copy only specific database tables:
- You have installed a theme or a plugin and only want to copy the tables related to it. You may need to refer to your plugin or theme support if you are not sure which tables hold the data you do not want to overwrite.
- You have added content to the target environment since the last copy and you hope to preserve that data when pushing it back.
To exclude pages and posts, do not select the following tables:
_posts
_postmeta
To exclude users, do not select the following tables:
_users
_usermeta
If you are using WooCommerce, you may want to exclude certain order data or user information from the deployment. In this case, do not include the following tables:
_posts
_postmeta
_woocommerce_order_items
_woocommerce_order_itemmeta
When using WooCommerce, we recommend enabling High Performance Order Storage, which separates orders into dedicated tables. This can simplify deployments by allowing those tables to be selected or deselected. Learn more here. When High Performance Order Storage is enabled, posts and postmeta are not used. Instead, the orders tables to exclude are:
_wc_orders
_wc_order_addresses
_wc_order_operational_date
_wc_orders_meta
For more information on deploying WooCommerce, see WooCommerce Best Practices.
Copying the database to production
We typically do not recommend copying a database to a production environment because the database will be rewritten entirely with the staging or development environment contents. This destructive process can cause the loss of important data, such as new orders or users.
If you added posts or pages to the staging or development environment that you want to copy to another environment, the easiest solution is to use the default WordPress Export/Import Tools to manually migrate that content to production. If more specific export parameters are necessary, then WP All Export has more customizable export options.
Alternatively, if you have added content to production, but you need to push or pull the staging or development environment database for some other reason, you will need to export the content from production before the copy, and then import it back to production after the copy is complete. The default WordPress Export/Import Tools can be used for this, as well as WP All Export for more customizable export options.
If you are using a theme that stores settings in the database, it would be best to make the changes on production and leverage the Preview Site theme feature as well as our Backup system.
If you are deploying a WooCommerce site, we recommend reviewing WooCommerce Best Practices first.
Copy tips
- User Portal 301/302 redirects, SSL certificates, custom cache exclusions, Nginx rules, and other custom WP Engine server configuration options.
- These items will not be copied using the Copy Environment process. These rules exist if added manually, and in most cases will not cause issues when excluded from a copy. The WP Engine Support team is happy to manually copy over any custom rules if necessary, by request.
- We suggest enabling a maintenance page on the Source environment before initiating the copy process.
- This can help you prevent any visual discrepancies, downtime, or missed orders. You can enable maintenance mode with a plugin or by leveraging default WordPress functionality.
- To speed up a copy, reduce the scope of the content.
- Reduce or offload storage to reduce overall size. Learn more here.
- Optimize the database to minimize database size. Learn more here.
Specific plugins or themes can be duplicated by using the file system instead of performing a copy process. Plugins are stored in wp-content/plugins and themes can be found in wp-content/themes. You can access files by downloading a full or partial backup, by using SFTP, or with SSH Gateway.
NEXT STEP: Learn about the WP Engine backup and restore system