Get Started
NitroPack Documentation
Tags:
Key Takeaways
NitroPack is a powerful optimization tool for WordPress sites on WP Engine. It enhances performance by compressing, caching, and optimizing resources with just a few clicks.
Image Optimization is crucial for web performance. Unoptimized images can slow down loading times and impact user experience.
Adaptive Image Sizing improves user experience across devices. Resizing images based on device screens enhances performance and reduces loading times.
Testing NitroPack in Staging or Development environments is recommended before Production. This ensures compatibility and performance benefits are maximized.
NitroPack is a powerful optimization tool that will help speed up a WordPress® site on WP Engine.1 With just a few clicks, it enhances the website’s performance by compressing, caching, and optimizing resources.
NitroPack can be purchased for most Shared and Premium plans from the Products page. At this time it cannot be added to WP Engine Headless Platform plans. NitroPack product pricing is based on number of licenses.
Enable
To enable NitroPack on an environment:
- From the User Portal, choose Products in the main sidebar menu
- Click NitroPack under Your products
- Access this page directly at: https://my.wpengine.com/products/nitropack
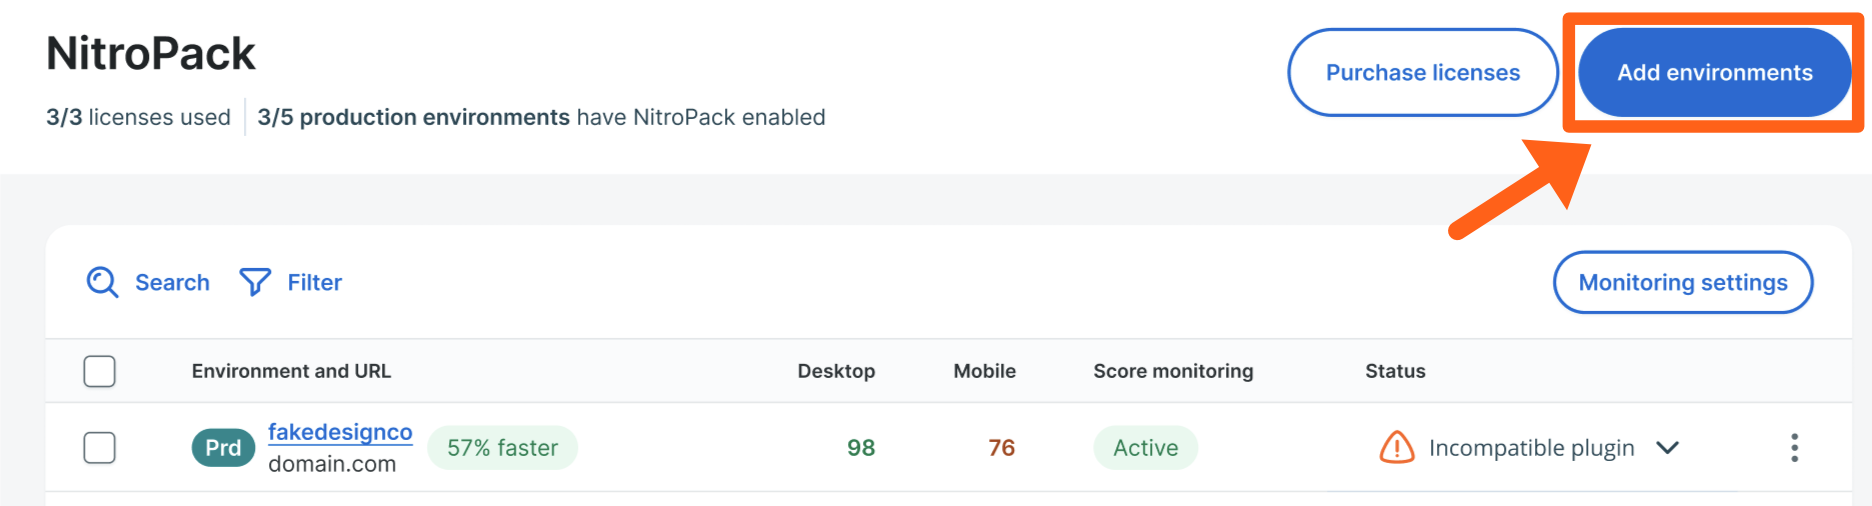
- Click Add environments
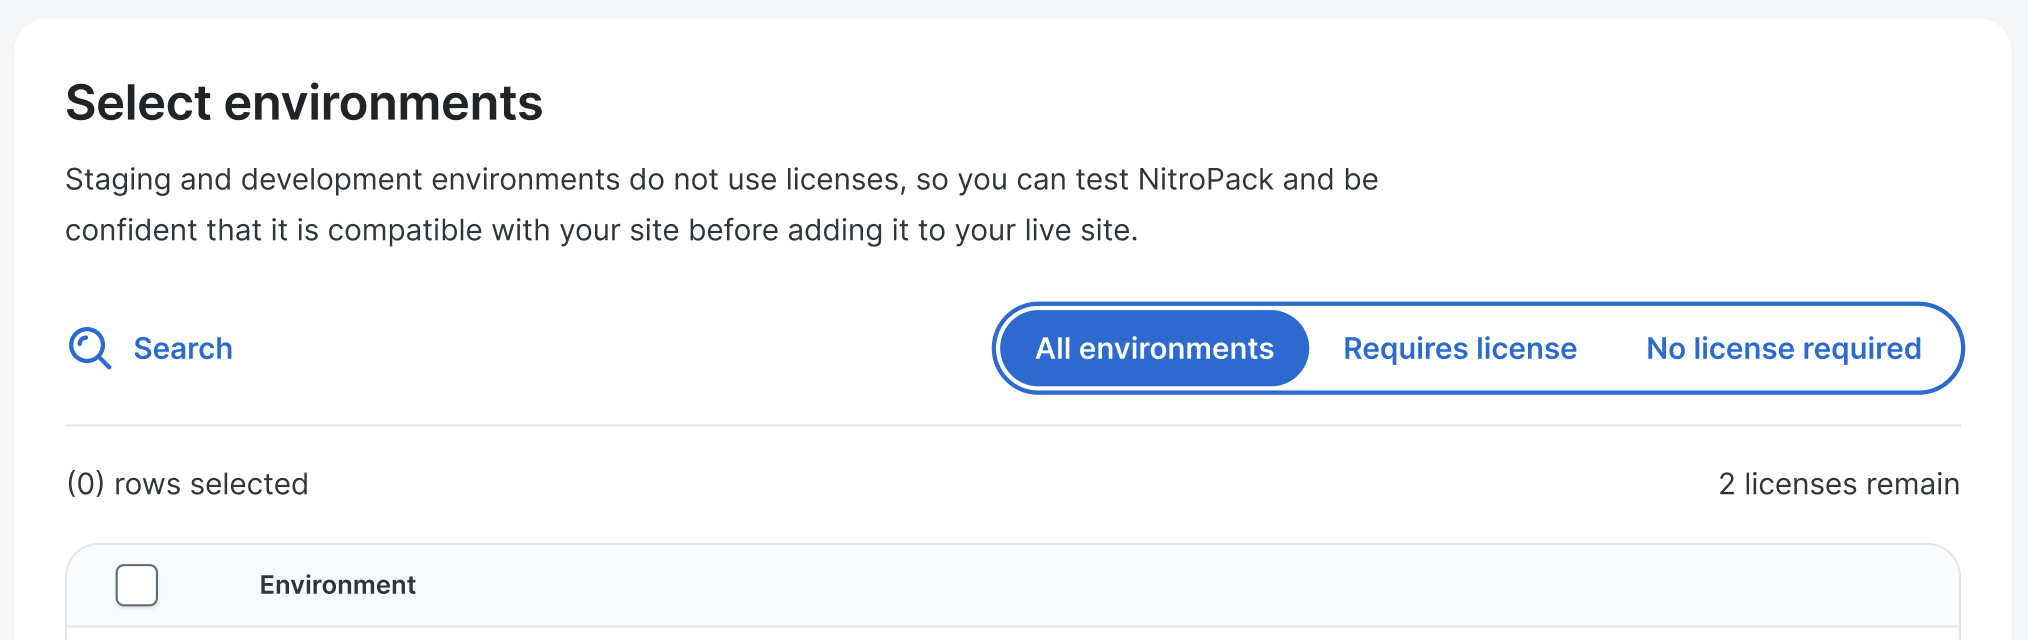
- (Optional) It’s recommended to test NitroPack on a Staging or Development environment before applying it to Production. Click the No license required filter to view Staging and Development environments. Note that the performance benefits on Stg/Dev will not be as great, and testing here should simply be done for overall compatibility with the Production environment. NitroPack must be purchased for the account before the No license required option will be available.
- Check the box(es) of the environment(s) to enable NitroPack on, read and agree to the Terms and Conditions, and click Install.
- If your site is already connected to the standalone version of the NitroPack plugin from nitropack.io, then you’ll see a popup with the message “Existing NitroPack connection detected“. If you choose to continue converting to the WP Engine version of the NitroPack plugin:
- Your site will automatically be disconnected from your nitropack.io account.
- A NitroPack license will be activated for the site in the WP Engine User Portal.
- You must check to box to confirm that you are aware that your NitroPack settings will not transfer and you will have to re-enable any necessary settings.
- Any subscription on nitropack.io will remain active and you must cancel it manually.
- You will see a popup progress bar while the NitroPack plugin is being installed on the selected environments. Wait for this to finish to see the next steps.
- If your site is already connected to the standalone version of the NitroPack plugin from nitropack.io, then you’ll see a popup with the message “Existing NitroPack connection detected“. If you choose to continue converting to the WP Engine version of the NitroPack plugin:
- Click Preview Site next to an environment name to preview how the site will display when NitroPack is enabled.
- This will open the environment’s url for previewing with the
?testnitro=1query string appended to it.- example:
https://mynewsite.wpenginepowered.com?testnitro=1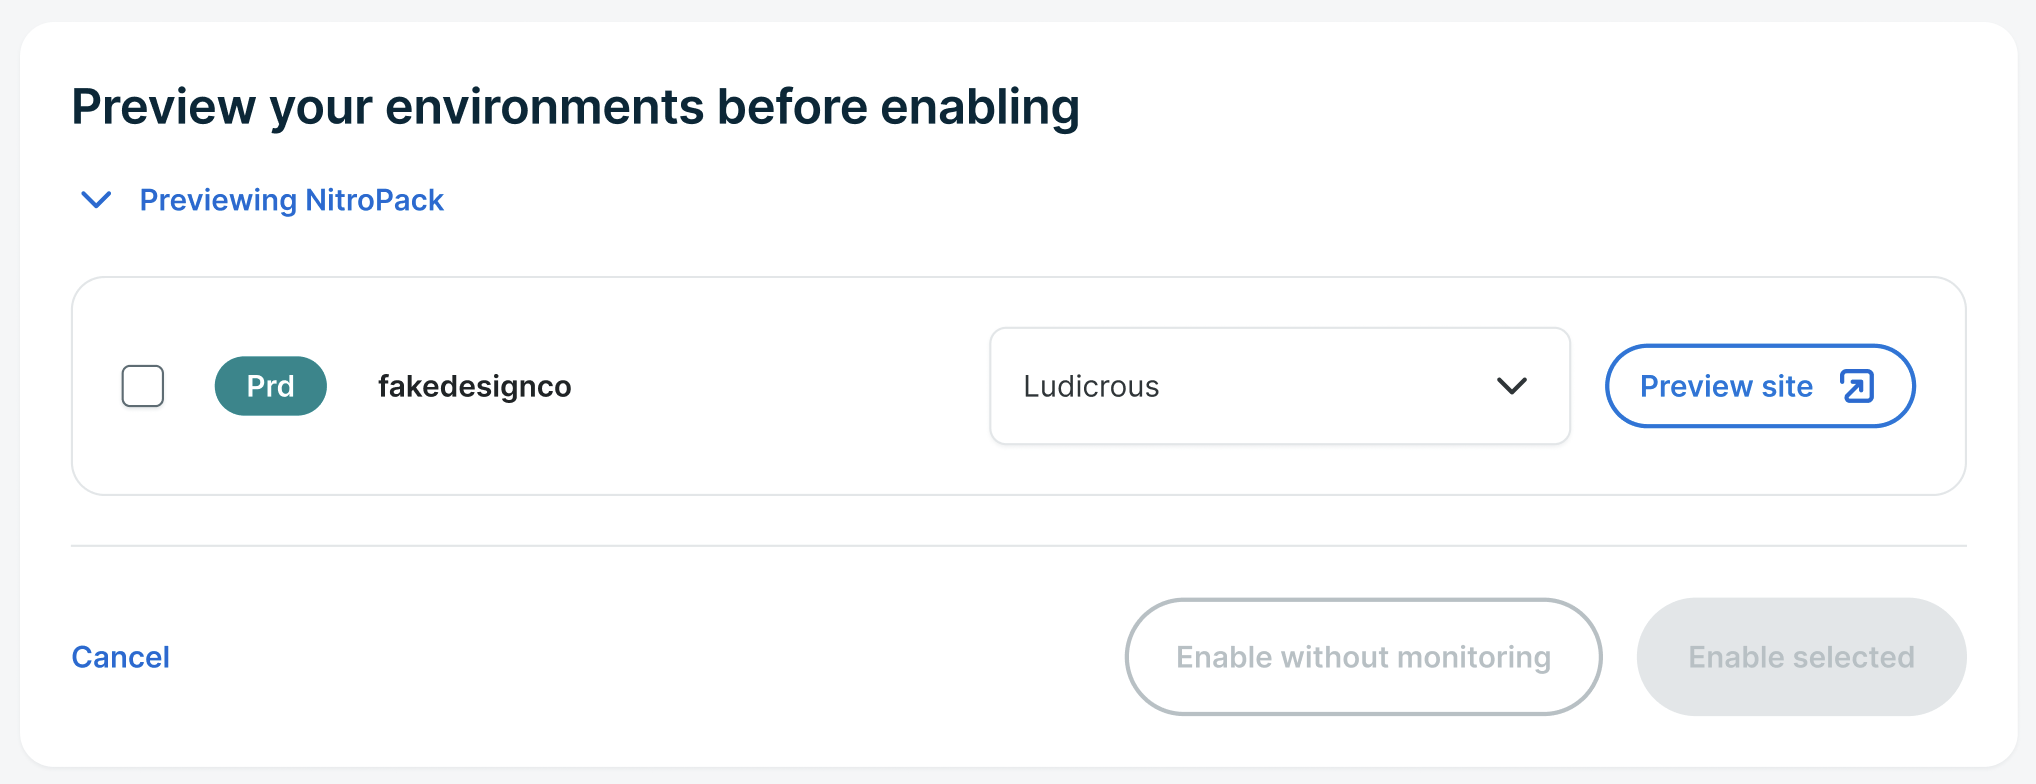
- example:
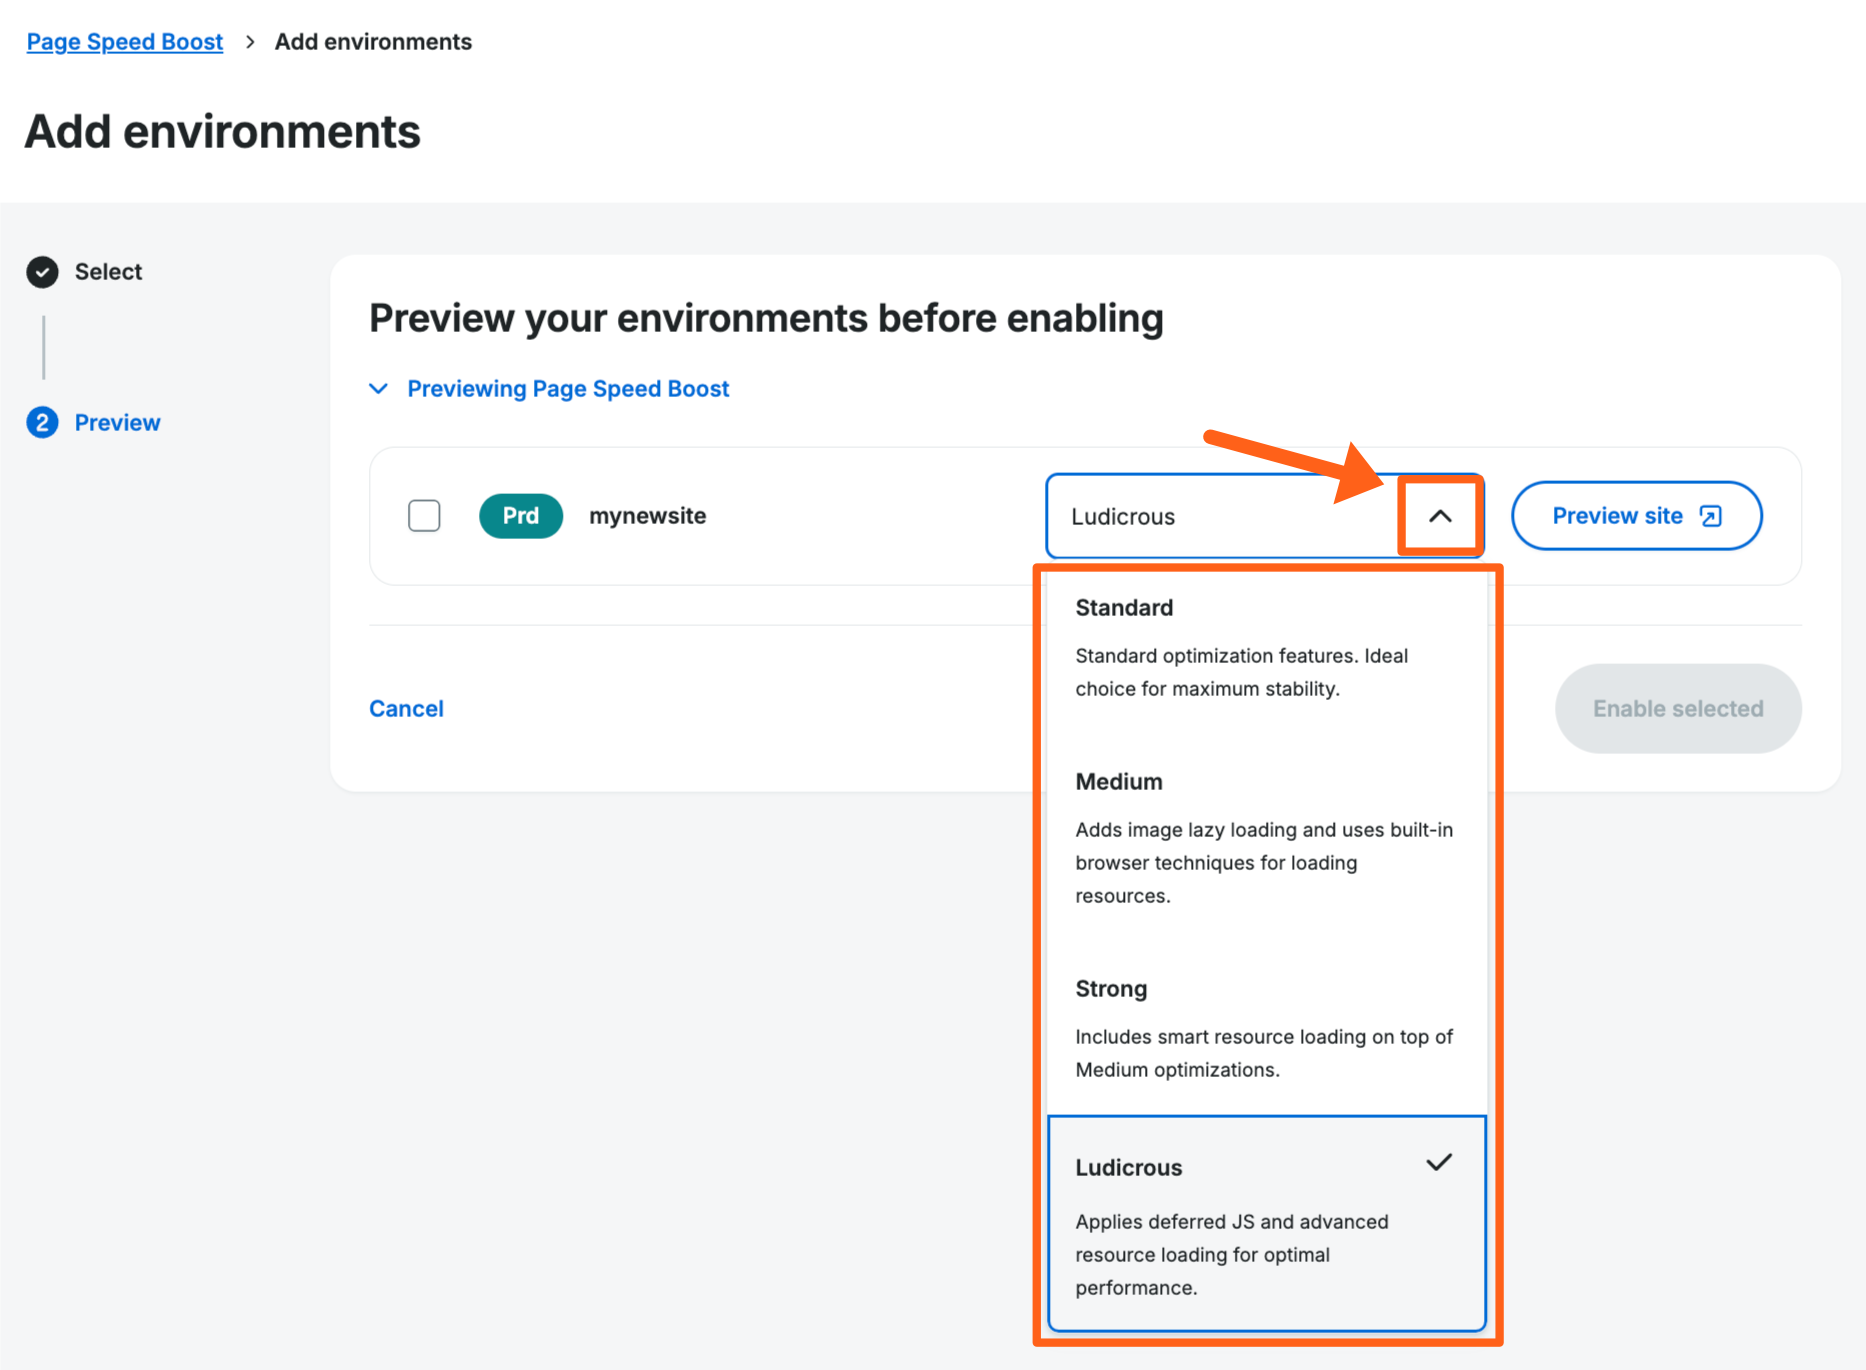
- If there are no issues on the preview, continue to the next step. If there are issues on the site preview you can choose a different Optimization Mode with the directions below or enable NitroPack and then try Custom Settings.
- Expand the dropdown to and select one of the other optimization modes. This will make some changes that might work better for the site.
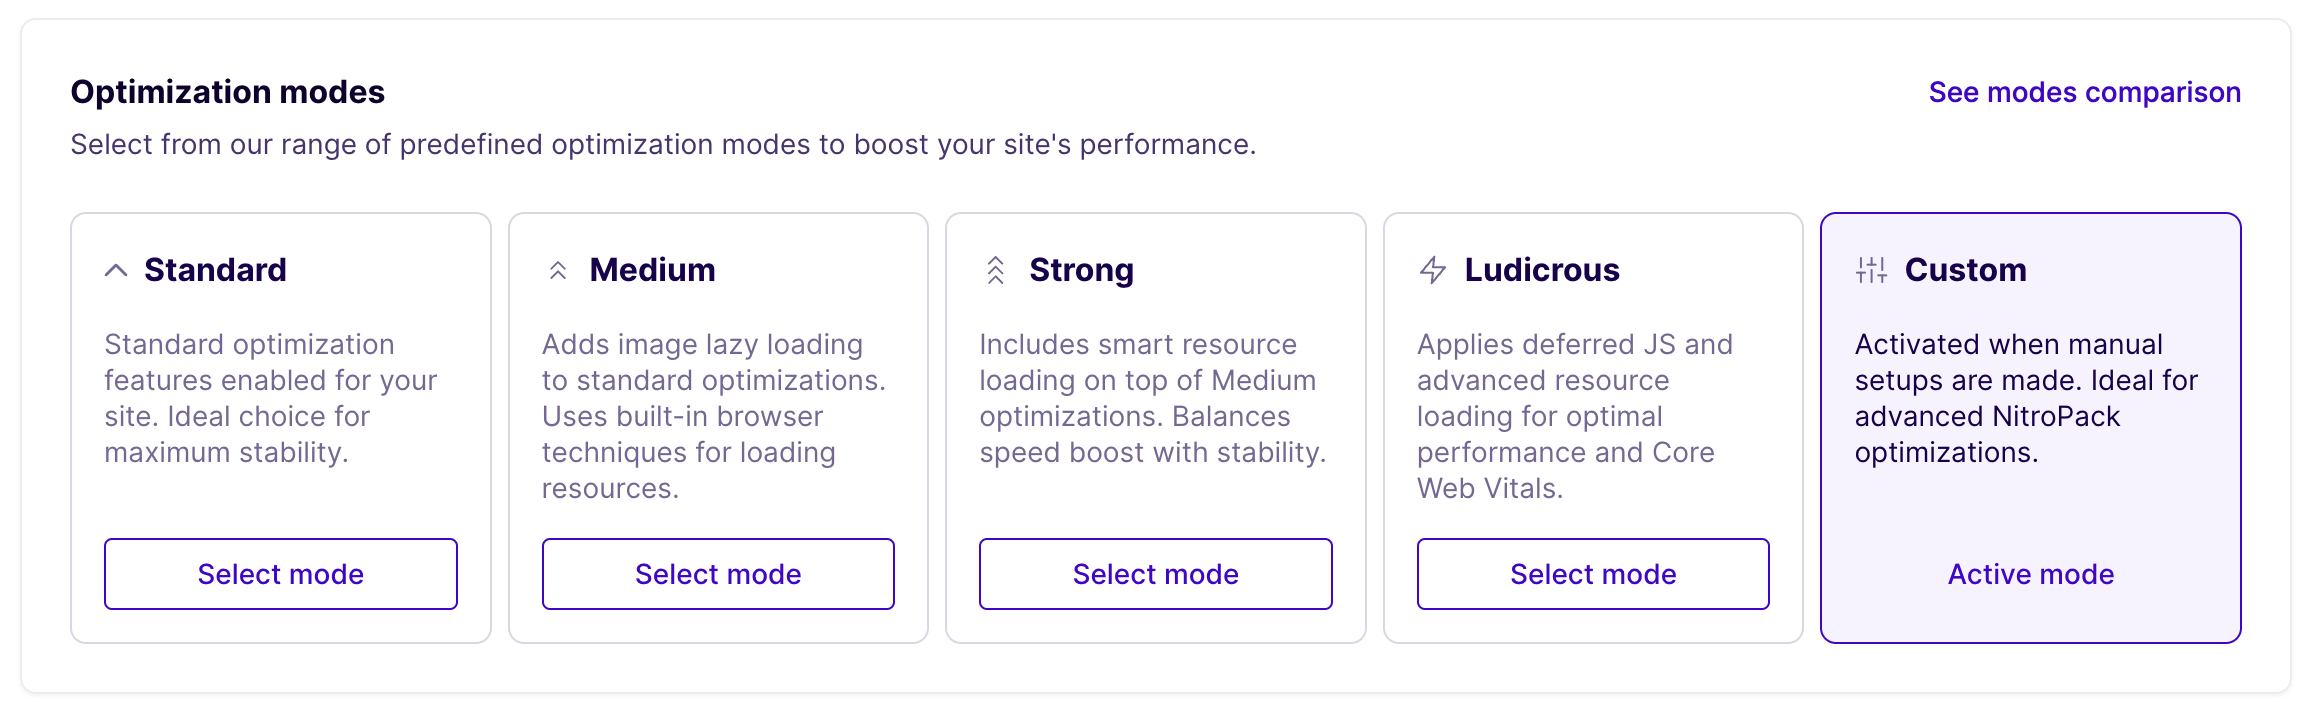
- Optimization Modes (view table under Optimization Mode Settings below for more details):
- Standard: Standard optimization features. Ideal choice for maximum stability.
- Medium: Adds image lazing loading and uses built-in browser techniques for loading resources.
- Strong: Includes smart resource loading on top of Medium optimizations.
- Ludicrous: Applies deferred JS and advanced resource loading for optimal performance.
- Ludicrous+: Leverages the most cutting-edge optimization features for peak performance.
- Click Preview Site again. (If the site preview is still open, refresh the page to see the changes.)
- This process can be repeated through the available configurations until the site displays properly. Once satisfied, proceed to the next step.
- Optimization Modes (view table under Optimization Mode Settings below for more details):
- Expand the dropdown to and select one of the other optimization modes. This will make some changes that might work better for the site.
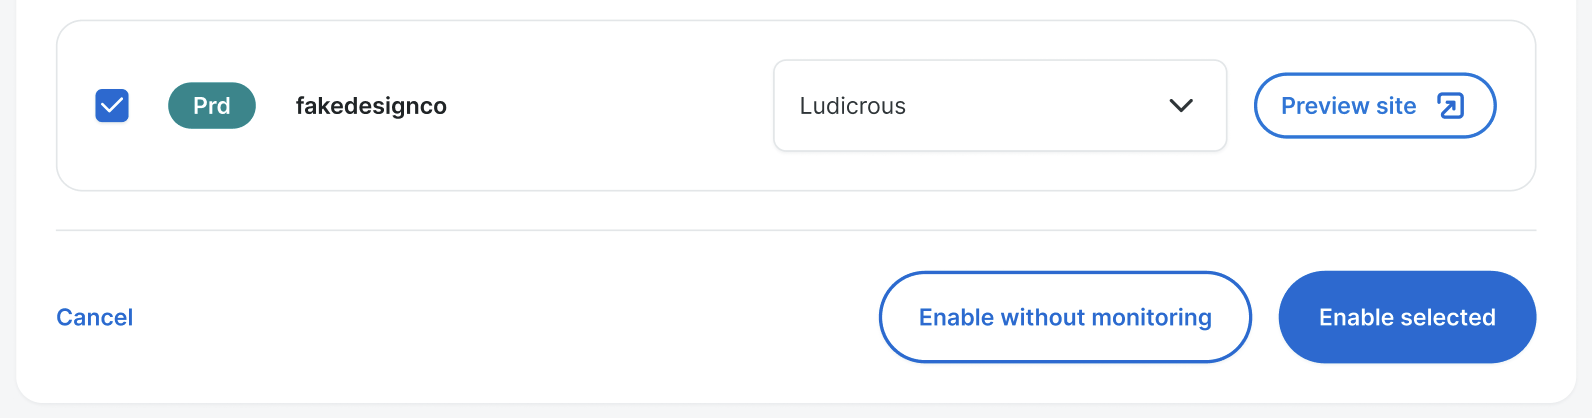
- Choose your enablement option. You have the option to choose whether you want to enable Google Lighthouse score monitoring during this step. You can change this later for each environment from the NitroPack product page later if you change your mind. If you don’t want Google Lighthouse score monitoring, then click the Enable without monitoring button. If you do want Google Lighthouse score monitoring then click the Enable selected button.
The plugin will be automatically installed on the selected environment(s) and no further configuration is required. Performance improvements may take some time before becoming visible.
Features
NitroPack is a performance WordPress plugin that automatically handles cloud-based optimization of the frontend of your website. Below is a list of current features.
Lazy Load Images
View the full docs on nitropack.io
The lazy load feature will only download images that currently fall within the browser viewport, on initial page load and downloads other images later when necessary. This speeds up the initial page load and saves on bandwidth.
Size Images Preemptively
View the full docs on nitropack.io
Preemptive Image Sizing is a smart optimization technique that ensures all images on your website have explicit height and width attributes before they load. This prevents layout shifts and helps maintain a smooth, stable user experience.
By setting proper dimensions, browsers can allocate space for images before they fully load, reducing Cumulative Layout Shift (CLS)—a crucial Core Web Vitals metric.
Lazy Load Iframes
View the full docs on nitropack.io
Delays loading of iframes until they come into the viewport.
Lazy Load Self-Hosted Videos
View the full docs on nitropack.io
Delays loading of YouTube and Vimeo videos until they come into the viewport.
Image Optimization
View the full docs on nitropack.io
Images are the largest contributor to page weight. Furthermore, unoptimized images can account for 2-4x more data usage, slower loading times, and bad page experience.
The solution to having an image-rich website and achieving web performance that Google and your users love is two-fold:
- Apply compression
- Serve images in next-gen format
Enabling NitroPack’s Image Optimization setting will take care of your images, keeping their high quality while massively boosting your page load times.
Animated Image Optimization
View the full docs on nitropack.io
Optimizes animated GIFs and PNGs, reducing size while maintaining quality.
Adaptive Image Sizing
View the full docs on nitropack.io
Adaptive Image Sizing is a preemptive optimization of images, making them match the dimensions of the containers they’re displayed in for desktop, mobile, and tablet devices. Faster-loading images significantly improve user experience and can positively impact metrics like bounce rate and page loading time.
Adaptive Image Sizing automatically resizes your website images to suit the visitor’s device and screen resolution without compromising on quality. This results in enhanced website performance and reduced loading times, making AIS particularly beneficial for image-heavy content.
Video Facades
View the full docs on nitropack.io
Video Facades is a feature within NitroPack designed to improve page load times by replacing embedded videos (like those from YouTube or Vimeo) with a static image (thumbnail). This means that instead of loading the entire video player and its resources when the page loads, only the thumbnail is loaded initially. The video content is loaded and activated only when the user interacts with the placeholder image, ensuring a smoother and faster browsing experience.
LCP Preload
View the full docs on nitropack.io
Improves your Core Web Vitals by automatically identifying and preloading the LCP (Largest Contentful Paint) element.
Optimization Mode
View the full docs on nitropack.io
NitroPack lets you choose between predefined optimization modes to balance stability and performance. The modes range from Standard (the most stable) up to Ludicrous+ (the most aggressive mode). You can also use Custom Mode to freely tweak individual settings. To use the Custom Mode you simply have to select one of the 4 predefined modes and then make any change to an individual setting. This will automatically switch you to Custom Mode. View the settings enabled for each mode below.
Test Mode
View the full docs on nitropack.io
The Test Mode lets you test NitroPack’s features in an isolated environment. That way, you can experiment without affecting your visitor’s experience.
When you turn the Test Mode on, it disables NitroPack for your website. While this mode is active, you can access the test (optimized) version of any page by adding ?testnitro=1 to its URL, like the screenshot below. Your website remains up and running for your site visitors as if NitroPack is disabled.

Any changes you make while in Test Mode affect only the test pages. This lets you experiment with settings without affecting the user experience.
Just remember that after disabling the mode, all changes will be transferred to your live website. If you don’t want that, make sure to reverse any changes you made while in Test Mode before turning it off.
Cache Warmup
View the full docs on nitropack.io
The cache warmup feature preemptively optimizes and caches your pages without having to wait for traffic to a page for the cache to be updated. It will also keep pages optimized and cached after automated cache purge events. This assures that the first visitors after automated cache clearing events receive a fast page load experience.
To enable cache warmup:
- From the Products page in the User Portal select NitroPack or visit the following url:
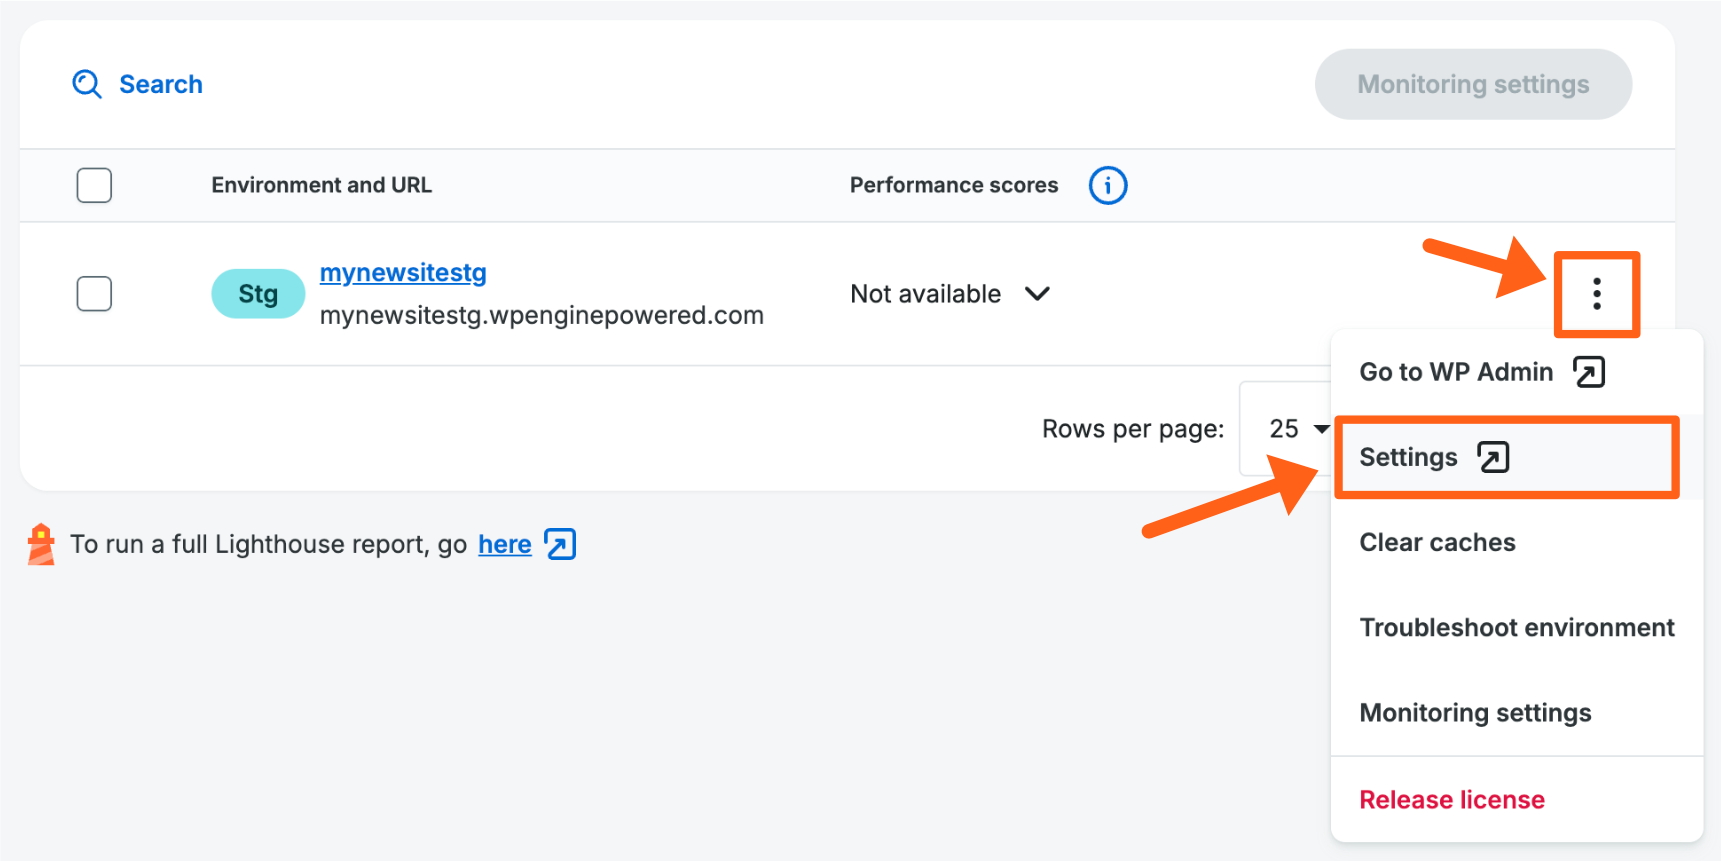
https://my.wpengine.com/products/nitropack - Click the three dot button to the right of an environment and select Settings
- Scroll down to the Cache warmup section and click Enable
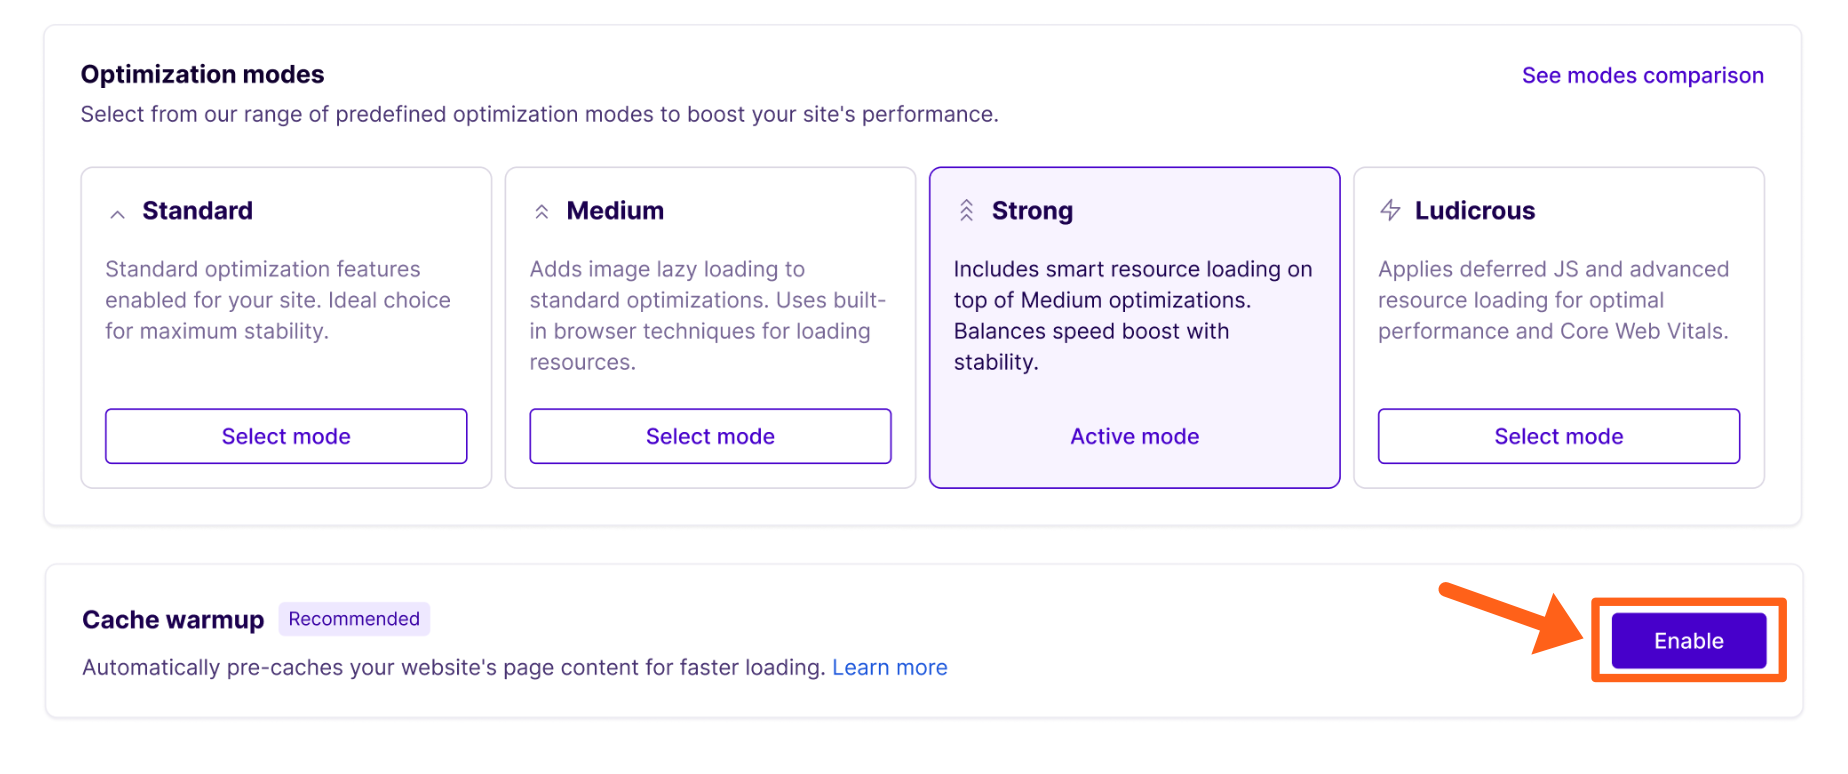
- Choose either Standard or Sitemap
- Standard will scan your home page to identify URLs of important pages to cache.
- Sitemap gives you the option to input your sitemap url to identity all pages in your sitemap index for caching.
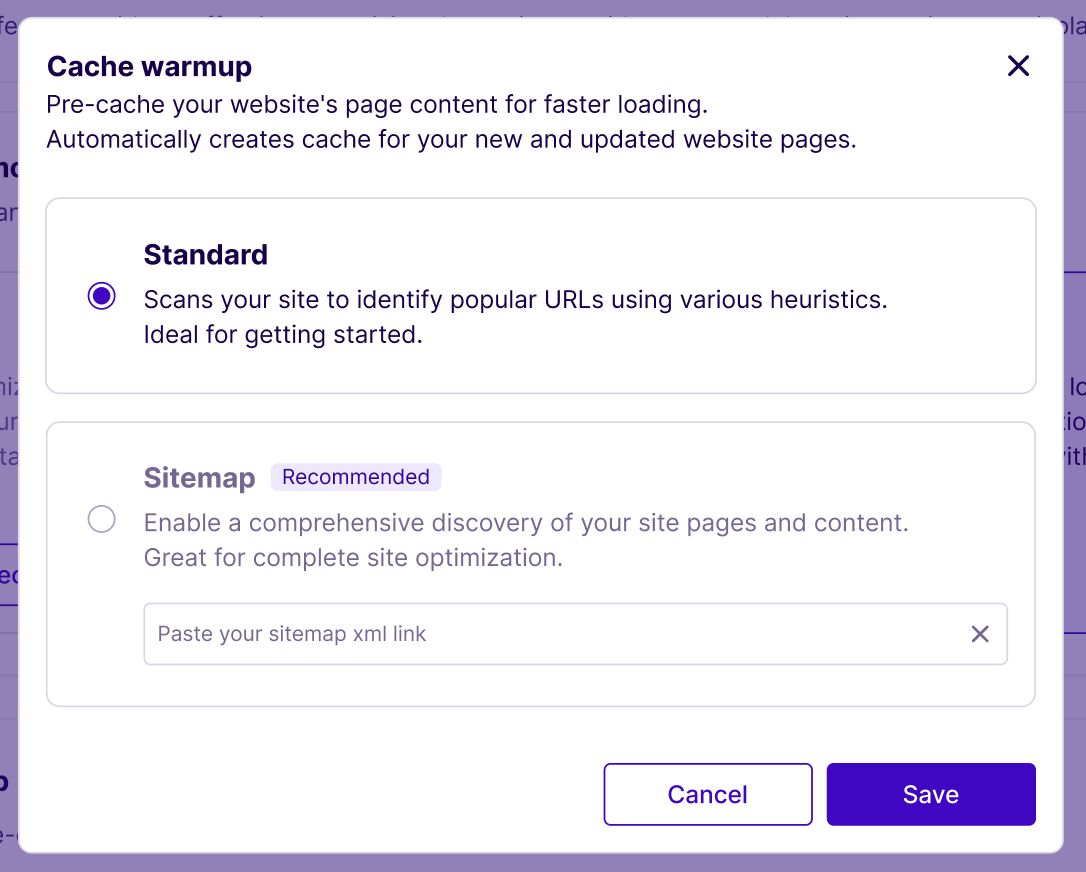
- If you chose Sitemap then input your full sitemap URL in the box. If you don’t know your URL, check with your development team or your SEO plugin author. 2 example sitemap URLs that are used by SEO plugins are:
https://yoursite.com/sitemap_index.xmlhttps://yoursite.com/sitemap.xml
- Click Save to finish enabling the cache warmup feature.
Remove Render-Blocking Resources
View the full docs on nitropack.io
Render-blocking resources are resources that prevent a web page from being rendered and displayed to the user until they are fully downloaded and processed by the browser. These resources include CSS, JavaScript, and fonts that are necessary for the layout, styling, and functionality of the page.
Below are some examples of the multiple strategies NitroPack uses for delaying, optimizing, or removing render-blocking resources.
Delayed Scripts
View the full docs on nitropack.io
Execute specific scripts with a delay (about 6500ms after page load) to prioritize other important user experience elements.
Combine JavaScript
View the full docs on nitropack.io
Combines your JavaScript files into just one file to reduce network requests.
Optimize Google Tag Manager
Improves page performance by optimizing how GTM loads and runs.
Keep HTML Comments
View the full docs on nitropack.io
Preserves your HTML comments and prevents them from being automatically removed during optimization.
Minify JSON for Linking Data
View the full docs on nitropack.io
Automatically removes unnecessary characters from JSON files, resulting in compact and efficient files.
HTML Normalization
View the full docs on nitropack.io
Normalizes your HTML prior to optimizing it, automatically resolving issues with misplaced elements in the DOM tree.
Generate Critical CSS
View the full docs on nitropack.io
Optimizes the delivery of critical above-the-fold CSS for faster rendering.
Custom CSS
View the full docs on nitropack.io
Add your own CSS styles and override default themes to fine-tune the styles of site elements during page loading.
Remove Unused CSS
View the full docs on nitropack.io
Finds CSS rules that aren’t used on the page and reduces them to lower total downloaded bytes.
Combine CSS
View the full docs on nitropack.io
Merges multiple CSS files into a single file to reduce HTTP requests.
Extract Large Inline CSS
View the full docs on nitropack.io
Inline CSS over 3KB is moved to an external file to prevent render-blocking.
Override Font Rendering Behavior
View the full docs on nitropack.io
Lets you override the default browser behavior by selecting specific font-display values.
Font Loading Strategy
View the full docs on nitropack.io
Provides two techniques (“Native” and “Onload”) for fetching fonts to prevent unwanted layout shifts and improve page load times.
Native (enabled by Default)
Also known as “Font Preloading technique”, it ensures fonts start loading early in the page lifecycle, reducing the chances of the “flash of invisible text” (FOIT) or “flash of unstyled text” (FOUT). By adding a preload link in the head section, you instruct the browser to fetch the font resources as soon as possible.
Onload
Similar to the previous method, however, the fonts are reconfigured to load after the onload event. That means that the fonts will be applied to the page after it’s loading.
With this option, we improve the LCP and FCP metrics.
Please note that font flickering may be seen during the page load. That is valid for websites that don’t use Web Safe Fonts.
Font Subsetting
View the full docs on nitropack.io
NitroPack’s font subsetting feature automatically creates a subset version of the original font file by removing all unused glyphs (in many cases, it is hundreds or even thousands of them).
Depending on the number of glyphs removed, it can reduce their size drastically, making them much faster to load by the browser.
Font Compression
View the full docs on nitropack.io
Upgrades your font compression to the WOFF2 format, which can reduce font sizes by up to 50%.
Optimize Google Hosted Fonts
View the full docs on nitropack.io
Once enabled, the “Optimize Google Hosted Fonts” feature overrides font rendering behavior, focusing specifically on Google-hosted fonts.
NitroPack’s innovative font optimization technology enables a smoother, visually appealing, and efficient browsing experience by streamlining how Google Fonts are rendered.
With a ‘swap’ rendering strategy in place, a fallback font is promptly displayed. This is then subsequently swapped with the desired Google Font once fully loaded, eliminating delays associated with blank text or invisible fonts during loading and maintaining an engaging user interface.
Cache Expiration Time
View the full docs on nitropack.io
With this setting, you can control for how long our service holds your cached pages. When a cached page expires, a new Page Optimization is required to re-create the cache. By default, the cache expiration time is set to 2592000 seconds (86400 seconds = 1 day).
You can change this using our “Cache expiration time” feature:

Optimize-Only URLs
View the full docs on nitropack.io
When you first start using NitroPack, you might like to test it only on a few pages. With the “Optimize only” URL feature, you can specify a list of included URLs you’d like to be optimized.
Important Note: If you use this feature, only the Included URLs and no others will be optimized.

- Go to Cache Settings >> Cache
- Find the Optimize-only URLs feature and enable it (click the toggle on the right).
- Enter the URL of the page you wish to include.
- For multiple pages, enter each one on a new line.
- Finally, click the Save button on the top right to save your changes.
Using Wildcards
With wildcards, you can include a group of pages with one entry. For example, here’s how you can include all pages of your blog post, assuming they’re set up as child pages with the/blog/article-name URL structure.
You can use the following pattern with your domain in place of yoursite.com:
https://yoursite.com/blog/*
This will include the page /blog/ itself, and all the pages with /blog/ in the URL, for example: /blog/first-article/ and blog/another-article.
You can also use wildcards to include all URLs containing a specific word. For example, to include all category URLs (assuming they all have “category” in the URL path):
*category*Minify Resources
View the full docs on nitropack.io
Minification removes whitespace, comments and other unnecessary symbols from code files, reducing file size and ensuring a faster download time.
Optimize Ads
View the full docs on nitropack.io
You can manually turn on the “Optimize Ads” feature if ads are affecting your performance metrics.
Dynamic Queue
View the full docs on nitropack.io
Optimizes your most-visited pages first to deliver faster performance where it counts.
Instant Cache Reoptimize
View the full docs on nitropack.io
Automatically refreshes cache when it expires to keep your site optimized at all times.
Cache AJAX URLs
View the full docs on nitropack.io
Captures the output of AJAX requests and saves them in an HTML file for quick reuse to make them load faster.
Ignored Parameters
View the full docs on nitropack.io
Specify URL tracking parameters that NitroPack should ignore when optimizing your website to prevent redundant cache files.
Include The Default Ignored Parameters
View the full docs on nitropack.io
Automatically ignore a long list of standard tracking parameters.
Must-Include Headers
View the full docs on nitropack.io
Forces NitroPack to check for custom or non-standard headers (like security headers) during optimization and preserve them.
Excluded URLs
View the full docs on nitropack.io
Specify a list of URLs you would not like to be optimized, either individually or using wildcards.
Excluded Resources
View the full docs on nitropack.io
Prevent NitroPack from optimizing specific CSS, JavaScript, Font, or Image files so they load directly from their original sources.
Dynamic Content Cookies
View the full docs on nitropack.io
Allows NitroPack to create and serve separate, customized cache files for each HTML variation based on specific dynamic PHP cookie names and values.
Excluded From Optimized Cookie Names
View the full docs on nitropack.io
Allows you to serve non-cached content to specific users based on their cookies (e.g., logged in users or active shopping carts).
Additional Domains
View the full docs on nitropack.io
Specify additional domain names pointing to the same website.
Cart Cache
View the full docs on nitropack.io
Cart Cache is a caching feature inside the NitroPack plugin that enables fast browsing in a WooCommerce store with items in the cart.
Background Purge
Replaces old cache only after new cache is ready so users always get optimized content and a fast experience.
Optimize Interactive Elements
Improves INP by reducing the time it takes for the page to react to clicks and taps.
Smart Cache Invalidation
View the full docs on nitropack.io
Smart cache invalidation automatically clears and updates cached content that is related to a page that you have just purged.
After purchasing and enabling on the environment of choice via the User Portal, the WP Engine NitroPack WordPress plugin will be installed automatically.
NitroPack Statuses
To see the NitroPack status for an environment, go to Products in the left sidebar of the User Portal and then select the NitroPack product, or go directly to the NitroPack product URL:
At the top of the table you’ll see a search bar and a toggle to switch between Production, Staging, and Development environments.

You’ll see a Status column in the table which will show one of of statuses listed below for each environment. Click the dropdown arrow to the left of an environment to see more details about its status.
- Optimizing: Signals that cache is actively being created.
- Optimized: Reflects how many pages have finished optimizing.
- Failed to install: NitroPack failed to be installed on the environment. This environment is not counted towards the account license limit.
- Incompatible plugin: A plugin that is incompatible with NitroPack has been detected.
- Not enabled: NitroPack failed to be installed on the environment. This environment is not counted towards the account license limit.
- Being disabled: NitroPack is currently being removed from this environment. This is typically faster than enabling. This environment counts toward the account license limit.
- Syncing plugin data: NitroPack shows this message during the enabling process. After the installation, we schedule a Smart Plugin Manager sync to update information about the plugin’s status. This will take some time before the sync finishes.
NitroPack Cache
NitroPack compresses and optimizes files, then stores those in an independent cache. Purging this cache can help with visual discrepancies and displaying recent updates.
To purge NitroPack cache when logged into your website:
- Locate NitroPack in the top menu bar of the wp-admin
- Select the option you would like to use:
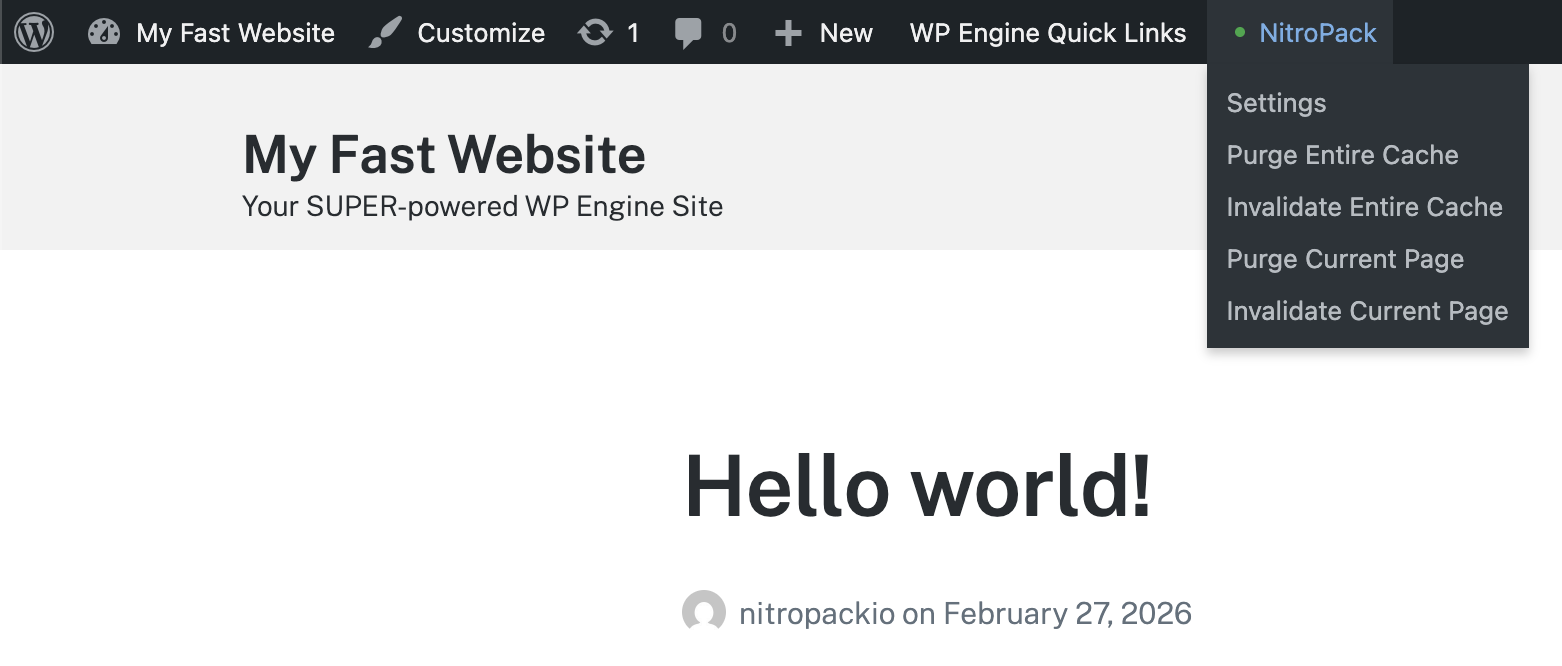
- Purge Entire Cache: Select this option to purge the cache for the entire website. This option is visible from both the front end and the wp-admin area of your website.
- Purge Current Page: Select this option to delete the page you are currently viewing from the cache. This means your website visitors will immediately see the updated content, however, it will not be optimized until NitroPack prepares the newly optimized content. Usually, this takes between a few seconds to a few minutes. This option is only visible from the front end of your website.
- Invalidate Current Page: Select this option to mark the cached content on the page you are currently viewing as “stale,” but keep serving it until newly optimized content is available. As a result, visitors will always see optimized content, even though it may be outdated for a short while. This option is only visible from the front end of your website.
NitroPack cache can also be cleared from the User Portal:
- From the User Portal, choose Products in the main menu
- Click NitroPack under Your products
- Access this page directly at: https://my.wpengine.com/products/nitropack
- Next to the environment, click the 3 dot menu icon
- Select Clear caches
Lighthouse Events
We’re now showing Events on the Lighthouse Performance graph. The graph shows on the Performance page for an environment. The Events will show for an environment if you have our NitroPack product, and Lighthouse Monitoring both enabled for the environment.
The Events are updates to the site which you can take into consideration when investigating score changes on a specific day. Also consider reviewing Events on days prior to a score change to account for the timing of the daily score measurement and different types of cache, etc.
You’ll see a dotted vertical line with a small circle at the bottom, when there is a day with Events on the graph. If you hover on the circle you’ll see the hover card with the list of events as shown below.
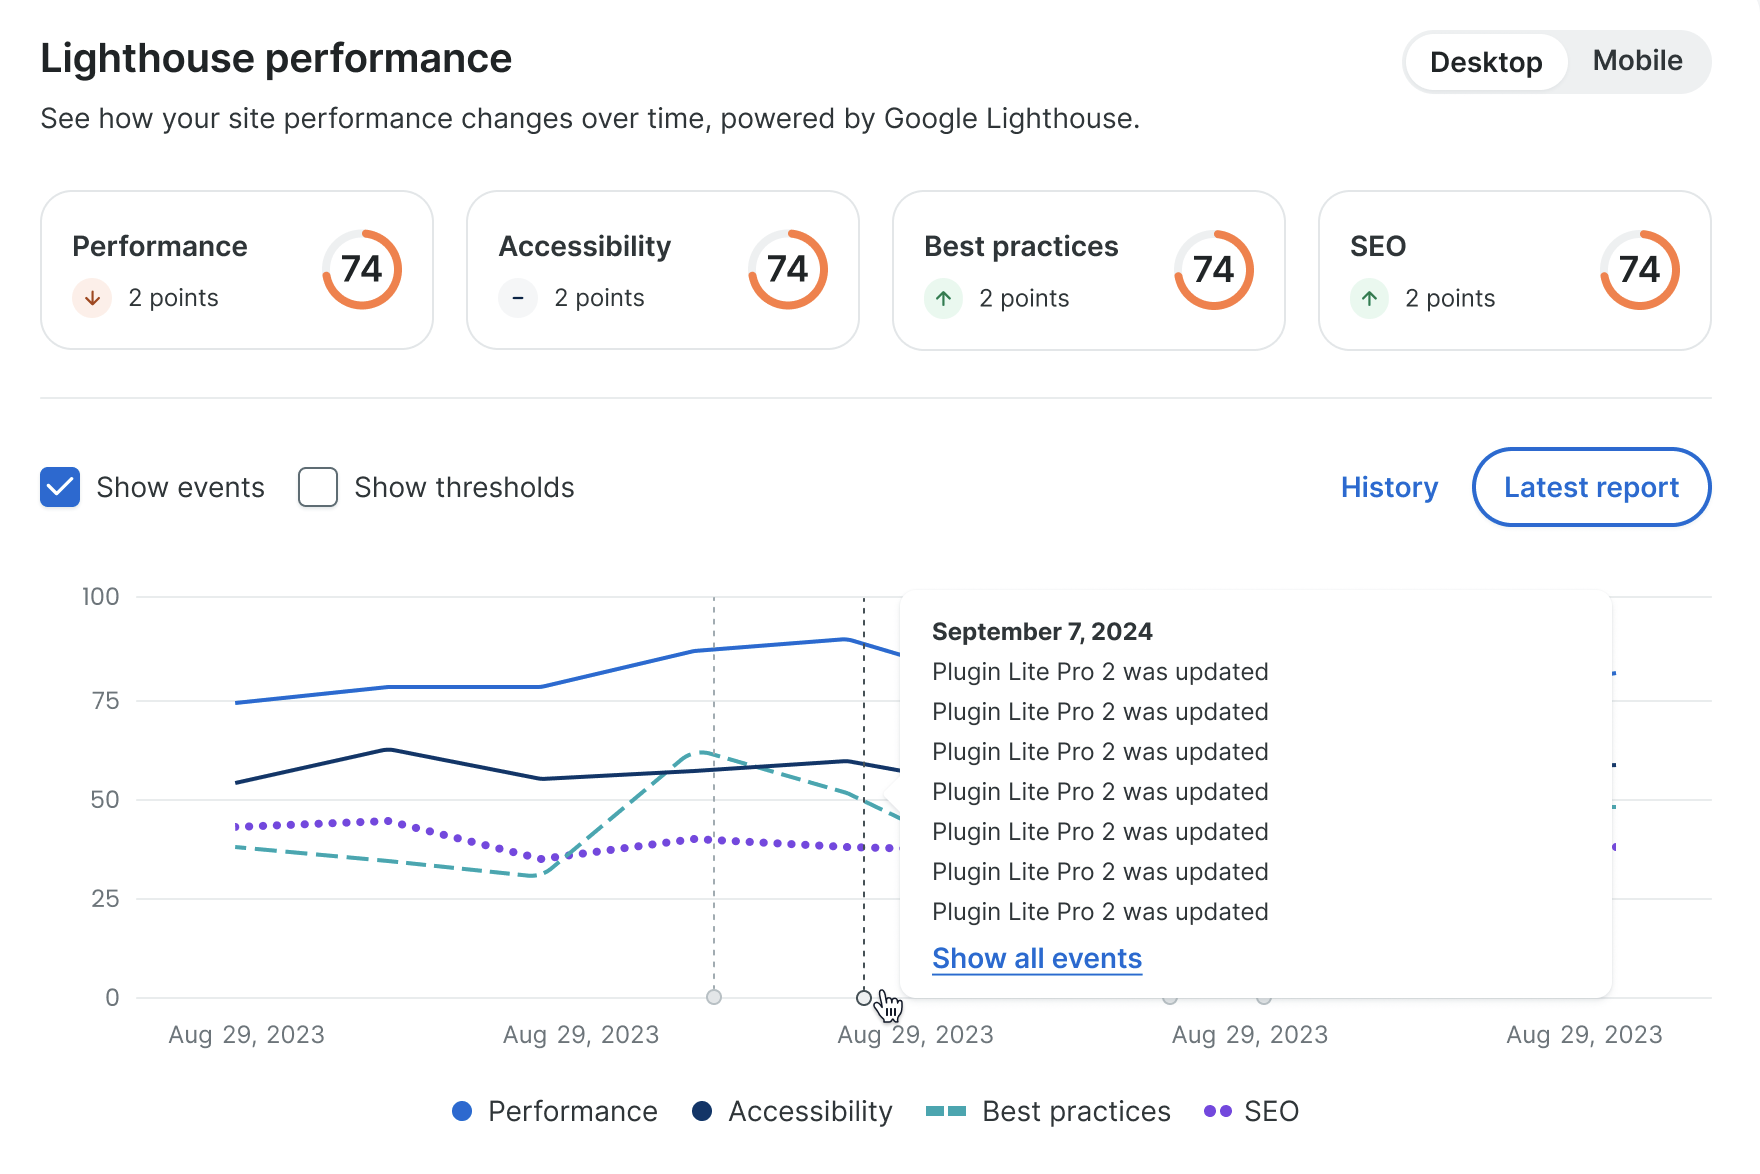
If there is a long list of Events, you can click Show all events to get a pop-out sidebar with the full list.
Monitoring Settings
You can now get notifications when your Google Lighthouse scores change. You can customize the notifications by environment or in bulk for multiple environments, and receive notifications through the WP Engine User Portal, email, or the Slack app.
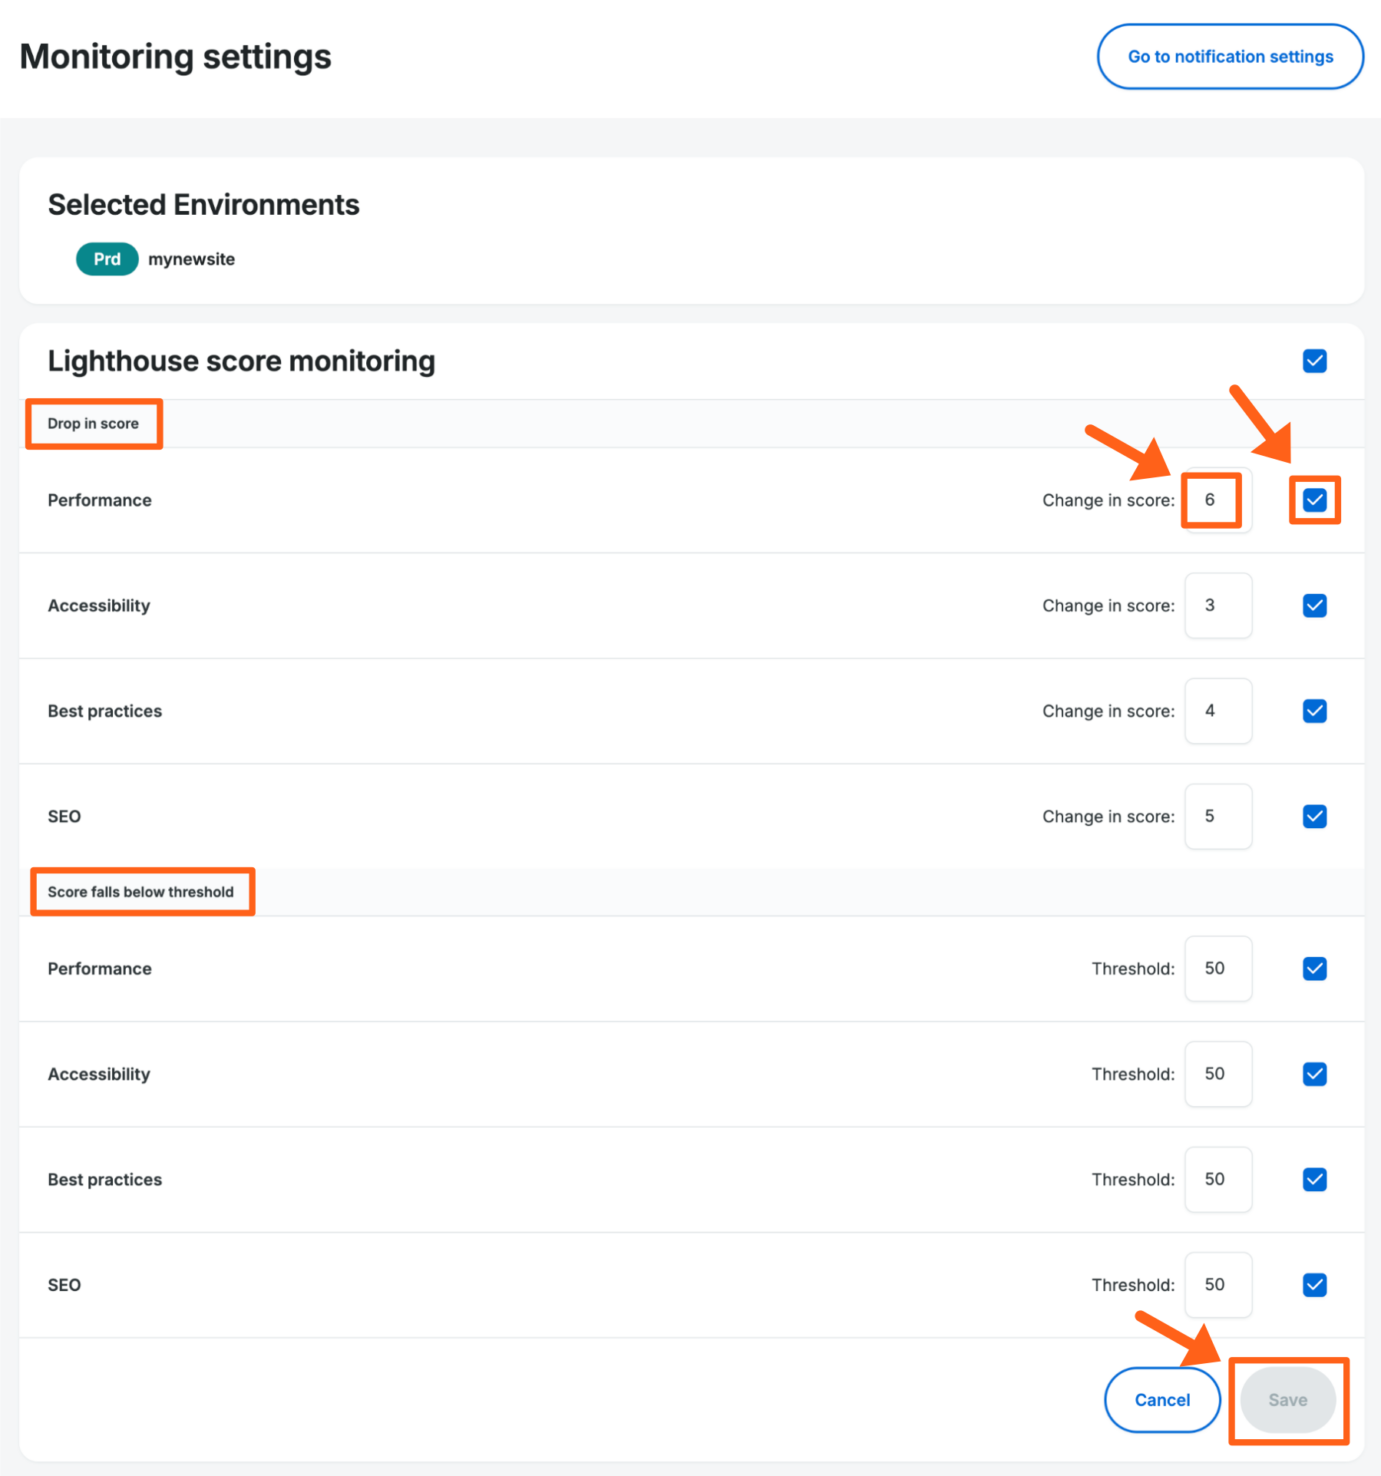
The two thresholds you can choose from are the score dropping by a number of points, or the score dropping below a number. You can customize each threshold for all of the Lighthouse score categories (Performance, Accessibility, Best practices, SEO). You can also choose which of the 4 categories you want to track.
Default Settings
Score drops by a specified number of points
- Performance – 6
- Accessibility – 3
- Best practices – 4
- SEO – 5
Score falls below a specified score
- Performance – 50
- Accessibility – 50
- Best practices – 50
- SEO – 50
Customize Settings
- In the User Portal go to the Products page in the left sidebar
- Click on NitroPack under Your products
- Check the box next to one or more environments that you want to share the same monitoring thresholds
- Click the Monitoring settings button in the top right of the table

- Review the Drop in score and Score falls below threshold sections
- Check the box next to each score category that you want to monitor in each section
- Adjust the numbers from 1-99 for each score category
- Click the Save button in the bottom right
Lighthouse Score Monitoring Column
We’ve added a new Google Lighthouse Score monitoring column to the main table view of the NitroPack products page. This lets you see an overview of which environments have monitoring enabled and statuses of score changes. You can also get more details in a tooltip when you hover on the status for each environment.
- In the User Portal go to the Products page in the left sidebar
- Click on NitroPack under Your products

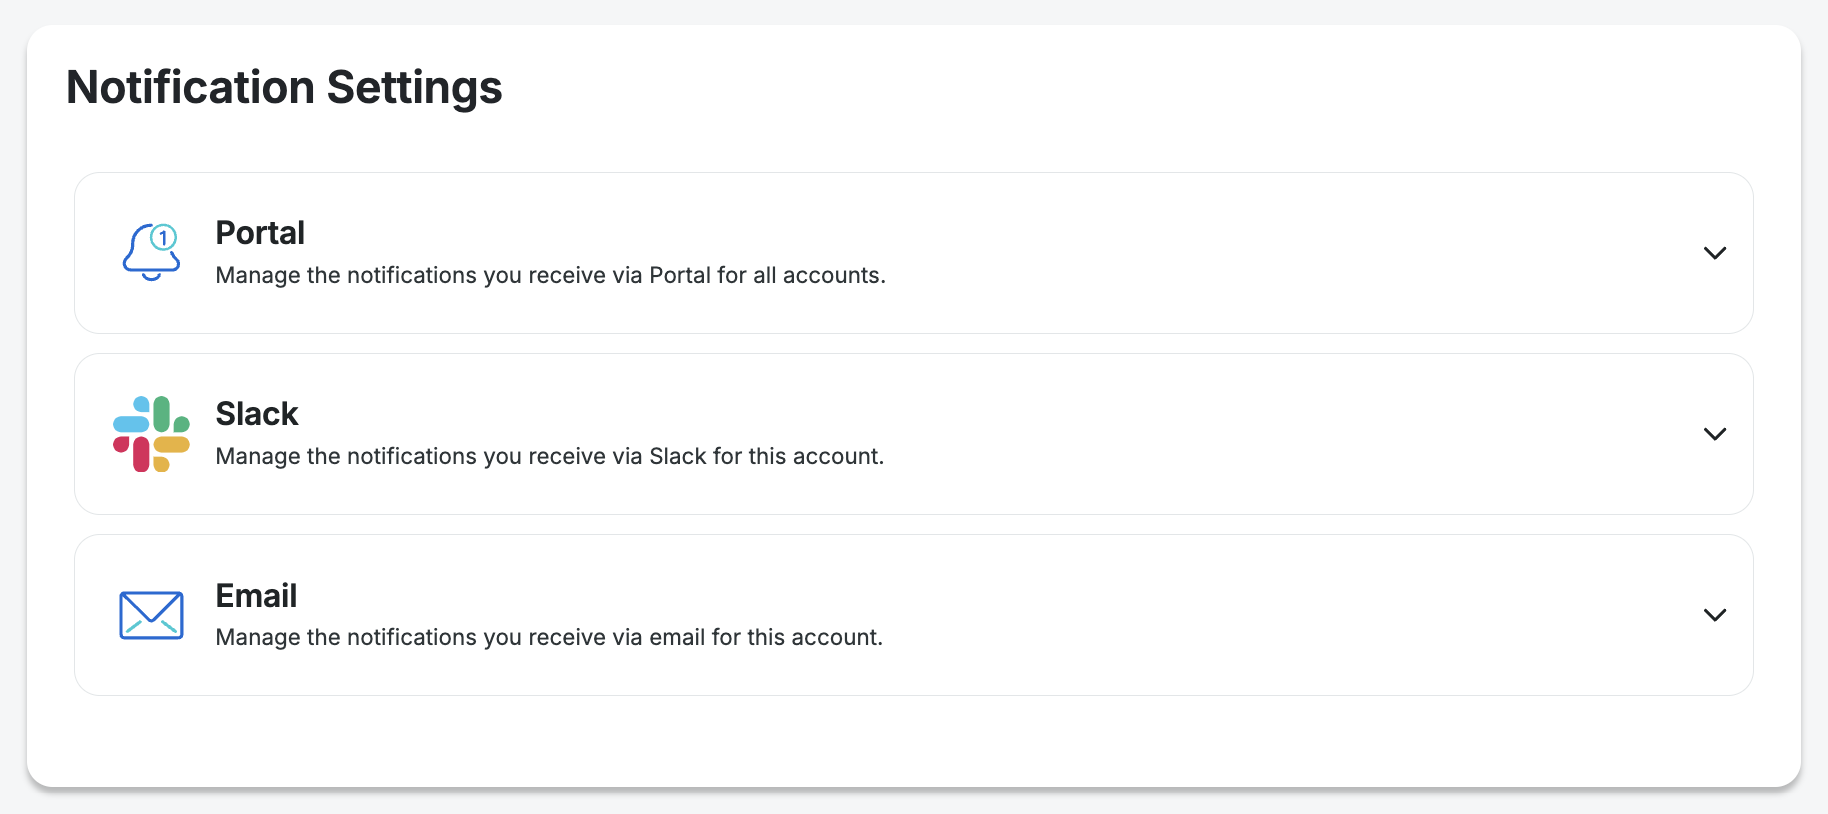
Set Notifications
To choose your notification method you can navigate to the Notification Settings page. In addition to using the link you can also navigate there by using the Go to notification settings button on the Monitoring settings page, or click the Bell icon in the top right of the Portal, and then click the Gear icon.

Then choose any of the 3 types of notifications outlined below, Portal, Slack, and Email.
Add Portal Notifications
- Click the dropdown arrow to the right of the Portal option
- Scroll down to the NitroPack section
- Click the Warning notification type to get notifications about score changes
- Notification choices will be grayed out when they are not turned on. Clicking the box will enable it.
Add Slack Notifications
- Click the dropdown arrow to the right of the Slack option
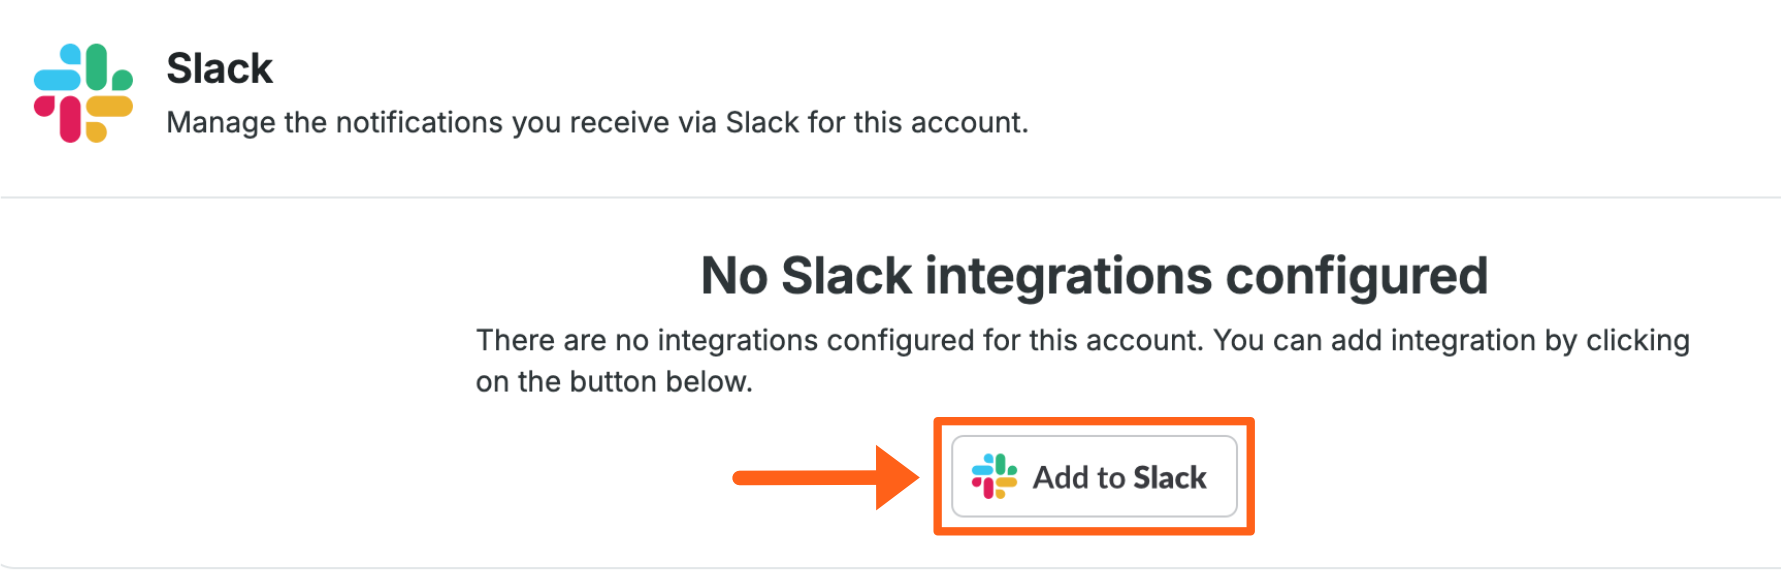
- If you have not yet connected Slack, click the Add to Slack button and you’ll be taken from the Settings tab to the Integrations tab. If you have connected Slack already then you can skip to step 7 to Create Policy.
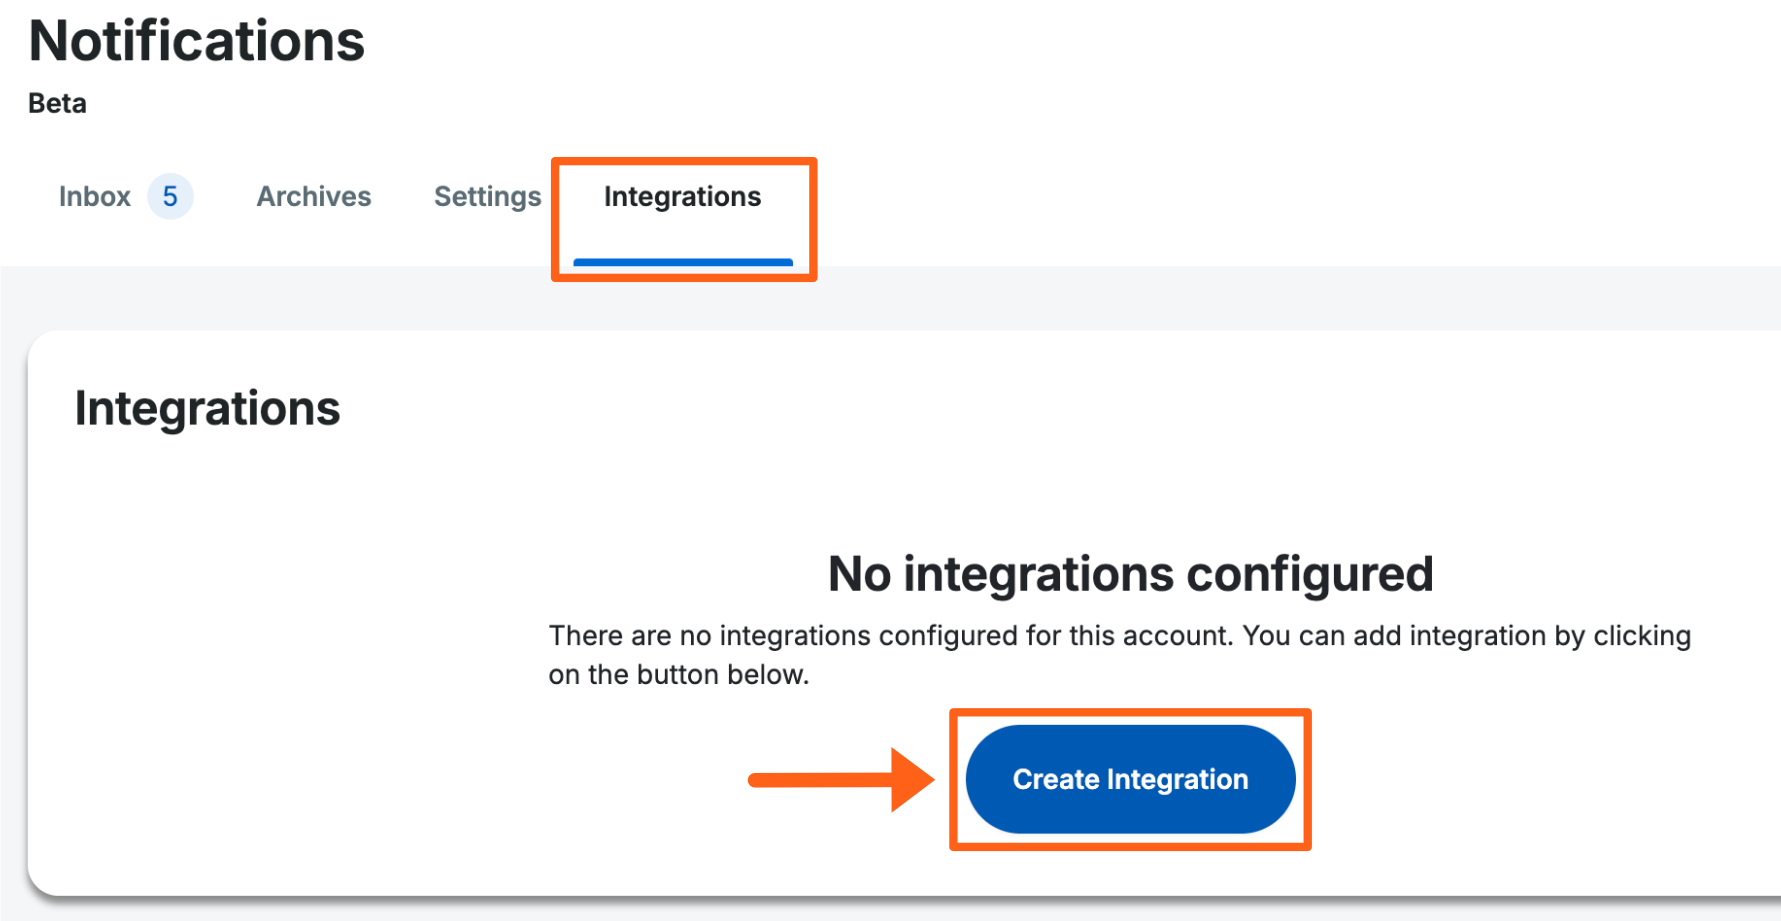
- Click Create Integration
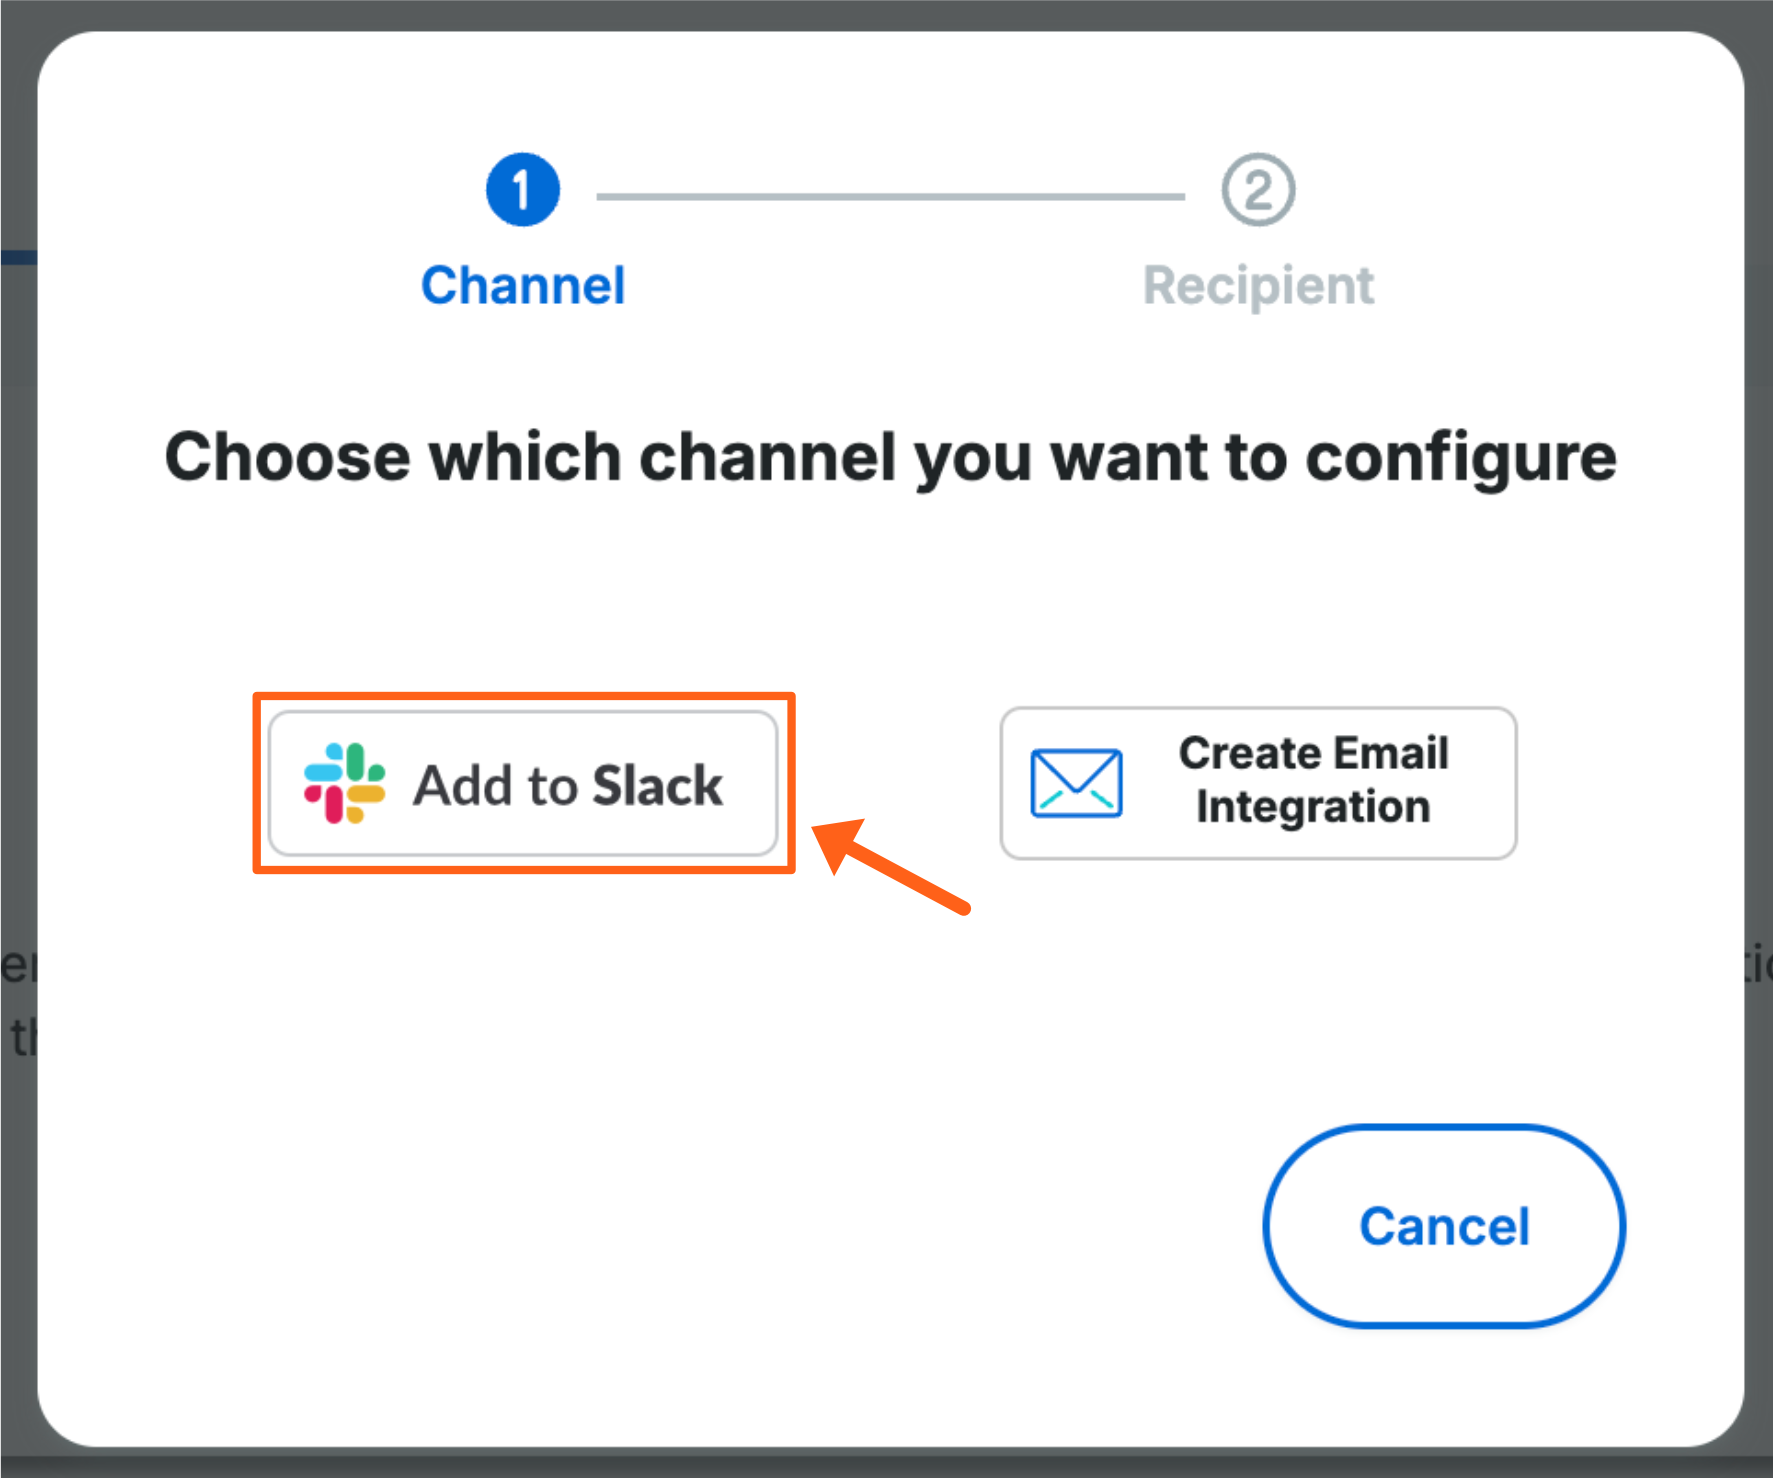
- Click the Add to Slack button again in the popup window
- Then in the next window, approve the permissions to connect to Slack
- Then return to the Settings tab and click the dropdown arrow to the right of the Slack option again
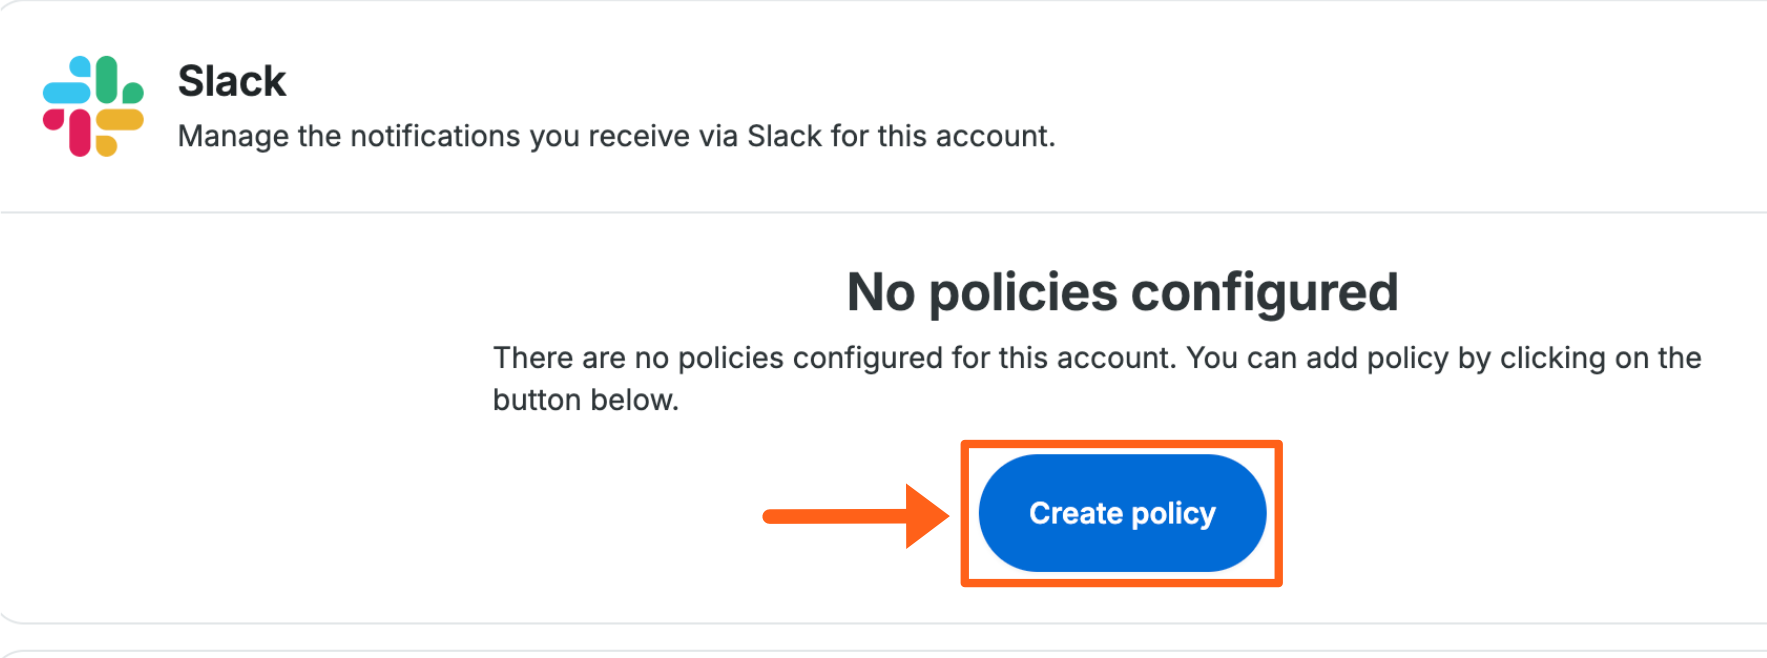
- Click Create policy
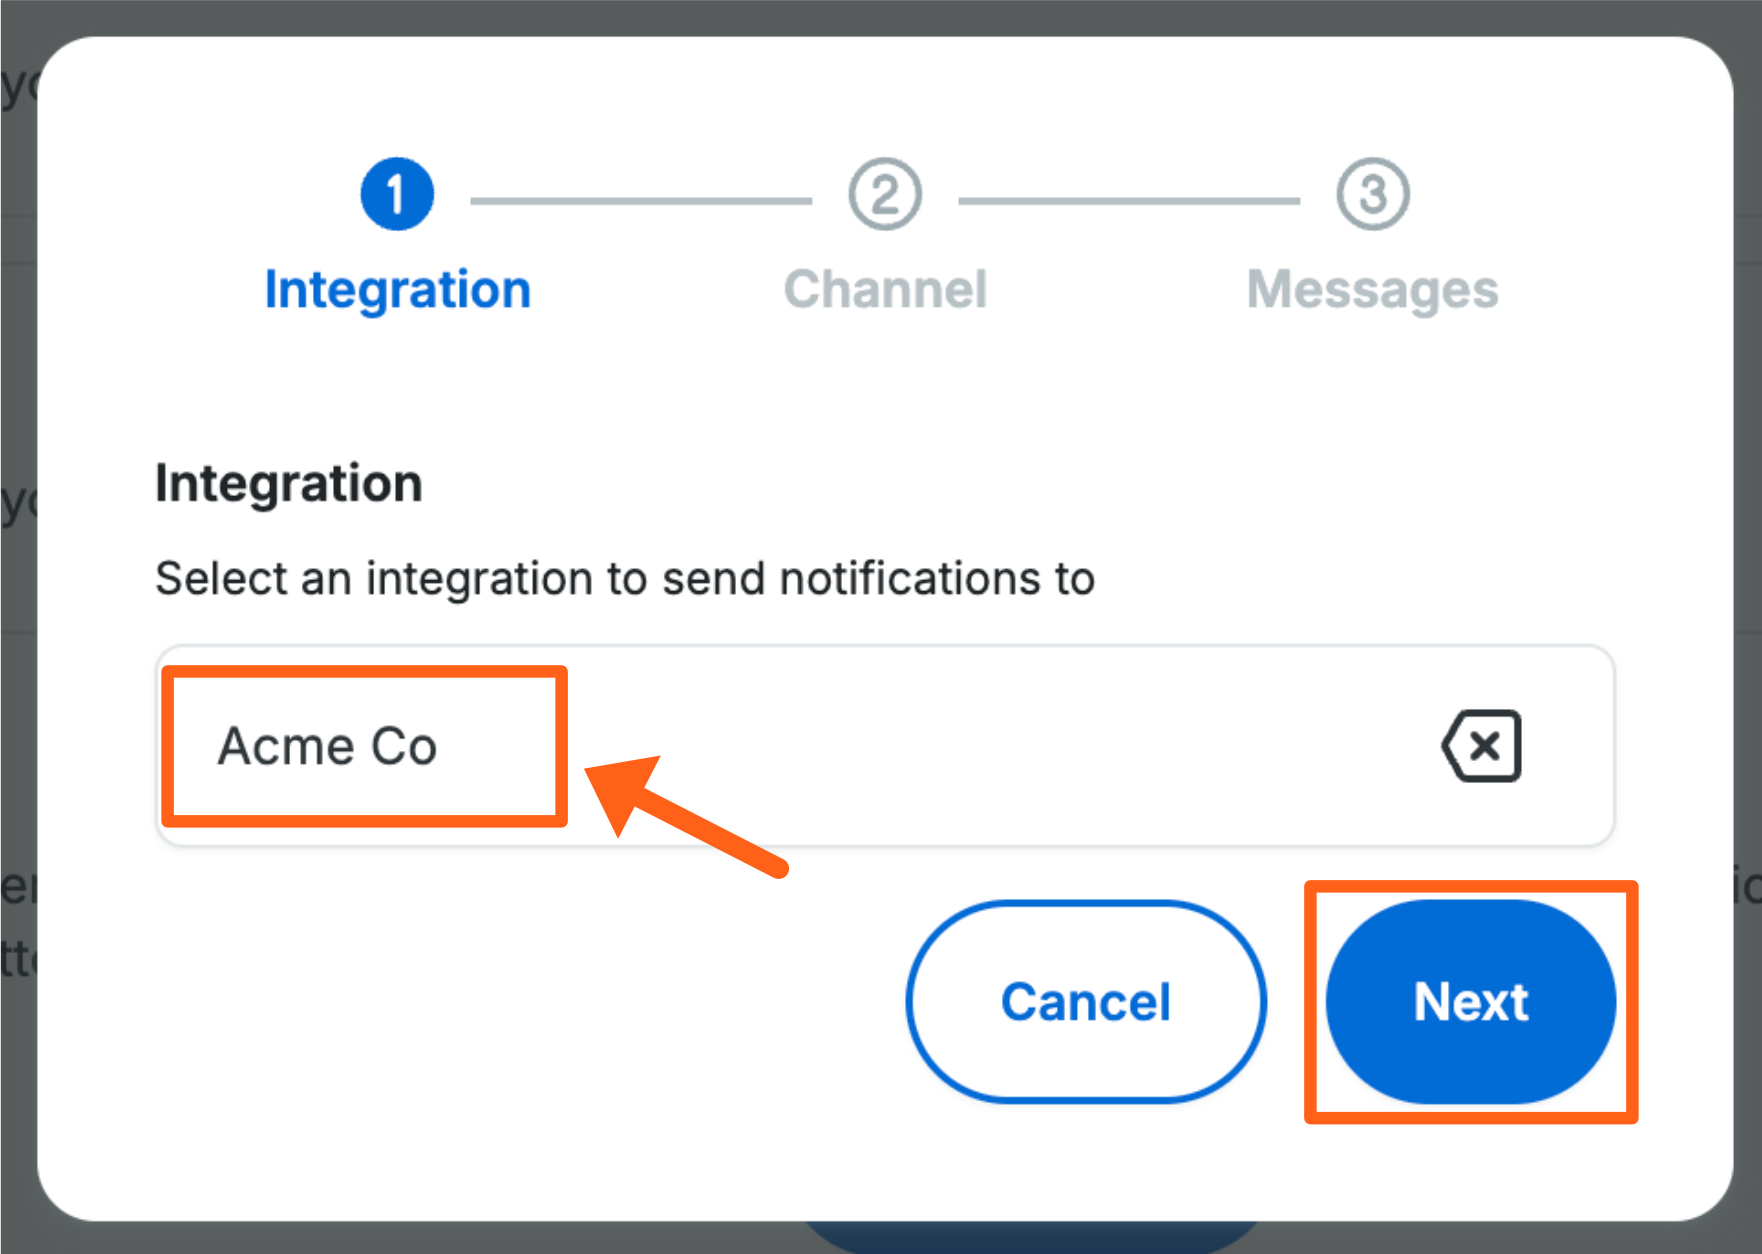
- Choose the Slack group that you want to send notifications to and then click Next
- Choose a public Slack channel to send notifications to and click Next
- Scroll down to the NitroPack section
- Click the Warning notification type to get notifications about score changes
- Notification choices will be grayed out when they are not turned on. Clicking the box will select it.
- Scroll to the bottom of the popup window and click Create Policy in the bottom right
Add Email Notifications
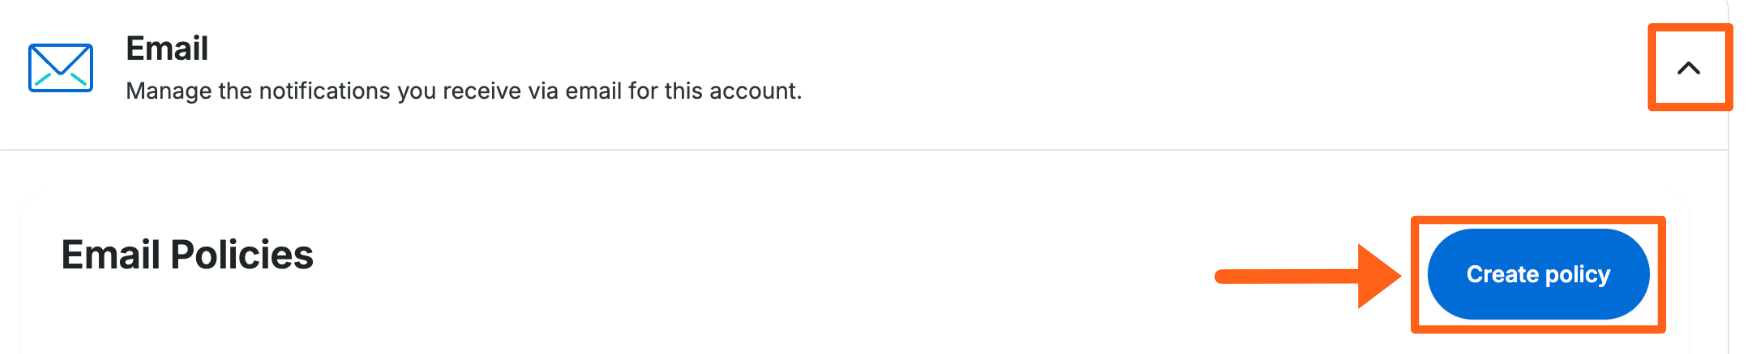
- Click the dropdown arrow to the right of the Email option
- Click the Create policy button
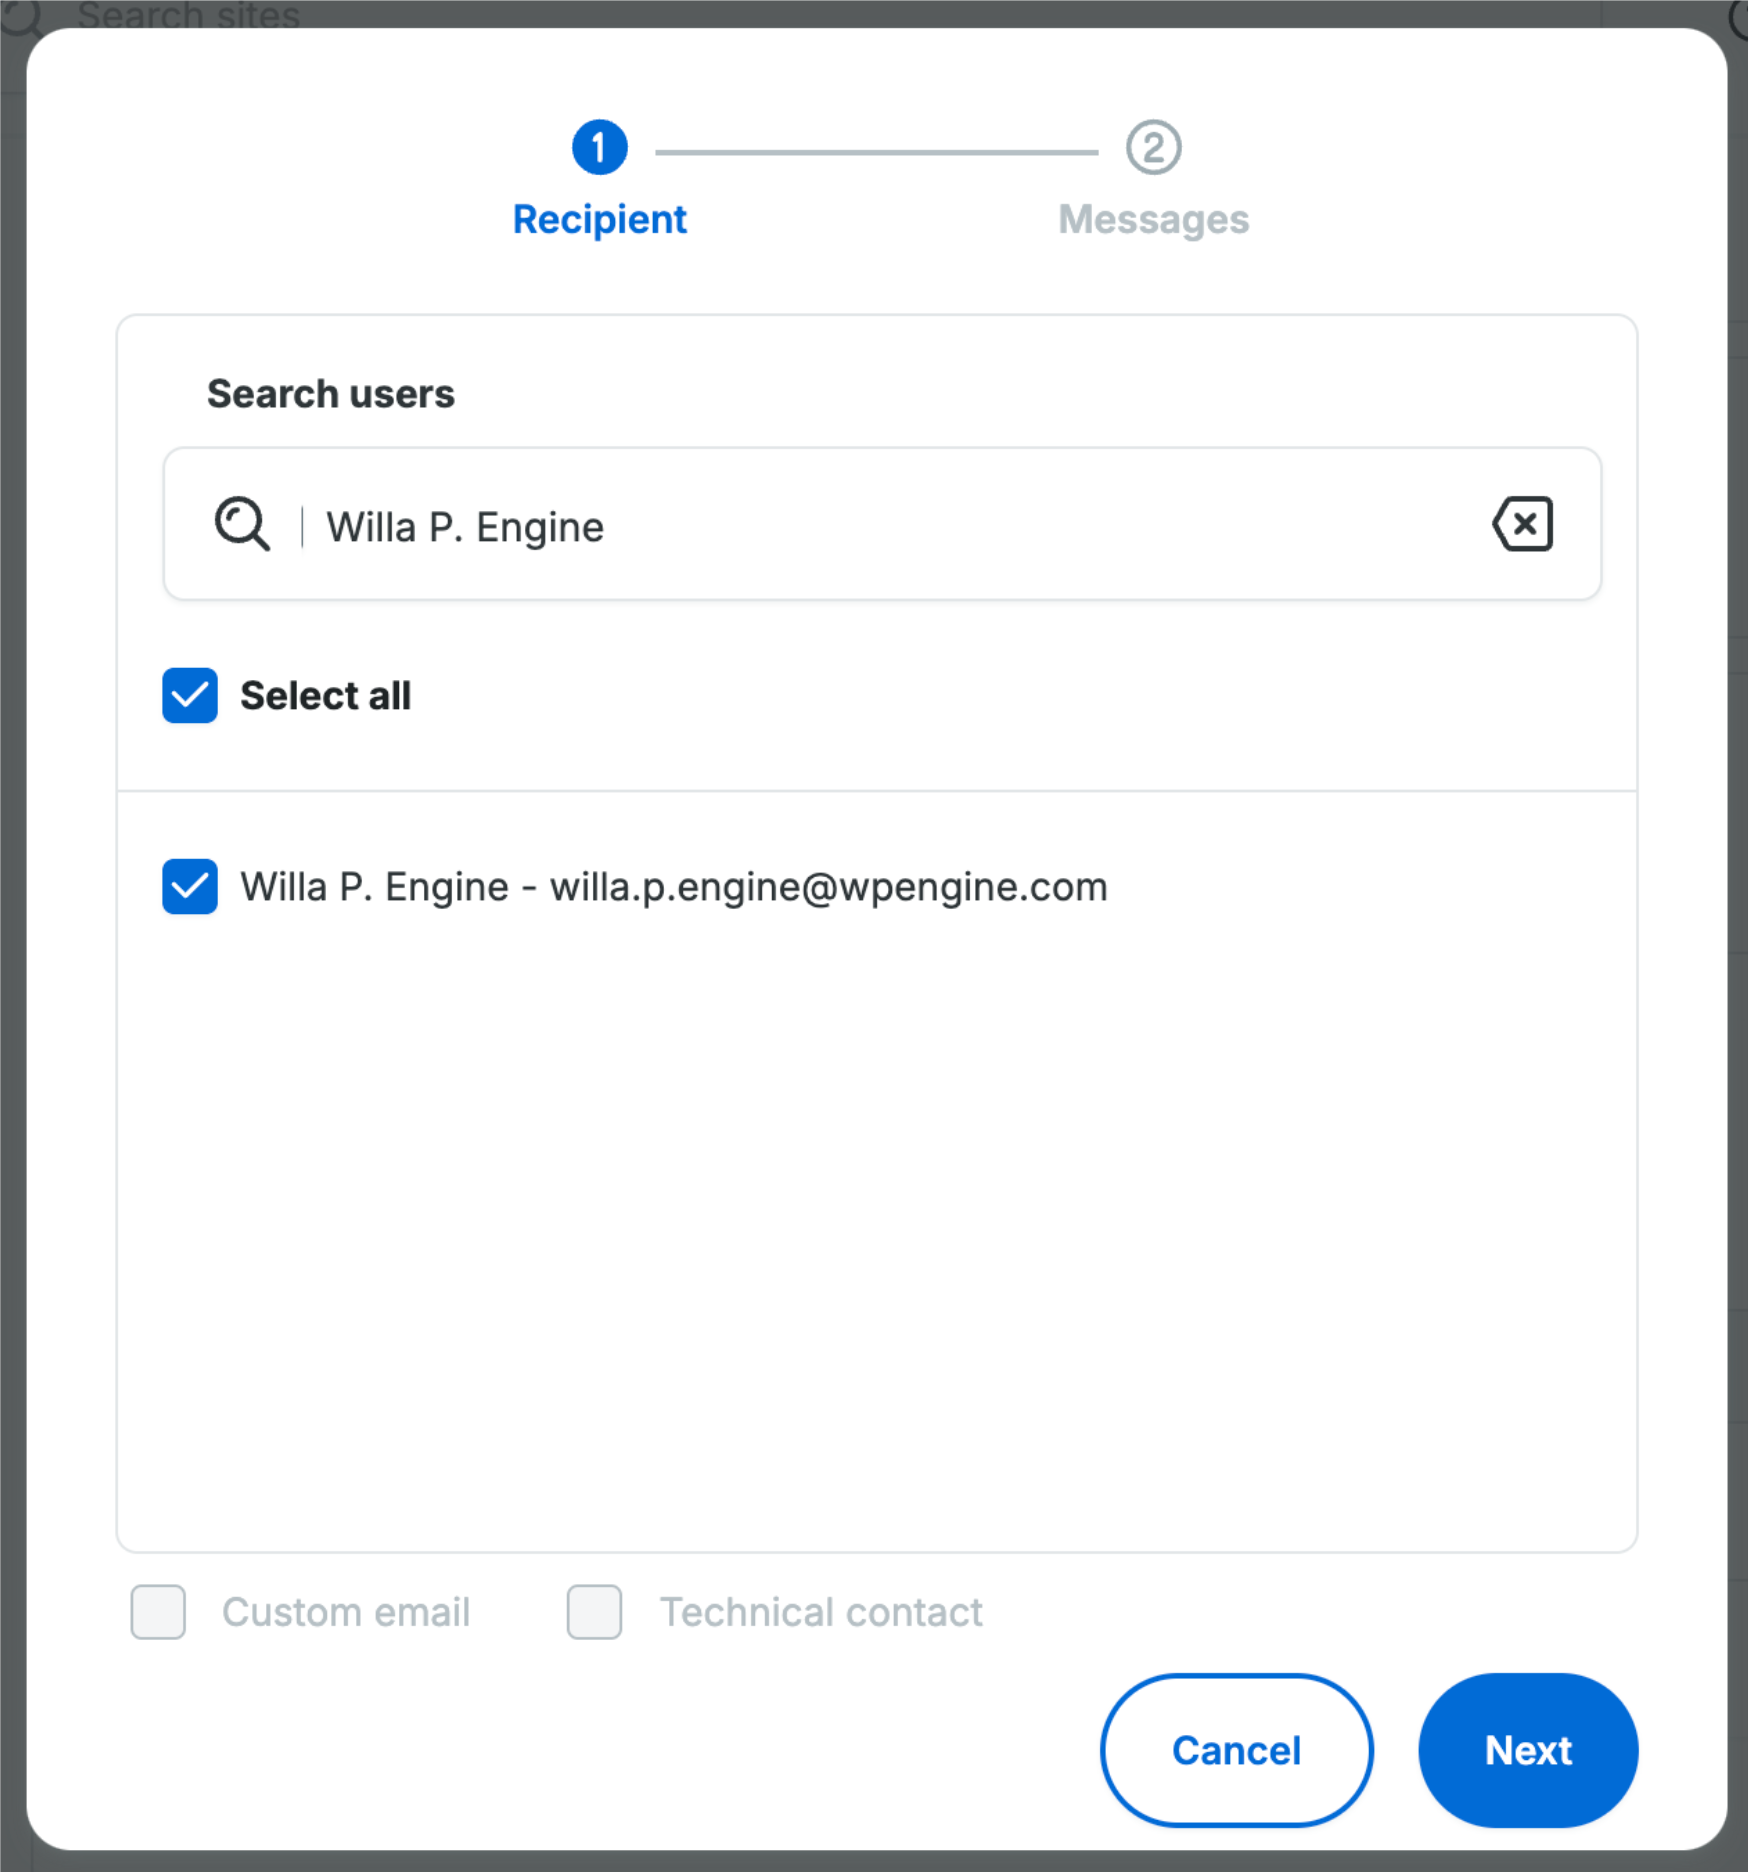
- Search for users and check the box next to each that you want to receive email notifications
- Scroll down to the NitroPack section
- Click the Warning notification type to get notifications about score changes
- Notification choices will be grayed out when they are not turned on. Clicking the box will select it.
- Scroll to the bottom of the popup window and click Create Policy in the bottom right
Troubleshooting
If issues are caused by NitroPack, it is recommended to try these steps:
- Check for conflicting features and plugins as well as service limitations.
- Confirm if NitroPack is causing the issue by bypassing it’s cache. Append the ?nonitro parameter to a given URL to test. (example:
domain.com/page?nonitro) - If media (images, video, etc) are having display issues, exclude the asset type or page from NitroPack’s cache.
- Change NitroPack’s optimization mode to see if less intrusive caching settings resolve the issue.
Optimization Modes
If you see issues when enabling NitroPack, several optimization modes are available that may work better for the site. If you prefer to make custom changes, see Custom Settings.
If the site is not live yet you can simply switch to different optimization modes to see which mode works best for you. If the site is already live then you can use Test Mode to try out different modes while NitroPack is disabled for regular visitors.
To switch modes for all visitors without using Test Mode:
- Open the NitroPack page in the User Portal
- Locate the environment and click the 3 dot menu icon
- Select Settings
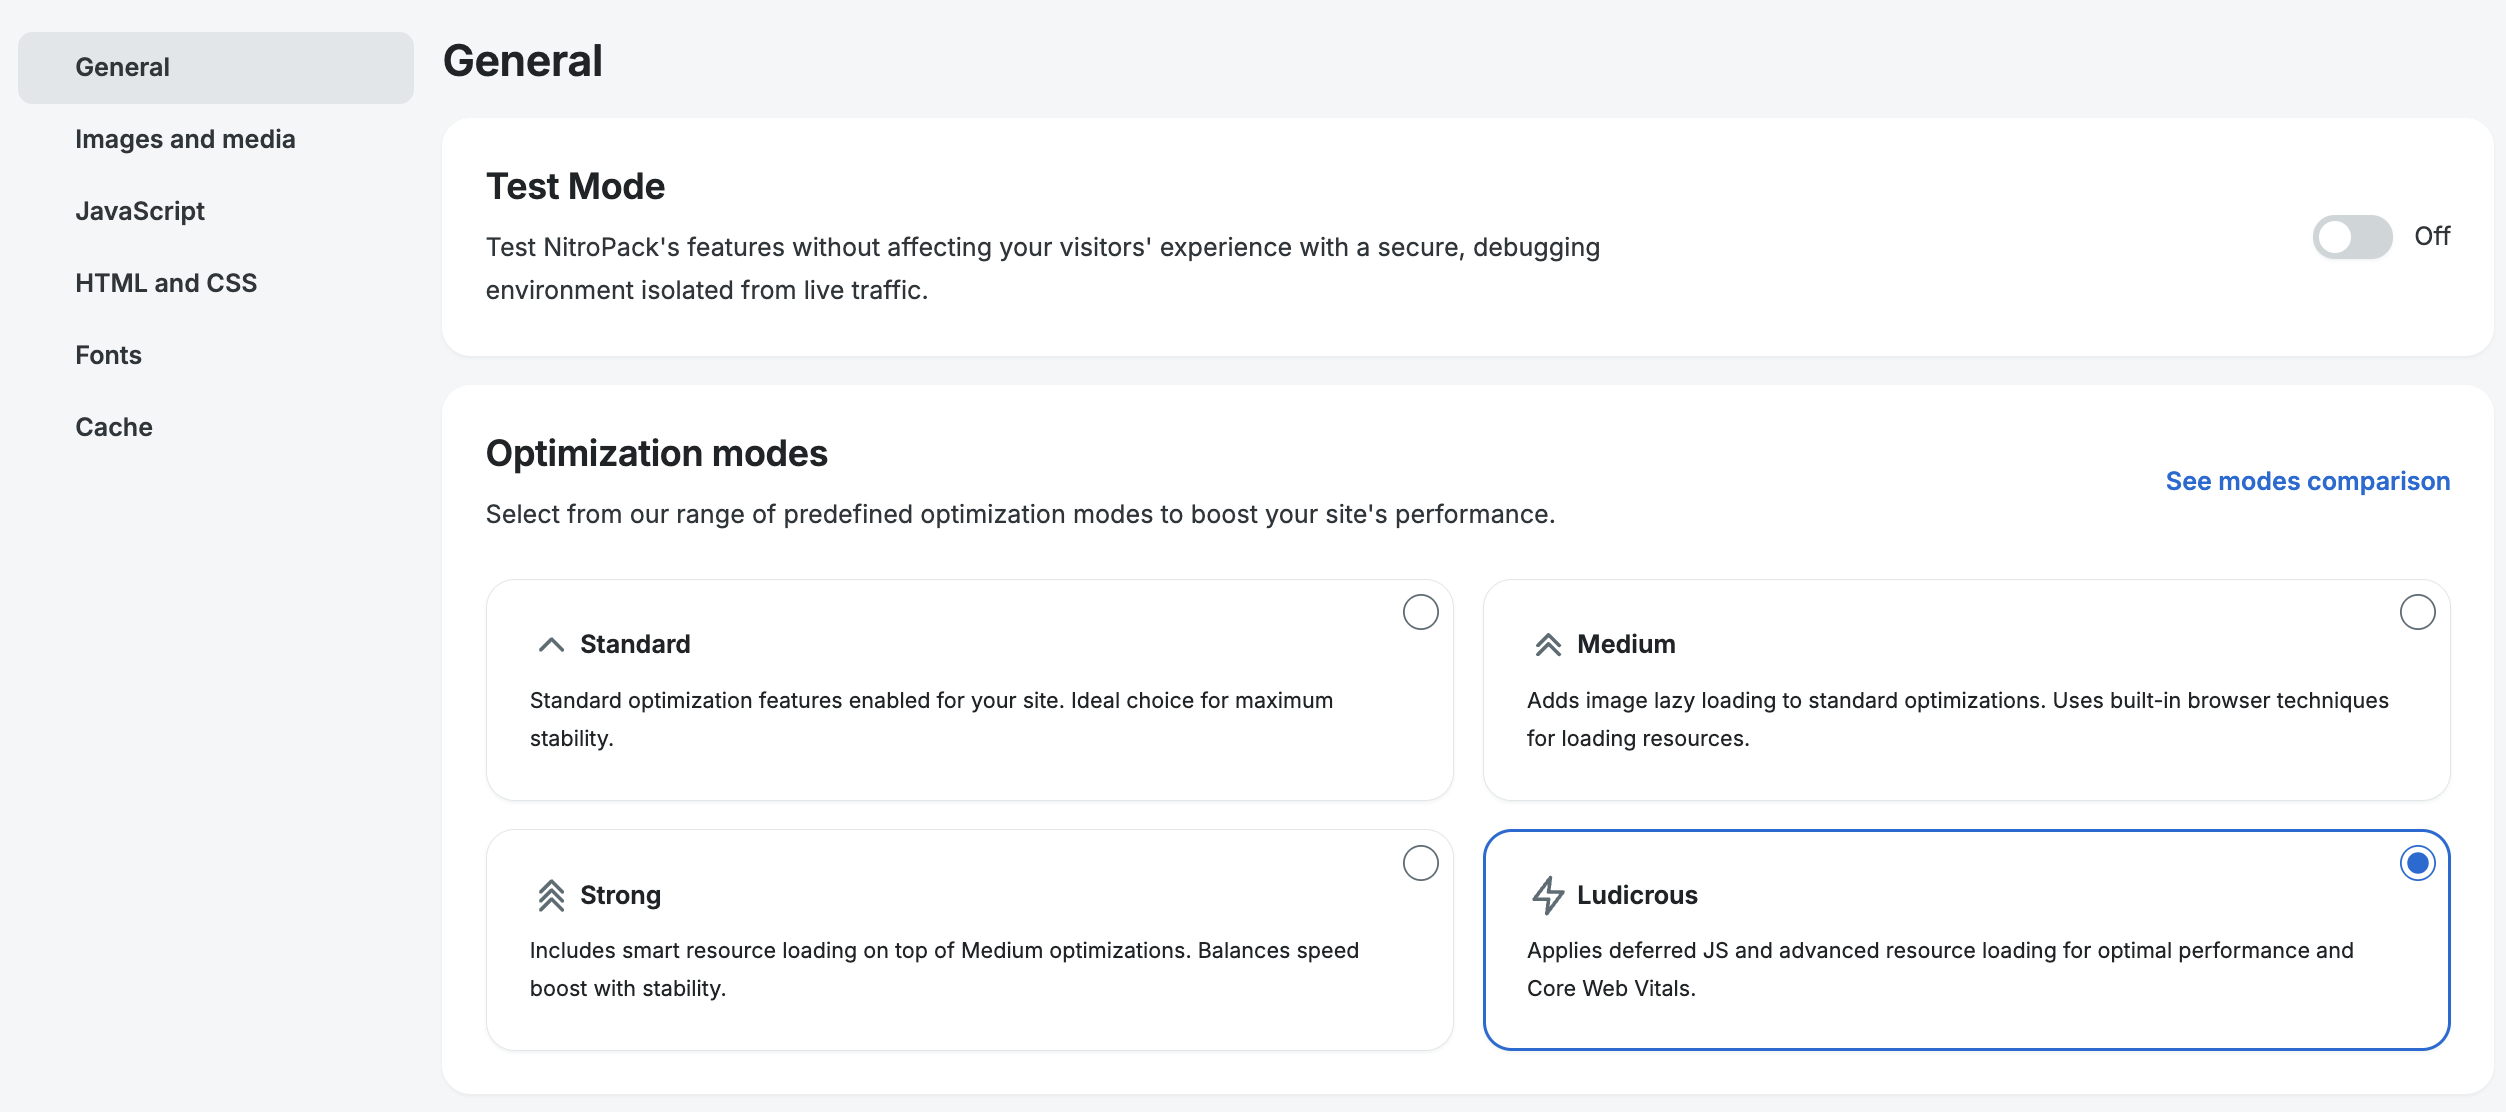
- From the General settings tab, select any of the Optimization Modes, and then click Switch mode in the popup to confirm that you want to switch. This will make some changes that might work better for the site.
- Optimization Modes:
- Standard
Standard optimization features. Ideal choice for maximum stability. - Medium
Adds image lazing loading and uses built-in browser techniques for loading resources. - Strong
Includes smart resource loading on top of Medium optimizations. - Ludicrous
Applies deferred JS and advanced resource loading for optimal performance. - Ludicrous+
Leverages the most cutting-edge optimization features for peak performance.
- Standard
- Optimization Modes:
Features Enabled for each Optimization Mode
| Setting | Standard | Medium | Strong | Ludicrous | Ludicrous+ |
|---|---|---|---|---|---|
| Add HTML preconnects | ON | ON | ON | ON | ON |
| Minify resources | ON | ON | ON | ON | |
| Combine JavaScript | |||||
| Combine CSS | ON | ON | ON | ON | |
| Combine CSS > Merge screen and all media styles | ON | ON | ON | ON | |
| Generate critical CSS | ON | ON | ON | ON | |
| Generate critical CSS > Remove @font-face rules from the critical CSS | ON | ON | ON | ON | |
| Remove render-blocking resources | ON | ON | ON | ON | |
| Remove render-blocking resources > Use resource loader script | ON | ON | ON | ||
| Remove render-blocking resources > Delay loading of non-critical resources | ON | ON | |||
| Remove render-blocking resources > Resource loading strategy | Styles First | Styles First | Styles First | Styles First | Styles First |
| Automatic image lazy loading | ON | ON | ON | ON | |
| Image lazy loading > Size images preemptively | ON | ON | ON | ON | |
| Image lazy loading > Lazy load iframes | ON | ON | ON | ON | |
| Image optimization | ON | ON | ON | ON | ON |
| Image optimization > Image quality | 100% | 80% | 80% | 80% | 80% |
| Override font rendering behavior | ON | ON | ON | ||
| Override font rendering behavior > Select font-display value | swap | swap | swap | ||
| Font loading | native | native | native | native | onload |
| Font compression | ON | ||||
| Animated image optimization | ON | ||||
| Adaptive image sizing | ON | ||||
| Instant cache reoptimize | ON | ||||
| Dynamic queue | ON | ||||
| Standard | Medium | Strong | Ludicrous | Ludicrous+ |
SETTING DEFINITIONS:
- Add HTML preconnects
Preconnecting alerts the browser that you intend to establish a connection with an important domain and that process should start as soon as possible. Reducing the time it takes to establish a connection results in better performance. This setting is always enabled and we don’t have an interface for it yet. - Minify resources
Minification removes whitespace, comments and other unnecessary symbols from code files. This reduces file size, ensuring a faster download time. - Combine JavaScript (JS)
Combining multiple JS files into a single file reduces the number of network requests the browser has to make. As a result, the browser finds and downloads everything it needs to render the page faster. - Combine CSS
Combining multiple CSS files into a single stylesheet reduces the number of network requests the browser has to make. As a result, the browser finds and downloads everything it needs to style the page faster. - Combine CSS > Merge screen and all media styles
This option makes sure that NitroPack treats @media screen and @media all values the same. This prevents the creation of unnecessary CSS files. - Generate critical CSS
Generate critical CSS means prioritizing the CSS responsible for styling above-the-fold content. Rendering above-the-fold content quickly improves a page’s actual and perceived performance. - Generate critical CSS > Remove @font-face rules from the critical CSS
@Font-face rules specify a custom font, which can be loaded locally or from a server. Removing these rules results in slower font loading but faster First Meaning Paint (FMP). - Remove Unused CSS (RUCSS)
RUCSS finds CSS rules that aren’t used on the page and reduces them. By reducing unused CSS, this feature lowers the total number of bytes that have to be downloaded and helps browsers start rendering content faster. - Remove render-blocking resources
By default, JavaScript and CSS files are render-blocking because browsers must load, parse and execute them before rendering the page. This can slow down page load significantly. NitroPack prevents this by rearranging and repositioning these blocking resources. - Remove render-blocking resources > Use resource loader script
Our resource loader rearranges the way resources are fed to the main thread. This is done to take advantage of modern CPU’s multi-core nature by offloading tasks away from the main thread. - Remove render-blocking resources > Delay loading of non-critical resources
By default, NitroPack’s Ludicrous Mode lazy loads JS execution until user interaction is detected. Lazy loading JS helps browsers start painting content (HTML, CSS) faster. In a lot of cases, this is crucial for avoiding page abandonment.
Important Note: This setting is not a good fit for websites that heavily rely on JavaScript for displaying content. Before applying the setting on your site, we advise you to test it with the Test Mode. - Remove render-blocking resources > Resource loading strategy
This option lets you choose between prioritizing styles (CSS) or scripts (JS). Prioritizing styles is the safer option, while loading scripts first can provide better performance but isn’t suitable for all websites. - Image lazy loading
Lazy loading helps browsers only load the images that visitors are currently looking at. Doing this helps prioritize critical images over non-critical ones, resulting in a much lower initial page weight. - Image lazy loading > Size images preemptively
Preemptive image sizing tells the browser how much space to allocate for each image in advance (without using width and height attributes). As a result, the browser can render the page faster and avoid potential layout shifts. - iFrames Lazy load
Again, lazy loading help helps browsers only load resources that visitors currently need. This option does the same thing, only for iFrames instead of images. - Image optimization
Image optimization reduces image file size via compression. It also converts images to WebP while keeping the original image in place as a backup. - Image optimization > Image quality
This option lets you adjust the quality of optimized images. As you increase the number, the quality becomes better, but the image file also becomes larger. Allowed values are between 1 and 100. You can learn more about image quality and compression levels here. - Override font rendering behavior
The font-display CSS rule determines how the browser should display fonts based on when they’re downloaded. This option lets you override the default behavior by selecting from one of the five values below. - Override font rendering behavior > Select font-display value
You can choose between five values for the font-display rule – auto, block, swap (the default), fallback, optional. Each value can be helpful in specific cases. You can read more about the font-display values here.
Custom Settings
You can now make custom changes to settings for NitroPack. When making a custom change you will automatically be switched to the Custom optimization mode.
To view and edit settings for NitroPack:
- Go to the Products page in the User Portal
- Click on NitroPack under Your products
- Click the three dot button to the right of any environment you want to adjust
- Click Settings
This will take you to the settings page inside of NitroPack where you can choose from the categories in the left sidebar to adjust individual settings.
The main settings are explained below the Optimization Mode Settings table above.
Exclusions
Exclude full pages that you don’t want to be optimized or exclude specific resources (CSS, Font, Image, JS) from specific optimization operations.
- Navigate to the NitroPack settings page referenced above in the Custom Settings section.
- Click Cache in the left sidebar
- Scroll down to the Exclusions section
- Click the toggle button to the right of Excluded resources or Excluded URLs to see the exclusion options
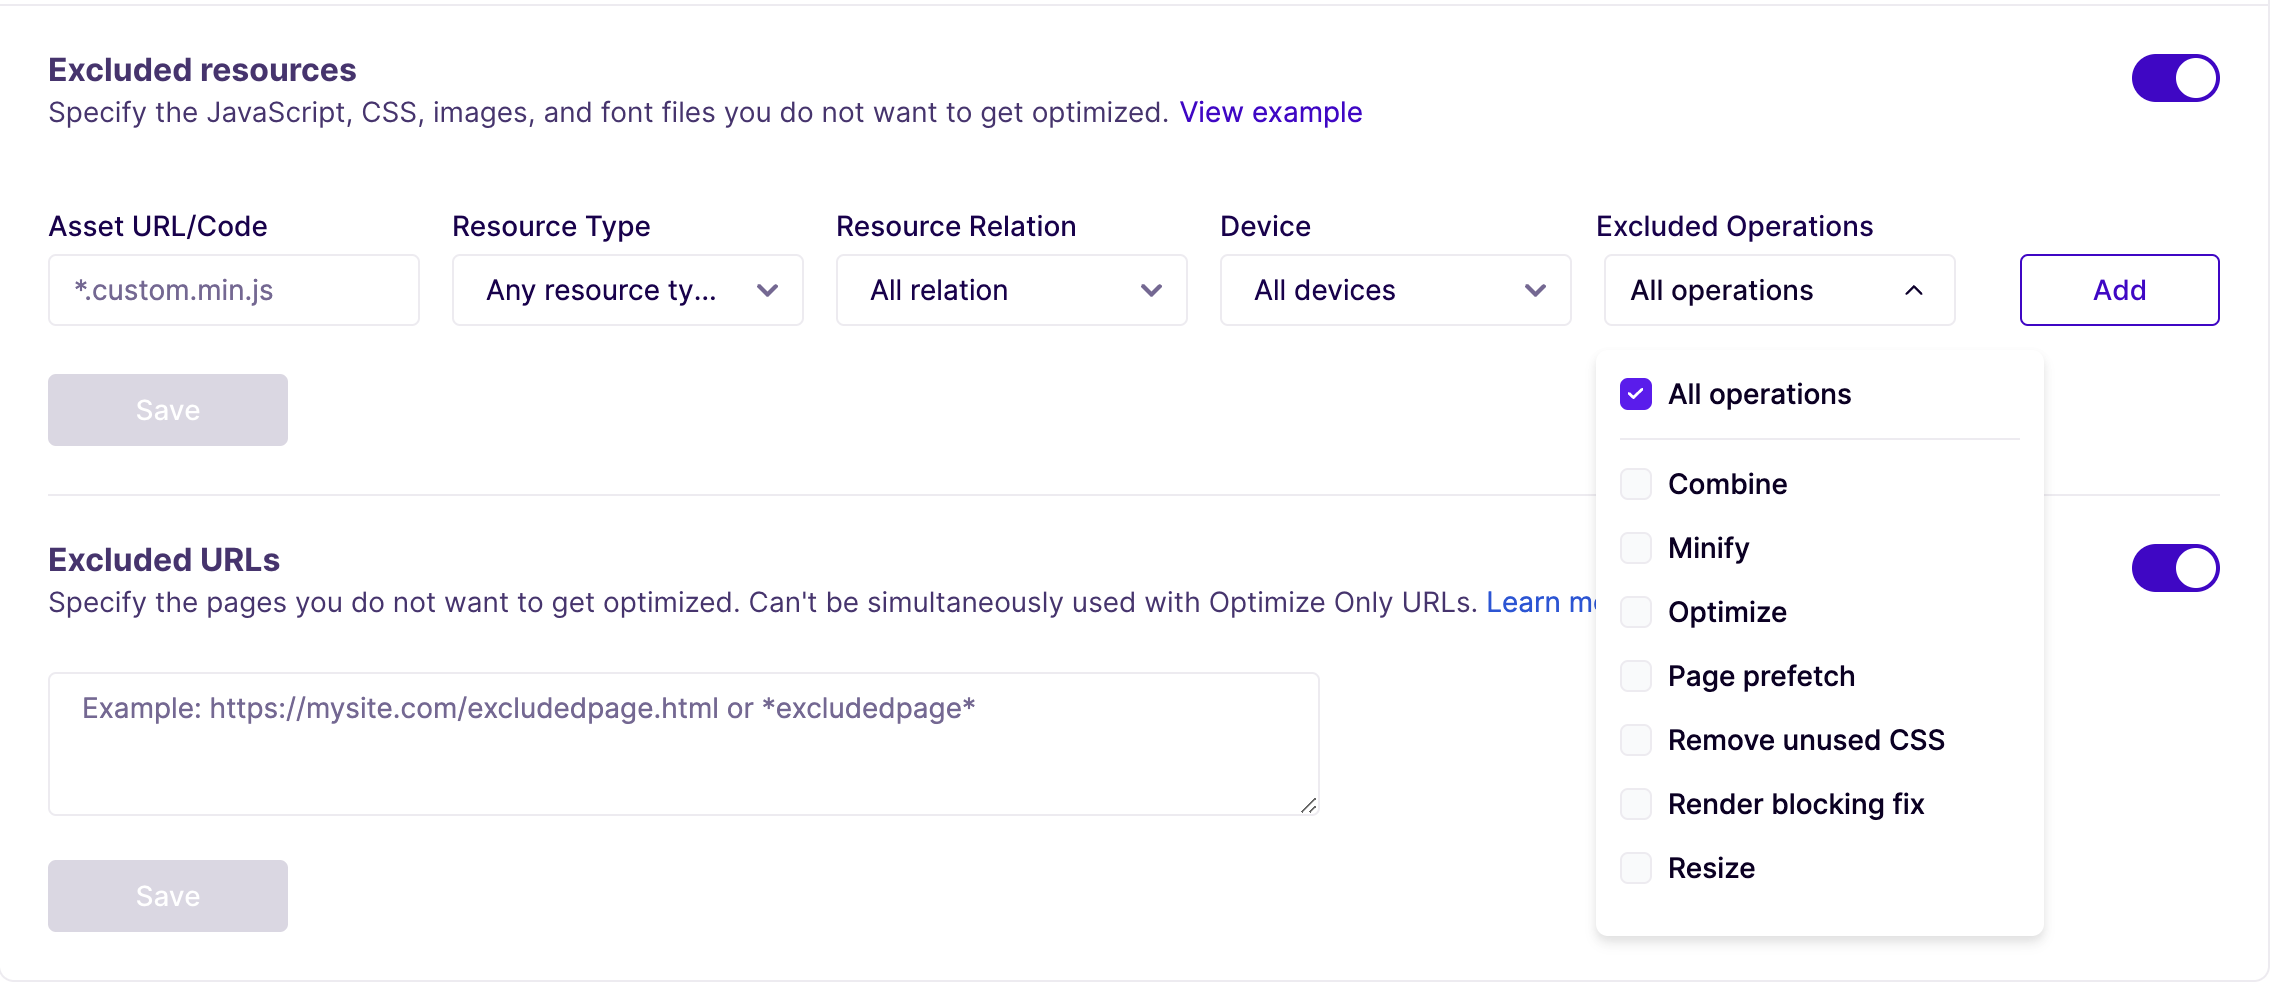
Excluded Resources
Specify the JavaScript, CSS, images, and font files you do not want to get optimized. Read more about excluded resources in the NitroPack article.
- Specify Asset URLs, Resource Types, Resource Relations, or Device types to exclude
- Select Excluded Operations (pictured above) to exclude from the selected resource types
Excluded URLs
Specify the pages you do not want to get optimized. Read more about excluded URLs in the NitroPack article.
- Specify full page URLs or URL patterns that you want to exclude
- example URL:
https://mynewsite.com/articles/article-1 - example URL pattern:
*articles/*
- example URL:
NitroPack Settings in the WordPress Admin Dashboard
Click NitroPack in the WordPress left sidebar to see available settings. For additional settings view the Custom Settings section above.
Some of the current noteworthy settings you can find here are:
Shortcodes exclusions
Load widgets, feeds, and any shortcode with AJAX to bypass the cache and always show the latest content.
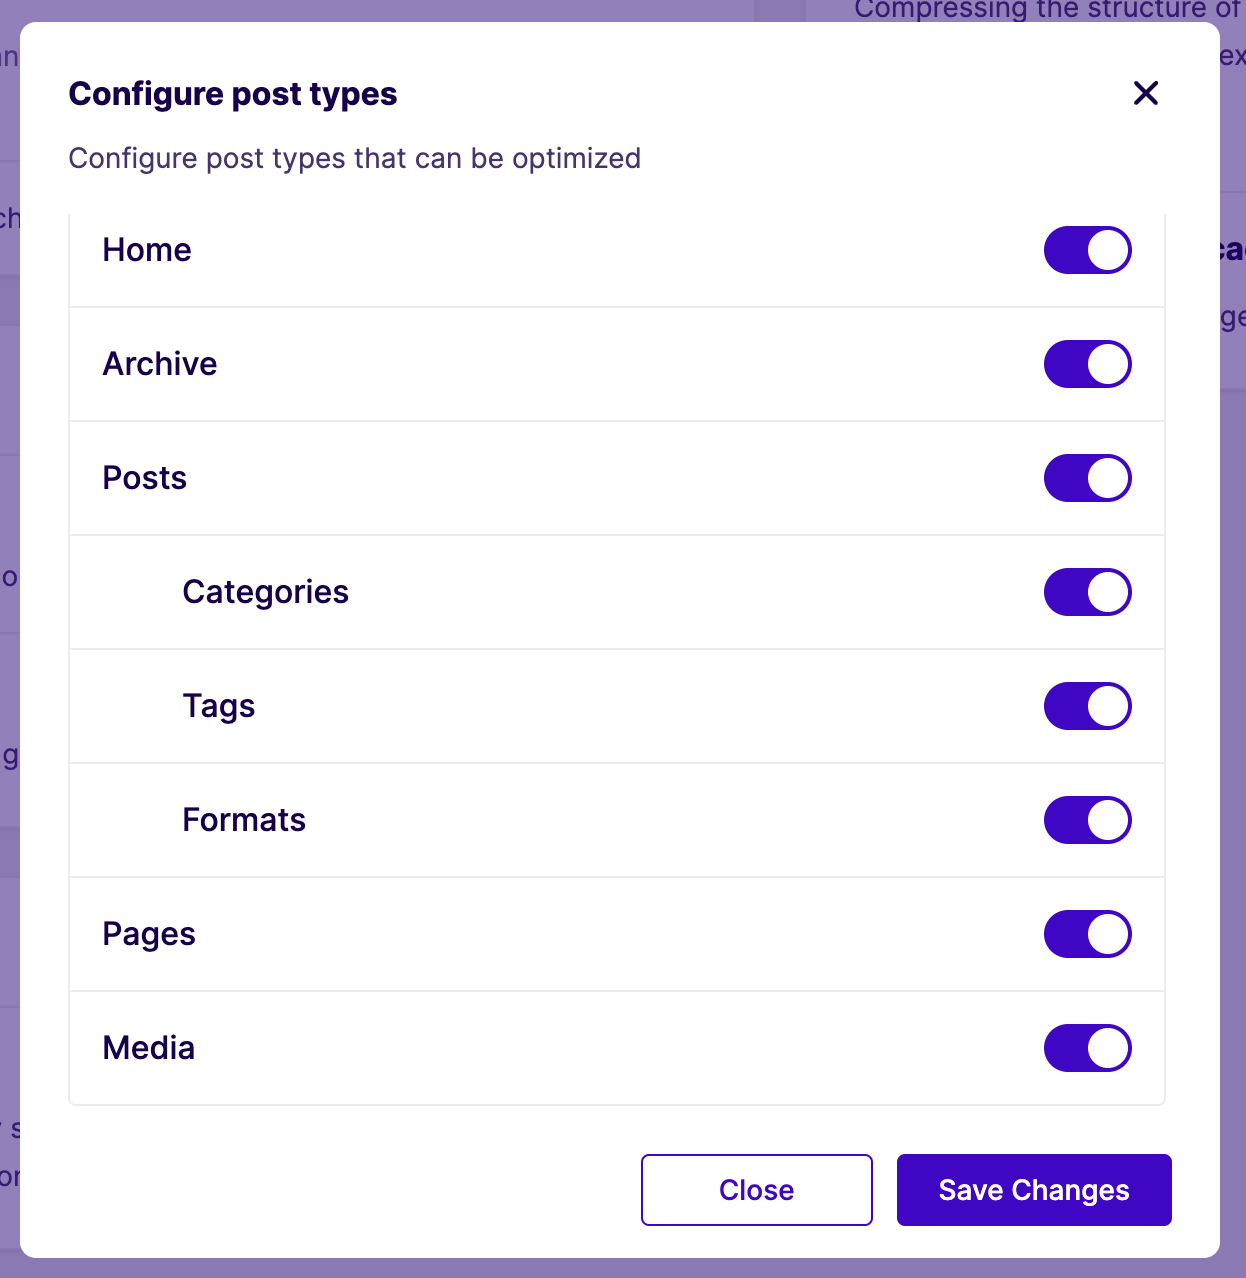
Page optimization (Select what post/page types get optimized)
If you ever add a new custom post type, either through custom code or through a plugin that has custom post types, you should click the gear icon next to Page optimization to confirm that all relevant post types are selected to be optimized.
Copying to a different environment
In order to use NitroPack with a site utilizing multiple environments (Production, Staging, and Development) make sure to check the following requirements:
- NitroPack is enabled on all environments (no license is required for Staging and Development environments).
- NitroPack plugin is updated to the latest version on all environments.
- Ensure that the
wp-content/cachefolder is not purged after a push or pull to a different environment as NitroPack stores its configuration details in that folder. The folder name should be a string of numbers and letters and then “-nitropack”.
ex:/wp-content/cache/1234abc-nitropack/. - NitroPack plugin shows “connected” in the WordPress Admin dashboard on all environments.
- If it’s connected You’ll see a green dot in the top bar menu like this:
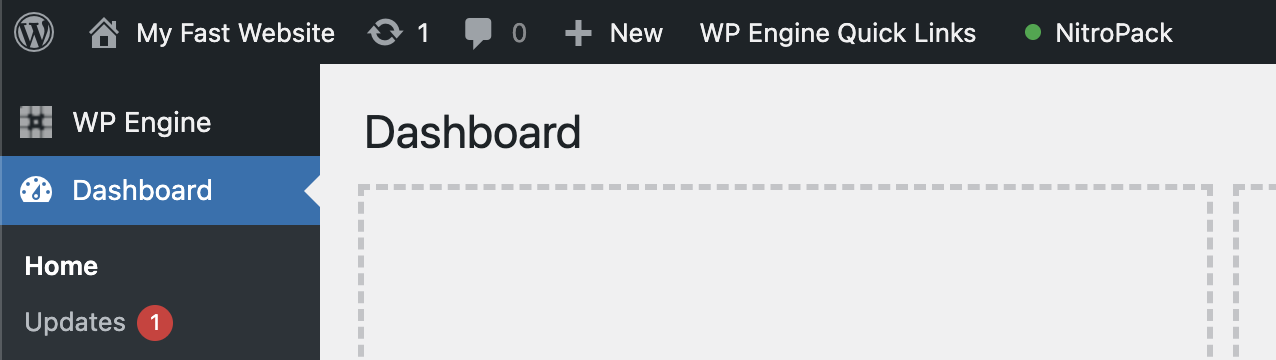
- If there are issues or the site is disconnected it will show either yellow or red dots.
- If it’s connected You’ll see a green dot in the top bar menu like this:
Bypass NitroPack
If you are unsure that NitroPack is causing issues on the site, comparing the optimized page with its non-optimized version can help pinpoint optimization-related issues.
- Bypass NitroPack’s cache by appending the ?nonitro parameter to a given URL (example:
domain.com/page?nonitro) - If the issue persists, this means it’s not related to NitroPack.
If needed, quickly release the NitroPack license in the User Portal by clicking the (…) dot icon on the right and selecting Release license.
Confirm NitroPack
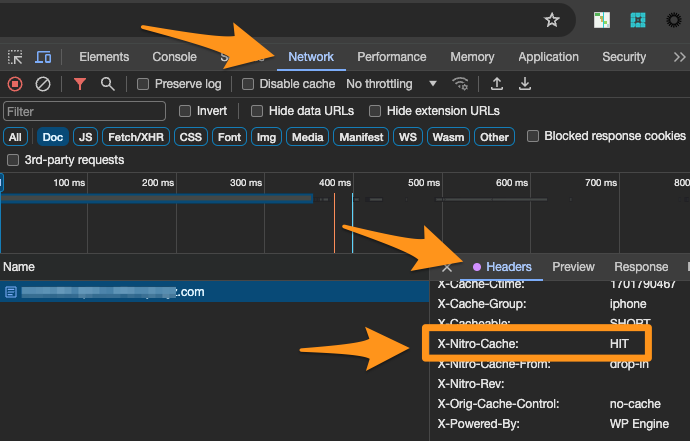
If you are unsure if NitroPack is affecting an asset, this can be confirmed by the existence of the x-nitro-cache:HIT header.
Visit the page you have NitroPack enabled on and right-click, then click Inspect. You should then find the x-nitro-cache Response Header. It should have a value of HIT, indicating that NitroPack cache was present and served.
Using GeoTarget with NitroPack
To make sure that NitroPack caches content dynamically based on GeoTarget values, you need to add dynamic content cookies within the NitroPack settings.
- Go to the Products page in the User Portal
- Click on NitroPack under Your products
- Click the three dot button to the right of the environment you want to adjust
- Click Settings
- This will take you to the settings page inside of NitroPack. Click Cache in the left sidebar.
- Scroll down to the Dynamic content cookies section
- Add all of the NitroPack cookie names in the Cookie name field, that correspond to the GeoTarget values you use for your website. View the table below for the corresponding cookie names.
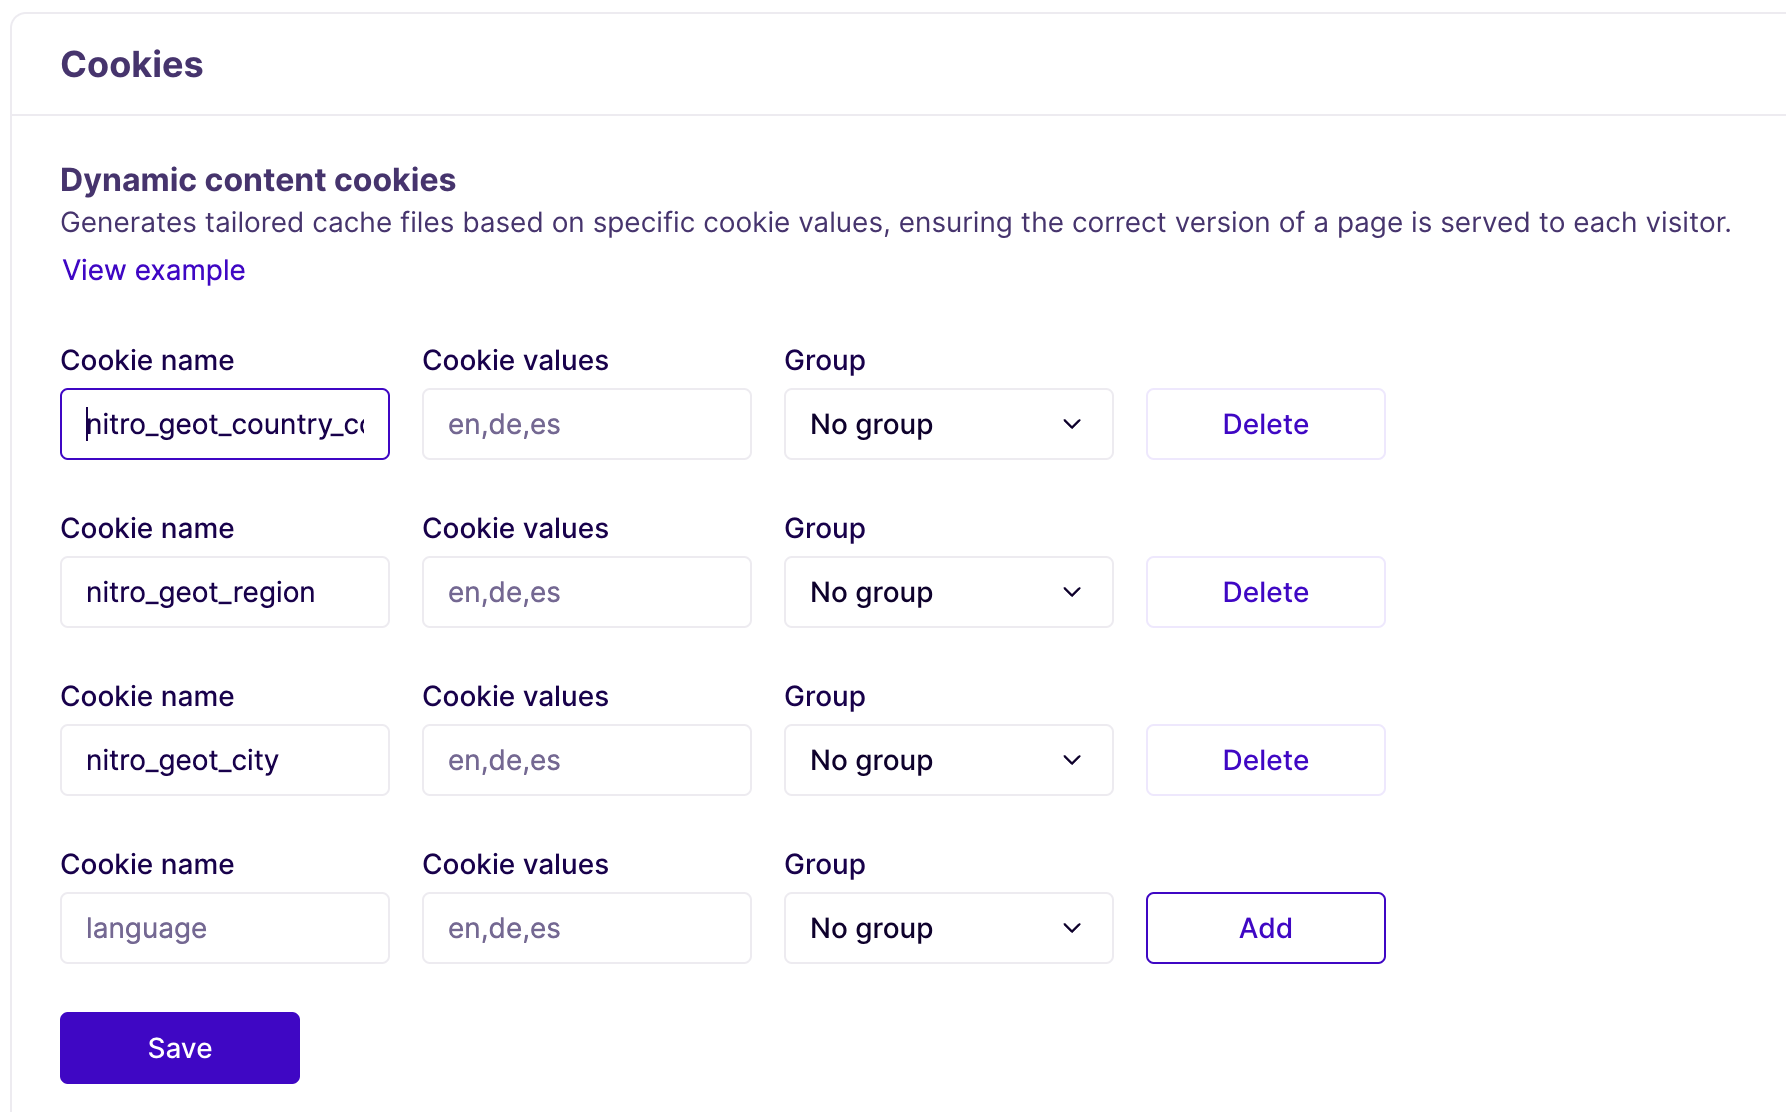
- Cookie values (optional) – Cookie values can be added as a comma separated list. Specifying cookie values is not required, but it is highly recommended. Including all possible values ensures that the cache warmup feature can simulate each scenario and prepare optimizations in advance. If you decide to skip it, an organic visit must occur before our service can detect and optimize that combination. If you leave Cookie values empty, our service will create optimizations for all encountered combinations.
- Groups (optional) – Grouping cookie names with a group number tells our service that a combination outside these groups cannot occur. This prevents unnecessary cache files from being created for different combinations to preserve server space.
- An example might be preventing combinations of a country and a currency, by grouping a cookie for a specific language value with the cookie for a specific currency value.
Cookie Names for GeoTarget
| NitroPack cookie name | GeoTarget value |
|---|---|
| nitro_geot_country_code | HTTP_GEOIP_COUNTRY_CODE |
| nitro_geot_country_code3 | HTTP_GEOIP_COUNTRY_CODE3 |
| nitro_geot_country_name | HTTP_GEOIP_COUNTRY_NAME |
| nitro_geot_latitude | HTTP_GEOIP_LATITUDE |
| nitro_geot_longitude | HTTP_GEOIP_LONGITUDE |
| nitro_geot_area_code | HTTP_GEOIP_AREA_CODE |
| nitro_geot_region | HTTP_GEOIP_REGION |
| nitro_geot_city | HTTP_GEOIP_CITY |
| nitro_geot_postal_code | HTTP_GEOIP_POSTAL_CODE |
Conflicts
Conflicts between NitroPack and other caching or optimization plugins may occur. As a result, visual issues or other issues may occur on the website.
In general, NitroPack can’t be used with other caching plugins that have any of the following features enabled:
- Page caching
- Image lazy loading
- CSS optimization
- JavaScript optimization
The overlapping functionalities can cause our optimization mechanism not to work at all.
Therefore, we don’t recommend using NitroPack simultaneously with another optimization plugin like (but not limited to):
- Autoptimize
- a3 Lazy Load
- Asset Cleaner Pro
- Breeze
- Comet Cache by WP Sharks
- Fast Velocity Minify
- Hummingbird
- JCH Optimize
- Jetpack Boost
- Litespeed Cache
- PageSpeed Ninja
- Perfmatters
- PhastPress
- Powerpack (WPTouchPro)
- SG Optimizer
- Smush (only their lazy load option must be disabled, not the entire plugin)
- Swift Performance
- W3 Total Cache
- WPML
- WP Fastest Cache
- WP Fastest Cache Premium
- WP Rocket
- WP Super Cache
- WP-Optimize (only their page caching must be disabled, not the entire plugin)
Auto-detected conflicting WordPress plugins
NitroPack generally provides a warning when an incompatible plugin is detected. If you start using NitroPack you can remove conflicting plugins listed below.
Note: Sometimes disabling these plugins might not be enough and deleting them might be required to avoid conflicts.
- Asset CleanUp Pro – their cache might cause issues in some cases
- Autoptimize
- Breeze cache plugin by Cloudways
- Comet Cache by WP Sharks
- Hummingbird
- JetPack – Enable site accelerator feature under the Performance Tab must be disabled
- LiteSpeed Cache
- PageSpeed Ninja
- Pegasaas Accelerator WP
- PhastPress
- Smush by WPMU DEV
- Swift Performance
- W3 Total Cache
- WP Fastest Cache
- WP Optimize (only their page caching must be disabled, not the entire plugin)
- WP Super Cache
- WP-Rocket
Ad Management
- Ezoic for WordPress integrated via DNS is not compatible
- Ezoic integrated via WordPress plugin is compatible
Cache conflicts
Page caching plugins must be disabled for NitroPack to handle caching.
- Asset Cleanup Pro
- Autoptimize
- Breeze
- Comet Cache by WP Sharks
- Ezoic Speed Accelerator
- Fast Velocity Minify
- Hummingbird
- JCH Optimize
- Not a WordPress plugin: Google’s page speed optimization module has to be turned off
- Jetpack Boost
- Litespeed Cache
- PageSpeed Ninja
- Perfmatters
- PhastPress
- Powerpack (WPTouchPro)
- SG Optimizer
- Swift Performance
- Swift Performance
- W3 Total Cache
- WP Fastest Cache
- WP Fastest Cache Premium
- WP Rocket
- WP Super Cache
- WP-Optimize (only their page caching must be disabled, not the entire plugin)
Optimization
This is the only feature that can work alongside NitroPack.
- AMP – AMP pages do not get optimized as AMP is considered an already optimized format.
Images
NitroPack takes care of image optimization so the following plugins are no longer necessary.
- a3 Lazy Load
- BJ Lazy Loader – Could work only with “Lazy load images” and “Lazy load iframes” options turned off, but deactivating it is recommended.
- EWWW Image Optimizer – disable Lazy load, Easy IO, WebP Conversion
- imagify – Create webp versions of images
- JetPack – disable Lazy loader
- MediaAce – disable Lazy loader (They also lazyload iframes, YouTube, etc). You can disable just image lazyloading but other issues may surface.
- OptiMole – disable Lazy loader
- ShortPixel Adaptive Images (separate plugin)
- ShortPixel WebP conversion
- Smush – disable Lazy loader
- WebP Express
- WP Compress
Incompatible non-optimization plugins:
- Anti-spam by CleanTalk – disable “SpamFireWall” (Disabling only “anti-crawler” will not work)
- WP-Cron Control – must be deactivated
- Buddypress – not compatible with NitroPack
- Buddypress + BuddyBoss – not compatible with NitroPack. Pages have x-nitro-disabled-reason: 404 which is expected
- PublishPress Revisions
Exceptions
The NitroPack “Incompatible plugin” warning can be ignored for the following plugin, but please do the following:
- OptiMole – disable Lazy loader
Limitations
Currently there are some caveats when using NitroPack. As we continue to modify and improve the plugin, these may change in the future.
- Sandbox Sites
- NitroPack is not currently available for Sandbox Sites.
- Logged in admin users
- NitroPack will not optimize the site for users logged in to WP-Admin. This can be tested by checking the following headers:
X-Nitro-DisabledandX-Nitro-Disabled-Reasonas they will showX-Nitro-Disabled: MISSandX-Nitro-Disabled-Reason: request type not allowed. NitroPack was not designed to improve or change the performance of the native WP admin options. Users logged in to the WP-Admin are uncached, and theX-Nitro-Disabled-Reason: logged inheader confirms NitroPack is off during these tests.
- NitroPack will not optimize the site for users logged in to WP-Admin. This can be tested by checking the following headers:
- Multisite
- NitroPack is not currently available for multisite configurations.
- Password Protection
- Sites utilizing password protection cannot be fully optimized by NitroPack.
- If the website’s password protection software supports whitelisting, Nitropack IPs should be allowed to ensure full optimization can occur. Learn more here.
The IP addresses for NitroPack that you can add to your allow list are:
178.62.81.205
46.101.77.196
178.62.71.222
159.65.180.53
34.89.113.53
34.147.235.168
35.246.2.61
104.154.182.50
- WP Engine Headless Platform
- NitroPack is not currently available for WP Engine Headless Platform plans.
- Environments
- NitroPack is intended to be used on Production environments. Staging and Development environments won’t see the full performance improvements because those environments are primarily used for testing and not live traffic. Nevertheless, NitroPack should be enabled on all environments (Production, Staging and Development) to be able to push and pull changes between environments without interrupting NitroPack.
- Reverse Proxy
- Due to the way reverse proxy configurations obfuscate traffic, NitroPack will not function.