Get Started
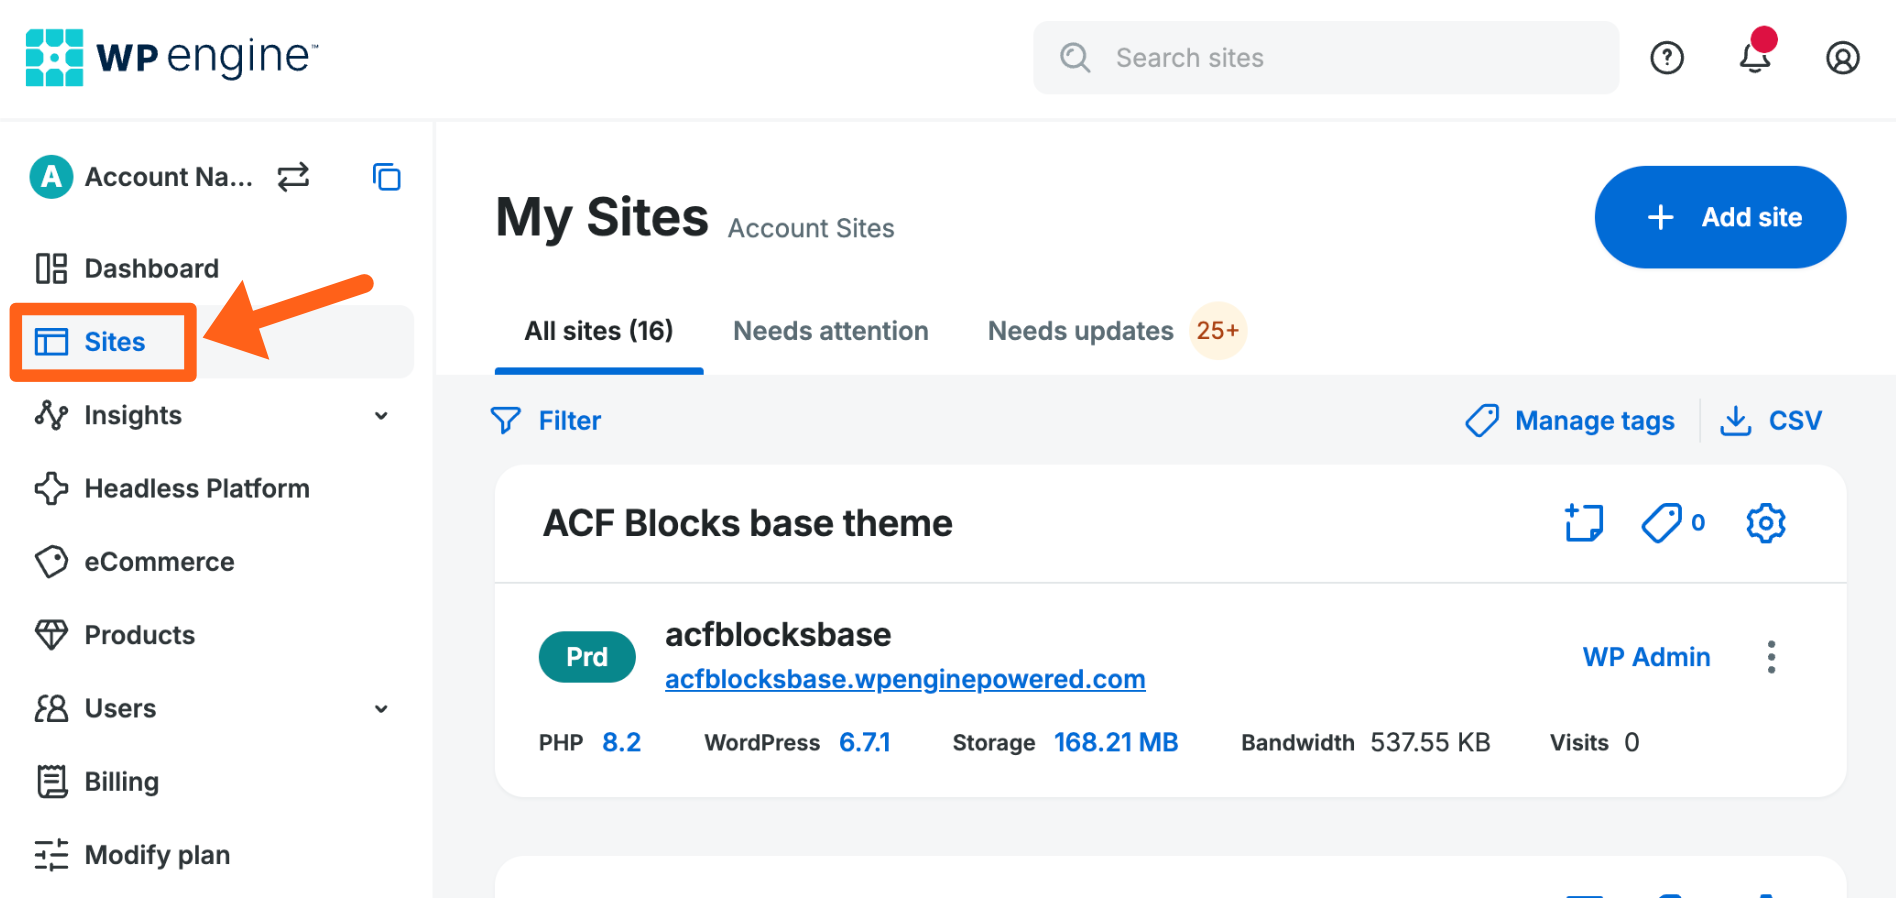
Sites Page
Tags:
Key Takeaways
The Sites page is the central hub for managing your sites on WP Engine. It offers tools for site and environment management, including updates to plugins and themes.
Tags allow users to categorize sites for better organization. They can be used to filter and manage a large number of sites efficiently.
Bulk tag management feature enables users to edit tags in batches. This streamlines the process for accounts with multiple sites.
Plugin and Theme Vulnerabilities can pose security risks. It’s crucial to update or remove outdated plugins promptly to prevent security incidents.
The Sites page is the central hub for managing your sites on WP Engine. This page offers site and environment management tools, such as details about the environment’s status and the ability to make updates to certain assets, like plugins or themes. Additionally, certain accounts also have the ability to perform these actions in bulk across multiple sites at once.
About
The Sites page can be accessed by clicking Sites in the main menu of the User Portal, or at the following link:
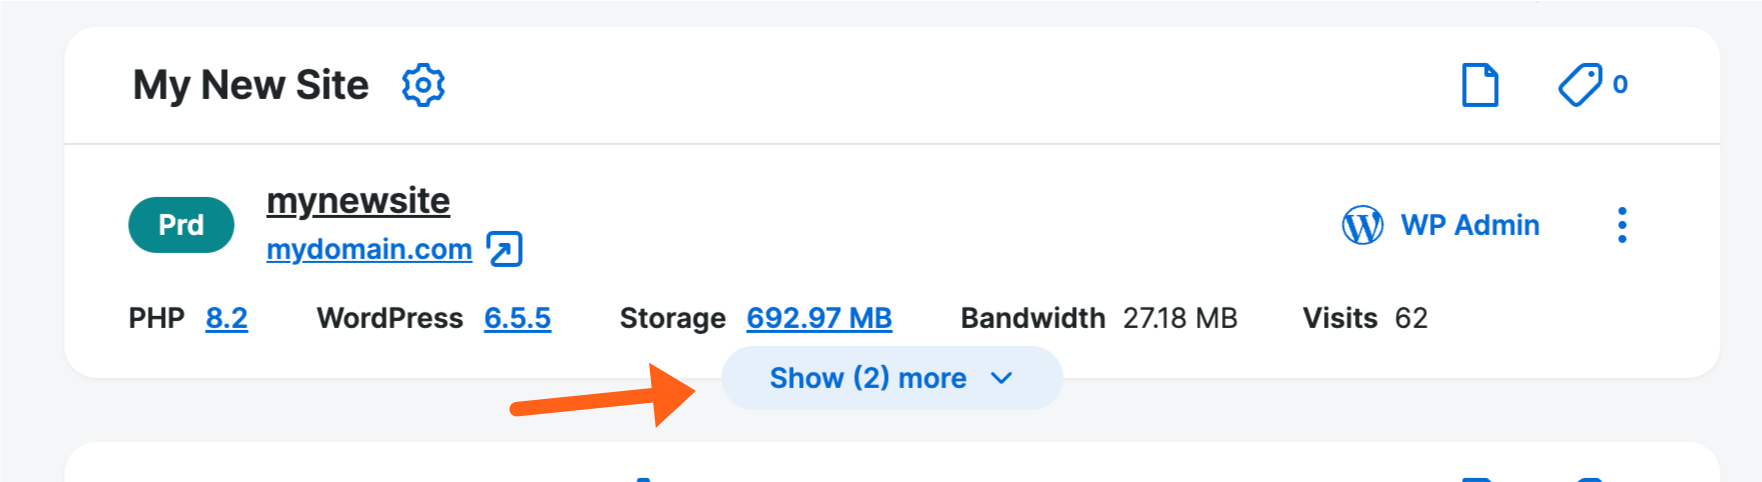
By default, Production environments will be displayed. To view Staging or Development environments, click the down arrow below the site name.
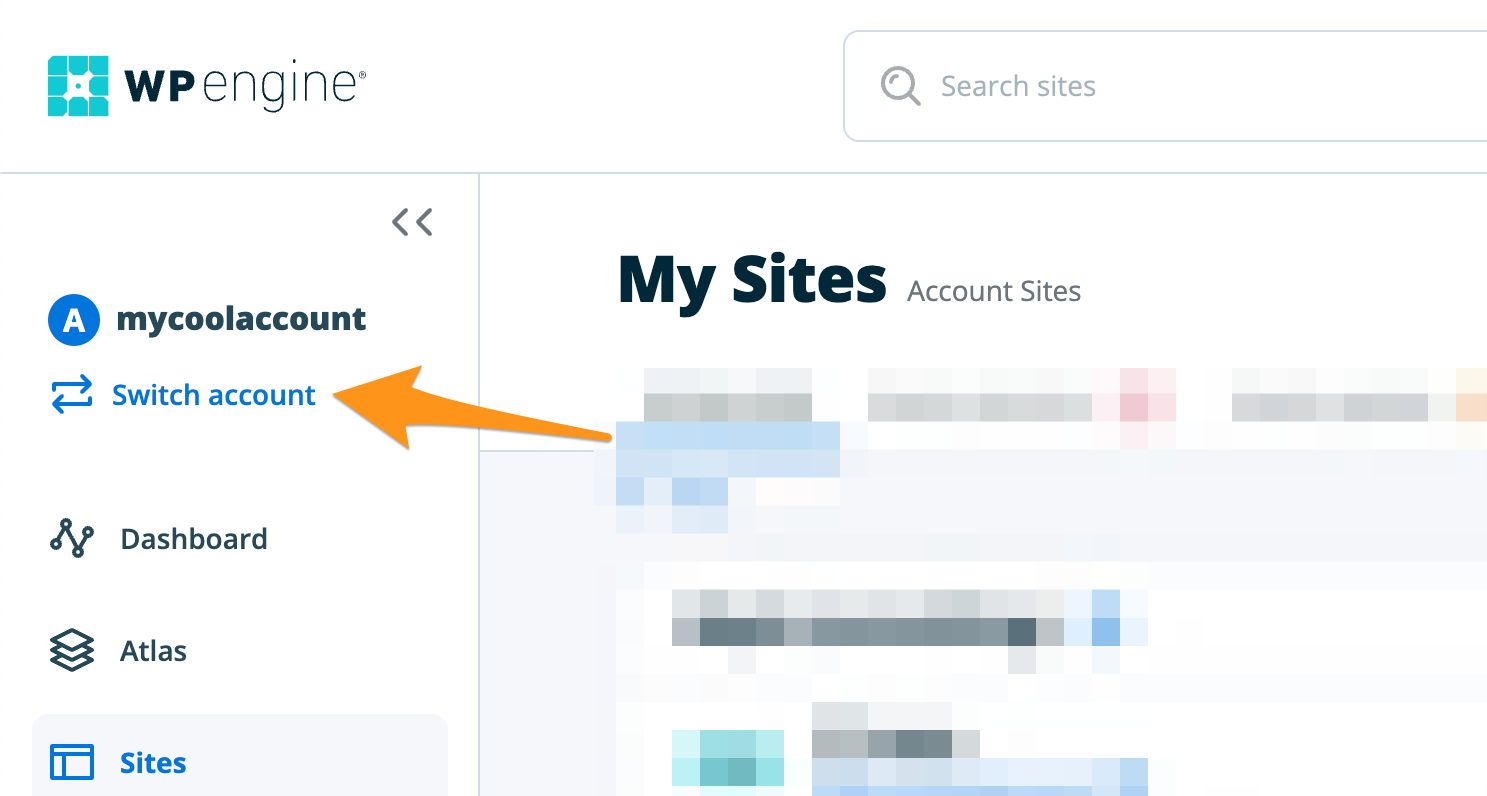
To view sites and environments from all accounts, click “Switch Account” near the account name at the top left, then select “All Accounts”. To view environments from just one account, select “Switch Account” next to the account name at the top left, then select the desired account name.
General Options
Below are the general options found on the “All Sites” tab of the My Sites page.
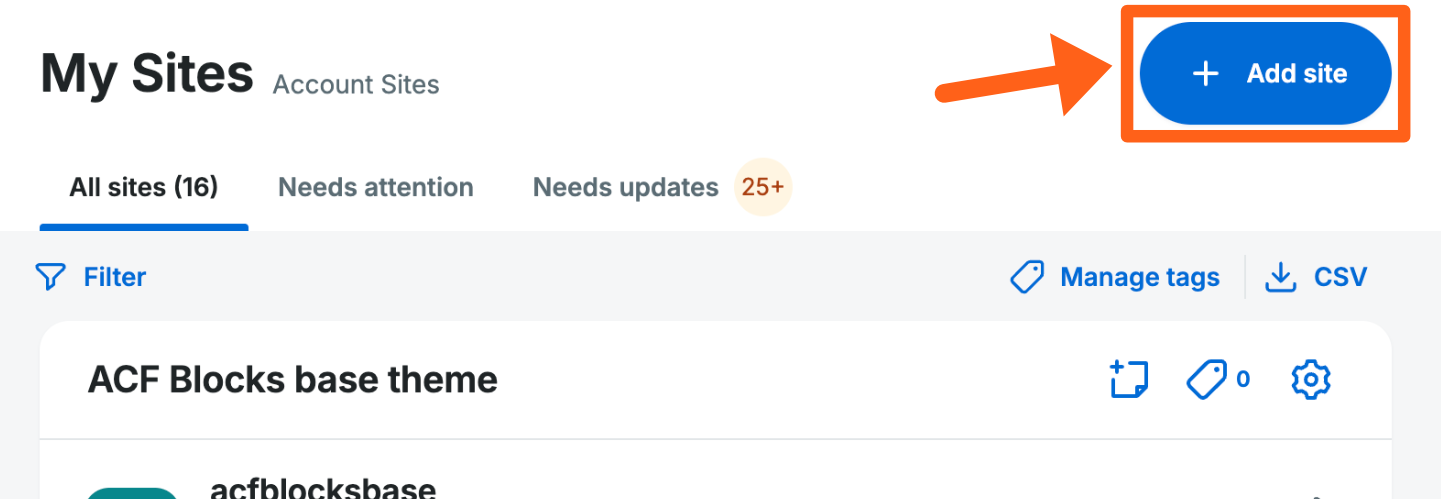
Add Site
This button is used to add a new site to your account. Learn more about adding sites here.
After adding a new site you can create up to three environments (individual installs of WordPress®) within the site, called Production (PRD), Staging (STG), and Development (DEV).1
Filter
Sites and environments can be sorted by clicking the Filter button, then selecting one or more of the filters in the menu to the right. Filtering sites and environments is available when an account has two or more Sites.
Accounts can also be used to filter, if the current user has access to multiple hosting accounts. Click the account name at the top left to view and filter all accounts.
To reset filters, click Clear All at the bottom of the menu.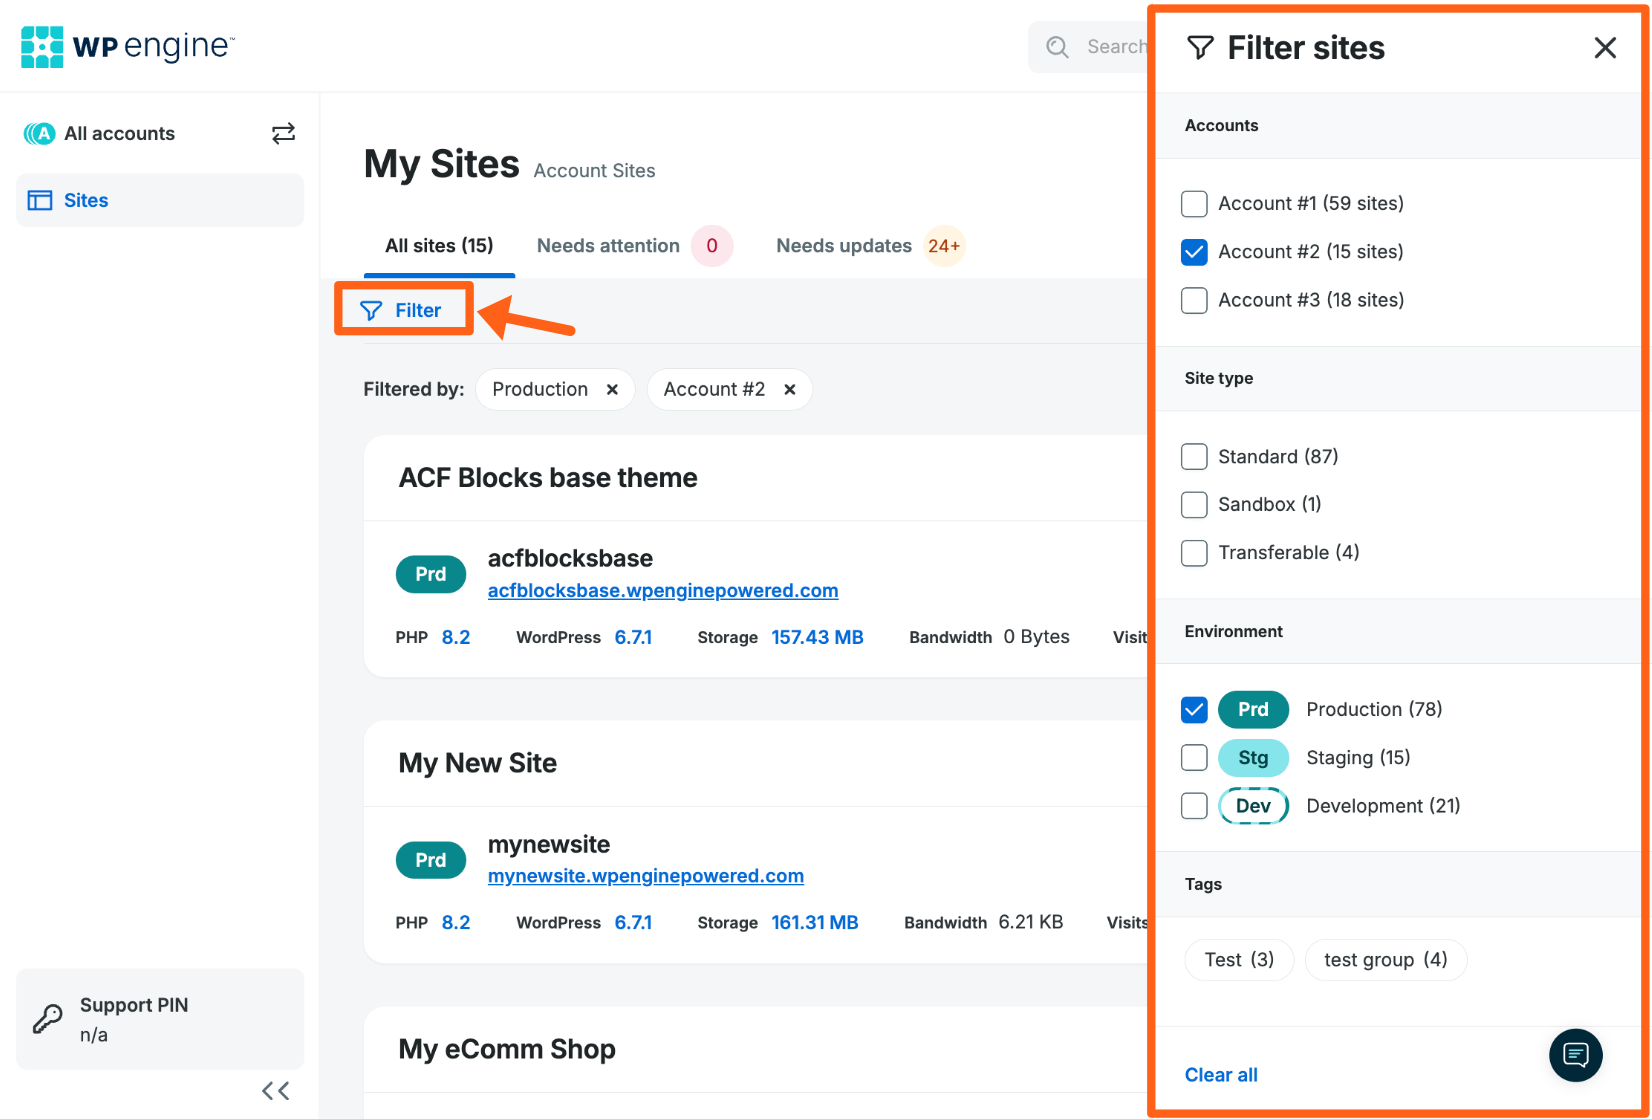
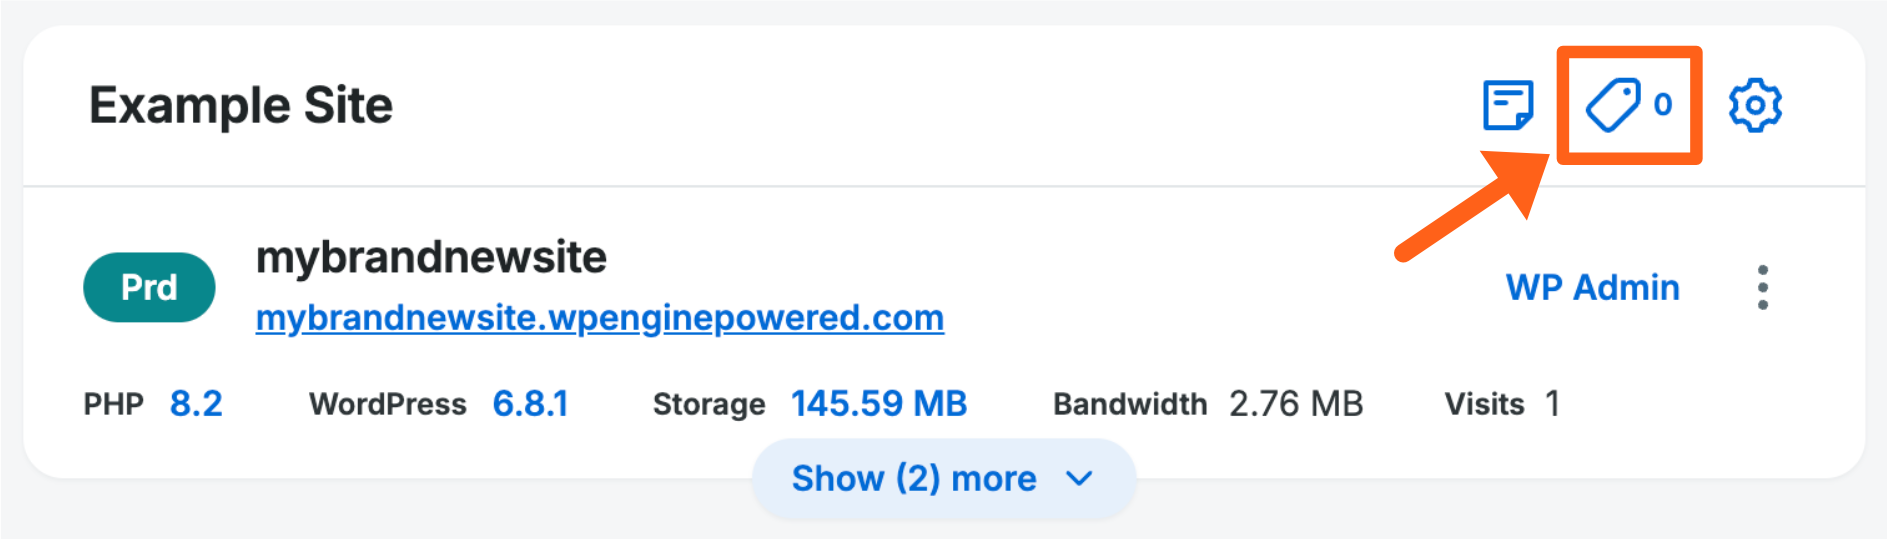
Tags
Tags allow users to collect and categorize sites. For example you can tag by client, web property, or status. Tags can be changed or removed at any time, and all users roles can create and delete tags.
Additionally, tags can be used as a filter when viewing the sites list when managing a large number of sites. Tags are only available to accounts with 10 or more sites.
Edit a site’s tags by clicking the tag icon to the right of the site title.
Bulk Tag Management
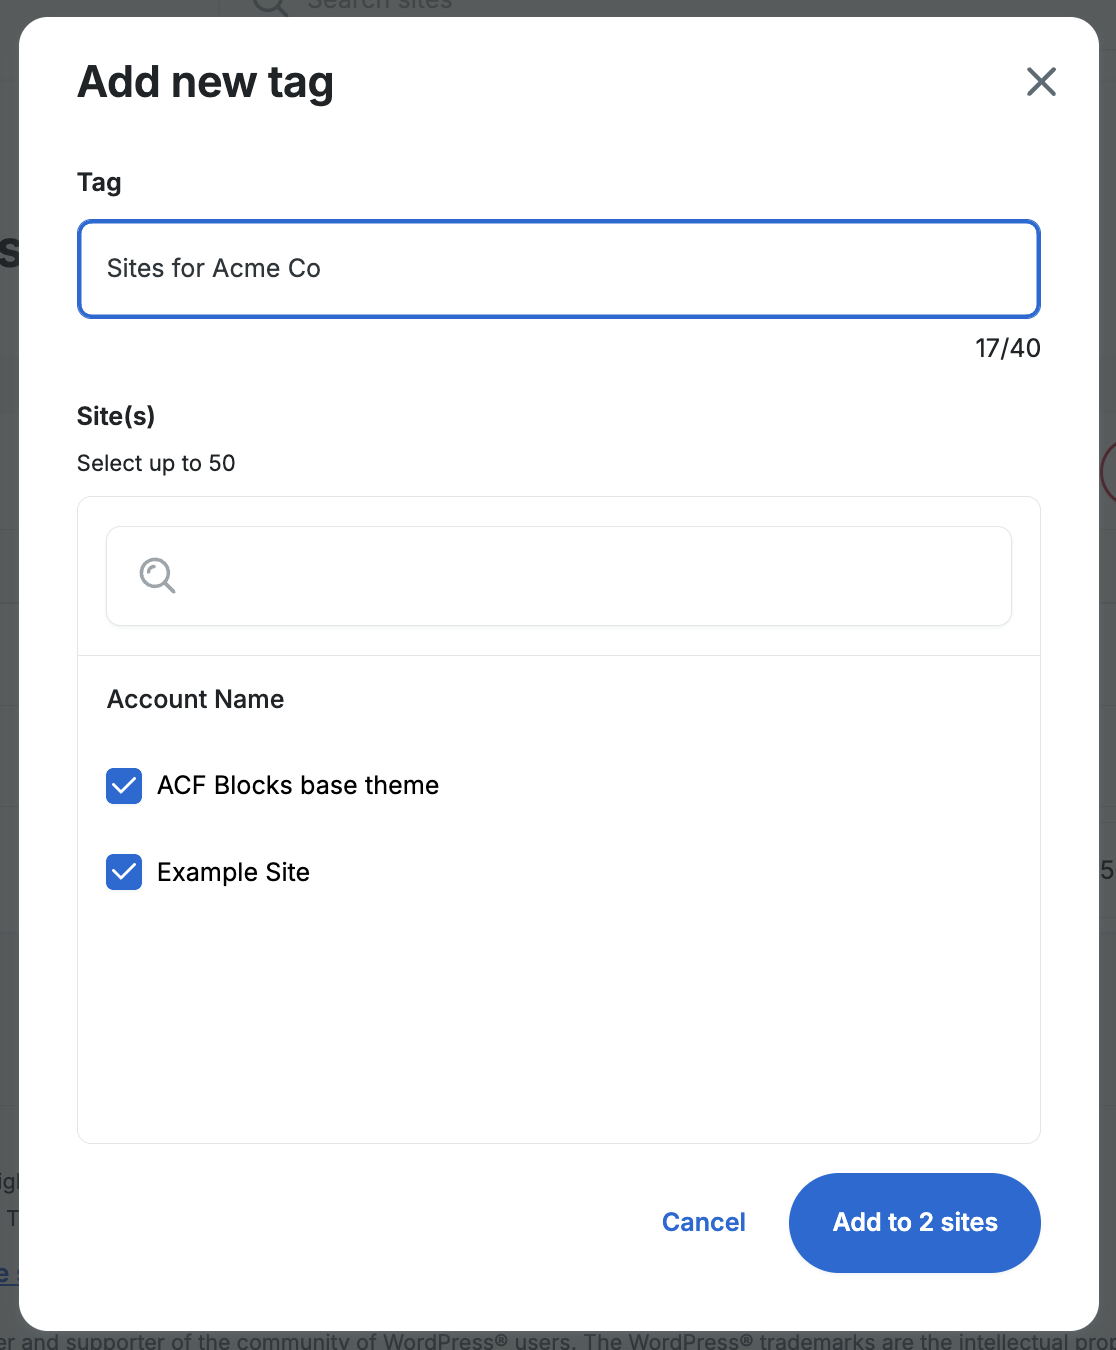
Bulk Add Tags
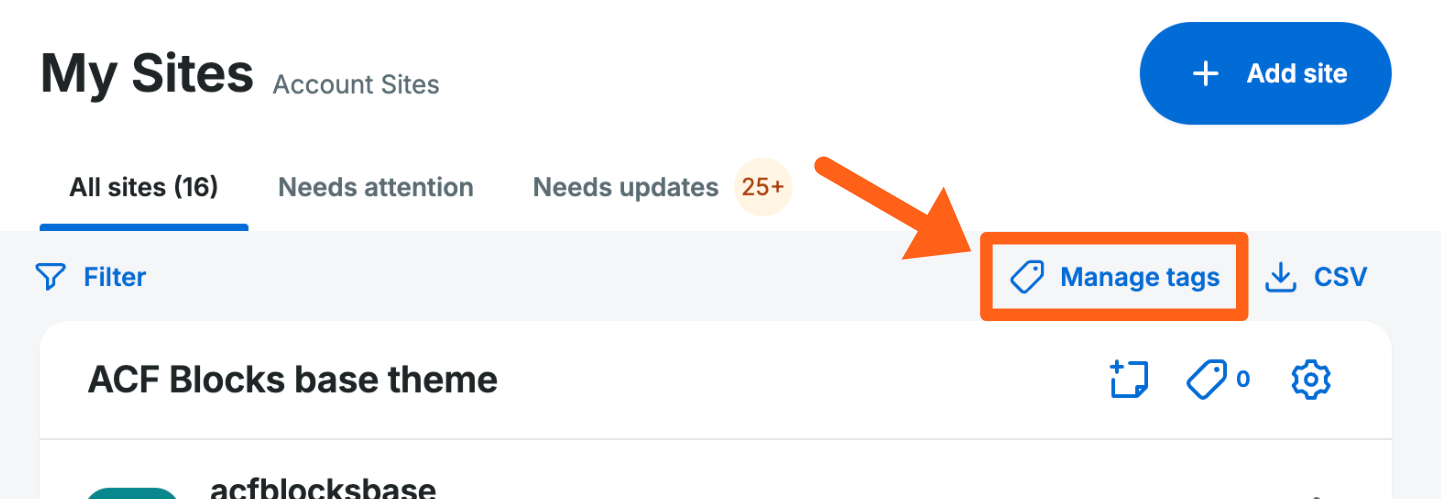
Starting Jan 2025 you can bulk edit tags. It will first be available on the “All Accounts” view of the Sites page. Soon after it will be available on Single Account views for the Sites page as well.
- Click Manage tags in the top right of the My Sites list on the Sites page.
- Click Add new in the top right.
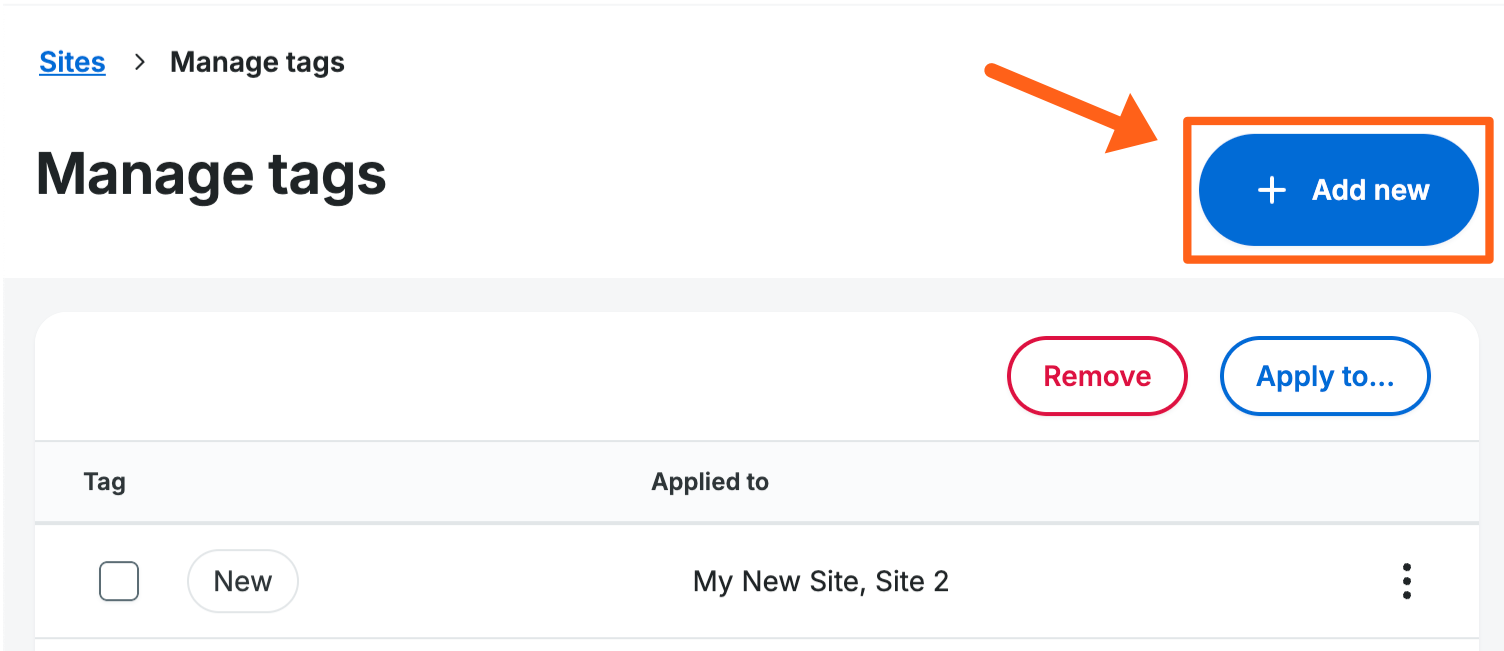
- Type a new tag name and select sites to apply it to. Then click Add to (x) sites.
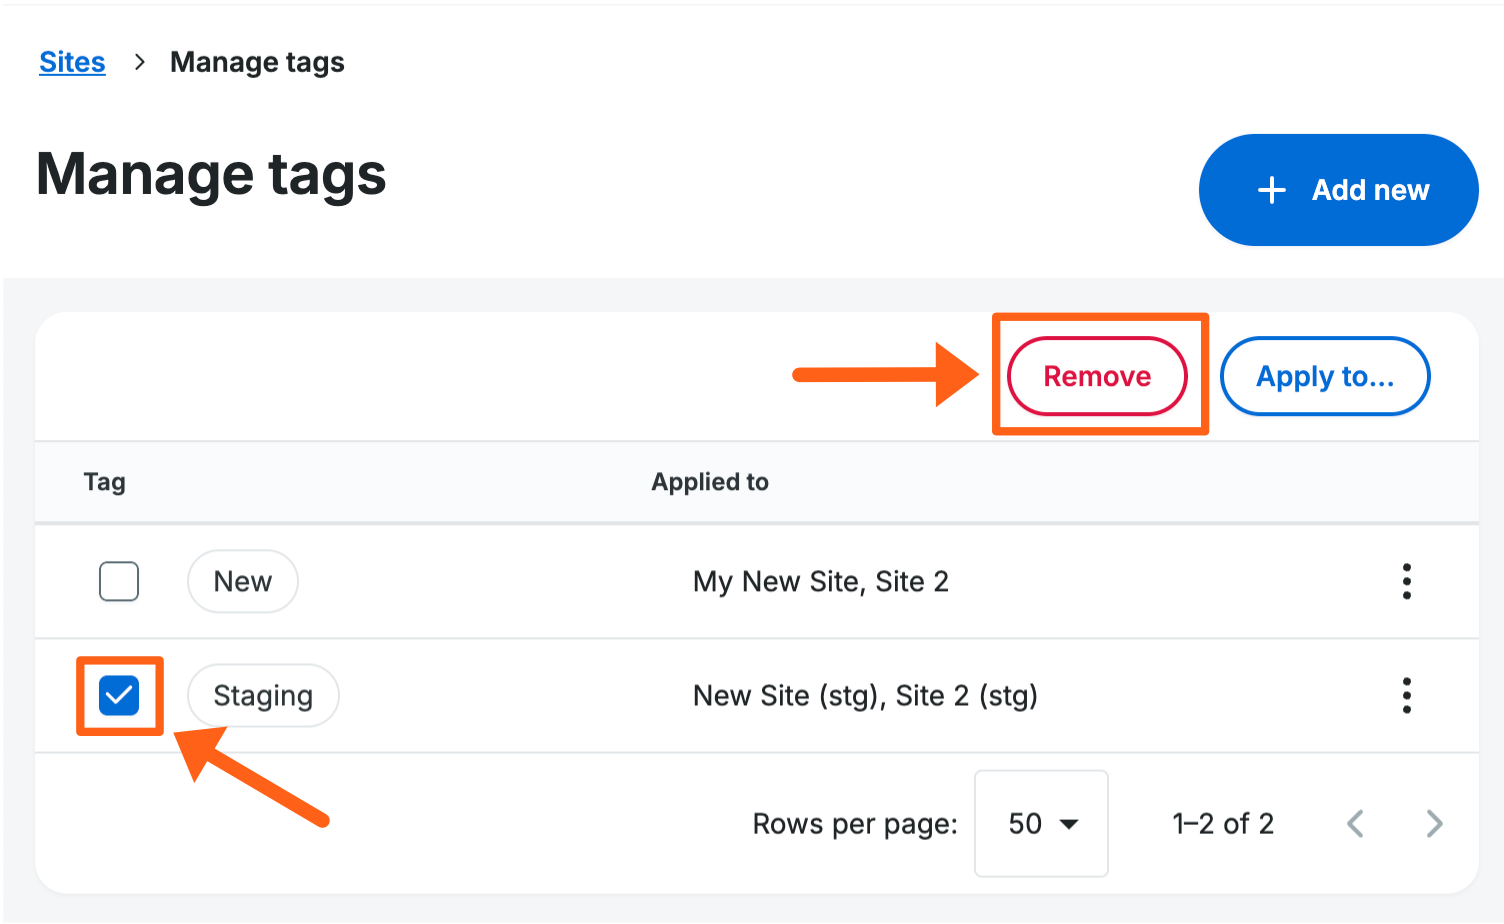
Bulk Remove Tags
- From the Manage tags page, check the box next to a tag.
- Click the Remove button in the top right of the table to remove the tag from all Sites that you have access to.
- Confirm your choice in the popup.
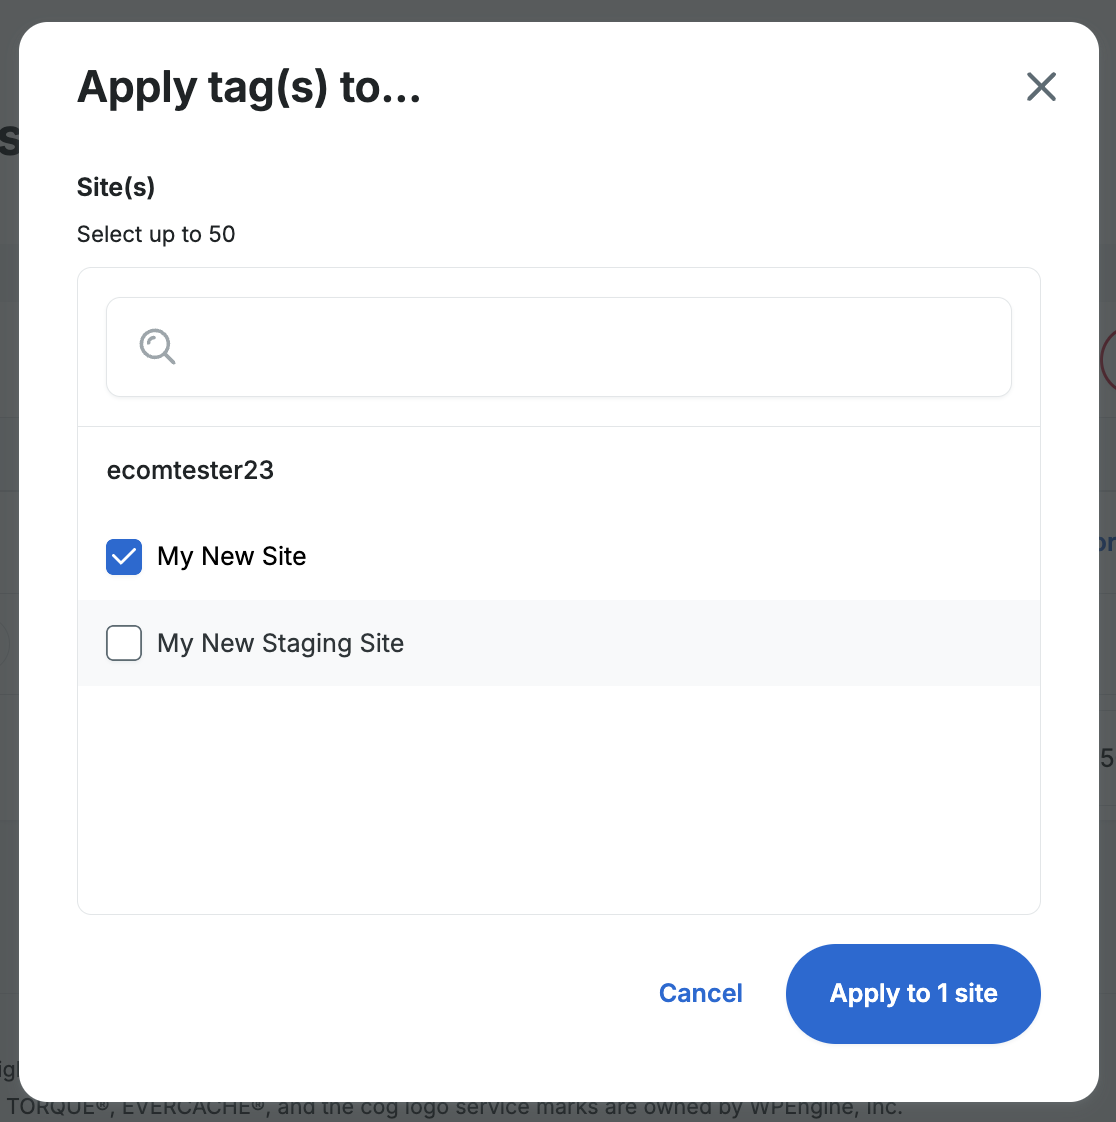
Bulk Apply Tags
- From the Manage tags page, check the box next to a tag.
- Click the Apply to… button in the top right of the table.
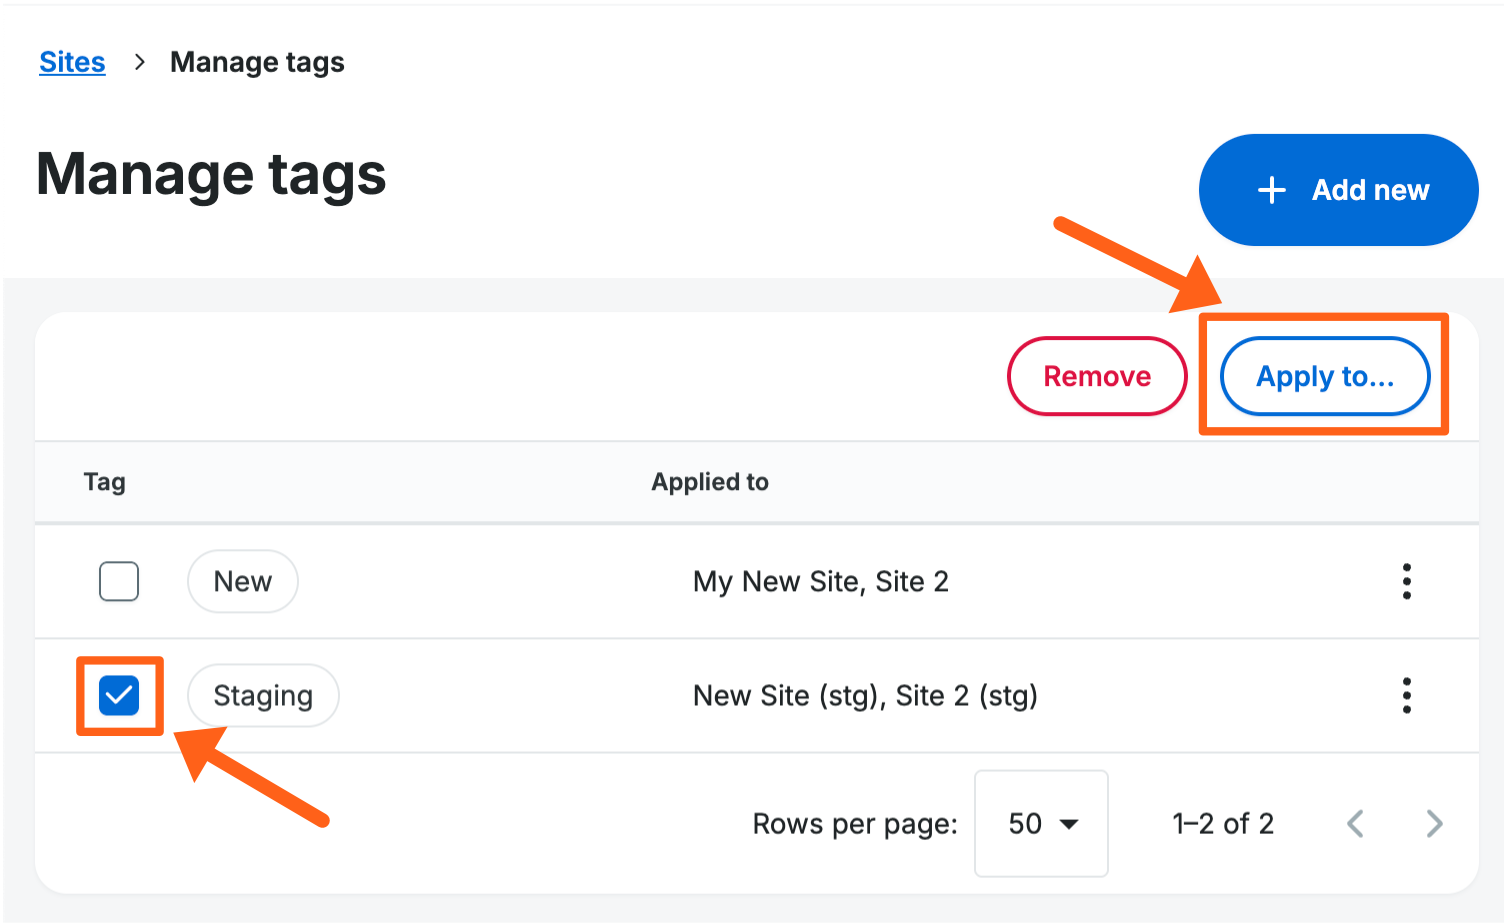
- Select Sites to apply the tag to and and click Apply to (x) sites.
Notes
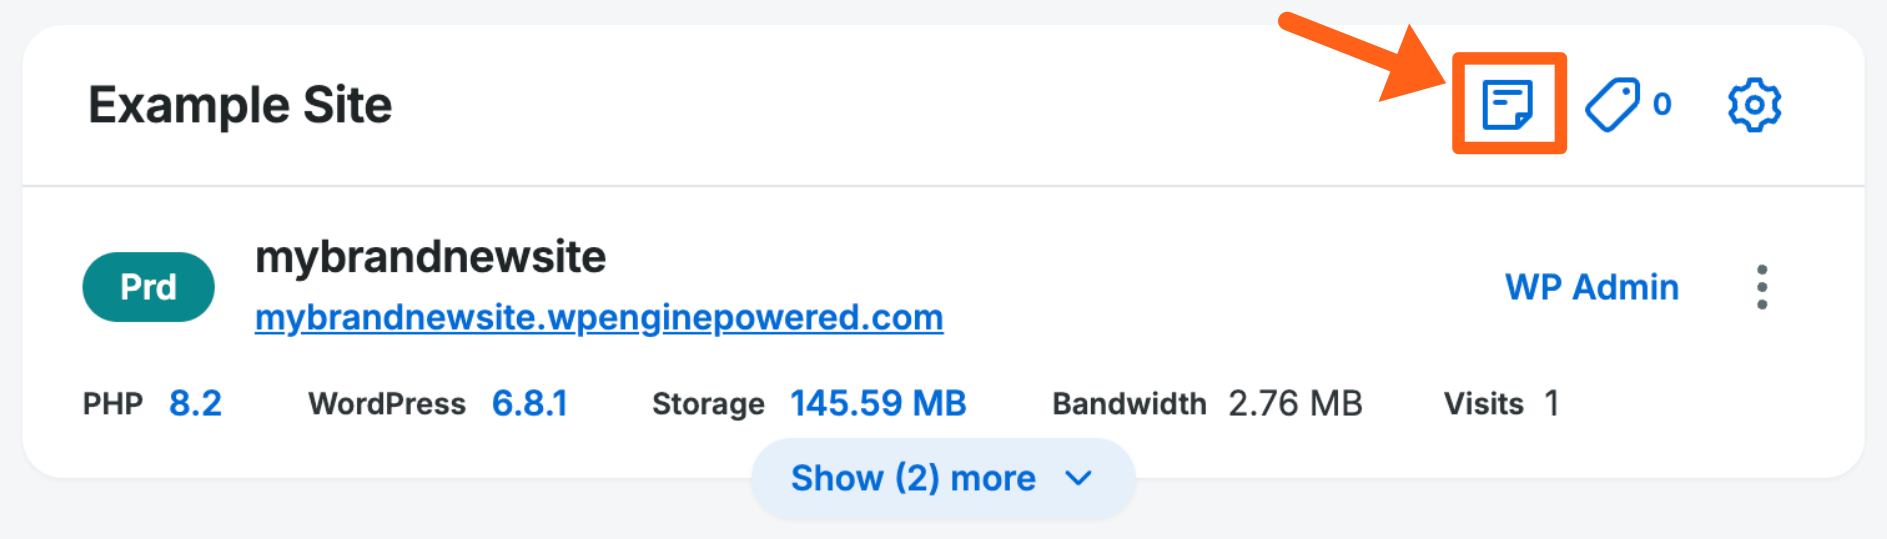
Notes are flexible labels and can be used however they are needed. For example, a developer could add this note: “Do not update [example plugin] without testing in staging”. All users roles can create and delete notes. Notes allow more flexible text input and therefore cannot be used to filter or sort in the site list.
To add a note, click the notepad icon to the right of the site title.
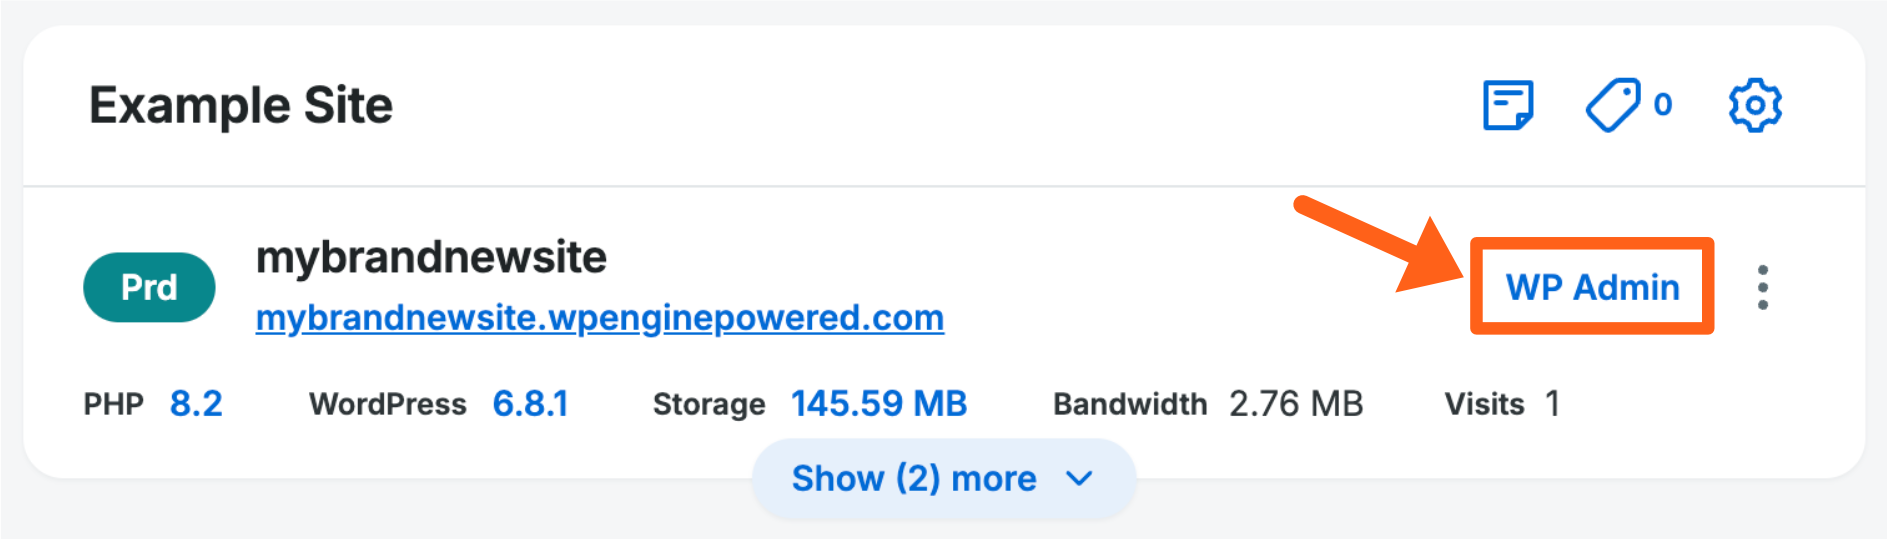
WP admin
Click the button to log in to the wp-admin area of the environment.
Learn more about Seamless Login here.
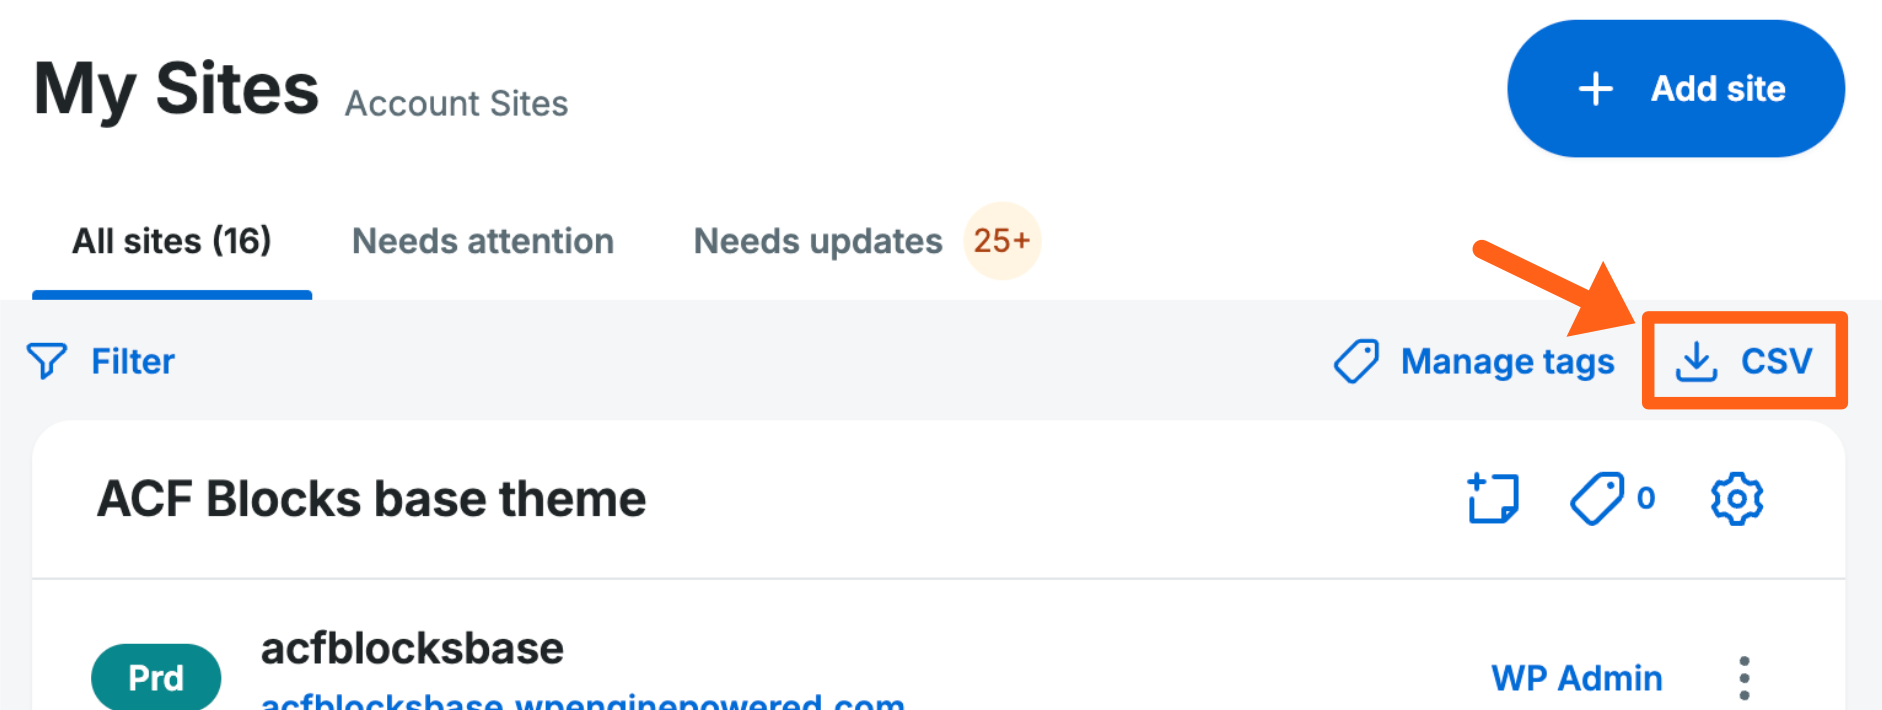
Download CSV
Click this button to download a full list of sites and related details found on this page.
Quick Actions
The quick actions menu can be access by clicking the three dot menu icon on the right side of the site tile.

The quick actions menu on the Sites page provides the following actions:
Site Settings
Site settings can be accessed by clicking the gear icon just to the right of the site name.
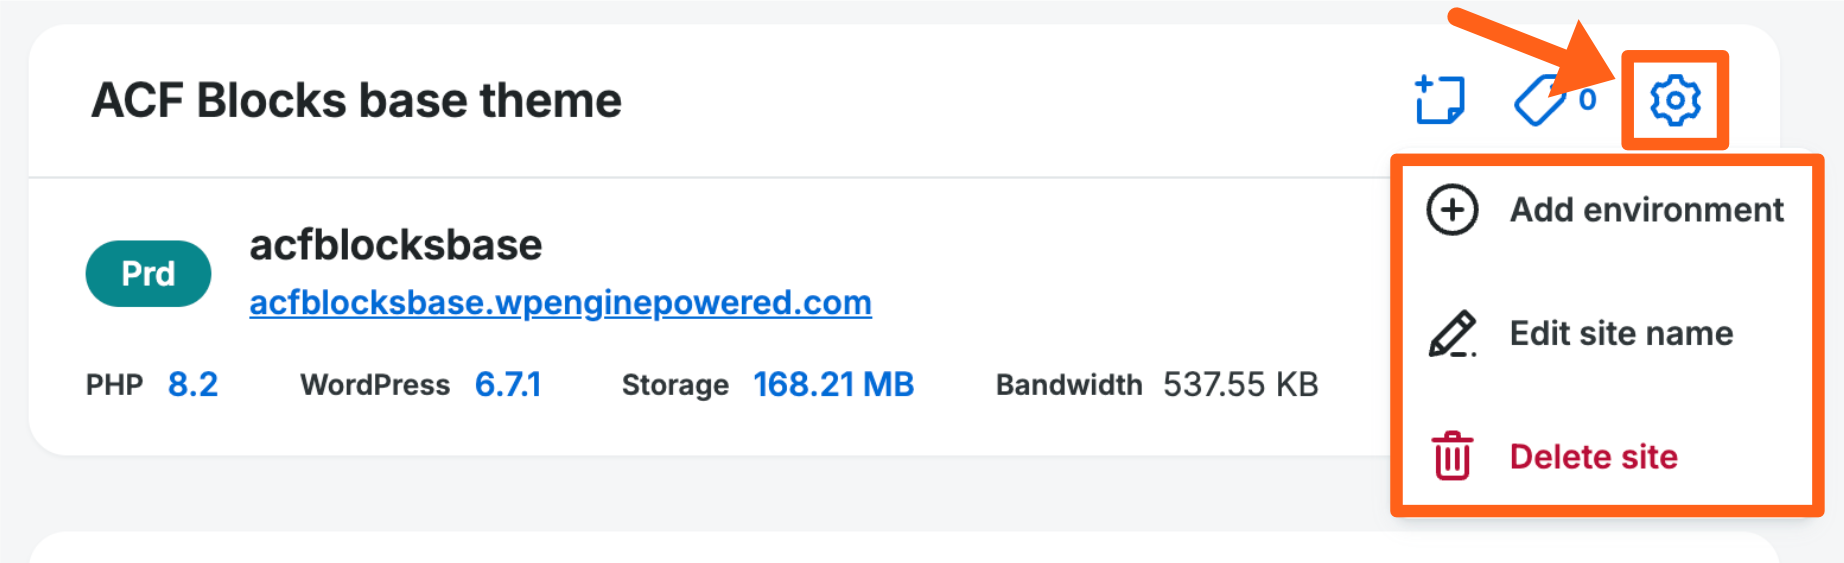
The site settings option on the Sites page provides the following actions:
Needs Attention
The “Needs Attention” tab displays outages detected by Site Monitoring and includes SSL status, outages, and WP Engine service disruptions within the last 7 days. For more information click on an item to be taken to the main Site Monitoring page.
To view incidents from all accounts or from a single account, click Switch account at the top left near the account name.
Note that if an outage occurs while Smart Plugin Manager is updating, it will not be displayed on this page. These can be viewed on the Site Monitoring page instead.
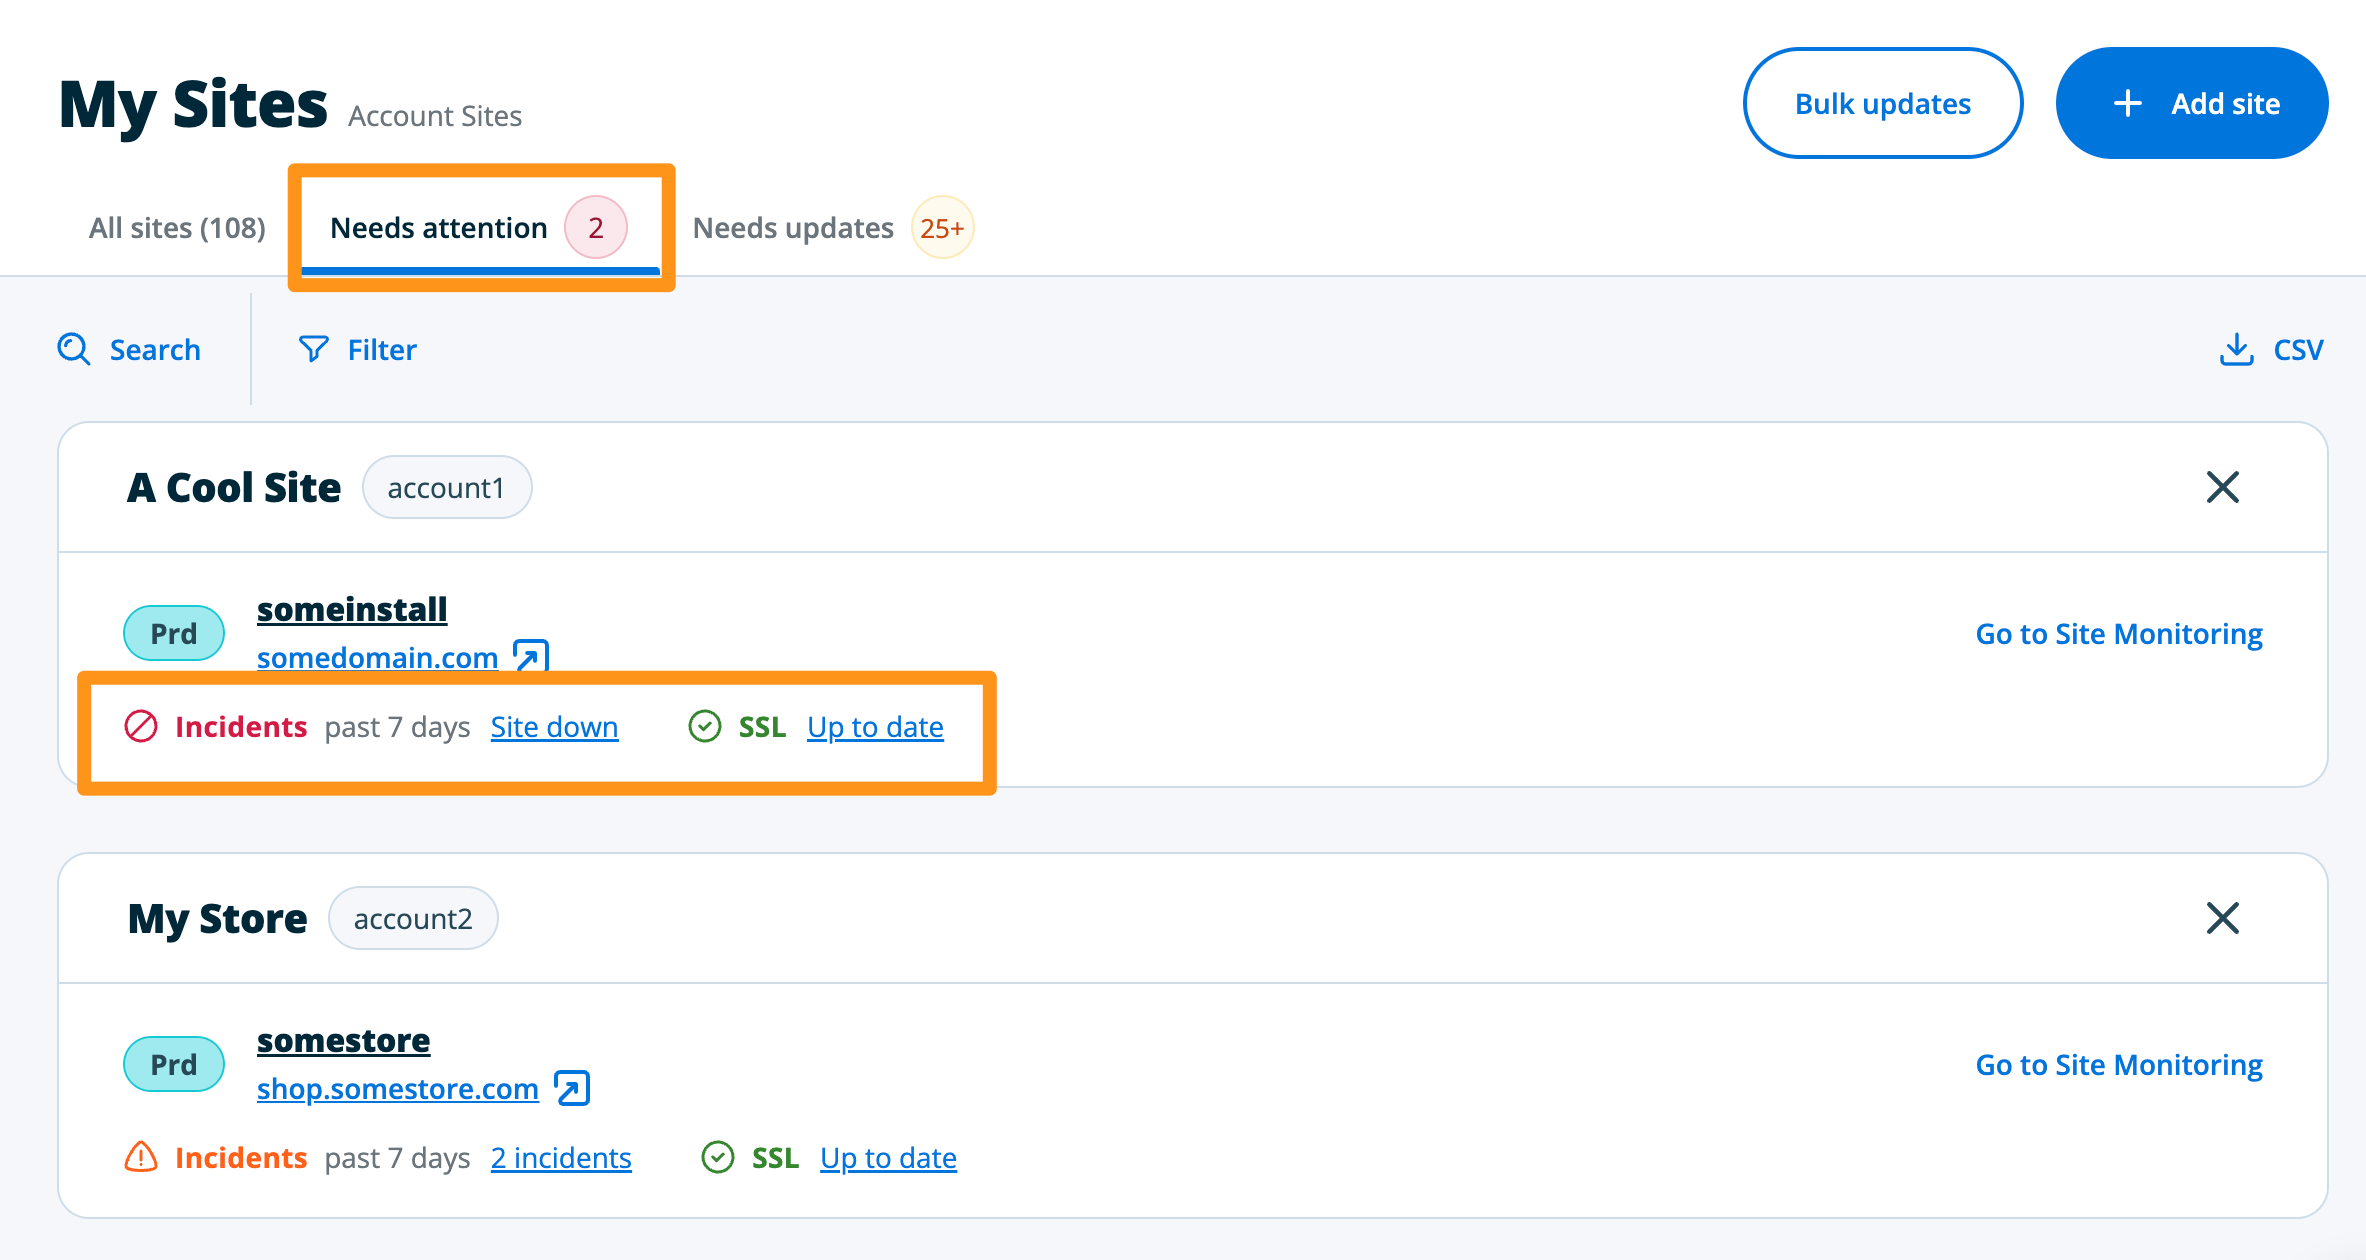
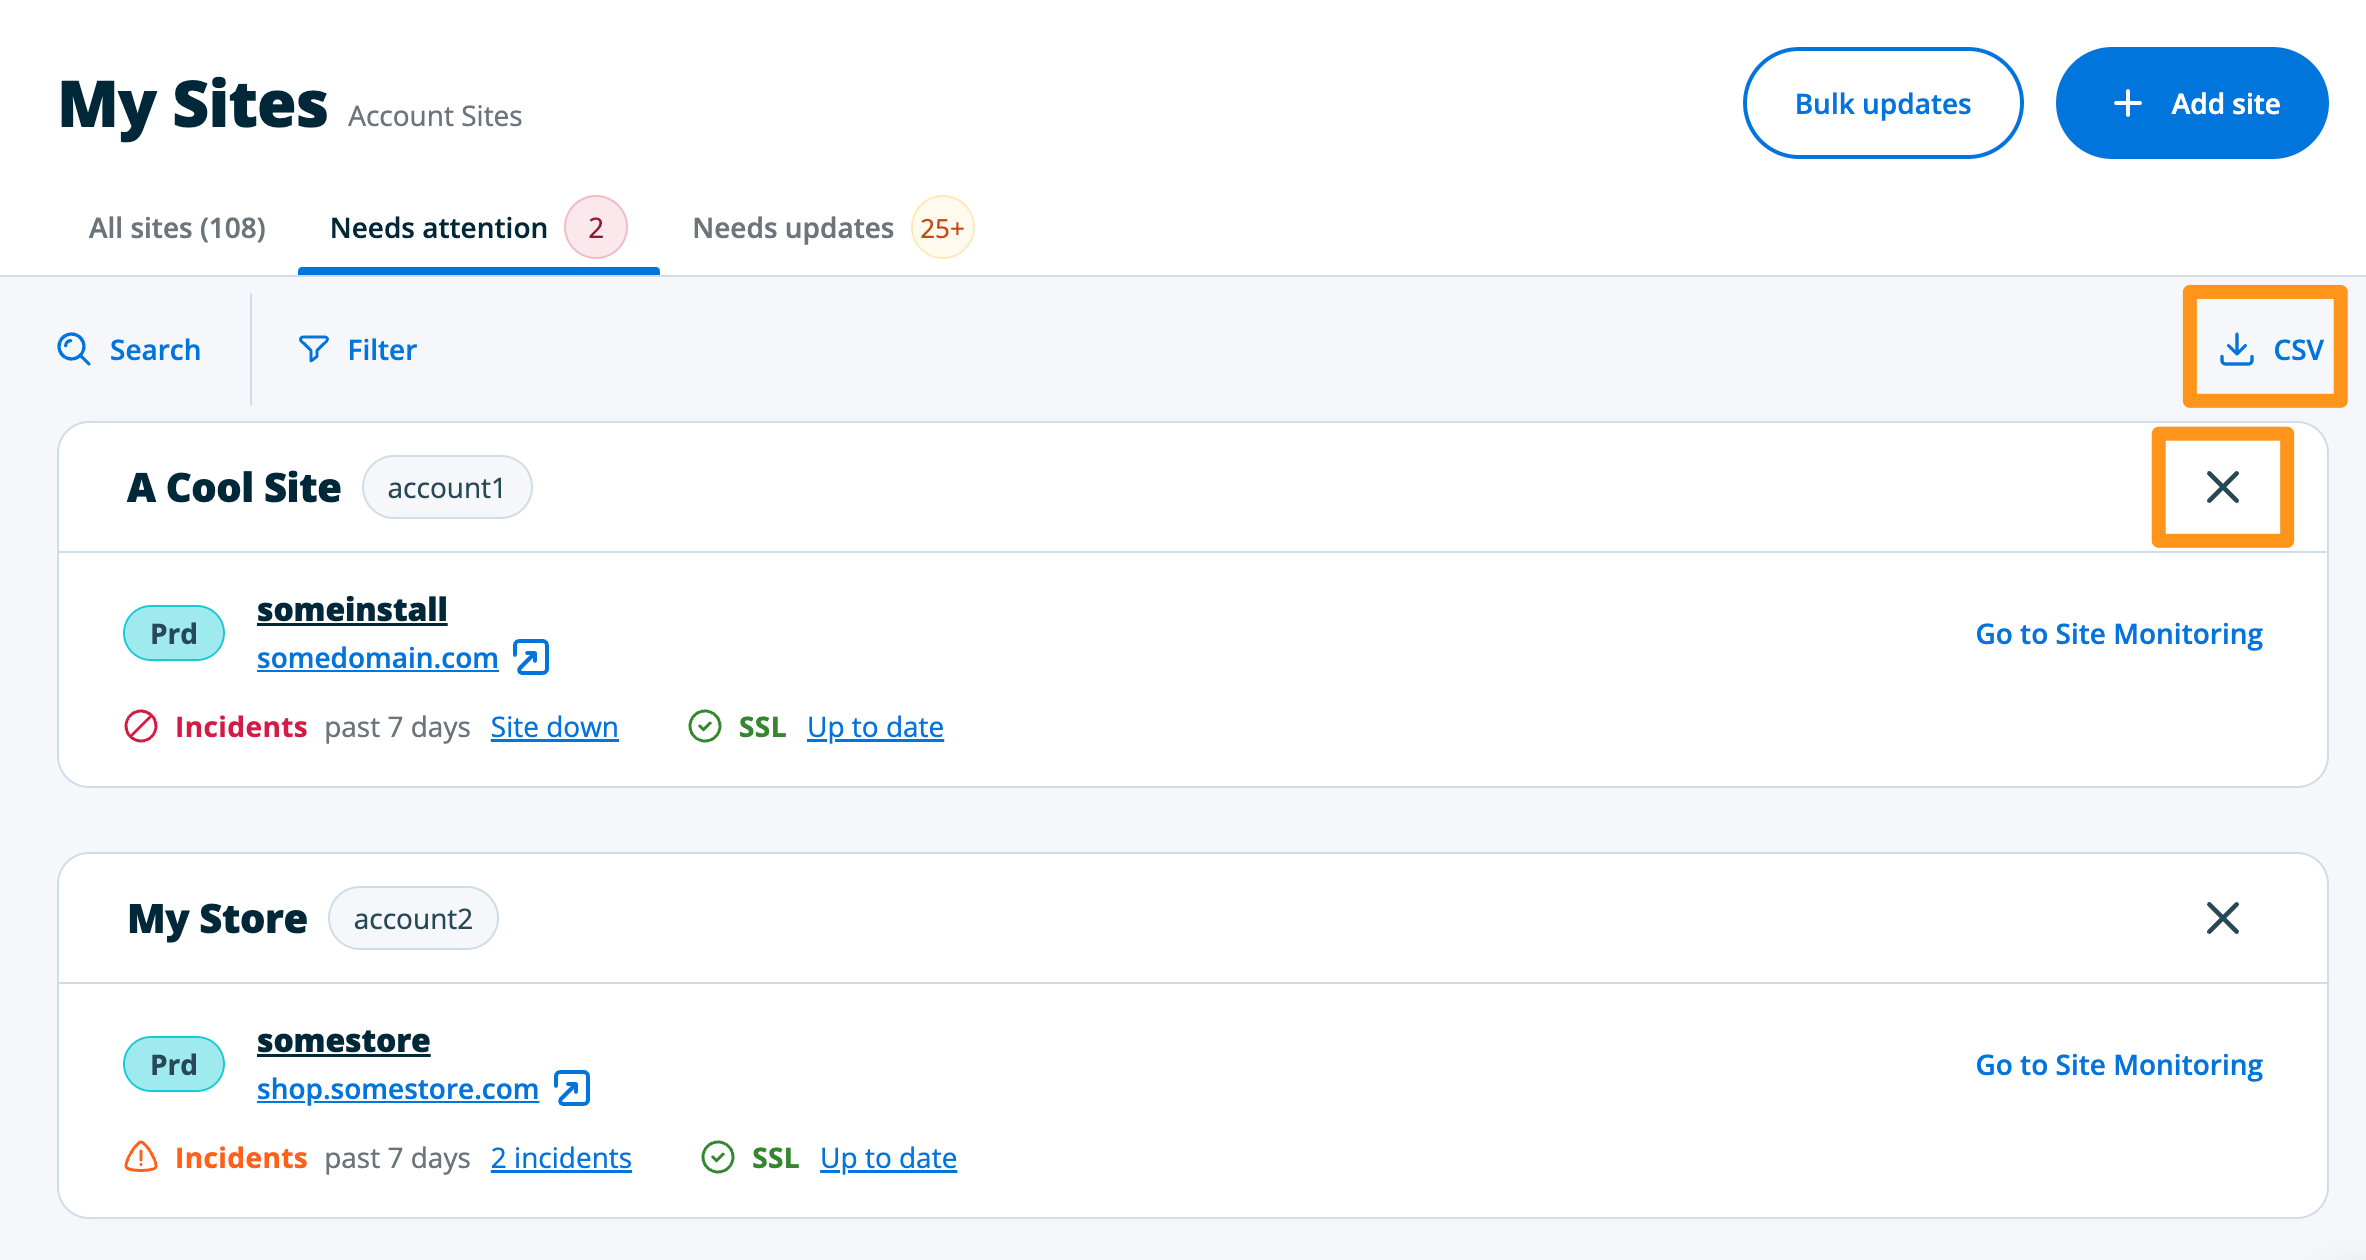
Outages for a Site can be dismissed from this page by clicking the X icon to the right of the Site name. This will mark the status as resolved, which can be accessed at a later time by clicking the CSV link top right side of the page.
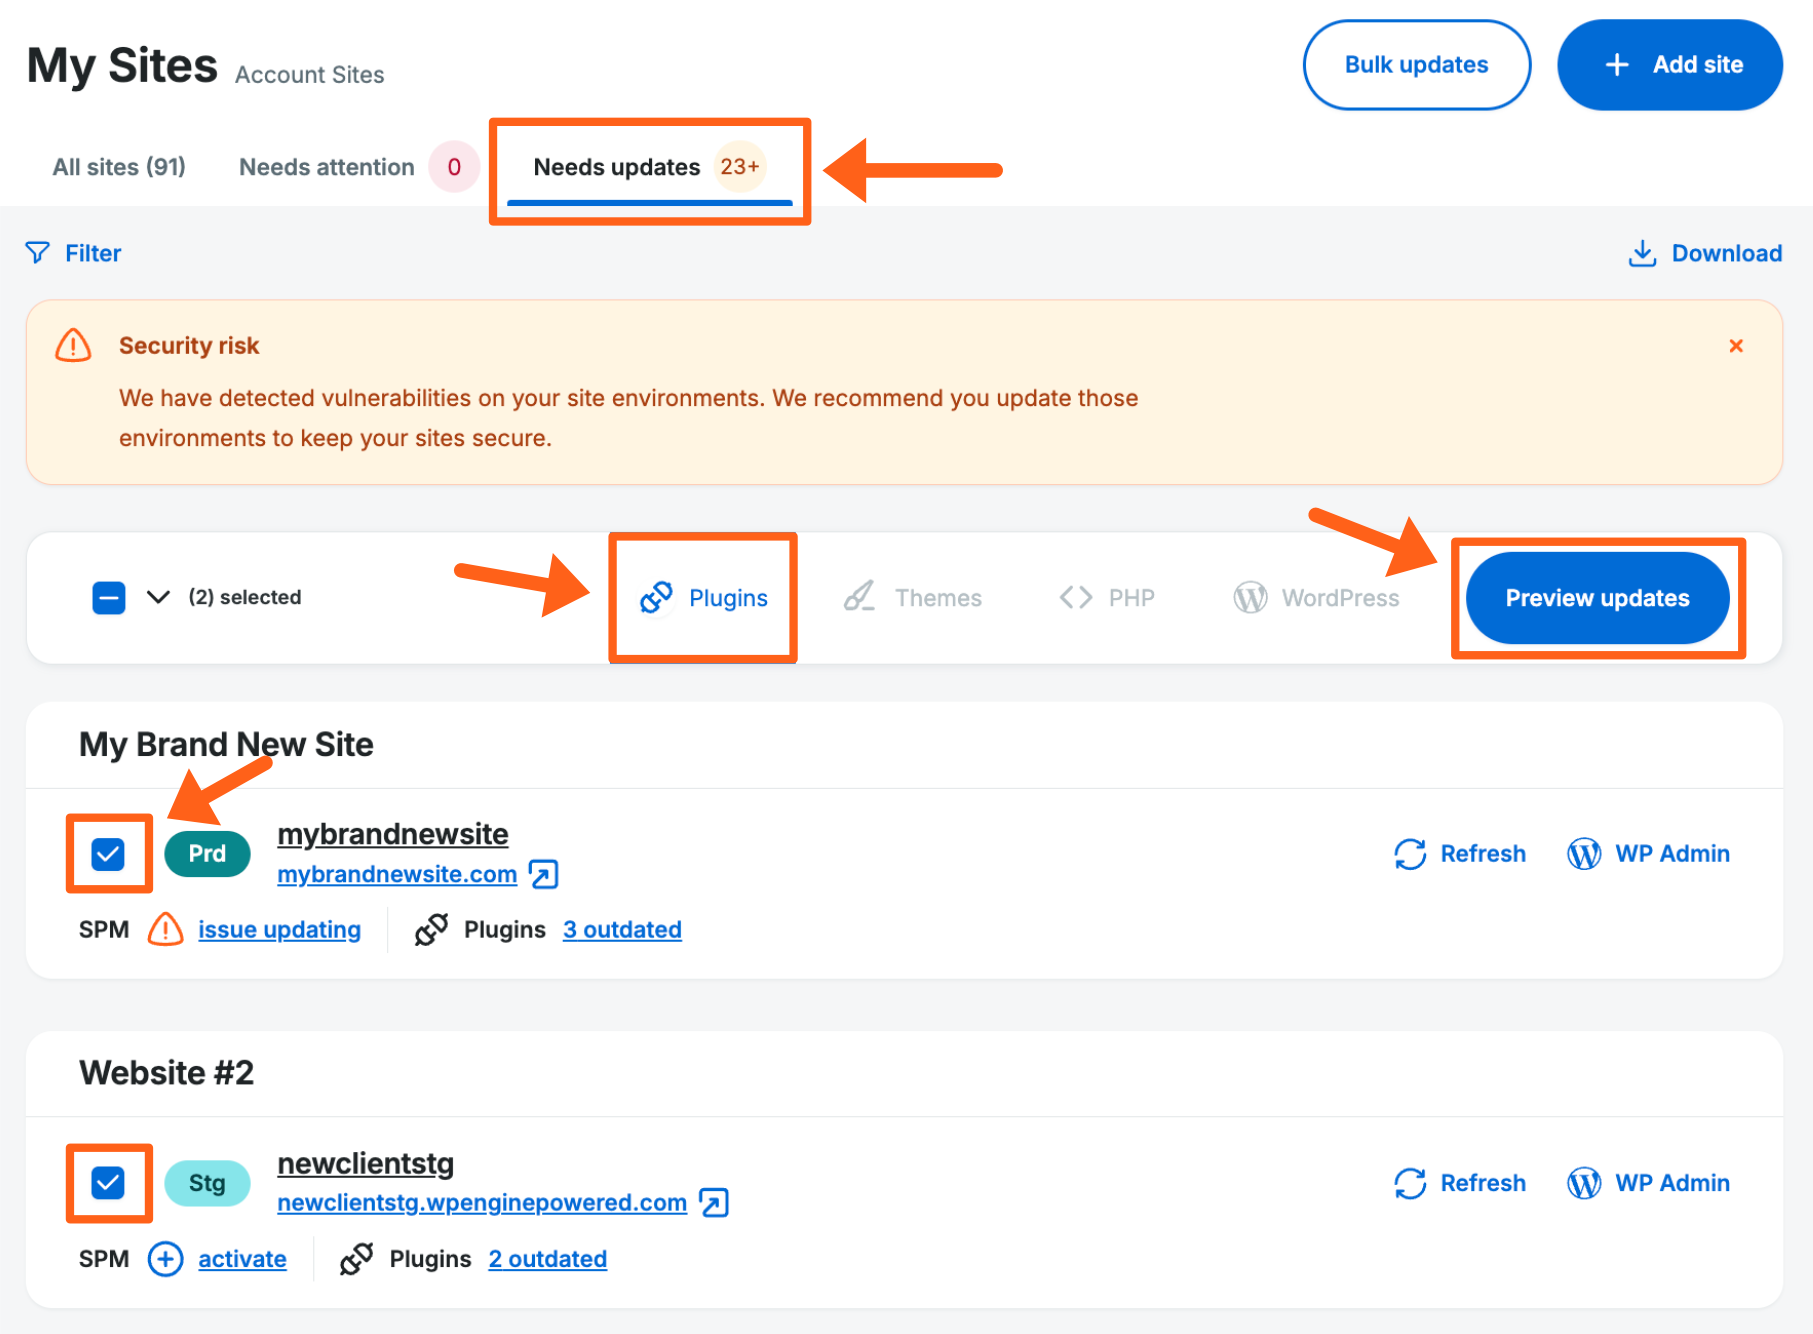
Needs Updates
Selecting the Needs Updates tab will allow you to see which environments have updates available to plugins, themes, core version, and PHP. The current version and available version numbers will be displayed when the asset is clicked. For users on more than one Account, you can view and filter all sites and environments you have access to, regardless of which Account it’s on. This page can also be accessed at the following URL:
https://my.wpengine.com/sites#needs-updates
If your environment has Smart Plugin Manager applied, the status and settings can be accessed here as well. If you have available SPM licenses, you can also choose to activate a license on an environment from this page.
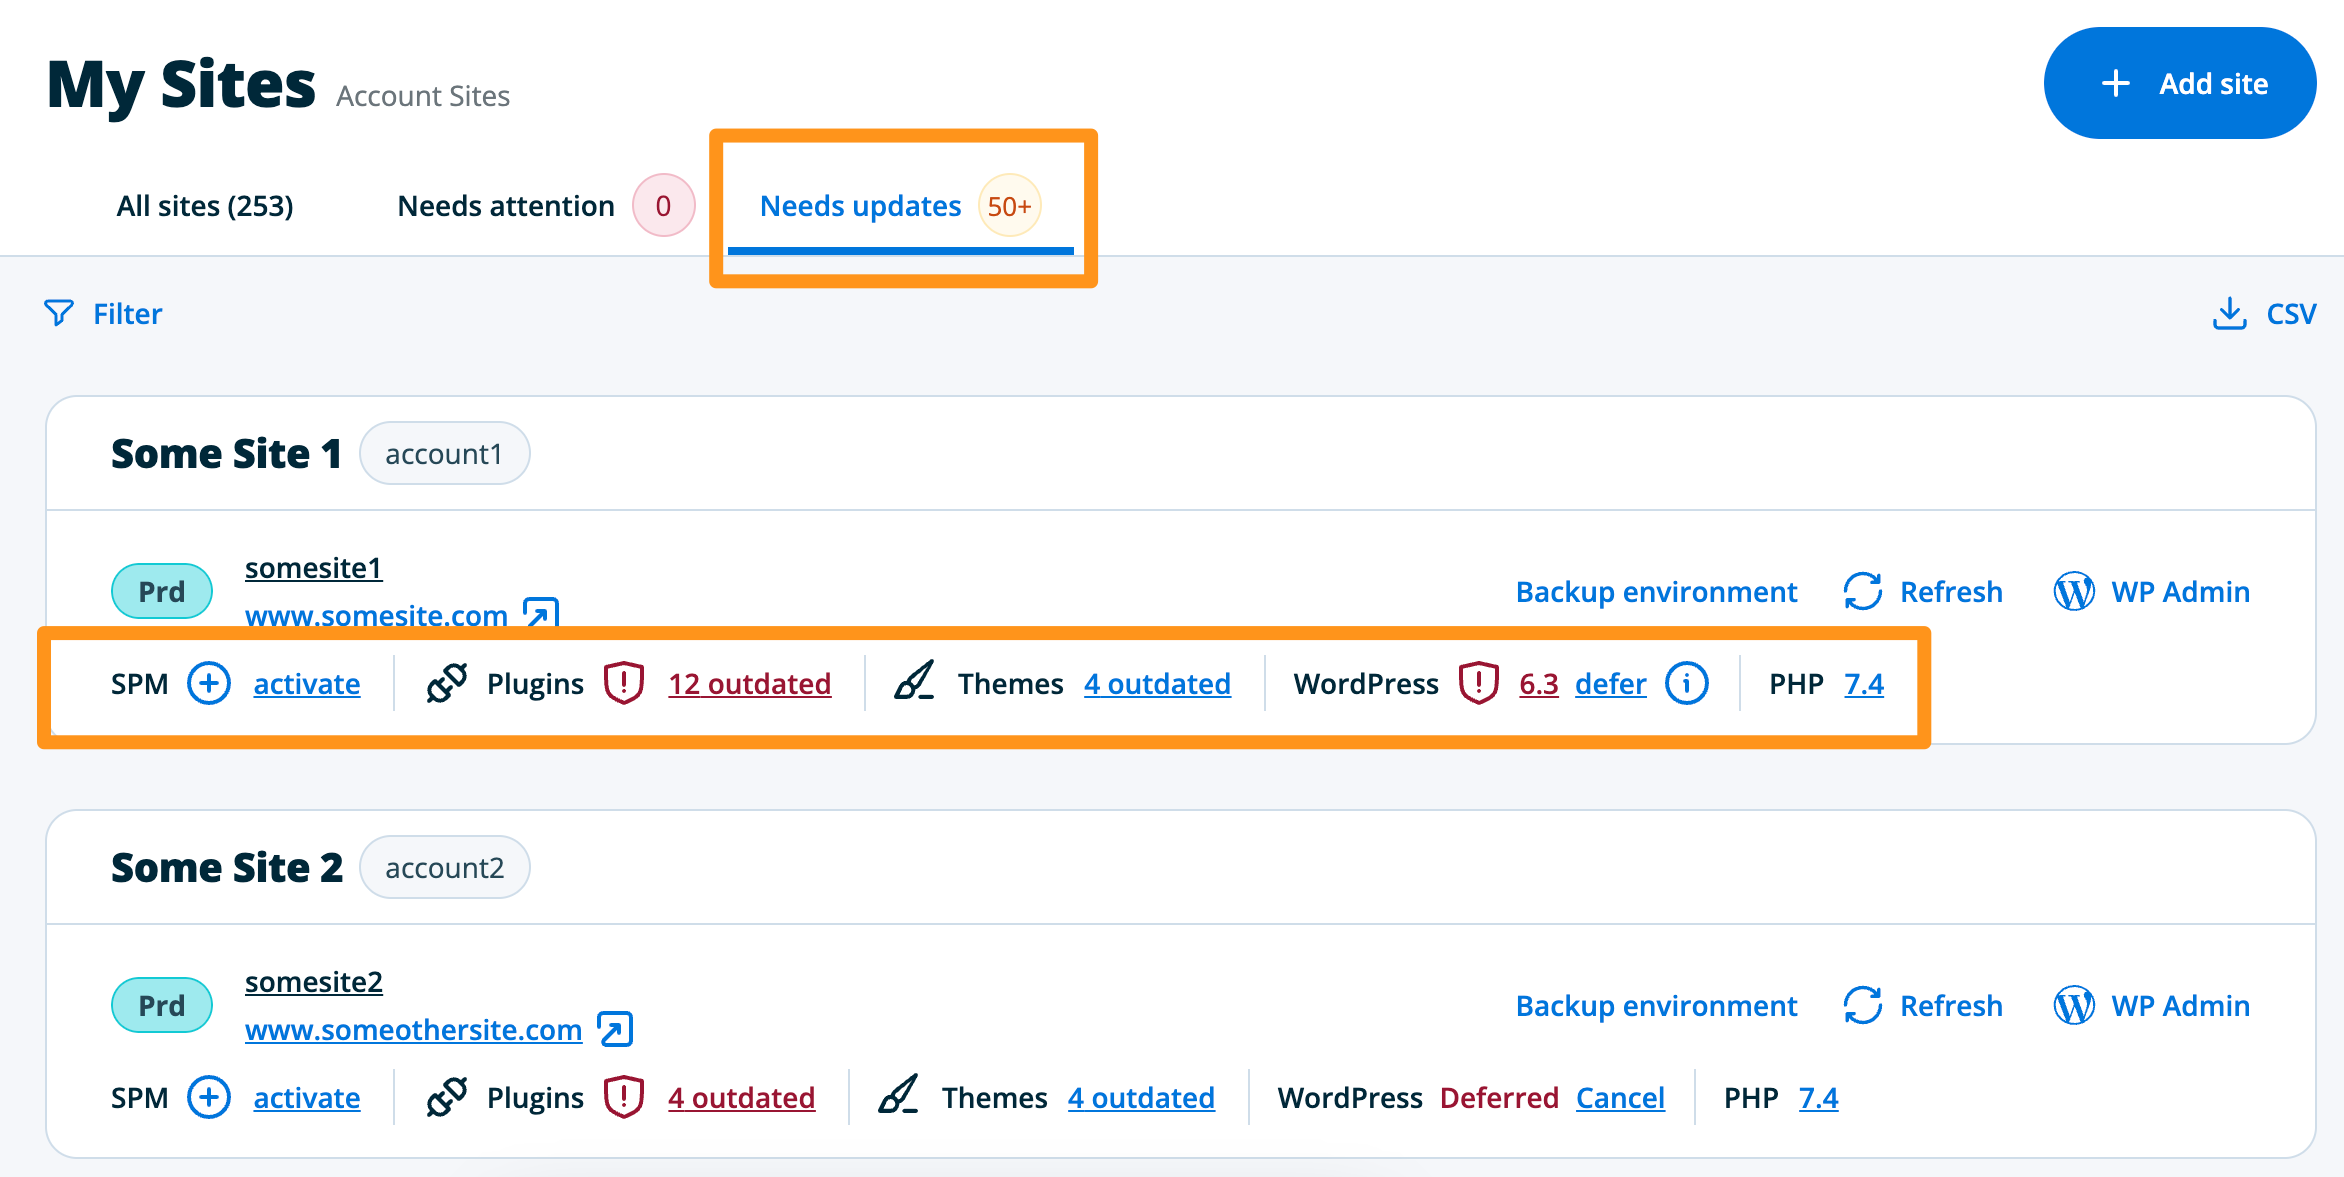
You can also download 2 different CSV files from the Download button near the top right so you can view the data in a spreadsheet. 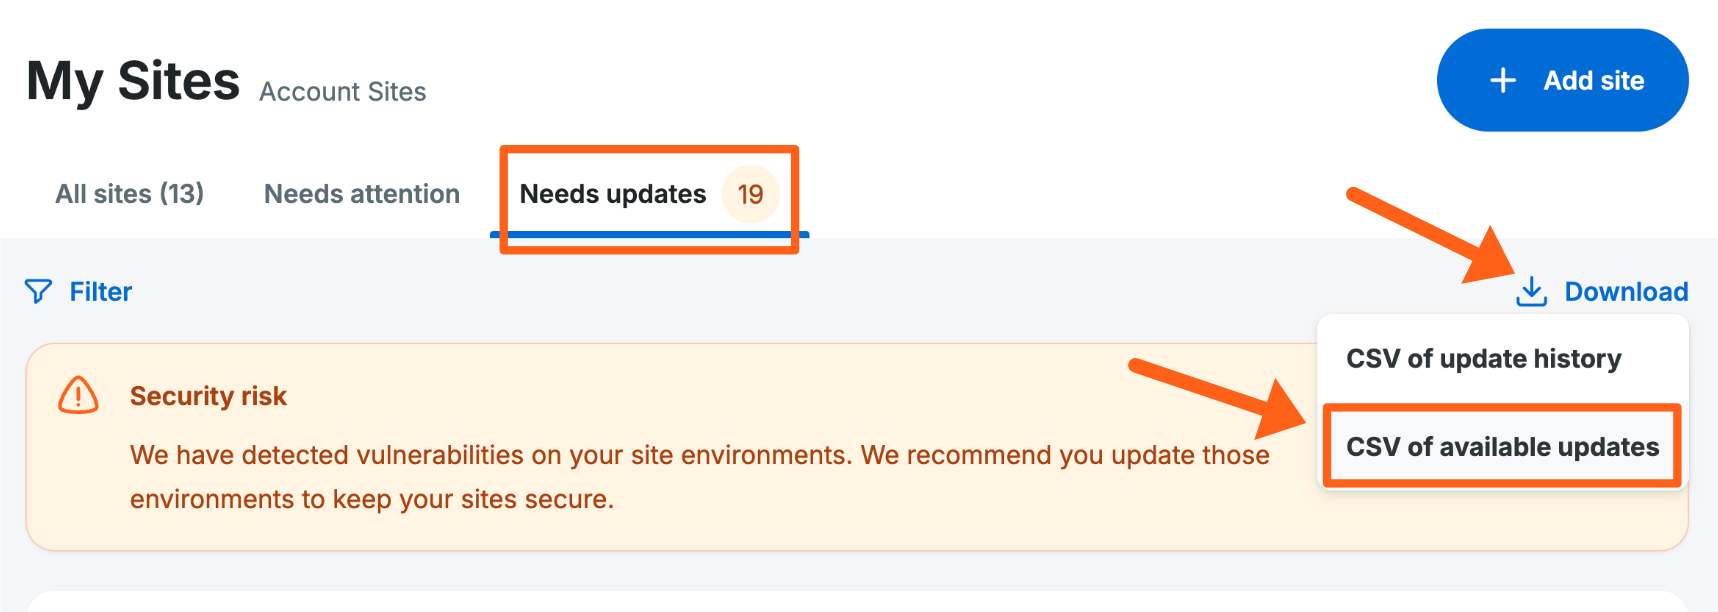
- CSV of update history
- CSV of available updates
- The available updates CSV file will also have a column for Plugin and Theme Vulnerability counts, showing a number of 1 or more next to any theme or plugin that is on a version that is currently known to have vulnerabilities.
Plugin and Theme Vulnerabilities
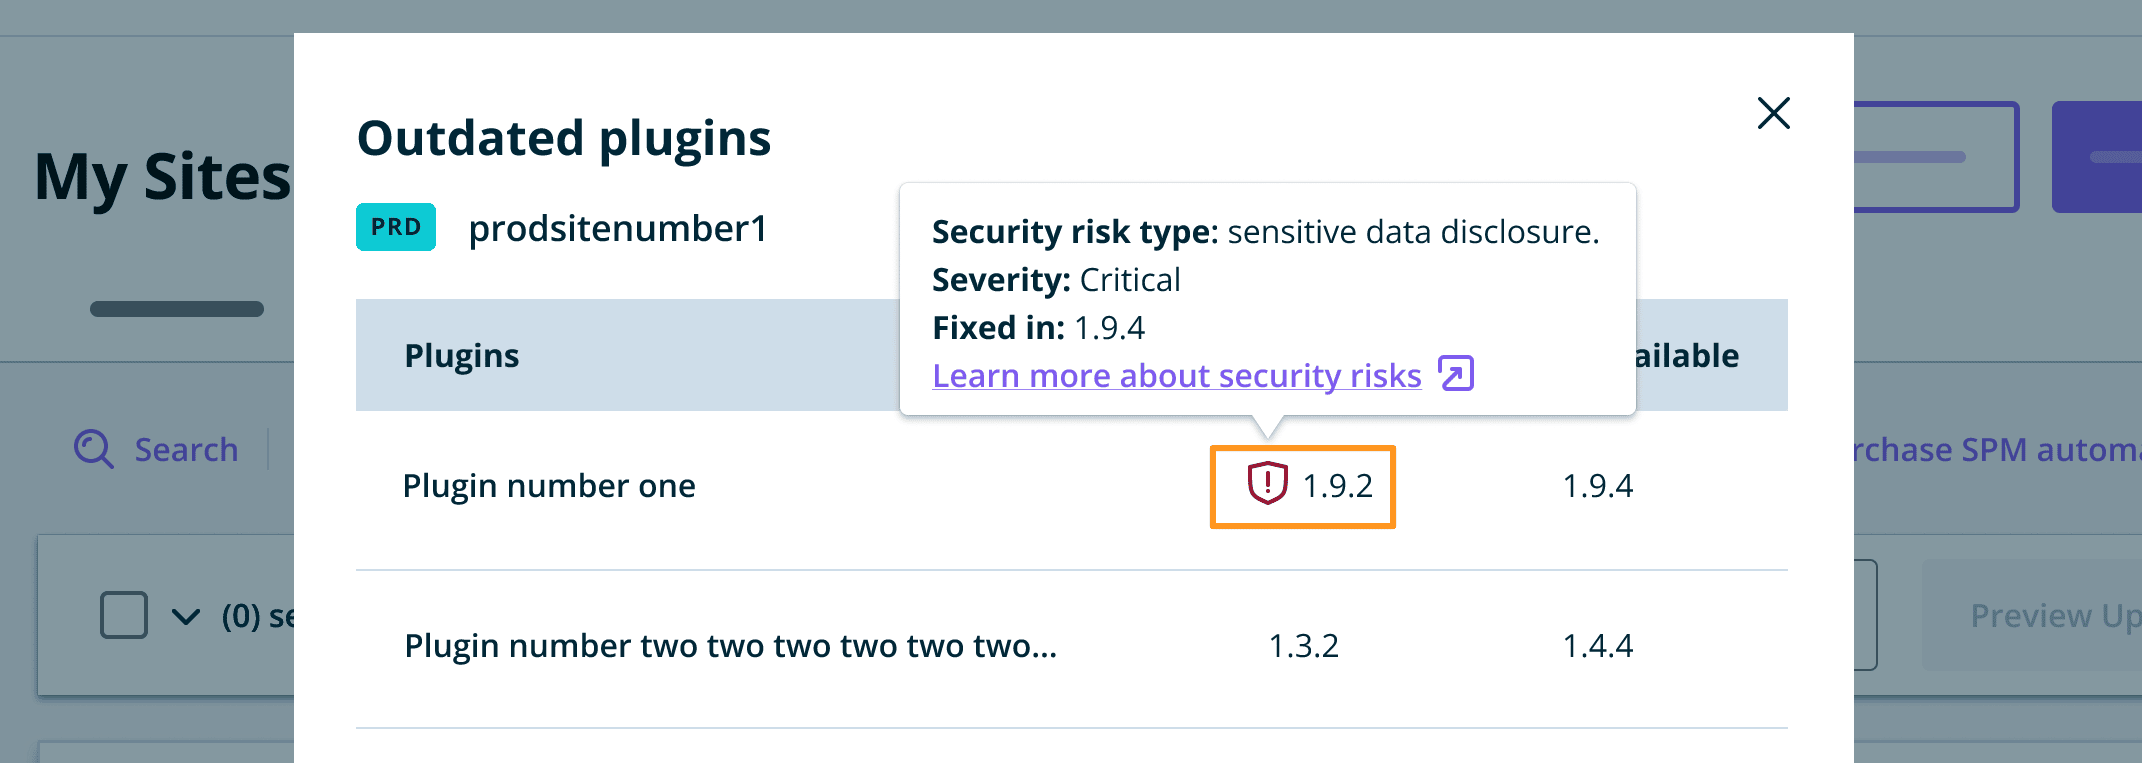
If we detect that an environment has a plugin or theme with a known vulnerability, a warning status will display next to the outdated plugin or theme text. We recommend updating or removing these plugins as soon as possible to prevent security incidences.
Clicking on this indicator, then hovering over the outdated plugin version will display more information.
Security Risk Type
- LFI – A File Inclusion vulnerability allows an attacker to include a file, usually exploiting a dynamic file inclusion mechanisms implemented in the target application. Local file inclusion is the process of including files already present on the server.
- RFI – A File Inclusion vulnerability allows an attacker to include a file, usually exploiting a dynamic file inclusion mechanisms implemented in the target application. Remote File Inclusion is the process of including files from a remote source.
- XXE – An XML External Entity attack is a type of attack against an application that parses XML input.
- UNKNOWN – An unknown vulnerability exists.
- IDOR – This vulnerability allows any unauthenticated user to perform actions that only an administrator should be allowed to do.
- INSUFFICIENT CRYPTOGRAPHY – Attempting to create non-standard and non-tested algorithms, using weak algorithms, or applying algorithms incorrectly will pose a risk to data in terms of Confidentiality, Integrity or Availability.
- CONTENT INJECTION – Also known as Content Spoofing, an attacker can supply content to a web application, typically via a parameter value, that is reflected back to the user.
- DOS – Denial of Service (DoS) attack is focused on making a resource (site, application, server) unavailable for the purpose it was designed.
- BACKDOOR – The plugin contains backdoor code which could be used to compromise a site by resetting an administrator password or deleting content from the site’s database.
- UPLOAD – A vulnerability exists wherein an unauthenticated user could upload a malicious file to the site. This could result in the disclosure of sensitive information or lead to complete site compromise.
- CSRF – This vulnerability allows an attacker to target privileged authenticated users with malicious links that make authenticated requests to WordPress on behalf of the user. An attacker could use this vulnerability to modify site configuration, including adding backdoors such as other WordPress administrators.
- RCE – An attacker could use this vulnerability to modify site configuration, including adding backdoors such as other WordPress administrators.
- REDIRECT – The vulnerability allows an attacker to redirect victims to arbitrary URL. Successful exploitation of this vulnerability may allow a remote attacker to perform a phishing attack and steal potentially sensitive information.
- SSRF – This plugin allows an attacker to target internal server resources. An attacker could use this vulnerability to read or modify site configuration.
- XSS – Data from an attacker could be interpreted as code by site visitors’ web browsers. The ability to run code in another site visitors’ browser can be abused to steal information, or modify site configuration.
- PRIVESC – It could be possible to elevate a user’s privileges to a higher permission level.
- TRAVERSAL – This vulnerability could let attackers access restricted directories, execute commands, and view data outside the normal Web server directory where the application content is stored.
- CSV INJECTION – An attacker could inject malicious content into a form field which could then be exported to a CSV file. If this exported CSV file is opened in a spreadsheet application, the malicious content could execute on the victim’s system.
- OBJECT INJECTION – This is an application level vulnerability that could allow an attacker to perform different kinds of malicious attacks, such as Code Injection, SQL Injection, Path Traversal and Application Denial of Service, depending on the context. This could result in sensitive data disclosure or site compromise.
- SQLI – The plugin contains a vulnerability wherein unauthenticated visitors could inject SQL statements into WordPress. SQL injection could allow an attacker to gain control of your site.
- SENSITIVE DATA DISCLOSURE – Information useful to an attacker could be made available. Site configuration, user names, or email addresses are examples of information that could be revealed as a result of an information disclosure.
- AUTHBYPASS – This vulnerability could allow attackers to perform various malicious operations by bypassing the device authentication mechanism.
- BYPASS – An attacker can exploit this issue to bypass certain security restrictions and perform unauthorized actions.
- ACCESS CONTROLS – This vulnerability allows any unauthenticated user to perform actions that only an administrator should be allowed to do.
- FILE DELETION – A vulnerability exists wherein a user could read, upload, delete, or access an arbitrary file from your site. This could result in the disclosure of sensitive information or lead to complete site compromise.
- MULTI – Multiple vulnerabilities exist.
- FILE DOWNLOAD – A vulnerability exists wherein a user could read, upload, delete, or access an arbitrary file from your site. This could result in the disclosure of sensitive information or lead to complete site compromise.
- INJECTION – This is an application level vulnerability that could allow an attacker to perform different kinds of malicious attacks, such as Code Injection, SQL Injection, Path Traversal and Application Denial of Service, depending on the context. This could result in sensitive data disclosure or site compromise.
- CROSS FRAME SCRIPTING – (XFS) is an attack that combines malicious JavaScript with an iframe that loads a legitimate page in an effort to steal data from an unsuspecting user.
- FPD – Full Path Disclosure vulnerabilities may expose the full paths to the potentially sensitive files, which may then be attacked.
Bulk Updates Bar
The bulk updates feature is only available on Flywheel Growth Suite, Agency Client Hosting, Premium Agency, and Premier plans. The feature is not yet available to WP Engine Shared, Flywheel, AWS, or WP Engine Headless Platform plans.
- On the Sites page, click the Needs Updates tab
- Select the environments you’d like to update
- Click the asset type to update in the bar at the top (in the example below Plugins are selected for update)
- Assets that can be updated in bulk include: Plugins, Themes, PHP version, and WordPress version.
- Additionally, plugin and theme vulnerabilities will be displayed.
- Then click Preview Updates to open the update prompt where you can select assets and other update options
- Select the assets from the list that you’d like to update
- Enable or Disable auto rollback
- Enter notification email address(es)
- Click Update to start the process

Our system will automatically make a new backup checkpoint, then update the selected item. You will receive an email notification at the address specified upon completion.
As this process creates a brand new backup checkpoint prior to performing the requested update, the update process can take longer for larger websites.
Smart Plugin Manager
If an environment has Smart Plugin Manager (SPM) applied, the status will be displayed on the same row as outdated plugins, themes, WP core, and PHP. For more information, click on the status text.
Bulk Updates
The bulk updates feature is only available on Flywheel Growth Suite, Agency Client Hosting, Premium Agency, and Premier plans. The feature is not yet available to WP Engine Shared, Flywheel, AWS, or WP Engine Headless Platform plans.
From the Plugins and Themes tabs on the Sites page, you can activate, deactivate, uninstall, and update plugins and themes. You can now also bulk upload plugins and themes. For bulk uploading skip to the section: Bulk Upload Plugins and Themes.
Bulk Update Plugins and Themes
- Open the Sites page in the User Portal
- Click the Plugins or Themes tab
- To modify a plugin or theme for all available environments, check the box next to the plugin or theme name.
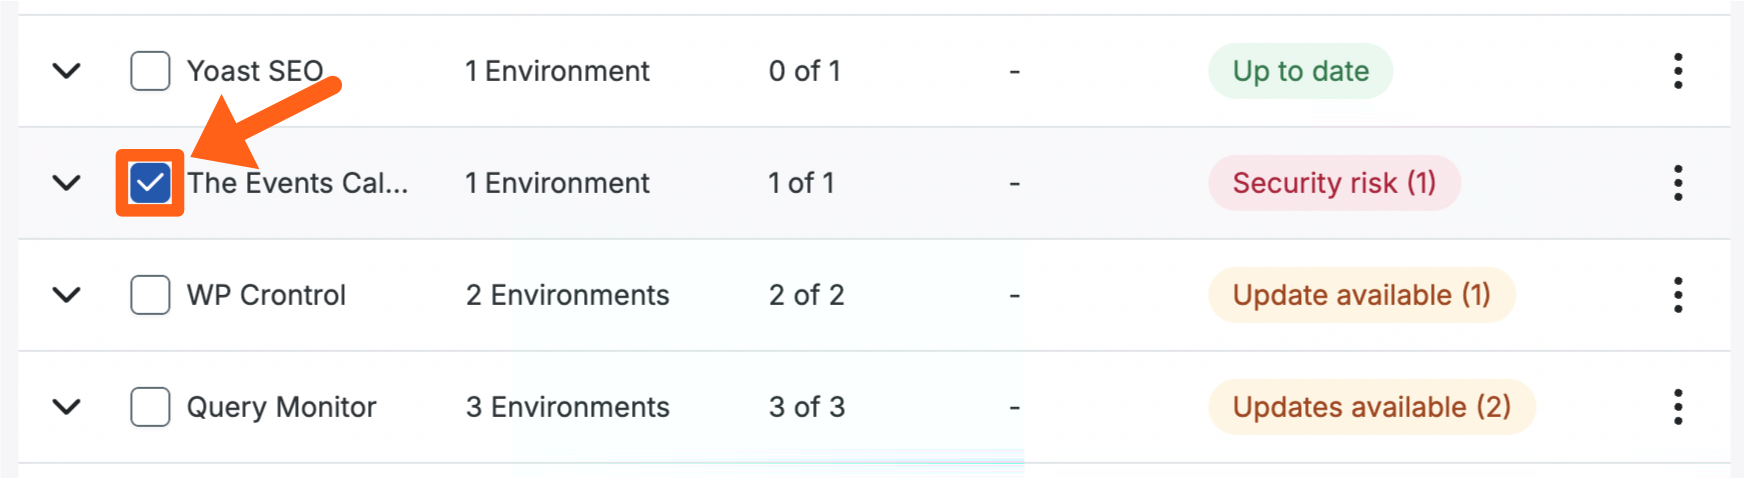
- To select specific environments where the plugin or theme will be modified, click the down arrow next to the plugin or theme to view all available environments.
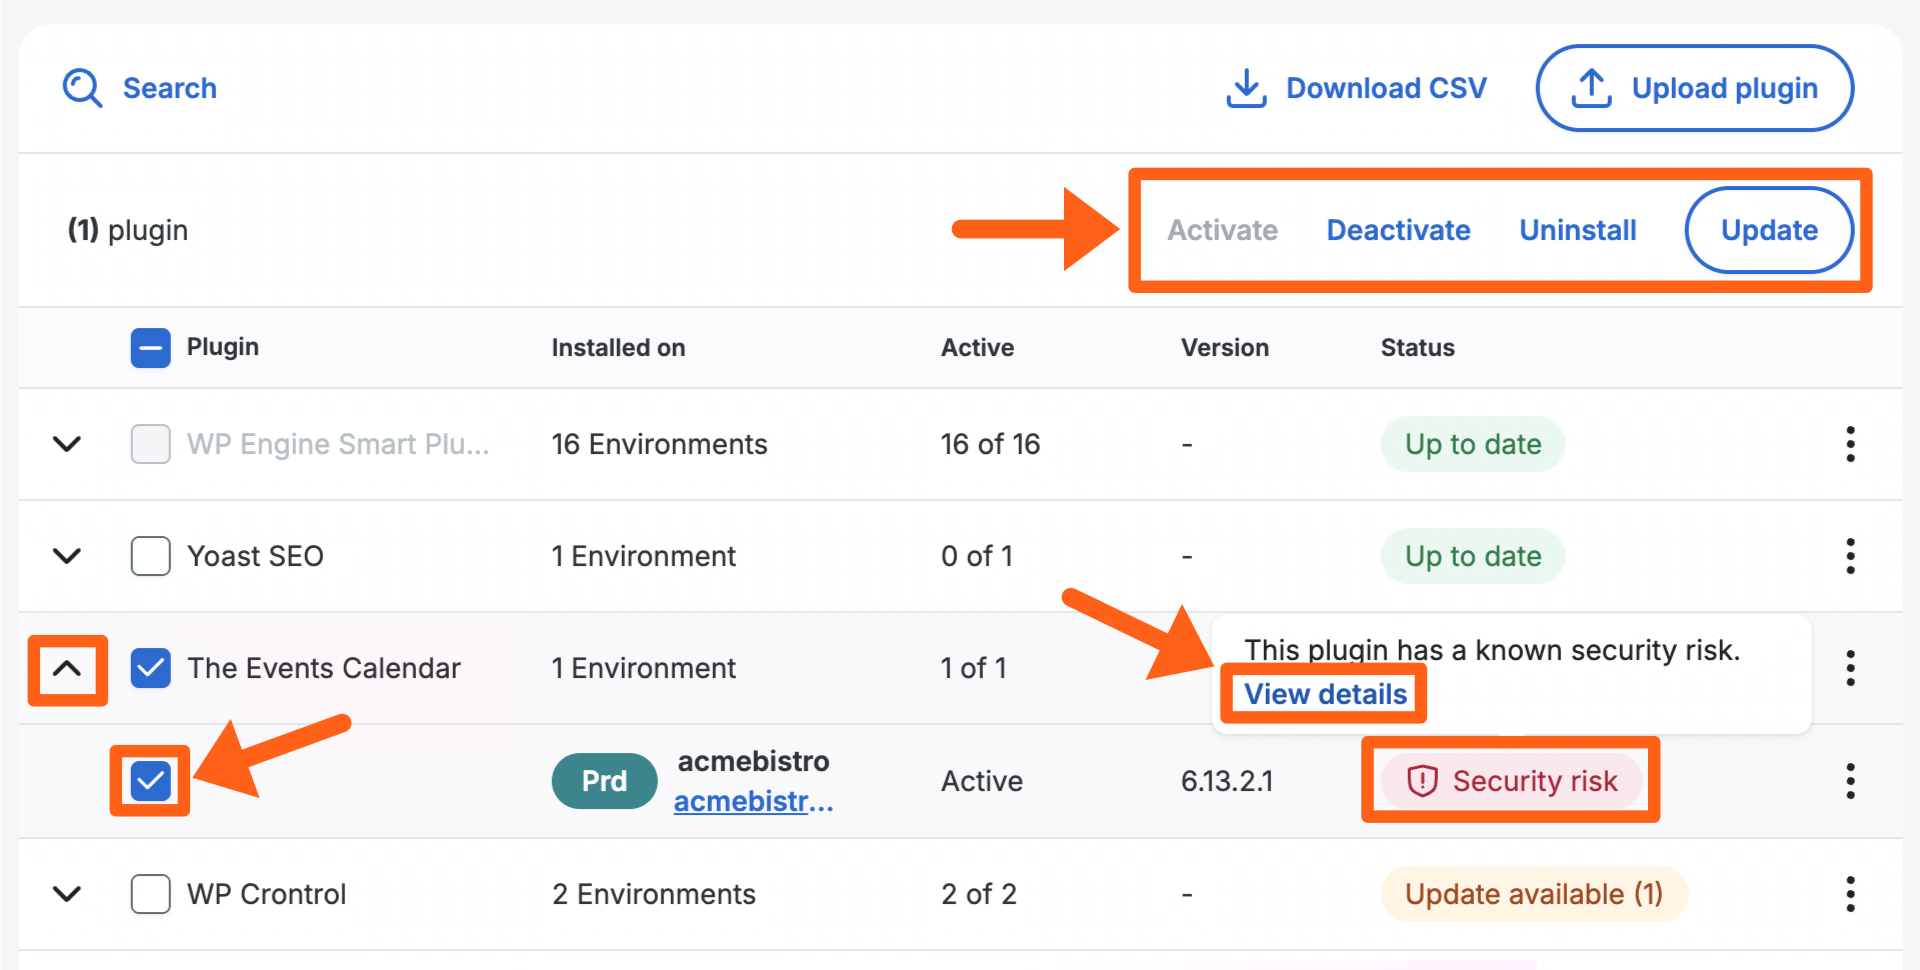
- To see details about security risk warnings, hover on the security risk label next to a specific environment. Then click the View details link. This will show a popup with details about the security risk affecting the specific version of the plugin on that environment.
- To select specific environments where the plugin or theme will be modified, click the down arrow next to the plugin or theme to view all available environments.
- Once the environments have been selected, click Activate, Deactivate, Uninstall, or Update at the top right of the table, to continue with the desired action.
- Enable/Disable auto rollback.
- Enter notification email address(es).
- Click Update to start the process.
Our system will automatically make a new backup checkpoint, then update the selected item. You will receive an email notification at the address specified upon completion.
As this process creates a brand new backup checkpoint prior to performing the requested update, the update process can take longer for larger websites.
Bulk Updates works seamlessly with Smart Plugin Manager and updating via this method will not cause issues with your SPM configuration. If an environment is being updated by either method when a new update request is made, the first request will be prioritized.
Automatic Rollbacks
The option to automatically rollback your website can be toggled on or off prior to beginning an update. An automatic rollback will occur if the update results in a 400 or 500 series error (EX: 404 or 502) on the homepage. It will restore the environment to the backup checkpoint that was created automatically prior to performing the selected updates.
An email notification will be sent to the notification email address provided if an automatic rollback occurs.
Bulk Upload Plugins and Themes
For accounts with access to bulk updates you can now bulk upload to install new or update existing plugins and themes.
- Open the Sites page in the User Portal
- Click the Plugins or Themes tab
- Click the Upload plugin button

- Check the box next to each environment that you want to upload a plugin or theme to as shown in the image below
- Click Select
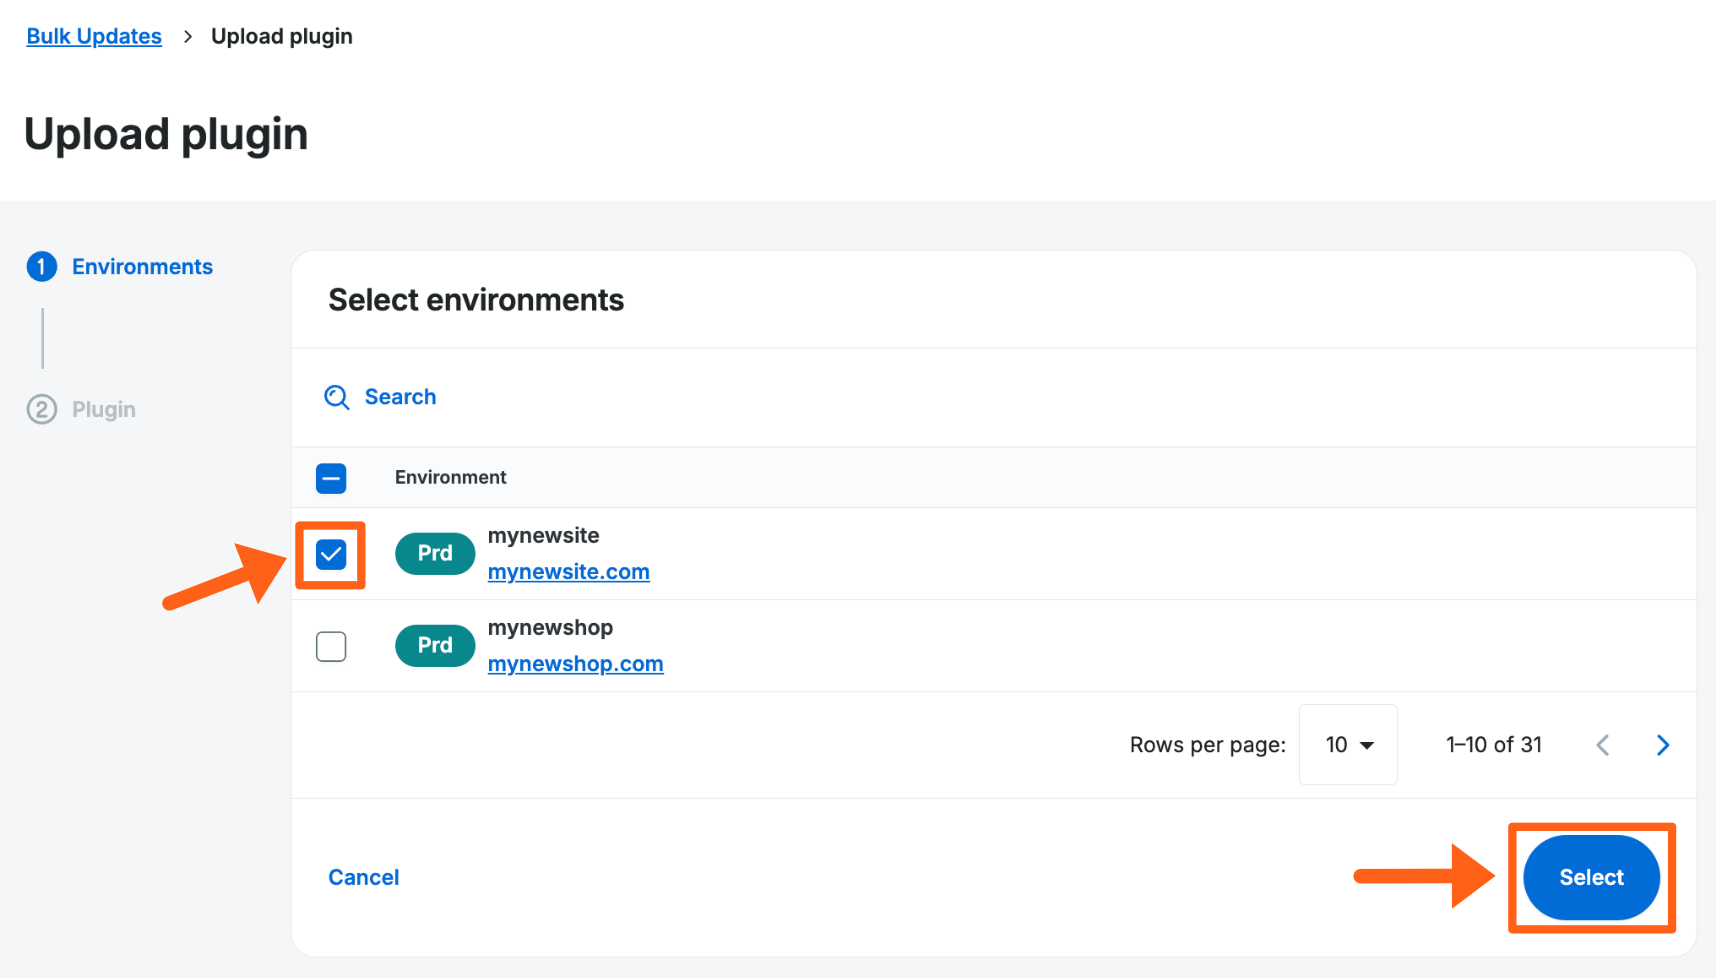
- Choose from 3 options to upload your plugin or theme as shown in the image below
- Search for plugin/theme
- Paste plugin/theme url
- Upload Zip file
- Click Confirm to upload the plugin or theme
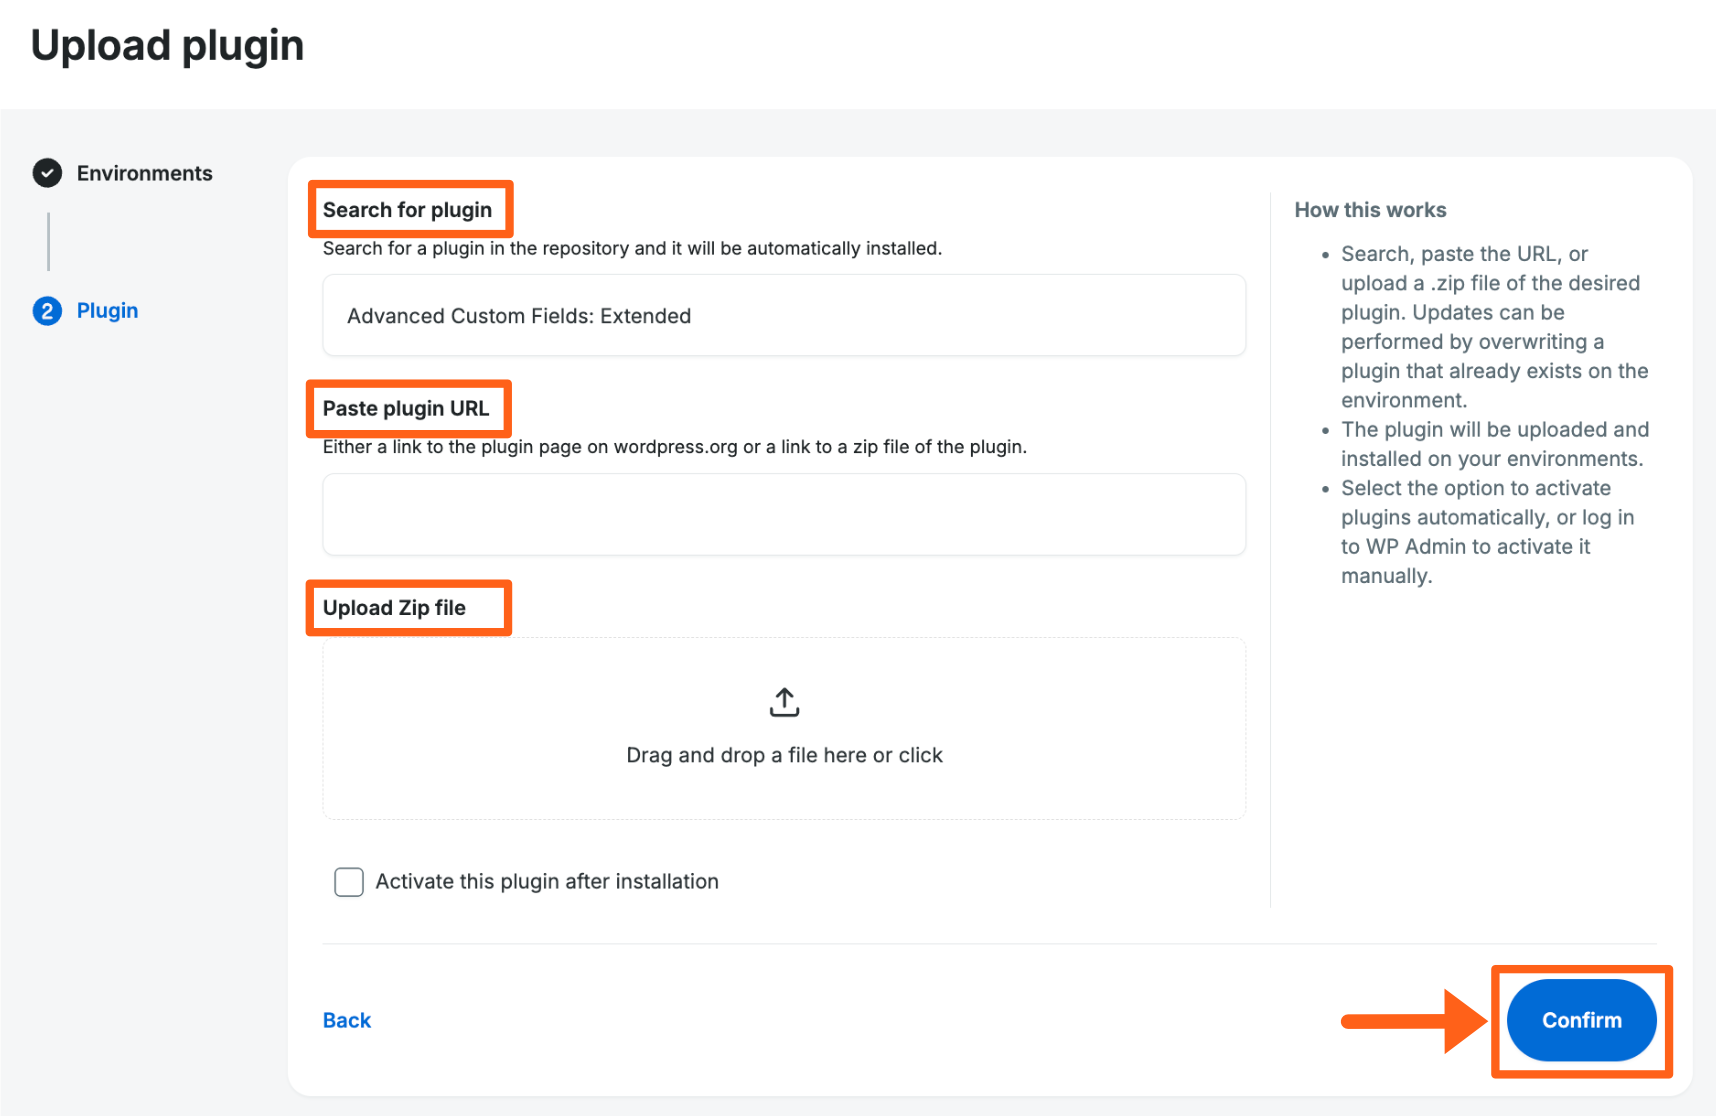
- Success! You should see a success message after it’s uploaded.